
One on the Left is pre-CW. One on the Right is post-CW


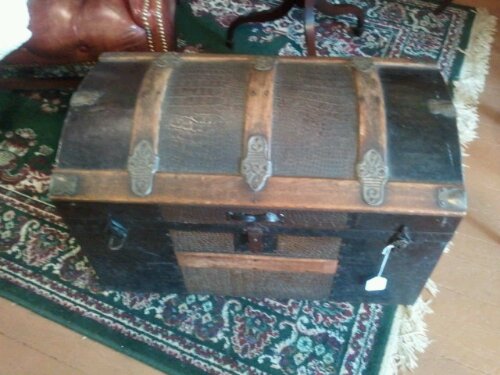


This is a Post-CW Trunk based on the lock. Just an example of a flat top.
Flat top trunks were popular for many decades prior to the Civil War then again from 1870 to 1920. The frame of these trunks is most often wood, though some patents suggest a metal frame in addition to the wood. The wood is most often covered with canvas, oiled canvas and eventually paper and metal. In pre-war trunks, the trunk body is supported with wood slats, metal trim and metal or leather hardware. Some later trunks are covered with sheet metal. The basic frame and support structure of the flat top trunk is applied to most round and dome top trunks. Some flat tops developed into dresser, wall or desk trunks.

Round top trunk circa 1864. This trunk is covered with “Western Squares” paper patented in 1864. The trunk body is constructed from wood, supported by iron stripes at the edges and lid lip. Narrower straps are mimicked in the decorative paper studded with buttons. Lock pairs are less common than a single lock.
Round top trunks have lids that are rounded front to back and not rounded on the sides. The rounded shape can be rather shallow, almost undetectable from a distance or very deep. The slats on the top of the lid can run end to end or be curved and run front to back. If the slats run front to back, they are bent to the shape of the lid. The front, back and side slats can run horizontally or vertically. The slats of a round top trunk are often wider than flat top trunks. These trunks are most often covered in a combination of leather, metal and canvas. Additional compartmentalized storage is created in the round top (see below.)
Shallow dome top trunk circa 1854 – 1875. There is a patent identification located on the lock plate marked May 1854. This trunk is labeled inside “From W. R. Drakeford, Manufacture of and Dealer in Harness, Saddles, Bridles, Whips, Trunks, Blankets and every description of Horse Furnishing Goods, 132 Canisteo St., Cor. Park, Hornellsville, N.Y. Canvas Trunk Covers Made to Order.” The wooden stave on the lid runs side to side. It would have been hand bent/shaped for the lid. This trunk retains a pair of buckles and part of their leather straps.
Dome top trunks curve front to back and side to side. They are also called Humpback and camelback trunks. The domes can be very shallow or very high and deep. The basic body of the trunk is constructed in the same way a flat or round top trunk is. The difference, of course, is the lid. The lid slats bend with the shape of the lid whether they run from side to side or front to back. These slats would have been bent by hand. Dome trunks are covered with paper, plain or embossed tin, leather or a combination of these.
Stage Coach Trunks or travel trunks became popular a few decades prior to the Civil War as travel by train or train increased. These trunks were most often wider than their height, such as 28 inches wide, 15 inches tall and 16 inches deep. Fully packed these trunks could be lifted atop a stage for travel.Jenny Lind trunk, circa 1850-1870. Constructed from 14 pine boards. Ends and lid lip secured by iron straps. May or may not have been covered with leather. (Found with layers of green paint.) This trunk used to have leather straps, handles (replaced) and lock cover. 27.5”wide by 16” deep by 13” high.
Jenny Lind Trunks were a popular form of travel trunk from about 1850 to 1870. These trunks were named after the popular Swedish singer Jenny Lind the “Swedish Nightingale”. Jenny Lind trunks are easy to identify by their shape. Looking from the end, the trunk outline resembles a keyhole, bread loaf or hour-glass. They were most often made of pine boards then covered in leather and bound with metal bands around ends and edges. Straps often wrapped from back to front, buckling in the front. The metal bands were studded with brass buttons. Size varied for these trunks, each being fairly easy to carry due to their width to height dimensions.
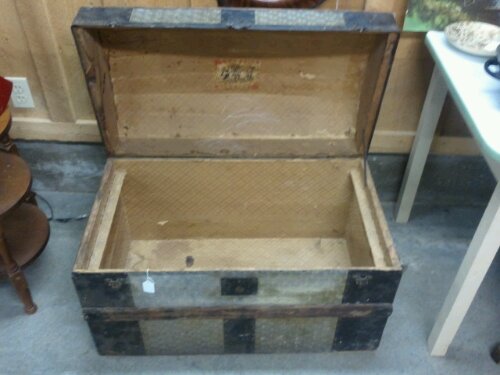
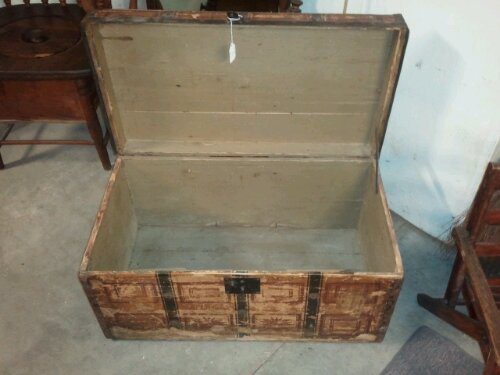
Leather Trunks are wood base trunks covered in leather. There were many types of leather-covered trunks made through the 1800s (and prior). Sadly, these trunks often suffer great damage to the leather over time. Advertisements list trunks made with rawhide, sole leather and hide. Some leather trunks are very early and vary in size. These are completely covered in leather. Decorative and identifying marks were added with studs or “buttons”. As time progressed into the 1800s, leather or hardware was added to the exterior. Smaller trunks would have handles on the top instead of or in addition to the side handles. Shapes include flat and dome tops. On flat tops, edges at front and back could be curved. Some leather-covered trunks are called “immigrant trunks” though immigrants used not all trunks of this style, nor did immigrants solely use leather-covered trunks. New and variant designs show up all through the United States patents and advertisements. There were new ideas to make a trunk more useful, more accessible, more secure or safer. You can find trunks that dual as beds, desks, or dressers. One commonly adopted variation was the half trunk. Half trunks are those that are roughly half the width of a regular trunk so that from above the shape would b almost square. These trunks were advantageous for 1850’s train travel for women because a few days clothing could fit inside with a space for a bonnet at the top. Post War Saratoga trunks were very large trunks most frequently having a dome top. Most secondary sources list Saratoga trunks becoming popular in the 1870s when the New York resort of the same name was popular. But, in the Columbus Enquirer, the Trunk Depot lists Saratoga trunks in their advertisement. This was in 1860. Steamer trunks were intended to stay with the owner while on a ship voyage while larger luggage was stored away. These were most popular from 1890 through1910. They were usually about half the height of a 19th C. Flat top trunk. Wardrobe trunks were often the same shape as a steamer trunk, but it opened when standing on end. The bottom, top or both was designed to hang clothing within. Some had drawers opposite the hanging section. These trunks would not have been practical for the dress of the Basic anatomy Slats are the wooden strips that support the trunk body. They can run vertically or horizontally on the bottom and front to back or side to side on the lid. Wood slats range from 1.5 inches to 4 inches wide. Later wood slats were replaced by metal ones. Slat clamps or caps are the metal pieces that connect the wooden slats to the sides of the trunk or each other. They serve to strengthen the connections primarily. As trunks became more decorative, the hardware became more decorative. Corner supports or caps are the metal, sometimes leather, pieces located on or very near the corners of the trunk. Supports and caps hold corners tightly together and serve to aid in the movement of the trunk. Most pre-war supports are “L” shaped. Three sided caps begin to appear toward the end of the 1850s or the beginning of the 1860s. The first patent using a three sided cap is dated ______. Latches/draw-bolts/catches also called hasps. These, normally in pairs on the front of the trunk, secure the lid closed.
Clockwise from top left. Images 1 & 2 are the lock from the shallow round top. The right shows the lock closed while the right shows the open keyhole. Image 3 is the lock from a Crocodile patterned Dome top trunk, circa 1850 to 1875. Note the handle above the lock in a different material. Image 4 is a flush mount lock from a specialty trunk made by Taylor Trunk Works circa 1868-1900. Image 5 is a handmade lock with latch, plate and pivoting keyhole cover. Image 6 is a lock from the Jenny Lind trunk Circa 1840-1860. Note this lock is internal. The leather cover is gone. You can see parts of the leather where it attached to the wood. The iron strap on the lid over the lock is bent.
Locks secure the trunk. There are several locks you may see on a trunk. Hasp locks swing down from the lid and secure to the body of the trunk. Chest locks have a panel built into the body and lid with locking mechanism hidden inside the closure.
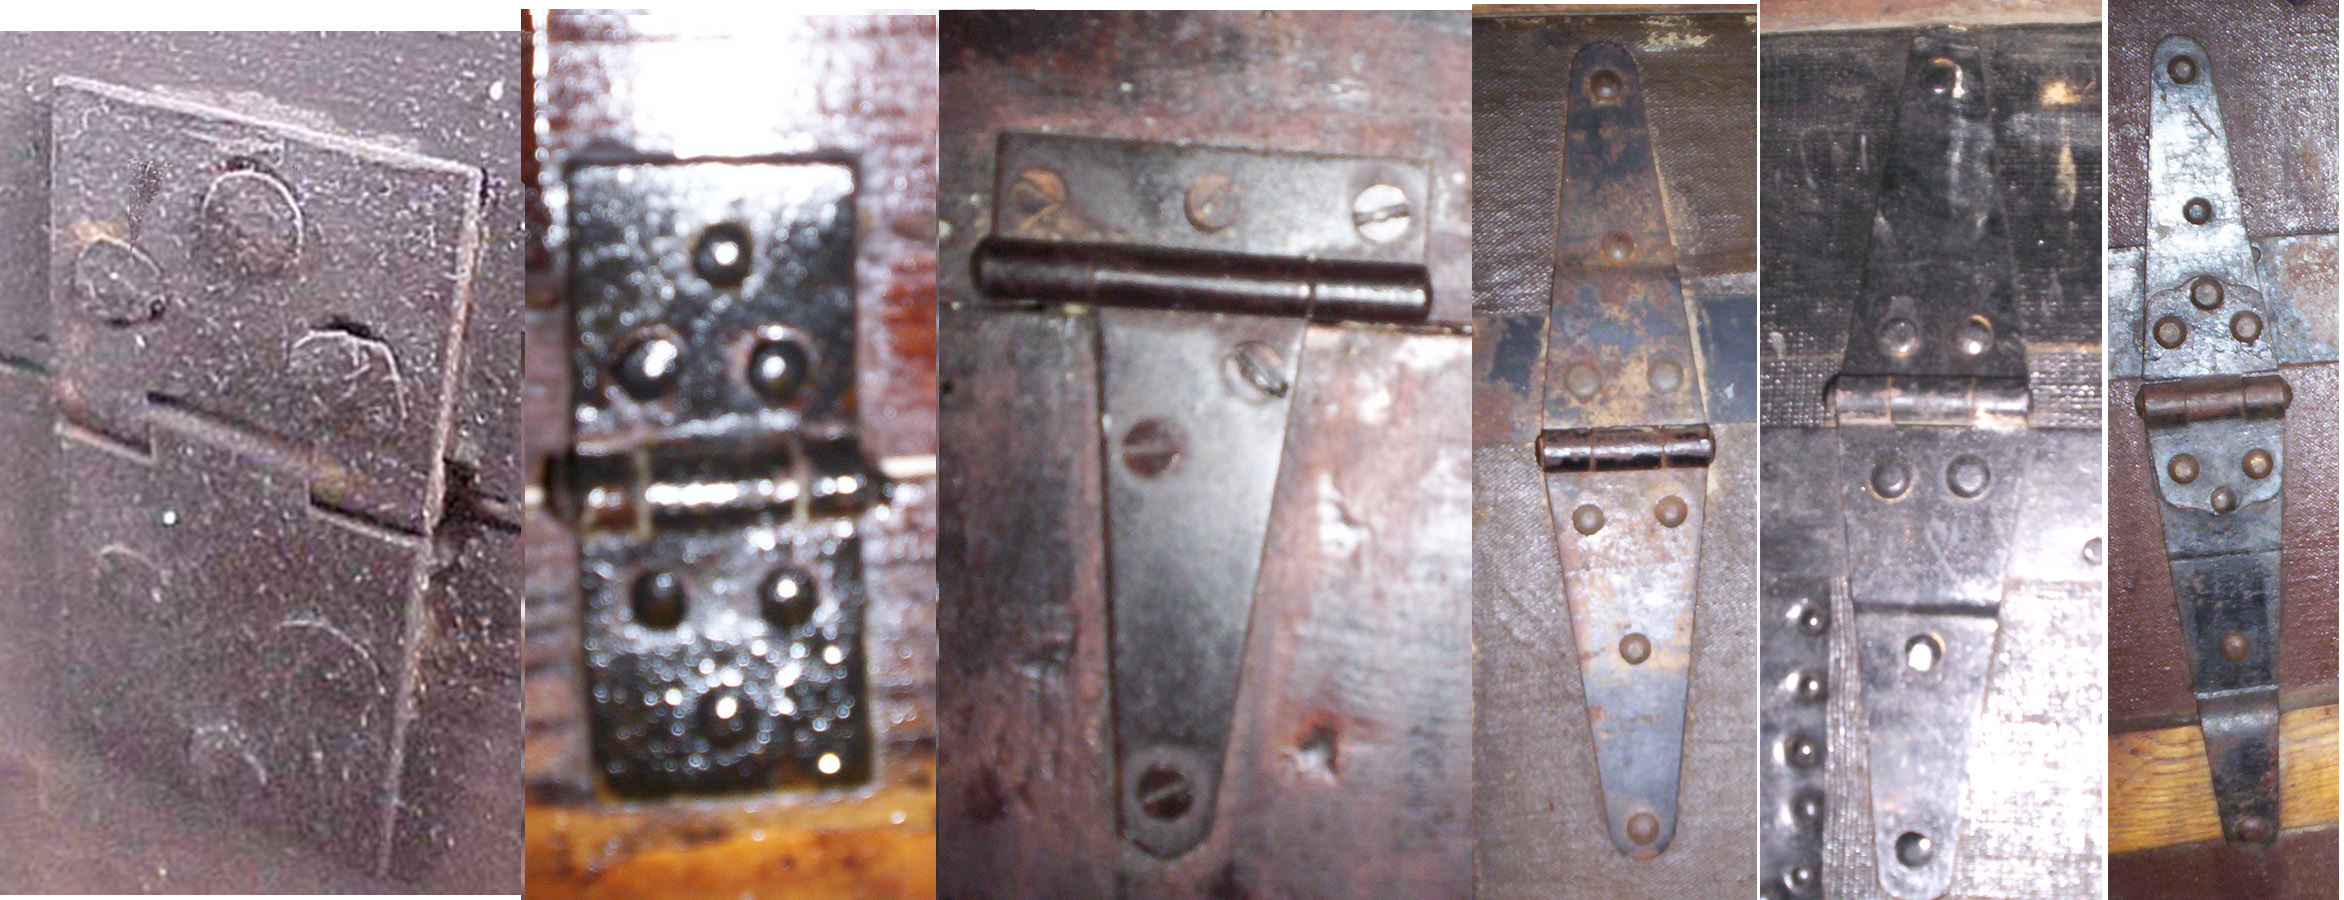
Examples of hinges – Left to right – Two square hinges from hand made box/trunk and a Jenny Lind trunk. A combination hinge from a box. Three variations of triangular, gate style hinges.
Hinges enable the lid to open and close. Hinges come in variations of two basic styles, a rectangular hinge and a triangular hinge.

Three United States Patents for improvements in casters for trunks. The 1856 patent combines a caster with a threes sided trunk corner cap. The 1863 and 1855 patents are meant to help enable a trunk to be moved flat or upright.
Casters allow a trunk to roll when moved. Not all trunks have casters. Pre-war patents are shown for roller and ball castors.

Top left – Handle from flat top Likely trunk, 1844-1870. Leather handle sewn at the edges and encased completely in hardware. Top right – Handle from post-war Taylor field desk trunk. The hardware is patented – Taylor Trunk Works Chicago patent Oct 23, 1883. Center – All leather handle. A single strip of leather secured directly to wood by nails. Lower left – Handle from round top trunk, circa 1840-1870. Note similarity to handle on the Likely trunk. Lower right – Handle from a round top trunk, circa 1840-1870.
Handles Some handles were hand wrought iron attached directly to the trunk sides. Other handles were leather attached to the trunk with metal end caps or brackets. These metal pieces could be hand-wrought, punched or cast. As designs progressed, handle irons became more decorative and could serve a dual purpose as a catch. The leather handles were created from layers of thick hide sewn together. Some trunk handles have designs pressed into the leather.
Leather straps help secure the lid closed. Straps usually run back to front or around the belly of the trunk. They are buckled in the front. Exterior decoration Most coverings are placed directly on the wood under the wooded slats. The most common exterior was a simple plain canvas or oiled canvas. Decorative paper mimicking wood or leather designs is delicate. Several secondary sources list paper consider “Western Squares” a post 1870s covering but there are a couple 1860’s patents for similar papers and trunks with definitive 1850’s hardware with similar paper. Leather hide and sole leather covered trunks in whole or part. Plain and embossed tin was also used to cover trunks. Some trunks are divided into three sections on the front, top and back. The end sections match, while the center section frequently off sets the ends. This is seen frequently on dome or round top trunks. Trays, inserts and compartments Trunks could have one or multiple trays in the lower portion and compartments in the lid. Trays could be simple or have compartments with separate lids or smaller trays. Compartments in the lids could be lidded, or have trays or drawers. Lid compartments or tray lids could have decorative portraits or scenes. Lining Prior to the 1800s many trunks were not lined. Newspaper was used in the late 1700s and early 1800s in many trunks. In the early 1800s “some newsprint was embellished with decorative dots that were stamped onto the paper with wooden stamps and ink. This gave the impression of a polka dot pattern from a distance.” (Brettuns Village Trunks, outline of trunk chronology.) In the early 1800s printed-paper began being used to line trunks starting with simple patterns in dull colors. They were lined with paper through the late 1800s as cloth began being used. Trunk covers Some household manuals and a few advertisements mention canvas covers for trunks. These covers would protect the trunk and contents from dust and some damage caused while moving. Other covers were patented with the intent of protecting the trunk from damage, breakage or water during travel. I have not yet seen these unique patents actually produced. Closing thoughts: Choosing a trunk for living history. While there are several reenacting situations where using a trunk is appropriate, not every trunk is appropriate. Anyone of us can wander through an antique shop, flea market or village yardsale and find a fabulous trunk. But, how do you determine if this fabulous trunk is suitable for reenacting? The first step is determining if this is the type of trunk you will need. Are you traveling by train or storing clothing during an event? If you are traveling during the event, you will want to be able to move the trunk easily. Consider a small flat top trunk or a travel trunk or a Jenny Lind trunk. If you are stationary during an event a slightly larger trunk may be useful. Consider a dome or curve top trunk if space is not an issue. If you need the trunk to serve as a functional piece of furniture, consider a flat top trunk. The second step is determining the age of the trunk. Looking at the hardware on the trunk can help determine age. Locks and end-caps can give a good idea of the date of a trunk. Most trunk restorers consider the popular machine made brass locks post Civil War. The three-sided end-caps began around mid-1850. The third step is considering location. Is this a trunk that you would have had in the region you are depicting? This is a minor question considering how frequently trunks moved around the country, and even across the ocean. If you are looking at a carriage trunk hand-made in Hornell, NY, you may not want it for an event in Alabama. Using a trunk for living history. Just like there are things to consider in choosing a trunk there are things to consider in using a trunk. While it is very tempting to use a beautiful trunk you find at an auction, antique shop, flea market or yard sale, remember the trunk is an antique. Most likely the trunk does not appear as it did in 1855 or 1860. It is important to consider the discrepancy of appearance between now and then. Beyond the impression is the integrity of the trunk. This antique is 130 to 150 years old with weakened wood, hardware and handles. You need to take good care of the trunk. My general rules for my trunks include – never moving it by the handles, never packing it full or heavy, never putting it where it might get damp or wet and never storing anything heavy on top. I also prefer a trunk I can move myself and that fits in the back seat of my car. (The trunk of a car is a dangerous place for your trunk and your back.) It is possible to find a trunk that has reached the end of its days and restore it to be useful. This is worth considering in order to avoid damaging a nice trunk at an event.
Recommended ReadingGeneral
Trunk production
House-keeping, including packing
General Secondary Sources
Last week someone on FB was asking about trunks. Here is the article I wrote in 2008 called “Carrying Your Impression” (I need to get the images fixed). I’m going to pull out some additional information and images as well. It all depends on what I have buried where.
Carrying Your Impression
The question “what do you carry your stuff in?” is one that comes up regularly with new and experienced reenacters. We need small containers to store things like hairpins, jewelry, hairnets, sewing supplies, medicine, a first aide kit, etc. In the nineteenth century there were a wide variety of boxes made from wood, tin, pasteboard, bark, papier-mâché, straw, etc.. They included Deed and Document boxes (wood, tin, paper covered), Small traveling boxes/trunks, Bark boxes, Sewing boxes, Pasteboard boxes, Chip boxes, Cash/money boxes, Dressing boxes, Snuff boxes, Patch boxes, Band & Hat boxes, Pantry and spice boxes, Artists’ boxes, Salt boxes, Candle and tinder boxes, Liquor boxes, Teas boxes/caddies, Boxes for games, and many more. We also need larger containers to transport our gear and smaller containers in and out of an event or throughout the weekend.The following containers are organized by type regardless of size. I have included notes on the advantages and disadvantages of each type of container along with some reading suggestions to learn more about each. One book I highly suggest is Neat and Tidy: Boxes and Their Contents Used in Early American Household by Nina Fletcher Little.
Considering Your Scenario
You will want to consider the situation of your event scenario when choosing what to carry your gear in. If at all possible, look to documentation of someone from the period in a similar situation to help you determine what to use. Long term refugees may have full furniture transported in wagons including chests of drawers, blanket chests, beds, tables, etc.. Comparatively, a refugee who left in haste may have only what could be carried quickly. This could range from a traveling bag to a stuffed sheet or pillow-case. A person traveling may have a few pieces of baggage depending on the situation and duration. (See Virginia Mescher’s article “Traveling Tips for Ladies”) Someone out for the day would carry far less than those above. A woman in town visiting may only have a purse or the contents in her pocket (See “Dress Pockets: A Lady’s ‘Carry All’” by Glenna Jo Christen in the February 2007 Citizen’s Companion) A woman going marketing or shopping may have a basket (not to be mistaken for the modern-day catch-all purse) in which to carry her purchases.
Environment and Usage
When considering containers for an event, each one has its advantages and draw backs. You will want to consider factors such as the weather prediction including humidity and rain, moisture in what you are storing, weight, lid tightness, wear and tear, and organization within the container. If the forecast calls for a weekend of heavy rain, you may want to consider a water resistant container to carry your extra clothes if you don’t have a nice dry location to store it. If you are carrying fragile items such as dishes, glasses, or original books, a soft-sided container may not suit your needs.
Personal Needs
Over the past years, I have used many methods of carrying my gear to events and during events, some successful, some not. Since each method has advantages and disadvantages, I tend to go in phases of what I take. Personally, I need the area I am staying in to be very organized and I need to be able to transport everything up and down stairs and in and out of storage without being overwhelmed. For some, storage containers need to do double duty as furniture or decoration at home. For others, storage containers can stay nicely in a garage or trailer while at home.
Options for Carrying Your Goods
Trunks 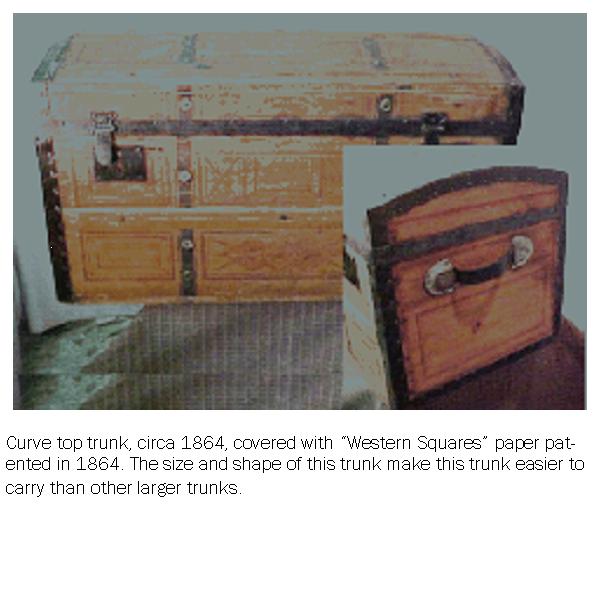
Trunks would have been purchased from a harness maker during the first half of the nineteenth century. They were a common item for transporting and storing household items. Trunks from the mid-century were generally smaller than the later steamer trunks used on trans-Atlantic journeys. Some trunks had inset trays for convenient packing. Dome and curve top trunks often had organized storage in the lids. These trunks were good for moving items in wagons but not good for on trains where they were difficult to stack. Stage coach trunks were small enough to lift, while full, up on top of a stage coach.
Trunks vary in size and shape. Original pre-war trunks should be reproduced for use as most originals are delicate and valuable. Trunks are good for transporting most materials and give some protection against moisture. Large or heavy trunks can be difficult to transport. Stage coach trunks such as the Jenny Lind trunk have ample space inside while being easy to carry by one person. My Jenny Lind trunk is 27.5” wide by 16” deep by 13” high. With the curved sides and lid, I can easily wrap my arms around the body of the trunk to carry it. For addition information on trunks please see “A Study of Trunks” in the December 2006 Citizen’s Companion. For clothing storage see “Hanging it Up or Not: Clothing Storage in the Nineteenth Century” by Virginia Mescher available on http://www.raggedsoldier.com.
Wooden Boxes
A basic wooden box can be made in a variety of ways to store many things. In the era these were homemade or purchased. Some had latches and/or locks. Most lids were flat or domed and hinged while some can have sliding lids. The exterior can be carved, stained, painted, gilt, or inlayed. Early nineteenth century boxes could reflect a patriotic theme with stars, flags, eagles and the like, either freehand painted or stenciled. Mid century painting tended towards sponging or swirling, faux graining or marbleizing, stylized foliage, life scenes, and stenciling similar to that done on interior walls, floors, and fireboards. Some late 1700s boxes resembled miniature dower chests. The interiors could be compartmented. Some of wooden boxes can be document or deed boxes used to store important papers. Some boxes were covered with leather or hideresembling small trunks. Some hide used to cover trunks retained the animal’s hair or fur. These often had latches and locks as well as strapping and decorative nails. A packing or shipping box can be very simple, possibly stenciled with contents or destination.
A wooden box can protect contents from rainy weather. Depending on construction and tightness of the lid, it may or may not protect from the humidity. Weight and ease of transportation can also be a factor. The type of wood, the size of the box, the shape of the box, and what is packed inside all contribute to the weight and how difficult it will be to carry. Attention needs to be given to construction techniques and the hardware used. Detailed information can be found in Nineteenth Century Wooden Boxes by Arene Wiemers Burgess.
Bags
There are a number of bags available for use. Some can be purchased while others need to be made by hand.
Directions for travel bags are available through-out the pages of Godey’s and Peterson’s. A travel bag was intended for carrying what you would need during a journey. In the case of stage or train travel, this may include a shawl, reading material, and extra set of underpinnings, and needlework. The idea was not to have to access your larger baggage during the trip.
Similar to the travel bags, carpet bags were used during travel. These were both manufactured and homemade as they are in reenacting today. The Carpetbagger and Heirloom Weavers both make authentic reproductions with reproduction carpeting. Tapestry and some carpeting is available to make a homemade bag following period illustrations or mimicking an extant bag. Depending on the size of your bag, you can pack a day’s or a weekend’s goods and clothing. Valises are similar in size and shape to many manufactured carpet bags, but they are made from leather.
Each of these bags are easy to carry. They work nicely for soft goods such as clothing. The soft nature of the bags does crush some items inside. The carpet-bag has more firmness to the body of the bag than the travel bag shown. This makes it a little better for items such as books. Since these bags are fabric or carpet, they do not withstand heavy rain or heavy humidity while carried or set on wet ground. Some carpet bags have leather bases, protecting the contents a bit more from a damp ground. But, I do not suggest leaving it set on a very wet surface for a prolonged period.
Cloth Sacks and Pillow Cases
Simple sacks or even pillowcases can be an easy way to carry soft goods. These are especially appropriate for a poorer impression. Cornelia Peake McDonald’s step-daughter, Mary, packed her last minute items in a sheet from the crib before departing Winchester with her children on a stage coach while wearing her calico morning dress. (A War Diary with Reminiscences p182) Bevin Lynn shared on the Sewing Academy how she asked a group of new teen reenacters to store all their materials in a single, monogrammed pillow case for their first events. This helped during carpooling and while sharing a camp location at events.
Bandboxes and Pasteboard boxes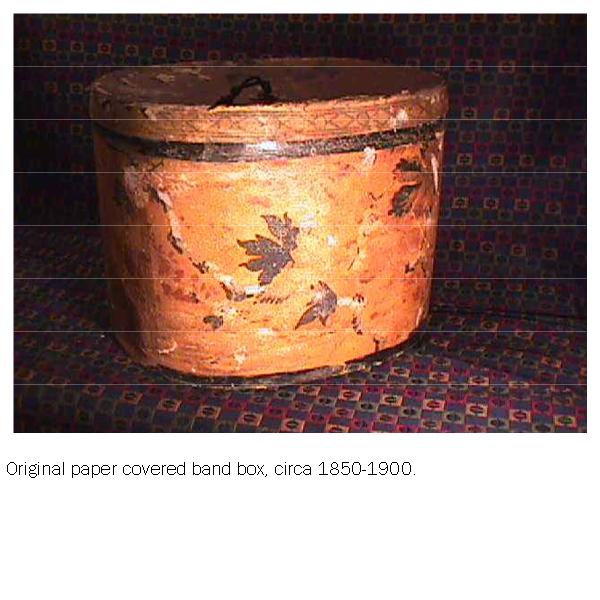
Band boxes were made of thin wood then covered with wall paper. Pasteboard boxes were made of paper-pulp pressed into thick sheets. These were also covered with paper. Some papers were wallpaper while others were printed specially for pasteboard boxes. These could be printed with information or illustrations regarding the bonnet, hat, or hair-comb inside. Either of these boxes can be used to hold headwear as well as other items. Pasteboard boxes were made in nesting sets intended to carry or store a wide range of lighter weight articles of clothing such as dresses, caps, gloves, and collars. Oval ones were sometimes considered bride’s boxes given as gifts to store finery and delicate trinkets. Band-boxes and pasteboard boxes of the mid- nineteenth century did not have the convenient cording used to secure the lid that we are familiar with in the 20th century. Instead they were secured with a strap of clasp. Cotton bags were made to carry one or more of the pasteboard boxes. Pasteboard boxes can be round, oval, or rectangular of many different sizes. You can make one with a base box, period wallpaper and interior paper.
Bonnets could also be stored or transported in wooden boxes or bonnet trunks that were becoming more popular in the middle of the century.
Sometimes we need very small boxes to carry medication, a key, a dollop of sun-block, etc.. There were small wooden stave boxes made for medicines held in the pantry. This may not be the best choice for modern medications. Consider boxes similar to snuff boxes or patch boxes for this use. These boxes sealed well and were made from fine or utilitarian metal, enameled metal, tortoise shell, ivory, horn, and papier-mâché. (be careful not to put moist contents in the latter part of the list.)
Staved Boxes
A pantry favorite, the staved box, can be very useful for an event kitchen. Staved boxes were used for many kitchen goods including cheese, butter, herbs, and flours. One New Hampshire example held hand-woven, hand-dyed linen handkerchiefs and towels (from Neat and Tidy). Those with pine staves/walls held together with hoops of a harder wood were used for moist items like butter. (This may not be practical for events because this box would need to be kept consistently moist. Consider a crock for butter instead.) Stave boxes were also made in sets that could nest. Round sets consisting of one large round box and seven or eight small round boxes set inside the large one were used beginning in the 1850s to store spices. Most often these were labeled: cloves, cinnamon, mustard, nutmeg, pepper, ginger, allspice, mace.
Round and oval Shaker spice and work boxes are the most recognized stave boxes. These were made with maple sides and pine tops and bottoms. These were available in most areas by 1825 either varnished or painted. (be aware, most cheese boxes available from Mennonite shops have staples instead of nails holding the staves. Early handmade stave boxes had headed nails clinched on the inside. Manufactured boxes starting in the mid-century had machine made tacks holding thinner, often poorer made staves.)
Tin boxes and Tin trunks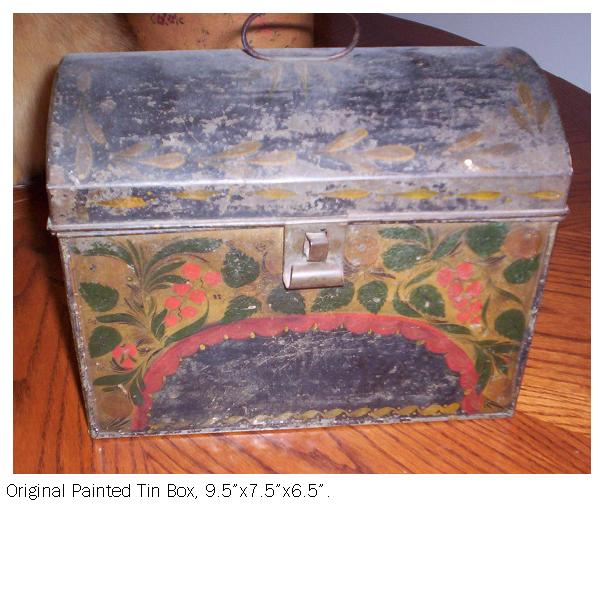
Tinsmiths made numerous tin containers for use in the mid-nineteenth century including canisters, tin boxes, tin trunks and small tins. Some have hinged lids with latches and handles such as the tin trunk which some used to hold documents. These can be nicely painted solid or painted with designs including stencils.
 Tin containers are excellent for storing items you do not want to get moist or invaded by insects. A container with a tightly secure lid can also hold up against the most curious of chipmunks, squirrels or raccoons. For this reason, I like to use tin to store baked goods. I don’t recommend any food with moisture, because some modern ‘tin’ does seem to spot rust from the inside out. For additional information on tin, consider The Art of the Tinsmith by Shirley Spaulding DeVoe.
Baskets
Baskets were used for a variety of purposes in the mid-century. There were egg baskets, cheese baskets, market baskets, field baskets, laundry baskets, storage baskets, fruit drying baskets, garden baskets, and many more. Baskets can be light weight and easy to carry with a built in handle or handles.
Baskets tended to be made for particular uses in mind. Their construction generally reflects this and should be kept in mind when choosing a basket. To strengthen the base of a basket for carrying heavy goods a basket may have a solid turned wood base or a “kicked-in” base. A buttocks basket with the handle encircling the bottom distributed the weight of the contents in the two bulbs of the basket making the basket easier to carry. A field or fruit basket could have an open weave on the bottom allowing dirt and particles to fall through and also allow the contents to dry. A basket meant for drying or for storing the contents could be footed or have runners, keeping the basket up off the floor allowing air to circulate under the basket. Regional variation and cultural origins should also be kept in mind when choosing a basket. While I, in close proximity to Shaker establishments, could choose a Shaker style basket, I could not as easily choose a coil basket made in a Pennsylvania village with German roots or a Nantucket lightship basket.
Baskets are relatively easy to find at craft stores, yard sales, even department stores. You may even be able to take a basket making class at a local history museum or through a continuing education program. For detailed information on baskets, please read Virginia Mescher’s articles in the in the Fall 2005 and Winter 2006 editions of the Watchdog and the books by Gloria Roth Teleki, The Baskets of Rural America and Collecting Traditional American Basketry which include several mid-century notations and baskets.
Baskets do come with a few drawbacks. Baskets provide minimal protection from weather and moisture. If the basket contains modern items, a cloth cover must be continually arranged to conceal the contents. Baskets, though popular for picnics, provide little barrier for hungry insects. I will never forget one of my early events when I had been sitting with a basket on my lap which recently had been on the ground. When the basket was set aside, my entire lap wasn’t the stripes of fabric but a mass of moving black and brown… ants, hundreds of ants.
Specialized Containers
At times you will find you need a specialized container to suit your needs. A common one is a spectacle (glasses) case. These cases were shaped for the spectacles, made from metal, covered metal, leather, and papier-mâché. They were most often lined inside. They are the best way to carry your period glasses. If you will be writing letters or a journal during your event you may want a writing desk. Writing desks are useful for writing letters or journal pages. They are wood with a slanted top or fold down top with a writing surface. Inside there are compartments for holding paper, pens and ink. Some men may who plan to shave at events may want a razor box. These wood boxes had swivel or slide tops. Some had compartments inside for razors and brushes. Another box, useful to most reenactors, especially during rainy events are candle and tinder boxes. At an event you will want to keep your candles dry and if it is hot, straight. These boxes were wood or tin, the length of the candle. You will also want to keep tinder for the fire if it particularly wet. A period tinderbox would contain a piece of flint, a steel striker, dry tinder, and possibly a tin damper to shield or extinguish the tinder. You will want either those items or dry matches, a striker, dry tinder (charred linen, paper, or wood shavings) or a fire starter and possibly a dry candle stub.
Well-stocked sewing baskets or boxes are essential for anyone who plans to sew during an event. Directions for both smaller sewing kits and larger sewing boxes and baskets can be found in Godey’s and Peterson’s. Chances are, even if you are not an avid seamstress, you have or eventually will need at least a small sewing case during an event. Small kits such as housewives, needle-books and needle-cases abound for purchase. They are also easy to make.
Boxes shaped like books are sometimes popularized for smuggling at events. These book-shaped boxes weren’t an unusual item. They were constructed most often from wood to store important books or other items. They would open like a book or with a sliding cover in the back. Some had humorous titles. The author of Neat and Tidy says hollowed out books were popular in the early 20th century.
Toilet or dressing boxes and trinket boxes were popular for both men and women in the 17th and early 18th centuries among the wealthy classes. By the late 18th and 19th century, these boxes were popular for middle classes. Trinket boxes were similar to what we would now call a small jewelry box. (A trinket was a small ornament, usually an article of jewelry for personal adornment.) 19th century boxes were decorated or painted frequently by the woman who used it. They were most often rectangular or octagonal, occasionally with locks. Some were decorated to match dressing tables.
Each one of us will find different modes of packing our goods works well at different times under different circumstances. In my experiences I have found some favorite modes of packing ranging from carpetbags to a wide assortment of trunks to a jam cabinet. I have seen a several successful methods as well. One, which stands out in memory, is an entire kitchen’s goods including flour, sugar, eggs, etc. packed into a copper double boiler. Each item was well packed in a period appropriate container within the boiler making it easy for the cook to carry her weekend’s ingredients from kitchen to kitchen. I am certain I have neglected some favorite containers of other reenacters. If I have, I am eager to hear what you use.
Citations:
Raycraft, Don and Carol. Country Baskets Wallace-Homestead, 1976. and The Basket Book. Paducah, KY: Schroeder, 1981.
Schiffer, Nancy. Baskets. Schiffer Publishing: Exton, PA, 1984.
 aka New Drawn Bonnets!!!
If you read the post a few weeks ago on Drawn Bonnets, you may have noticed a black and white check and a blue and white check. There was just something about these bonnets that screamed “make me!”


The black and white is a taffeta silk with approx 1/6″ checks. The silk is drawn on cane over a light weight wired buckram. The slightly flared brim is prettily flounced. The fashion ties are a high quality double faced satin and the functional/utility ties are a silk taffeta. It is lined in cotton voile. The frill is a silk organza. The interior decoration pulls directly from the inspirational original that was done in ribbon and lace. This one has handmade ribbon petals and delicate white violets set on a wire and tacked into the bonnet. I really was quite giddy when I finished the exterior of this bonnet. I was so please with how it came out.


Since my silk merchant had a blue check in a shade that nearly matched an original blue check, I just had to make that one as well. This check is a tissue taffeta with a tiny check. It is also drawn on cane over a buckram bonnet, with one drawn section over a wire. The interior is cotton voile lawn with an organza frill. On the inside are blue paper flowers. On the outside is a garland of small velvet blue blossoms. The utility ties are an ivory silk taffeta and the fashion ties are a German moire.


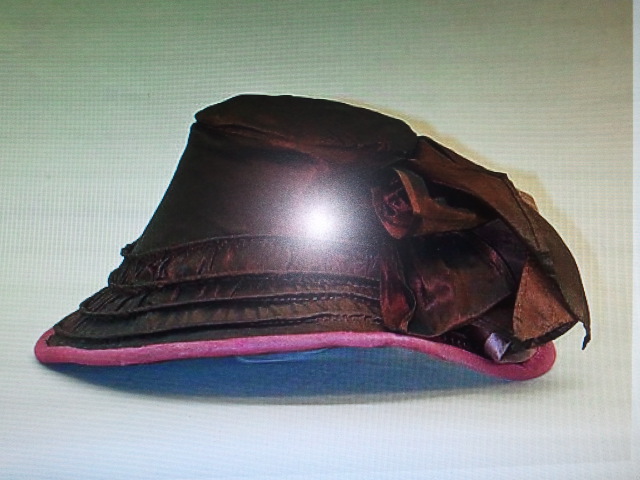
I had just enough of the black check taffeta left. It really wanted to be a soft crown.
This is a straw plait brim with the black and white silk taffeta soft crown. The interior is lined and has an organza frill. The fashion ribbon is a black German moire while the utility/functional ties are a narrow black silk taffeta. I was so very tempted last night to trim this out in peacock feathers and black velvet berries. I wasn’t sure that people would like that, so I held off.


Here is a sampling of checked drawn bonnets:

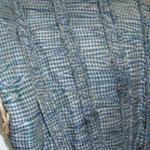


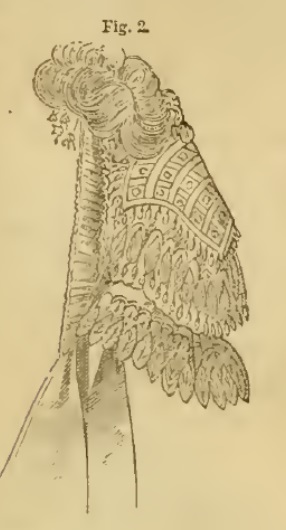
Fig. 2 is a dress bonnet of white tulle; down the front edge is a fulling of tulle, and at the top of the front is a plume of white feathers. The top and crown of the bonnet are covered
by a square of white lace, edged with a small white silk ball fringe; at the top edge of this square is a deep flounce of white lace, edged with ball fringe. The strings are of white silk, and the cap has a few small pink flowers at the top. (Godey’s, July, 1864)
From Moore’s Rural New-Yorker in Rochester, NY
June 25th, 1864
What is Becoming.
The effects of color on complexion are learned from experience, and the subject cannot be treated successfully in a short paper like present. Portrait artists know how many are the colors that mingle in one face, and slightly varying porportions[sic]and small omissions produce difference in the skin, so that colors which suit one person are not becoming to another, although the complexions of the two are supposed to be the same. A candid friend, or the more candid looking-glass, must be the ultimate appeal. Now that we have touched the delicate subject of the mirror, let us notice the fact of how much the position of a glass, in reference to the light, has to do in making a person satisfied or discontented with his, or her, appearance. The most flattering position for the glass is when placed between two windows, the equal cross-light reducing inequalities and roughnesses to a minimum. The most unbecoming reflection is from a glass in front of a window, the only one in a room. It is remarkable, and perhaps unexplained, that any irregularity of the features, anything out of drawing in the face, is increased when seen in a glass. There is a great difference in the color of the glass itself; some glasses are very pure and white; some have a greenish tinge, necessarily producing disheartening reflections.
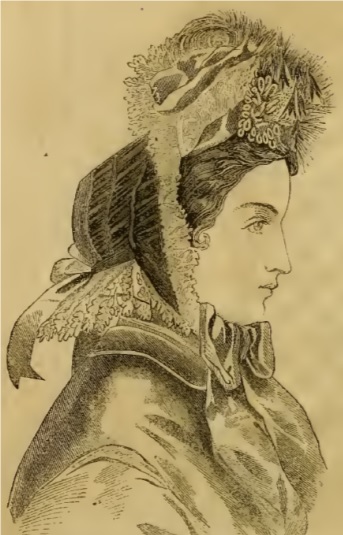
Fig. 1 is a bonnet of rose-colored crepe, with curtain of the same. Near the front edge is a narrow band of the crepe, edges by a white lace; at the top of front is a group of roses and rose-buds, mixed with fulling of lace or blonde; from beneath the group, a passing down the back of crown, is a fulling of tulle edged with narrow lace; at the back curtain is a small rose-bud with leaves, from under which, falling over the curtain, is a broad lappet of tulle edged with white lace. The strings are of pink silk. (Godey’s, July, 1864)

Round hats are now very generally adopted. Some of the prettiest we have seen were in cuir-colored straw trimmed with velvet and feathers to match. Others were of chip, straw, and imitation Leghorn, elaborately trimmed with spun glass, shells, plaid velvet, and feathers. Veils, or rather scarfs, of white or black lace, are frequently looped at the side of the hat, and fall as a streamer at the back. The hats we have seen were not as high and pointed as those of last season. The brim fits rather closely to the face, and the back of the brim droops, and is much longer than the front.
We noticed some very pretty hats trimmed with bands and loops of velvet in front, and a pointed cape of velvet edged with lace covering the brim at the back.
Little girls are wearing half gypsies of straw. These are rather pointed in front, flare much at the sides to display a full cap of lace and ribbons, and at the back turn up like a turban. Cased silk bonnets with inimitable muslin and lace crowns, trimmed with the lightest of feathers, are also among the Spring costumes for little girls. Muslin and lace caps of every description are worn, they are generally of the Marie Stuart shape, with quite deep capes at the back. They are highly trimmed with ribbons, and frequently a tiny bunch of bright flowers is nestled among the soft lace on one side.
…
Mask veils are altogether worn. That is, the veil is drawn closely over the face, and fastened on top of the bonnet or hat with an insect pin. It is, however, difficult to arrange an ordinary veil in the mask style, on the small turban hats now so much worn by young ladies. We would therefore recommend the veil manufactured for the purpose, and just introduced by G. W. Vogel, of 1016 Chestnut Street, Philadelphia. These veils are a little over a quarter yard wide, perfectly straight, and just sufficiently long enough to fit round the hat. For the Spanish hat there is another veil, which is decidedly novel. This has a hole in the centre, which passes over the crown of the hat; round this is a beading in which the elastic is run. The veil is pointed in front, and at the back, while the sides are shallow.
(Godey’s, June 1864)
With yesterday being the last day of classes, I am running summer thoughts around in my head. (I technically have a week and a half of exams yet.)
Before I talk about summer, I do need to skip ahead to fall. I lost my list of who wants to know about reprints. So,I need to recreate this list. Please, comment below if you want to be email about reprintings of From Field to Fashion or my Quilted Bonnet/Hood Pattern. While we are at it, also let me know if you want to be emailed about new publications. (Yes, there will be new publications.)
Back to summer….
I have a few summer millinery goals for this summer. They are both personal/artistic and financial/budget based. After all, millinery pays the bills for the summer & early fall.
I have some fun ideas in mind that I think you will like.
I also want to know what you are looking for.
What bonnets & hats do you want to see?
What pieces will meet your needs?
When talking about drawn bonnets, we should start with a little vocabulary and “how it is done”.
Drawn – Drawn is when the fabric, most often but not exclusively silk, is sewn with channels into which cane or wire is inserted. The fabric is then bunched, or drawn, up along the length of the cane/wire to create a gathered effect. The drawn cane/wire is attached to the bonnet form.
Shirred – Shirred is when a fabric, often silk, is gathered without additional structure. This can be flat or with flounces.
A single bonnet can have either drawn or shirred techniques, or it may have both.
Construction can be done with individual strips of fabric or larger pieces with multiple sections of drawing or shirring. These were done on both wire only frames and frames with light foundation. Drawn and shirred sections are seen on the brim, on the brim and crown, evenly spaced, unevenly spaced, edged with a different material and even running front to back in some cases.
Now, let us look at some examples. (My apologies for the flash in the images.)
In this fashion illustration and description, the bonnet is directly referred to as “drawn”. This bonnet would have the crepe gathered on cane or wires passing over the bonnet. This bonnet could have been made with two drawn sections, one for the brim and one for the crown.
The bonnet of drawn cuir-colored crepe, trimmed on the front with a fanchon of white lace, loops of green ribbon, and Scotch feathers. The inside trimming is of bright flowers, of the
Scotch colors. The cape is covered with a fall of white blonde. (Godey’s, May 1864)
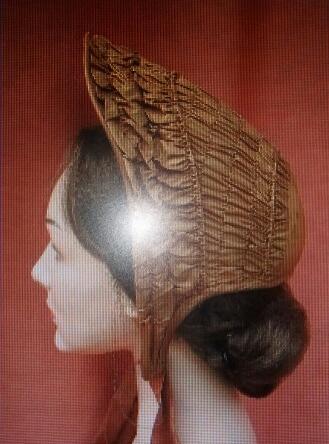
This bonnet, from the MET, has very easy to see canes which the silk is drawn on. 4 canes draw a single piece of silk onto the brim, while a separate piece is set smoothly over the crown and tip. These canes are on the thicker/larger size, being round. (the widest cane channels I’ve seen in an image are on this Henry Ford Museum corduroy bonnet.)
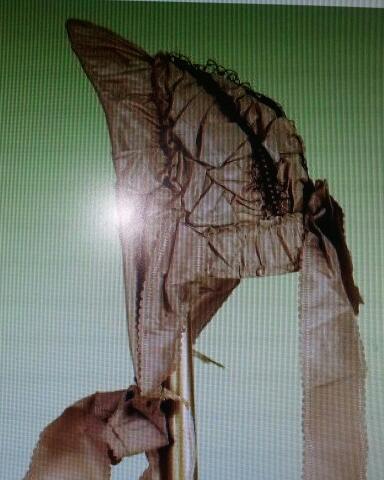
This bonnet also has the drawn sections on the brim while the crown is smooth. It appears to differ from the previous bonnet in that the canes are drawn on separately in strips. The very edge of the brim is covered with one strip. Three strips are drawn onto canes. These are applied from the back to front, with the front most strip being drawn onto 2 canes, creating a little flounce just behind the front edge.

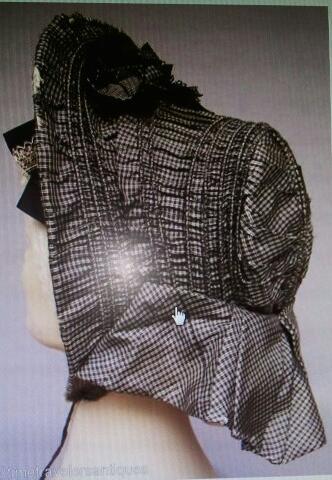
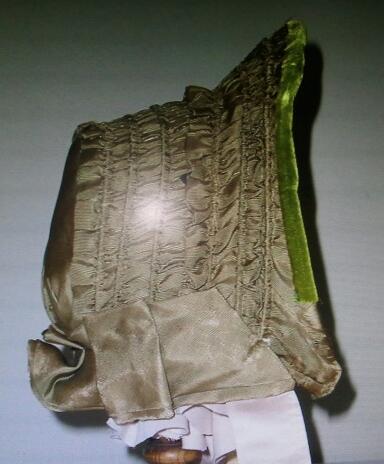
The next several bonnets show drawn silk on the brim and crown. Notice the variety of spacing used. Some are set snuggly, while other are set with quite a bit of space. The green bonnet has fairly evenly spaced drawn canes/wires. The blue and white pairs the drawn canes together. Flounces drawn on cane or wire are tucked in as well. The black and white one has a flounce just where the crown meets the brim. The brown bonnet highlights the angles and overlapping that was done on some bonnets. This helps add to the curvy movement to some bonnets.

This example shows that gathered sections can be worked vertically, over the back of the tip. This may or may not be drawn. A better example, where the canes can be seen, showing it is truly a drawn bonnet can be seen HERE
This last illustration show that a drawn brim can be done with a soft crown. (A tempting idea for this summer. Maybe I’ll make one.)

This bonnet has a front of drawn green silk. The graceful soft crown is of white silk. The trimming consists of a tuft of meadow grass and field flowers, also loops of white silk placed directly over the crown. The inside trimmings is of white and black lace and field flowers. (Godey’s, May 1864)
This is my pin board of 1840s through 1860s drawn bonnets. (I’m splitting drawn and buckram. Bare with me.)


