Veil 101

I am reposting favorite helpful posts each Monday throughout March, April, and May. This post will wrap-up this series. Starting in June, I will share posts focusing on the the questions I am asked most often when Intepreting.

This look at veils concentrates on the everyday veils of the mid-19th century, the 1840s through 1860s. It does not include mourning veils.

As some of you know, I have issues with sunlight that can trigger migraines or full-body crashes. So, veils are very important to me. This is very much a “don’t leave home without it” item.

You will notice each of the veils I wear are silk gauze. This is for two reasons. First, when we started exploring veils locally, some years ago, the silk gauze at Dharma was what we felt suitable. Our research has expanded. Second, personally, I find the gauze helps with my light issues nicely. I am kinda afraid to make the change to net. But, I will be giving net a try when I find a net that I feel mimics the feel of those originals I’ve held.

Veil Shapes

wpid-2014-08-30-18.09.42.jpg.jpeg

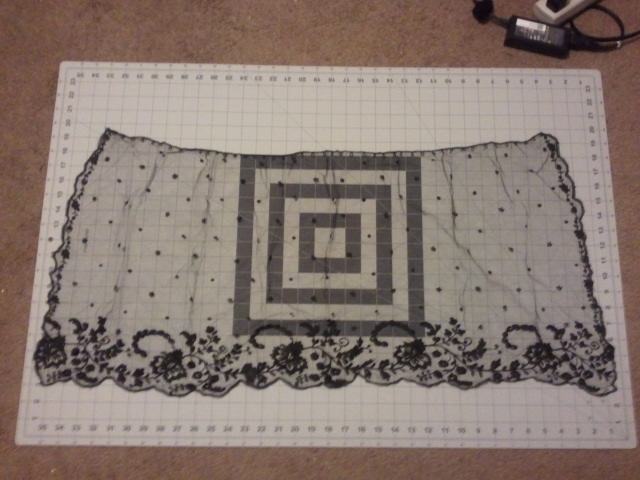
The most common shapes for veils included the wide rectangle and the semi-circle. In each shape, they tended to be wider than they are long, ranging approx from 30″to 40″ wide and 15 ” to 20″ long based on those I’ve been able to see in photos and in person.

il_570xn-642507724_qoqn

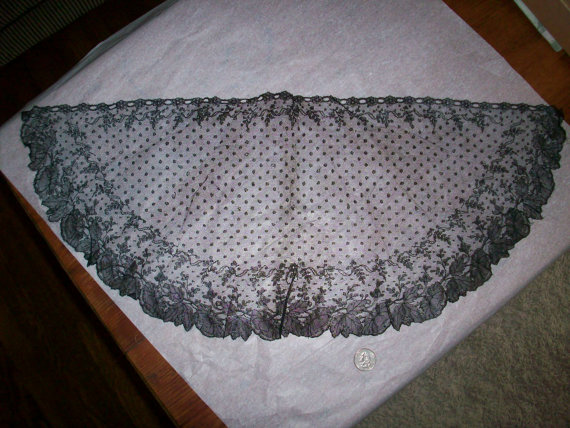
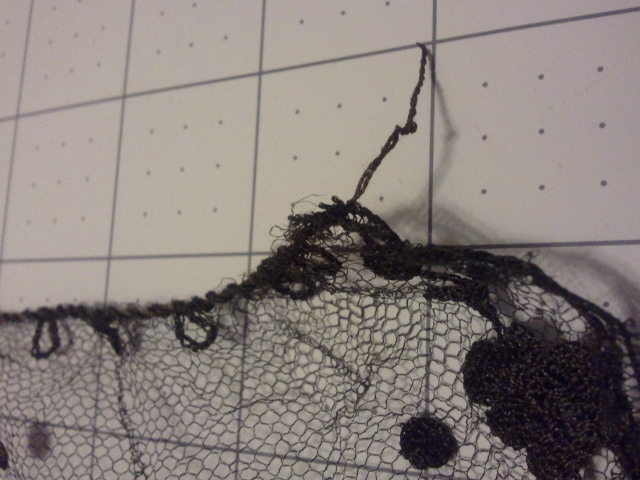
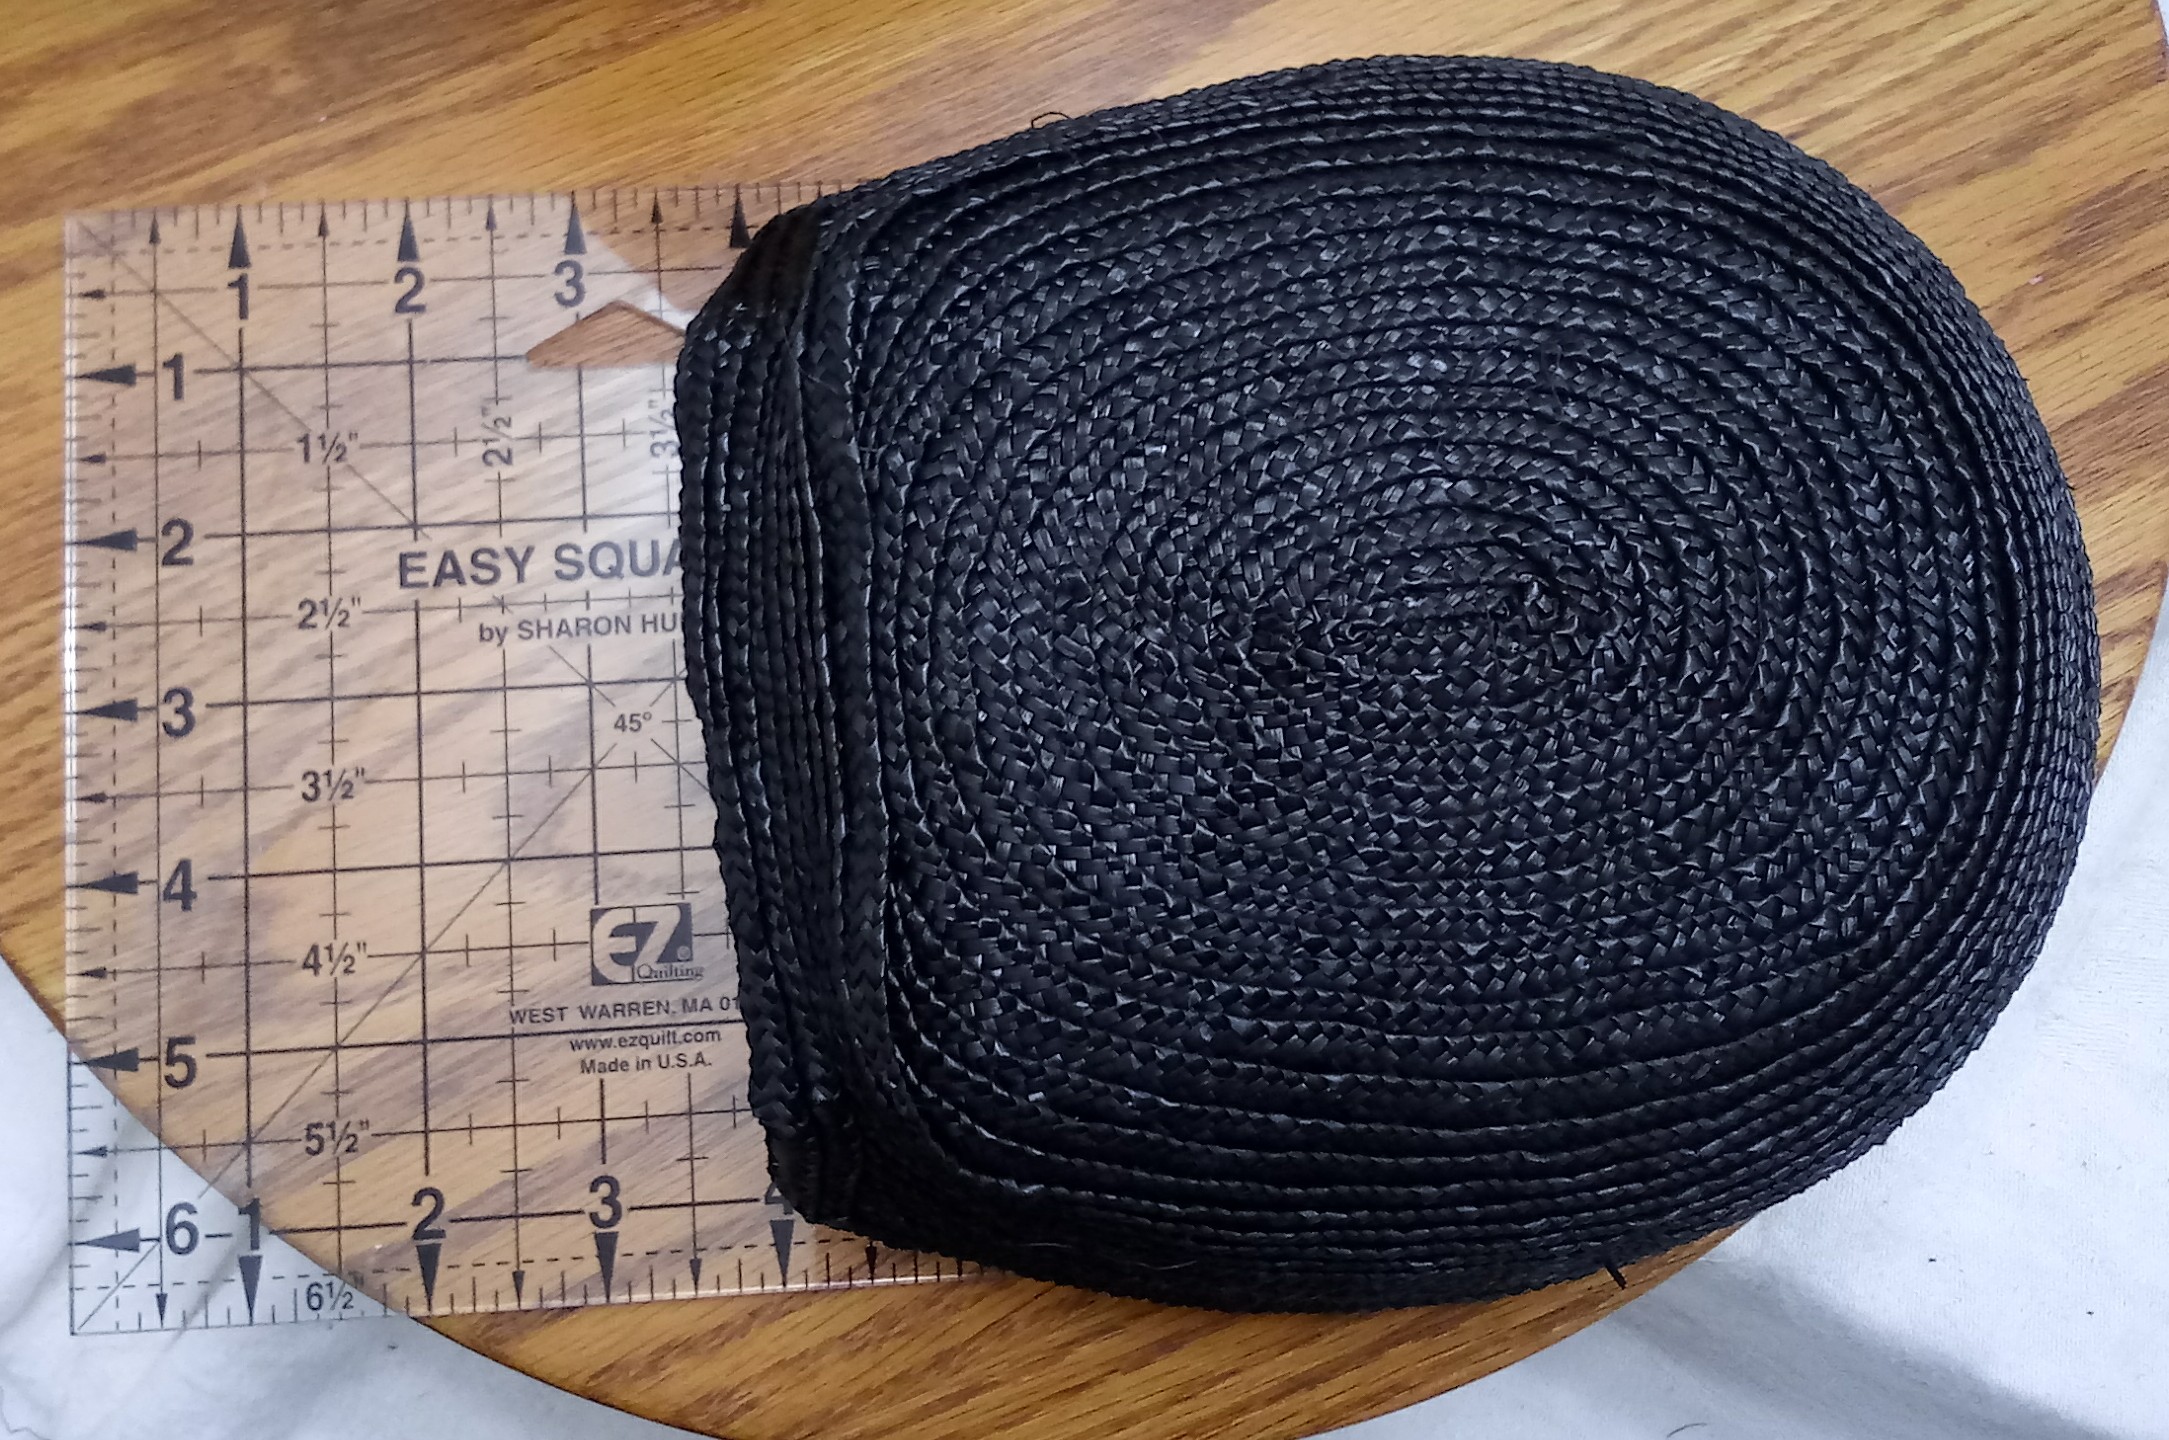
Right above: A rectangular net veil, approx 36″ wide by 17″ deep. Right below: A semi-circular veil. I need to double check the dimensions, as I am pretty sure I bought this one but haven’t a clue where I put it.

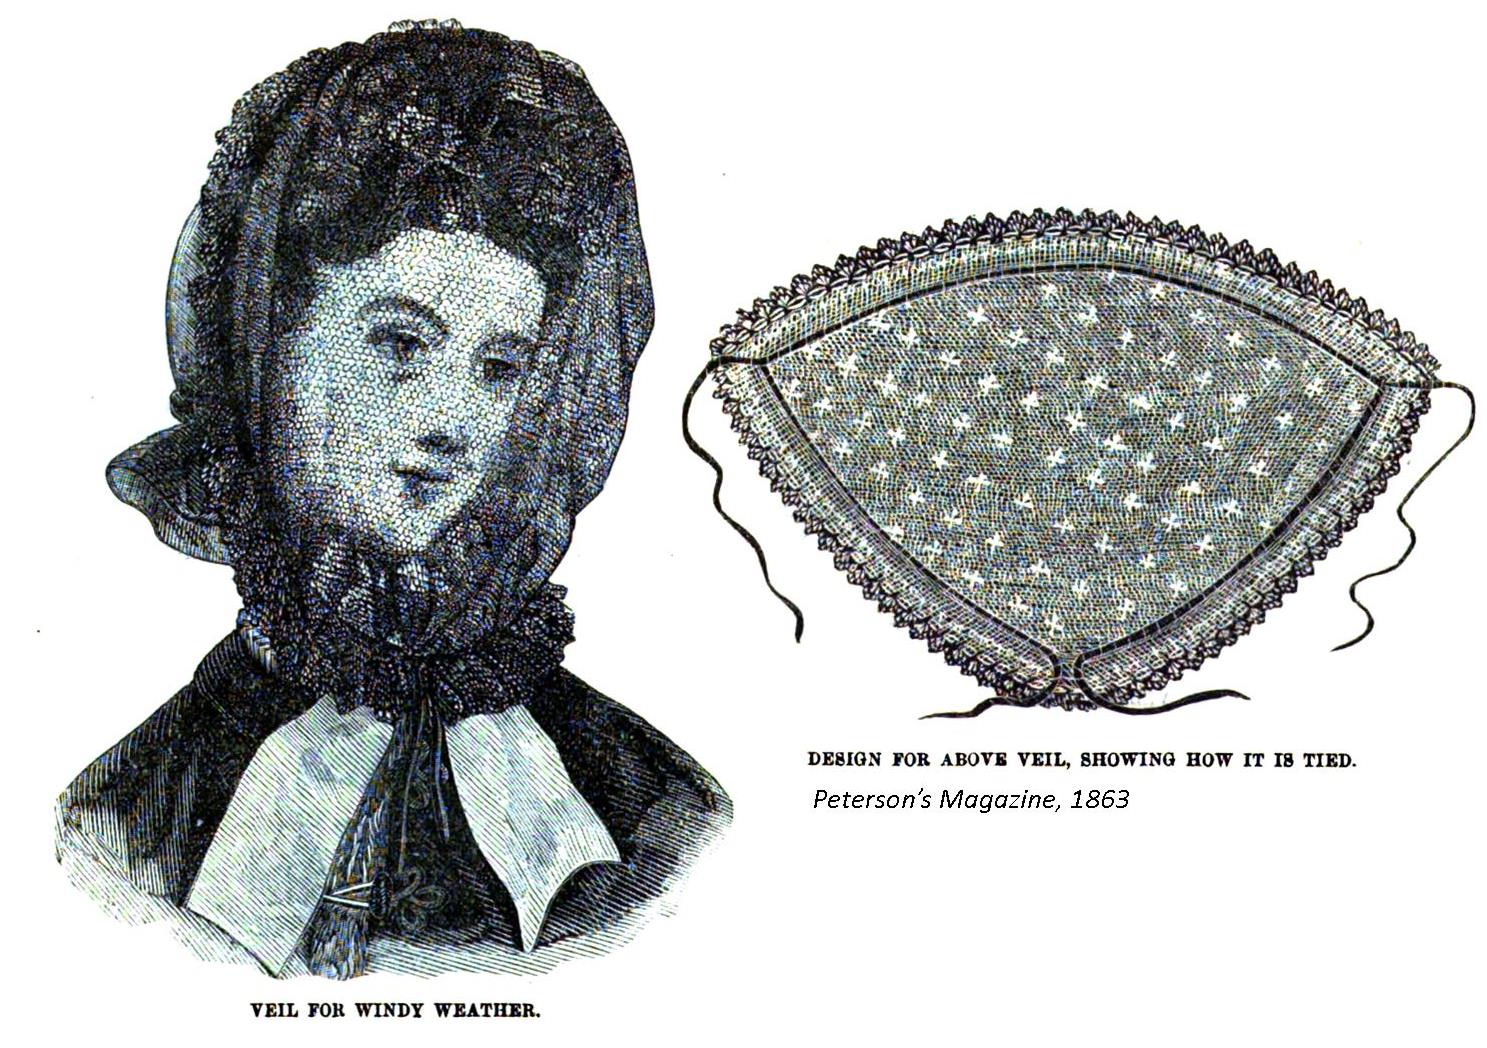
There were some variations to these shapes. This example at the MET may be mid-century. It is a variation on a rectangle with the top and bottom edges curving. There is a shape I would call a petal, with two sides each an arc. At the bottom of the page, you will see a quasi-triangle shaped veil meant for windy weather.

Be sure to browse your favorite and local museums to see original veils.

Veil Materials

wpid-2014-08-30-18.10.14.jpg.jpeg

Let me first say I am utterly clueless about lace, or at least entirely lacking confidence in my knowledge of lace. I will leave the details of which lace is which and which is correct to those who have studied lace in depth.

That said. In minimum:

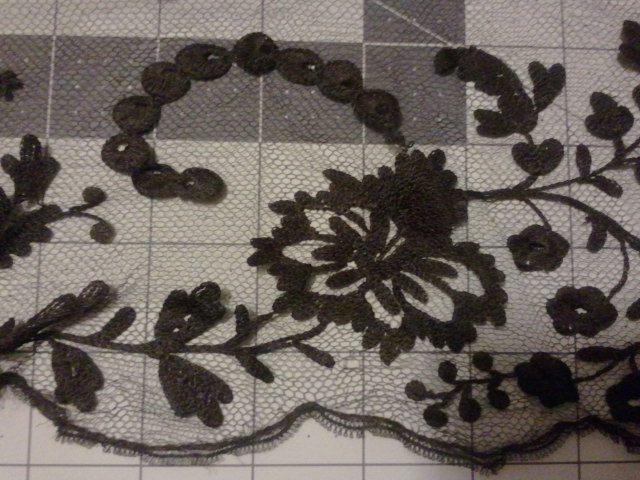
In terms of fibers, silk, linen, wool and cotton all come up for nineteenth century shawls in museum collections.

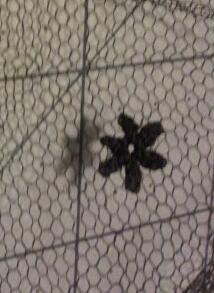
When looking at the net ground of net or net lace, you want little hexagons. You do not want the little rectangles or diamonds.

wpid-2014-08-30-18.10.36-1.jpg.jpeg

Veil Colors

1830s travel program me 1

The most commonly found veil colors for the century are black, white and ivory. We can also find blues and greens. These do tend to appear more frequently in earlier remaining veils then in those of the 40s, 50s and 60s.

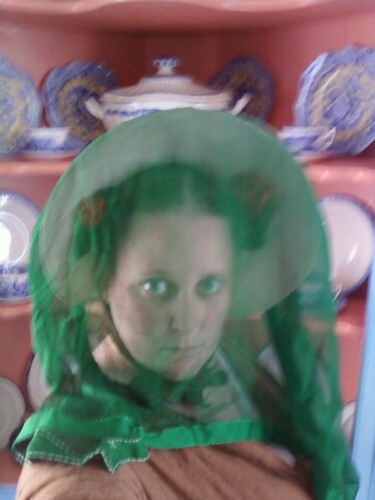
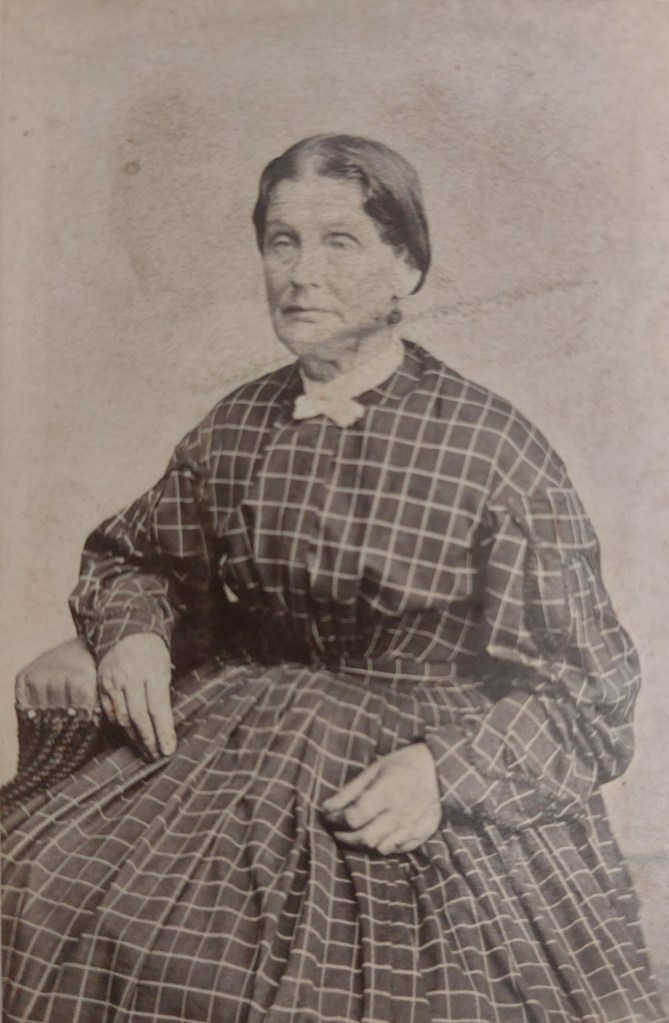
To the left is an image of me in an 1820s bonnet with a green veil. This is a dyed silk gauze veil made by Bevin Lynn. I found this green to be gentle on the eyes when out in the sun, given moderate protection. It did not give glare as some white veils can do. It did play with the light giving a streaked color effect similar to what some migraines can produce.

I have also worn white and black veils. I find black silk gauze to give the most protection from the sun. It also gives the most vision dampening of the colors I’ve worn. White give some light protection. I prefer it on moderately sunny day for short walks across the tree filled square.

Attaching a Veil

wpid-2014-08-30-18.11.51.jpg.jpeg

This is how I attach my veil. Original veils show either a channel at the top of the veil or worked holes, through which a thin cord or ribbon can be drawn. In my veils, I prefer to put a small knot or loop in the end. This helps keep the cord from sliding back through and makes it easy to grab.

IMG_3831

Once this cord/ribbon is drawn up, the veil can be positioned along the brim edge. I drape the veil over the back of the bonnet.

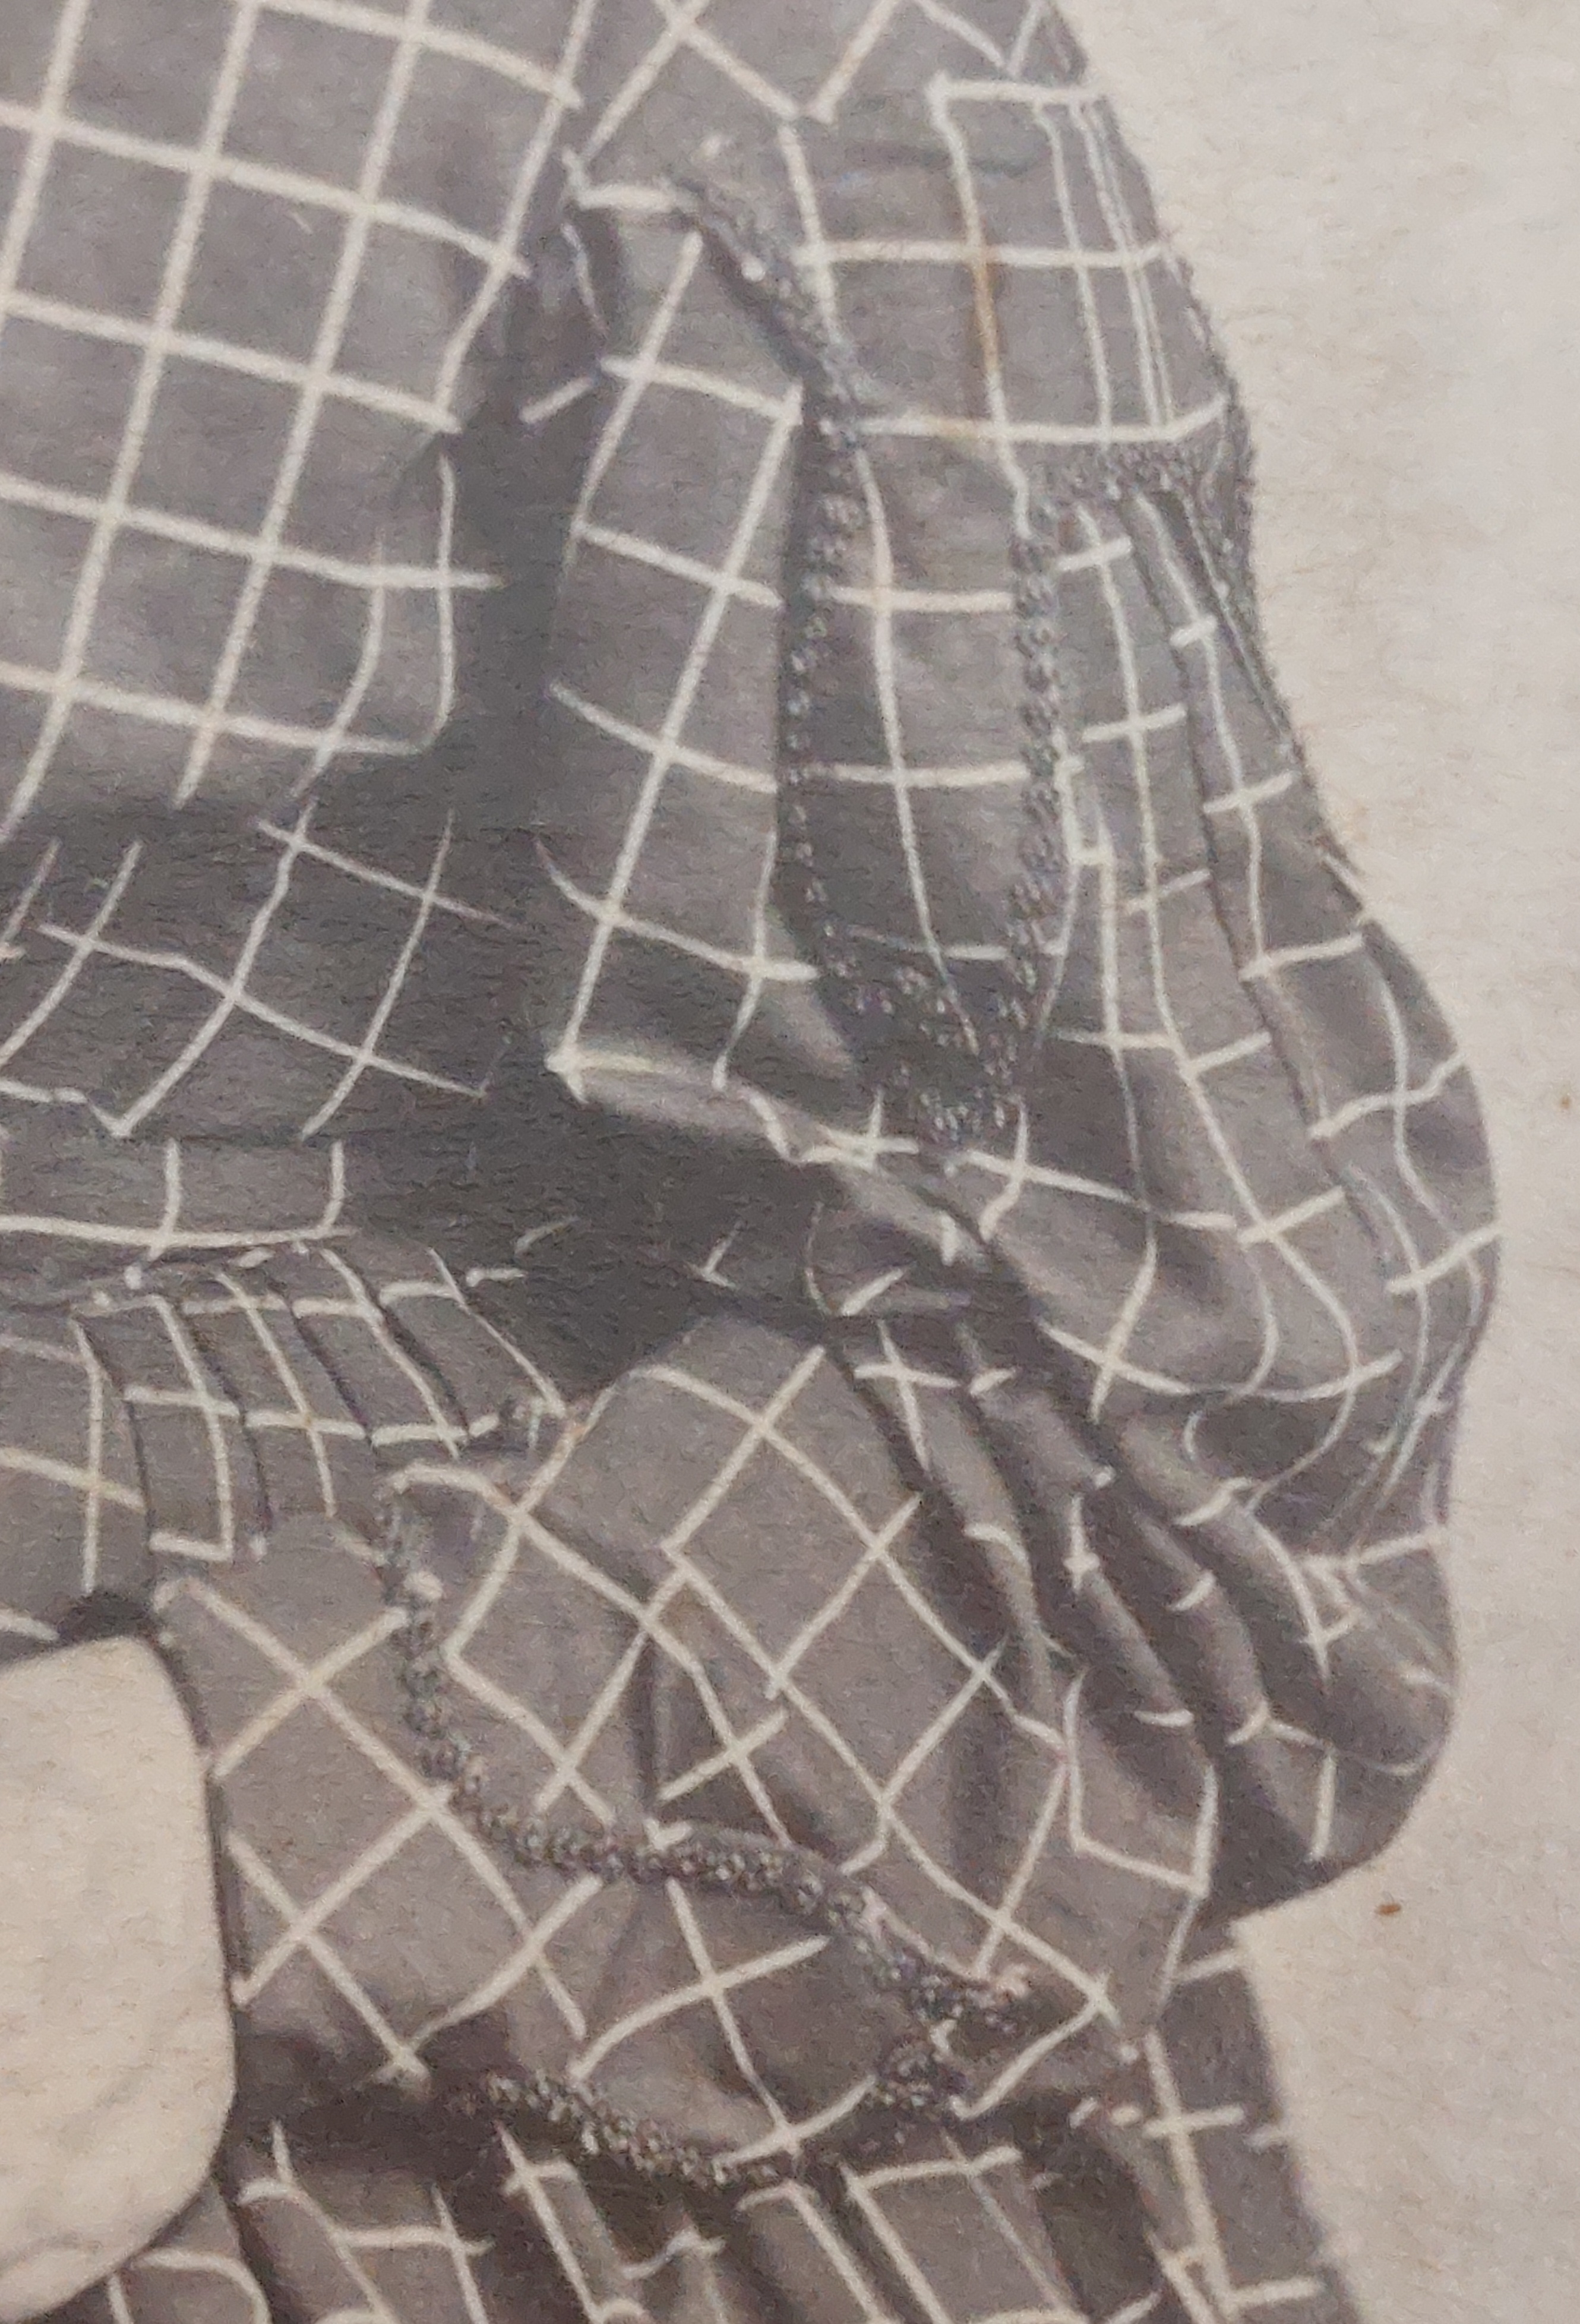
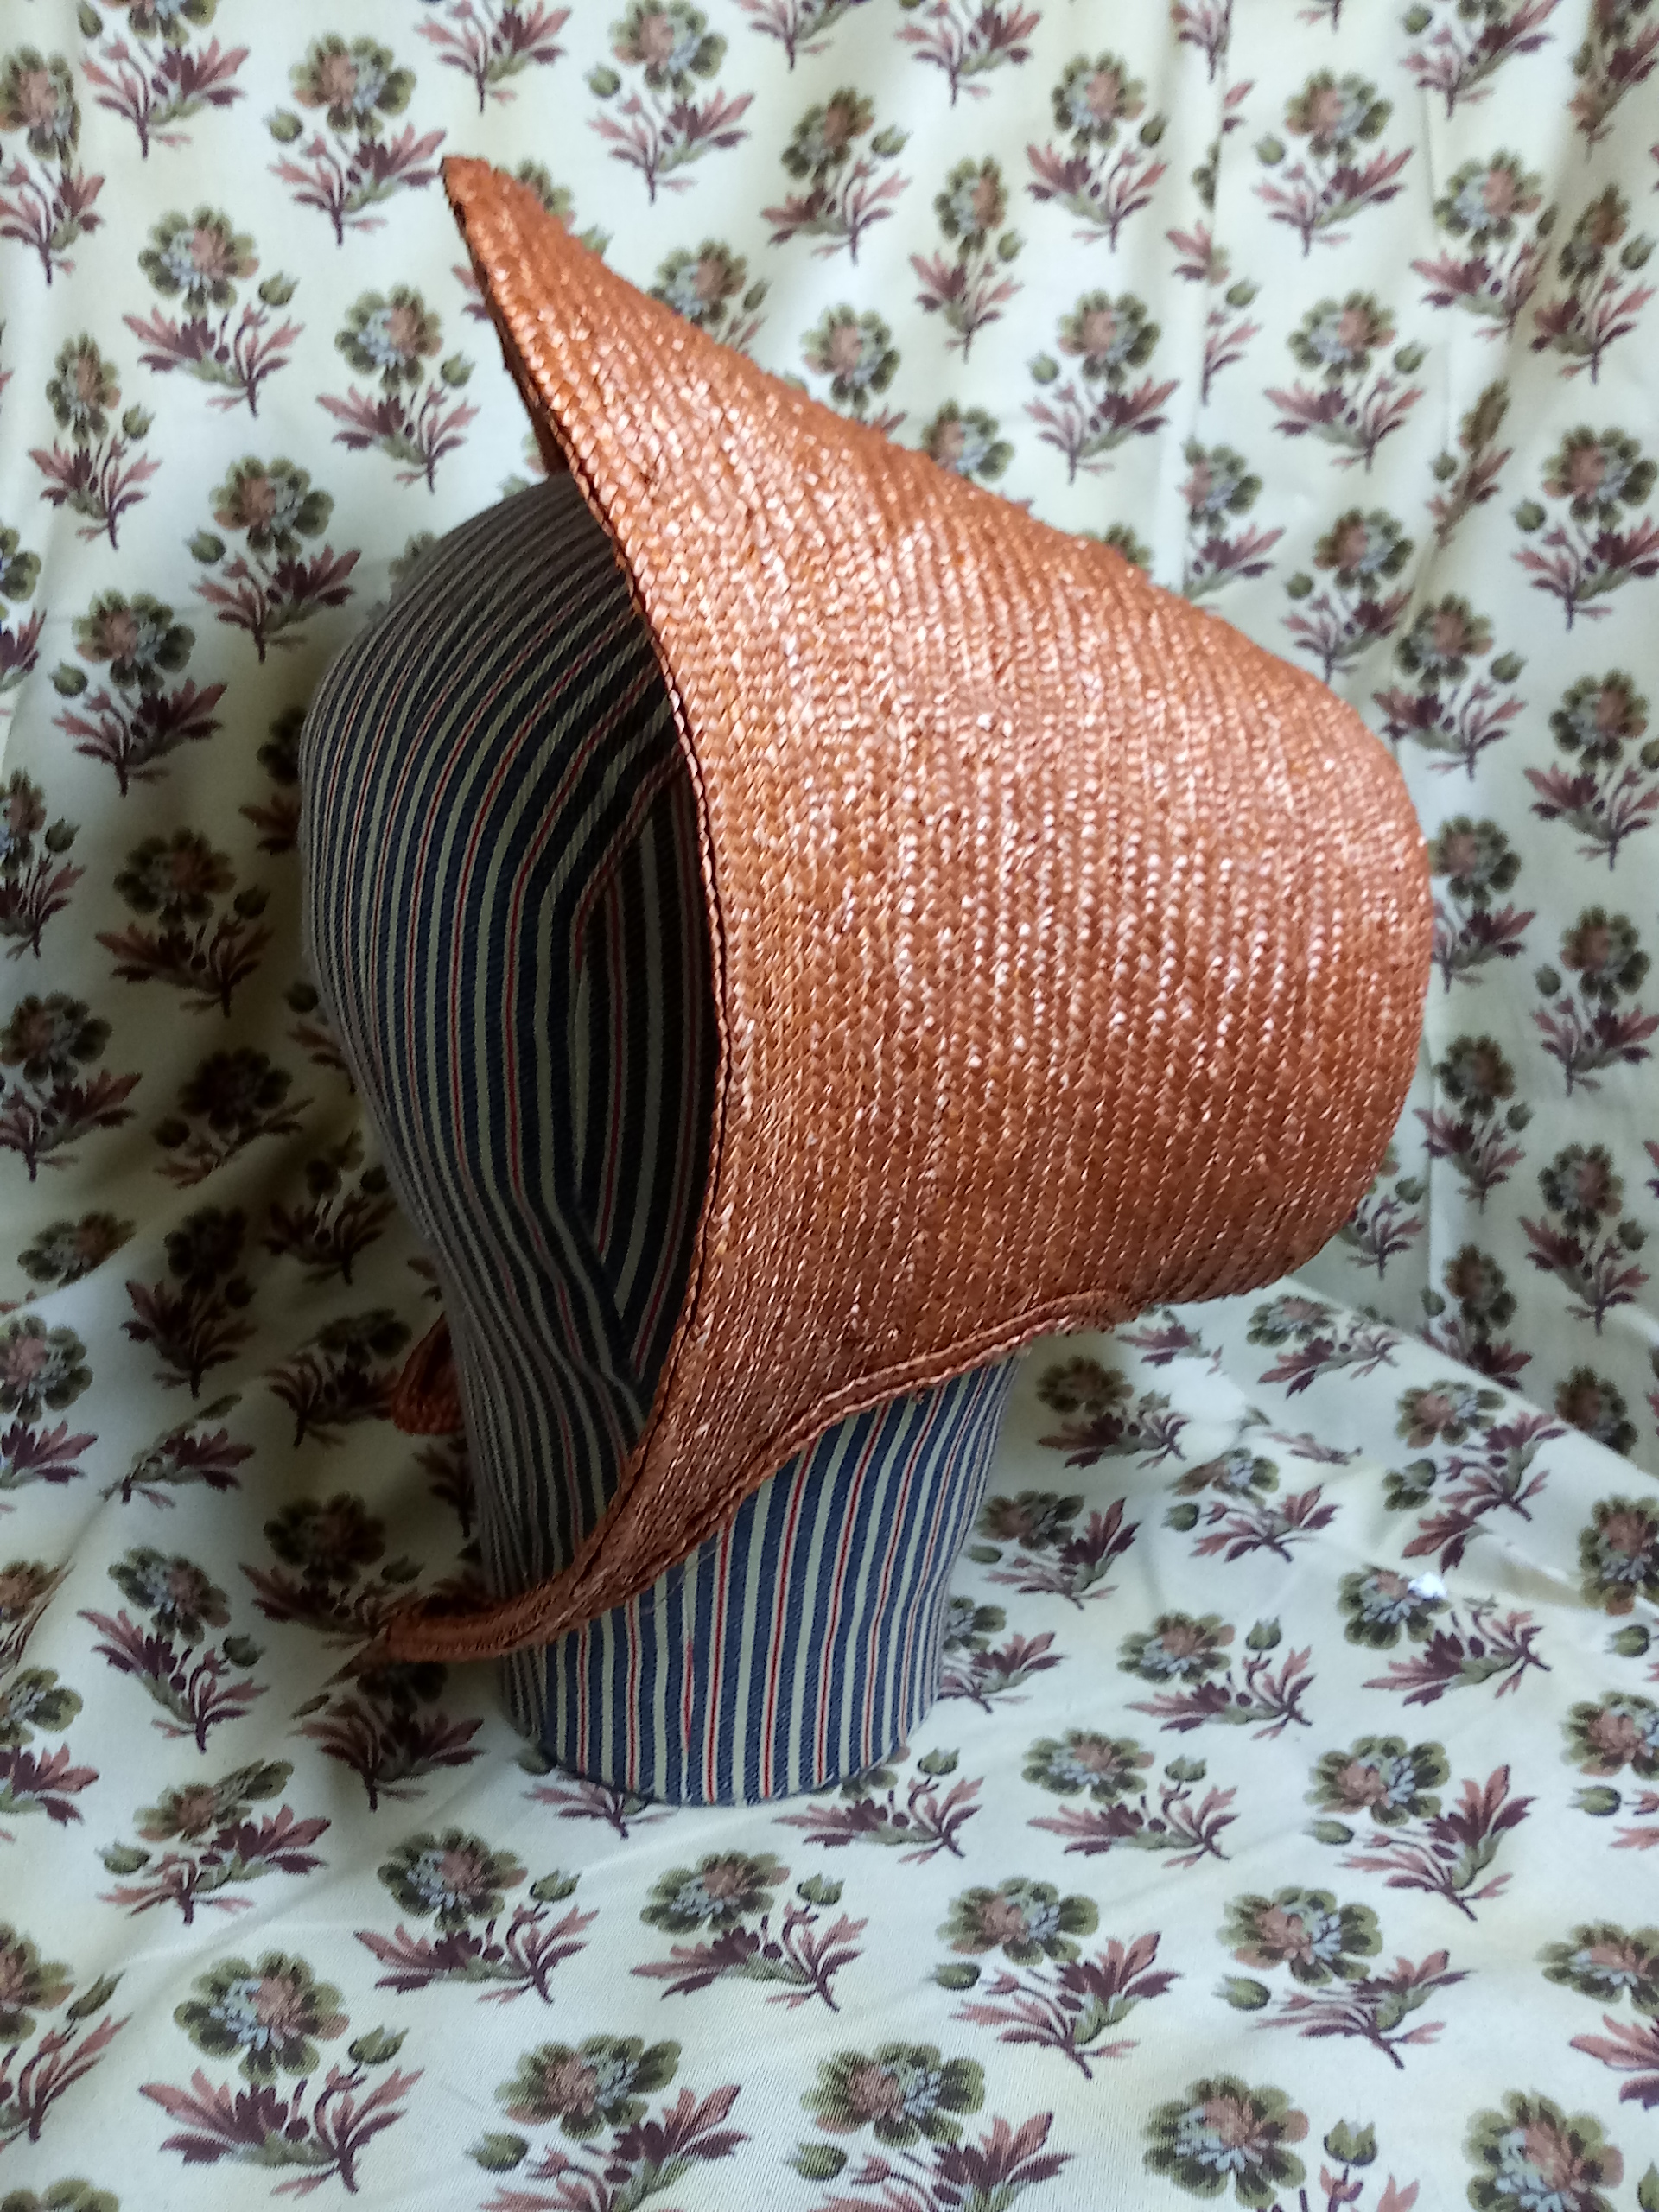
I prefer to pin just back from the edge. With my drawn bonnet, seen here, I pin under the second cane. On my straw bonnets, I pin a row behind the fancy plait or about the 3rd row back. The end pins are pinned upward sorta following the row of cane or plait. In the center top, I pin one or two pins across the veil, trying to catch the cord,

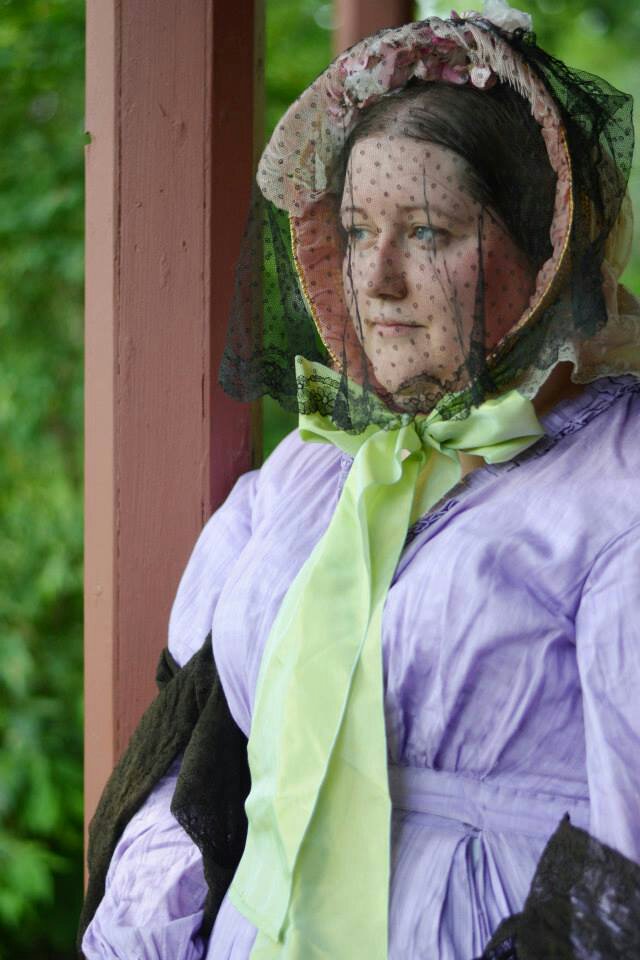
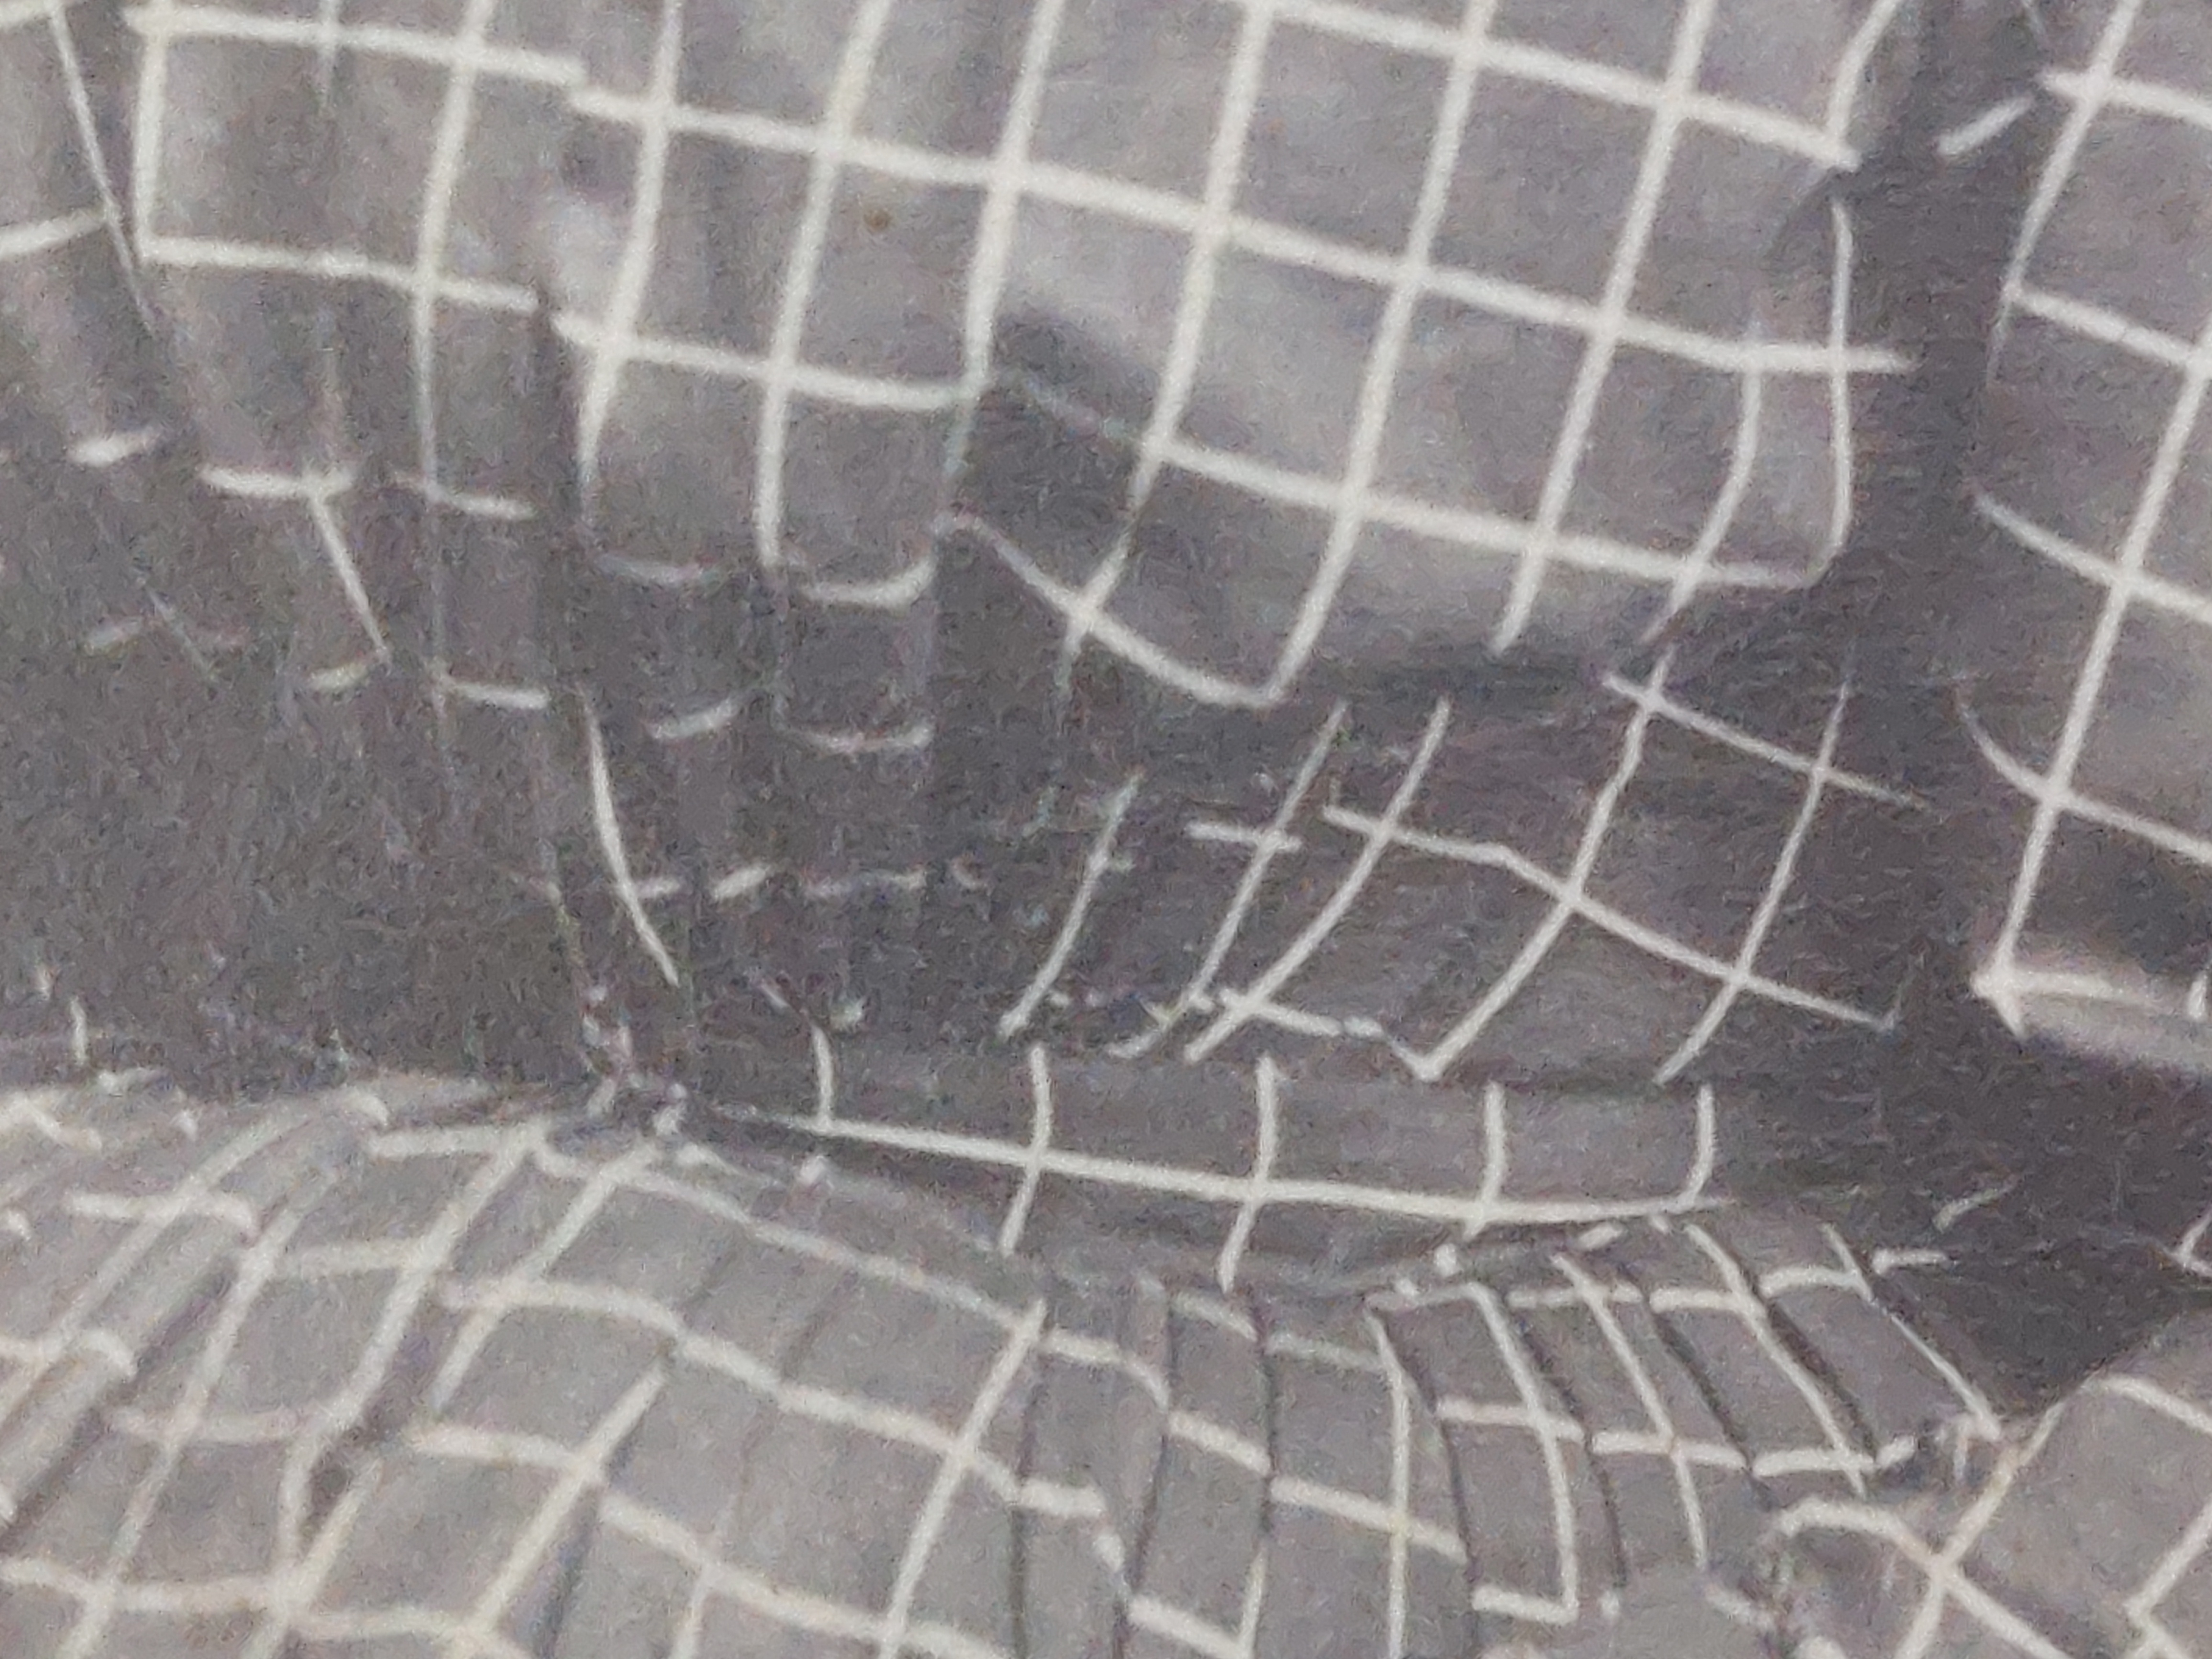
parallel to the cane or plait. (pinning perpendicular to the plait will allow the veil to pull forward or backward as it drapes.) Here you can see how this veil drapes forward and back. This is a silk gauze veil made for me by Bevin. It is trimmed in silk ribbon. It is a little longer than most 1860s veils. Some 1850s images do show a similar length.

Here Betsy Connolly is wearing a semi-circular veil. Notice how she doesn’t have the ends pooling on either side as a rectangular veil would.

wpid-534186_556635881040979_23383459_n.jpeg

Specialty Veils

3

Note for the repost: This is one of those posts I intended to get back to and provide additional information on but didn’t because life happens. I do hope to do another post about veils addressing several questions and details. Hopefully soon.

Published in: on May 16, 2022 at 9:10 am  Leave a Comment  

Finishing a Straw Bonnet


I am reposting favorite helpful posts each Monday throughout March, April, and May.

20180723_092546.jpg

We are entering the time of year when people are thinking spring and about decorating their bonnets. Straw bonnets have a great appeal because they are cooler to wear in the heat as the straw allows the head to breathe, and the embellishments can be changed fairly easily without leaving as obvious thread holes.

Just as with most other garments and material culture pieces, millinery is an investment. You want to finish your straw bonnet as accurately as possible. This will include several factors:

  • A lining to protect the straw from your hair products and to protect your hair from snagging on the straw. While not every extant bonnet has a lining or evidence or a lining, a lining can extend the life of your bonnet
  • A frill or cap for the inside of the bonnet’s brim. This frill simultaneously frames the face and helps hold the bonnet in place. You may also want to add a facing to the front couple inches of the inside of the brim. This is found in many originals.
  • The bavolet will need a cotton net lining to give it the proper fullness. I believe this net also physically supports the materials of the bavolet. The silk, whether from fabric or ribbon, is most frequently seen on the bias in original bonnets. The net will help the bias cut hold its shape, especially if addition elements such as straw, lace, or bead-work is added. Consider reading “Understanding the Ribbon Bavolet” for additional information.
  • A bonnet will need 2 sets of ties – A functional set of narrow ties which will hold the bonnet on, and a decorative set of wider ribbons.
  • You may want to add a stay to assist in holding the bonnet to your head. The easiest to add is a simple strip of velvet. More information with images can be found in the post “Bonnet Stays
  • Then, of course, you need your decorations – flowers, feathers, ribbons, lace, etc.
  • I will add – A storage box and stand – While this is not an immediate need, a stand and box will help your bonnet last by protecting it from being mis-shappened, and from dust.

Recommended Shopping List:

  • I highly recommend Danielle’s book from Timely Tresses: Finishing a Straw Bonnet Form
  • Cotton net to line your bavolet
  • Fine cotton or silk net (bobbinette), or silk organza or lace for your frill/cap
  • Fine cotton voile or silk taffeta to line your brim
  • 3 yards minimum of wide (silk or quality rayon) ribbon (2 yards for ties, 1 yard for bavolet, additional for decoration/bows) (silk taffeta is also an option for the bavolet.)
  • 1 yard of 3/4″-1″ wide silk or cotton sateen ribbon for ties.
  • Ribbon and laces of choice for decoration
  • Flowers and feathers of choice for decoration
  • 1/2″-3/4″ wide velvet for optional stay

20180730_175702.jpg

Recommended Reading List:

20180730_175123.jpg

Godey’s, November 1856

Straw Bonnets.—Straw bonnets generally require some sort of lining, crape, muslin, or a thin silk. Very few are now worn with a plain lining. It requires just the same quantity to make a little fullness, which is more becoming. I will explain to you how to make a plain lining or a plain bonnet will take just the same quantity; or, if any difference, the plain requires more than the full. I think I hear my readers say this if very strange. You are aware that, in cutting out a plain bonnet or lining, there are several small pieces cut out to the shape. The piece make the fullness, for the material is used on the straight when put in the easy and on cross-way when plain, which compels you to cut pieces off , which on the straight and put in full, is not required. A head lining of silk or muslin should be put in after the lining to make all neat and clean when the bonnet is worn. Straw curtains are worn; but a great many ladies prefer a silk curtain made of the ribbon to match the trimming. The curtain is best cross-way with a narrow straw on the edge. The curtain will not quite take a yard of ribbon; three and a quarter or three and a half are sufficient to trim a bonnet. Plain colors on a straw are neater than mixed, such as primrose, light or dark blue. Sarcenet ribbon is better than satin. It is a good plan to sew narrow strings on the bonnet at the same time you sew the wide tie; the narrow first: it keep the bonnet more firm on the head. When I say narrow ribbon, I mean an inch and a half wide. An old fancy straw bonnet will make up again very weill by putting some silk between each row of straw. You must have a wire frame, and unpick the bonnet; cut some pieces of silk on the cross for puffings, and now lay your straw alternately with the silk. Unless the straw is a very good color, mix colored silk with it. This bonnet will require a lining.


Are you one of the many readers enjoying my millinery blog posts?

Consider becoming a Patreon patron. Doing so helps support my work and helps me write more useful articles.

https://www.patreon.com/AMillinersWhimsy

Published in: on May 16, 2022 at 6:05 am  Leave a Comment  

Unboxing: An 1880s Bonnet Block

Published in: on May 12, 2022 at 5:29 pm  Leave a Comment  

How is a Tie-on Pocket Worn

I was asked to talk about and show how a tie on pocket is worn. Here is a short video that looks at how a separate pocket ties on around the waist and how they are accessed through the skirt. I also give examples of what might be found in a pocket whether it is worn for interpretive use or keeping modern essentials.

I forgot to mention in the video that having the emergency/essential items in a tie on pocket reduces to chance of losing or forgetting something in transferring from one dress pocket to another.

Left: Items for interpretation or period use: notebook and pencil, fan, workpocket with sewing items, hairpins, candy, lavender sachet. Right: Modern essentials: Emergency or medical needs, hand sanitizer, lip balm. Inwould also include: keys, emegency/medical forms, phone. Note: I wear period items on the right and modern items on the left.
Published in: on May 9, 2022 at 8:00 am  Leave a Comment  

Hairnets – The Basics and More Indepth

I am reposting favorite helpful posts each Monday throughout March, April, and May.

There are several resources available to learn more about hairnets…..

Are you confused about the word “Snood”? Read Getting Snoody by Elizabeth Stewart Clark.

Do you want to know what basic hairnet to buy and have in your hair kit? Watch this video:

Want to know the basic ins and outs of hair nets? Read To Net, or Not to Net an article by Anna Worden.

Want to know the details of hairnets, who wore what kinds and when with lots of photos and illustrations? Read the full-length e-book To Net, or Not to Net: Revisited, by Anna Worden Bauersmith.

to-net-or-not-to-net-revisited-cover


Are you one of the many readers enjoying my millinery blog posts?

Consider becoming a Patreon patron. Doing so helps support my work and helps me write more useful articles.

https://www.patreon.com/AMillinersWhimsy

Published in: on May 9, 2022 at 6:05 am  Leave a Comment  

Connection

We all yearn for connection,

whether we know it or not.

My goal for the day was a simple one: sew a doll dress by the end of the day.

After a slow start, I found myself thinking about connection.

We connect in many ways. We connect with our senses. We connect emotionally. We connect physically. We connect through story.

To lack connection, or worse, to be denied connection can be detrimental, can be tragic.

On this Mother’s Day, sitting in the sun and shadows, I found myself listening to a story. I often listen to stories in this spot. This story was different. The words came from their mouth but the story came from the heart and eyes. The story was one of lack of story, of being denied story. It tugged at my heart.

I am grateful I heard what I could in that moment.

As days filled with sun and people go, moments fly away.

I was no longer working on my simple goal for the day. I was connecting with one of my Grandmas by sitting where she used to sit, while connecting with one of my Grandmas by sharing a love she loved.

I share with you Theo:

Theo was named by a moment, a moment created by two pairs of siblings. As I finished her dress and was ready to put it on her for the first time, the first pair of siblings came in. They were darling in how captivated they were. They watched wide eyed, both eager and polite, as I tucked and fussed and adjusted, then presented the newly dressed doll. I said: “She still needs a name.” The first sibling said “Theo.” The second sibling said “Yes, Theo.” both said “Hello, Theo” as two more siblings walk in and one says “Hello.” One of the new pair of siblings was also named Theo. It was obvious to me, the doll is Theo.

Theo is dressed in an 1850s style dress made from one of GCVM’s reproduction kerchiefs. This is one of three reproduction kerchiefs based on originals in the Susan Greene Collection and produced by Burnley & Trowbridge. When I saw this beautiful red and black on white print, I knew it had to be made into a doll dress. I am delighted with how the dress came together today. The skirt is the full 36 inch width of the kerchief with the border design around the hem and up the front. The design lined up creating a circling leaf motif centered on the bodice. The sleeves are open sleeves with the border edge at the wrist. This is the one change I would make: I would make the sleeves more funneled.

The dress will be accessorized with a black belt and mother of pearl buckle. I will add a broach as well to the deep V neck bodice. Theo will also be getting hands soon.


If you read my “Transparency” post you may be wondering how the day went for me, the part of me that has been exhausted. Today was much needed. Approaching this weekend, I was not sure how I was going to do it; I wasn’t sure if I could do it. The morning started hard for me. I was struggling to feel my groove and zone. Then I got there. The above happened. Suddenly it was closing time and I wasn’t tired. I reached the end of the day without feeling like it was the end of the day or the end of me for the day. I wasn’t even tired a little bit until the drive home. When I got home, it didn’t hurt to get undressed, well except for the bit about gravity. I hoped in the shower. I ordered dinner. I uploaded. started editing and writing. In this moment, I am good; I feel that soft sigh of “this is good.”

Published in: on May 8, 2022 at 6:40 pm  Comments (3)  

Free Printable Sewing Resources

As part of the 5 year anniversary for Fanciful Utility I created these goodies for the workbox. These are “Fill Your Case” useful PDFs you can print and put in your sewing case.

Basic Sewing Booklet from Eliza Leslie’s Lady’s House-Book 1850

Basic Sewing Booklet from Eliza Leslies Ladys House Book 1850

Mini Quick Reference Booklets

Mini Booklet Sewing Guide

Mini Booklet Gather Gauge Button Guide

Mini Booklet Gather Gauge Button Guide

Mini Booklet Basic Sewing

Directions for folding the two mini booklets:

Mini Booklet Directions images

Needle Packet Labels

These are scanned from antique packets in my collection I’ve included directions for the two ways these packets are folded as well as label and packet measurements.

Sewing Needle Labels to Print and Fill Your FanU Case

*note: These are direct scans. Some were on the packets angled.

Construction:

wpid-2015-08-14-10.04.30-1.jpg.jpeg

Each of these packets can be made of black paper slightly lighter than writing paper and the label printed on white paper.

  • Print your labels on white printer paper. Cut them to the size indicated on the print out.
  • Cut the black paper using the dimensions accompanying each label – 3 times the width and 3 times the length. ie – if the folded packet is 1″x1.5″, cut the black paper 3″x4.5″
  • Fold the black paper in thirds lengthwise. Fold the paper in thirds width wise.
  • Looking at the placement chart and the notes with each label, glue the label in the corresponding location on the exterior. Use either a brush or small glue stick for the best control.
  • You can also cut a second piece of black paper, slightly smaller to fit inside the outer paper to help hold your needles.

wpid-2015-08-14-10.04.12-1.jpg.jpeg

Looking for your own copy of Fanciful Utility?

Click HERE to go ESC Publishing.

Published in: on May 7, 2022 at 12:40 pm  Leave a Comment  

Publications Available

Here is a list of publications I have available.

Books

Fanciful Utility: Victorian Sewing Cases and Needle-books is a guide packed full of directions and templates for making your own period correct sewing cases, housewifes, and needle-books. FanU is available directly from the Publisher at http://www.thesewingacademy.com/2012/08/fanciful-utility/

.

To Net, or Not to Net: Revisited is an in-depth look at hair nets of the mid-nineteenth century. This e-book is packed full of cdvs and illustrations, covering how nets were worn and what they were made of. This e-book is available through my Etsy shop.

.

.

Paisley, Plaid, & Purped: Shawls of the Mid-Nineteenth Century looks at the types of shawls worn in this era, from the sizes to the materials. This book includes original directions for making shawls. This e-book is available through my Etsy shop.

.

From Field to Fashion: The Straw Bonnet was my first book covering the the materials and processes used to make straw hats and bonnets. This book focuses on the mid-nineteenth century. This e-book is available through my Etsy shop.

.

In Detail

I developed the “In Detail” series to take a closer look at original handmade items. These publications are packed full of close-up photos and details of how these pieces were made. Many of these publications include directions for making your own using period techniques.

In Detail: Blue Ribbon Sewing Case looks at an amazing sewing case made from a single plaid ribbon. (Note: this publication does not include directions.)

This e-publication is available through my Etsy shop.

In Detail: The Velvet Slipper Pincushion takes a close look at this example of a popular sewing accessory.

This e-publication is available through my Etsy shop.

.

In Detail: “Earl’s Ball” A Corded Ball looks a darling toy made in the style of a popular corded pin ball pin cushion technique.

This e-publication is available in my Etsy shop.

In Detail: Frozen Charlotte Pen-Wipers is a close look at two pen-wipers made with small porcelain dolls. This e-publication will appeal to doll and writing enthusiasts.

It can be found in my Etsy shop.

In Detail: Paper Pieced Pin Ball examins a pin ball constructed using a paper piecing method. This technique can be used to recreat the nineteenth century pin ball or a Victorian ornament.

This e-publication is available in my Etsy shop.

In Detail: The Pillow Pin Ball is near and dear to me as it was written at a very difficult time. This edition looks at a well loved pincushion made of pillow segments. This is a great project to use you scraps or to share with friends.

This e-publication is available through my Etsy shop.

In Detail: Embroidered Velvet Needle-book looks at a staple of the 19th century workbox: the needle-book. This edition focuses on recreating this sweet example.

This e-publication is available through my Etsy shop.

Patterns

My Wadded Hood Workbook takes a pictorial look at multiple original wadded hoods and guides you through making your own with period construction and techniques.

This workbook is available in my Etsy shop.

My Fichu Pattern previously sold out quickly in its paper form. As a downloadable pattern, you can start you fichu in the middle of the night if need be.

This e-pattern is available through my Etsy shop.

The Princess Capote Hood Directions are a collaboration between Jamie Quick and myself. This e-publication takes the period directions and re-explains them with some corrections.

Remember: I also have numerous free templates available here, on my blog for period correct projects. I also have modern projects available on Don’t Paint the Cat.

Published in: on May 6, 2022 at 2:05 pm  Leave a Comment  

For the Love of Pockets

I am reposting favorite helpful posts each Monday throughout March, April, and May. This is the newest of the reposts.

If you have been following even for a short while, you know I love pockets. I love making pockets. I love having pockets.

For years, I carried a basket or a purse. It would get filled with a myriad of this and that, period and modern.

All this stuf I thought I needed to have on me.

Extra water, a camera, a little money…. You know what? It all just added up and added up. Frankly, it was heavy and a PITA.

It also wasn’t accurate.

Then, one glorious day, I learned about pockets. Dresses had pockets! We aren’t talking the wimpy pockets in women’s jeans that barely hold a few dollars and a small set of keys. We are talking huge, mother of all pockets!

Skeptical?

Don’t think they could be that big?

Take a look at my dress from a few years ago. Okay, 15 years ago. (Ignore the hair falling down and the gloves for rusty nails. This was a heavy work day, building fences and moving corn.) The pocket in that dress is holding my lunch including a couple bottles of water and bananas. Can you tell?

I wear two pockets when dressed in Victorian era clothing. Each of my 1830s through 1860s dresses has a pocket on one side, preferably the right side. In this pocket goes the things I need throughout the day of the event, the period items. On the other side is a separate pocket that sits either below my skirt or below my skirt and upper petticoat. This pocket holds the modern items I hope not to need during an event but should have on me in case of emergency or when I leave.

The dress pocket with period items holds:

  • Building key
  • A small wallet/pocket with ID and cash. This is roughly 3.5”x2.5”.
  • Handkerchief
  • Possibly a workpocket
  • Possibly a purse (a small item that carries money)
  • Possibly a fan
  • Possibly a glass

My seperate tie-in pocket holds:

  • Epipen
  • Medications I need immediate access to
  • Car key (mine pop apart)
  • Phone if I need it

This video shows a sampling of what I carry in my pockets:

Want your own pocket? I have a few available in my Etsy shop: https://www.etsy.com/shop/AnnaWordenBauersmith?ref=simple-shop-header-name&listing_id=1086425702&section_id=10182162

Pocket Basics

Plain cotton pocket set into the seam of a cotton plaid skirt. The pocket is nearly rectangular shape with a fold down the long side, and a seam on the bottom and short side.

Pockets as tie-on, seperate pockets appear long before the nineteenth century, centuries before. In the eighteen century, they were often worn in pairs, one one each side of the body. They were accessed through the two slits formed when putting on petticoats. When skirt supports were worn, pockets hung beneath the supports. (That was an incredibly short generalization about centuries of this accessories history. I highly recommend reading into these eras further.)

Wearing tie-on pockets continued into the nineteenth century with a short interlude during the Regency era with the wearing of higher waisted, often diaphanous dresses.

By the mid-nineteenth century, pockets became part of the skirt construction. They were most often set into the seam of a skirt. Originals show pockets were long, wide enough for the hand to fit comfortably, and both rounded or squared on the bottom. They are often a plain or cotton print with the seam to the outside of the pocket. Sometimes a support stay attaches to the pocket part way down and to the waistband. A straight edge of the pocket lines up with the skirt seam, and the skirt edge folds over the edge of the pocket. I prefer to do two rows of stitches around the edge of my pocket for a strong pocket.

The Lady’s Guide to Perfect Gentility and Manners, by Emily Thornwell, 1859.

While seperate pockets grew less common by the 1840s and 50s as dress pockets became more common, they were still in use and recommended for situations like travel.

Separate pocket beneath the petticoat for travelling – Eliza Leslie’s The Behaviour Book , 1853 & 1859.  Republished as The Ladies Guide to True Politeness and Perfect Manners, 1864.

When I first wrote this post, there were a pair of pockets embroidered by sisters Mary Ann and Hannah Rose Brigham of New Hampshire in an Etsy shop One is dated 1850. Both show wear indicating their use.

The Behaviour Book: A Manual for Ladies, Eliza Leslie. 1855.

What did they carry in their pockets?

The Behaviour Book: A Manual for Ladies, Eliza Leslie. 1855.

I plan to make a post/video showing how a pocket looks under the skirt and how it is accessed.


Additional Resources

List of pockets from the 19th century: https://docs.google.com/document/d/1KISeV0ZVhD2SOsF_lJ71DI9RrVLu2C5lLPsk8T5Fonw/edit?usp=drivesdk

Section on pockets from the Workwoman’s Guide, 1837:

The Pocket: A Hidden History of Women’s Lives by Barbara Buurman. Available on Amazon and your local bookstore.

Articles about Pockets:

  • Pockets of History (VADS)
  • Women’s Tie-on Pockets (V&A)
  • Picking the DAR Museum’s Pockets
  • What’s in a Pocket? (RICHS)

Are you one of the many readers enjoying my millinery blog posts?
Consider becoming a Patreon patron. Doing so helps support my work and helps me write more useful articles.
https://www.patreon.com/AMillinersWhimsy

Published in: on May 2, 2022 at 6:05 am  Comments (2)  

Improving Your Impressions For Less than a Pizza

I am reposting favorite helpful posts each Monday throughout March, April, and May.

A couple years ago, I wrote an article/post called “Pizza and the Piggy Bank” that looked at which items to save up for and which items could be had for less than the cost of a pizza. It was a fun article to write and helped put some perspective on the cost of things. Since writing that article, I’ve often compared items to the cost of a pizza. (I also price life expenses in comparison to the number of bonnets it will take to cover.) I thought I would revisit the “Less than a Pizza” list with some revisions.
When I wrote the initial list, I could get a medium vegetable covered pizza for about $25. That price has gone up a little to about $30. So, this list will include items that can be had for $30 or less.

For the Price of a Pizza (or less)

  1. Drawers and chemise in linen. I have recently been converted to a linen chemise lover. A linen chemise is comfortable, soft, and cooler. Subscribe to http://www.fabrics-store.com to receive their regular sales offers. In doing so, you will see their light, handkerchief linen come up for $6-$7/ yard. This fabric is 58” wide, so you only need 2 yards for a chemise and 2 yards for drawers. Prewash the linen for shrinkage and to soften it.
  2. Petticoat – I am of the opinion that once can never have too many petticoats to choose from. Most of us within a few inches of average height can make a simple petticoat from four to five yards of cotton. Quality premium muslin can be had for $3.99 at certain craft stores. Using a coupon/code to save 50%, this brings a petticoat to $20. Poplin at Dharma Fabrics is $6.50 for a 55” width. A three panel petticoat would be about $26 (4yards), while a 4 panel does tip us over the pizza price at $32.50 (5 yards). I am assuming you have mother of pearl buttons laying around. If not, add $.25-$.50. But, pick these up when you see them.
  3. Wool Petticoat. While we are talking about petticoats, I will add a wool petticoat to the list. Two yards of tropical to light weight wool is plenty for a warm wool petticoat. You may also want a yard of scrap cotton from your stash for a yoke and waistband, minimizing the bulk at the top.
  4. Personal Linens. New personal linens can spruce up a wardrobe for little money, be it cuffs, collars, or pelerines. Purchasing a few yards of cotton lawn from Dharma ($6/yard) can result in several sets of cuffs and a few collars, or a few pelerines. These will give you a chance to practice your rolled hems too.
  5. A Pocket. I am a big advocate of pockets, both set into the skirt and under the skirt. A pocket will get things out of your hands. It will also eliminate the need to have something to carry your things in. A simple pocket can be made from a half yard of linen or cotton.
  6. Wool Shawl with fringed edges. This will take 2 yards of light to medium weight wool in an
    appropriate plaid, check, or solid. This can be found at discount fabric shops like
    http://www.fabricmartfabrics . I suggest waiting for wool to be under $10/ yard to keep this under the pizza limit with shipping. Or, watch for someone destashing wool. Plan on two movies during a rainy or snowy weekend to fringe the whole shawl, or do one side per evening. Check out my earlier post of fringing.
  7. Work Pocket. I am a little bias here. But, I think everyone should have a work pocket, or sewing case, or housewife. This little roll can tuck away needed sewing tools as well as be a great interpretive device. It can act as a story all rolled up in fabric.
  8. Sunbonnet. A sunbonnet is essential for protecting your head and face from the sun and elements. As much as we love the pretty, fancy bonnets and hats, some times, many times, a sunbonnet is needed. I recommend checking out the remnants or end cuts of your local quilt shop for small period prints that will work for a sunbonnet. You will want a yard and a half of 45” fabric. I also love white semi-sheer weaves for corded sunbonnets. Since this often comes 54”-60” widths, a single yard is enough. Hop over to http://www.thesewingacademy.com for directions on how to make your own corded sunbonnet.
  9. Cap. If you interpret an era that wore caps, a new cap can be made from a yard of voile, which is currently $6.87 a yard at Dharma.
  10. Hair Dressing Kit. I will make a point to do a video on my favorite hair dressing items in the future. The whole kit can be made for less than a pizza.

Helpful Hints

  • Create a sewing plan. Note where common fabrics will need to be purchased from (ie: Dharma or Fabrics-Store) so you can save up and purchase in sets.
  • Optimize shipping costs by pairing up with friends nearby. Plan similar projects together (all do
    personal linens or caps) or let each other know when you are ordering from a particular place.
  • Subscribe to online stores with essentials. Practice self control with their sales.
  • Know your local shops. Get on their mailing lists if they have sales.
  • Join a couple destash groups if you are on social media.

Are you one of the many readers enjoying my millinery blog posts?
Consider becoming a Patreon patron. Doing so helps support my work and helps me write more useful articles.
https://www.patreon.com/AMillinersWhimsy

Published in: on May 2, 2022 at 6:04 am  Leave a Comment