


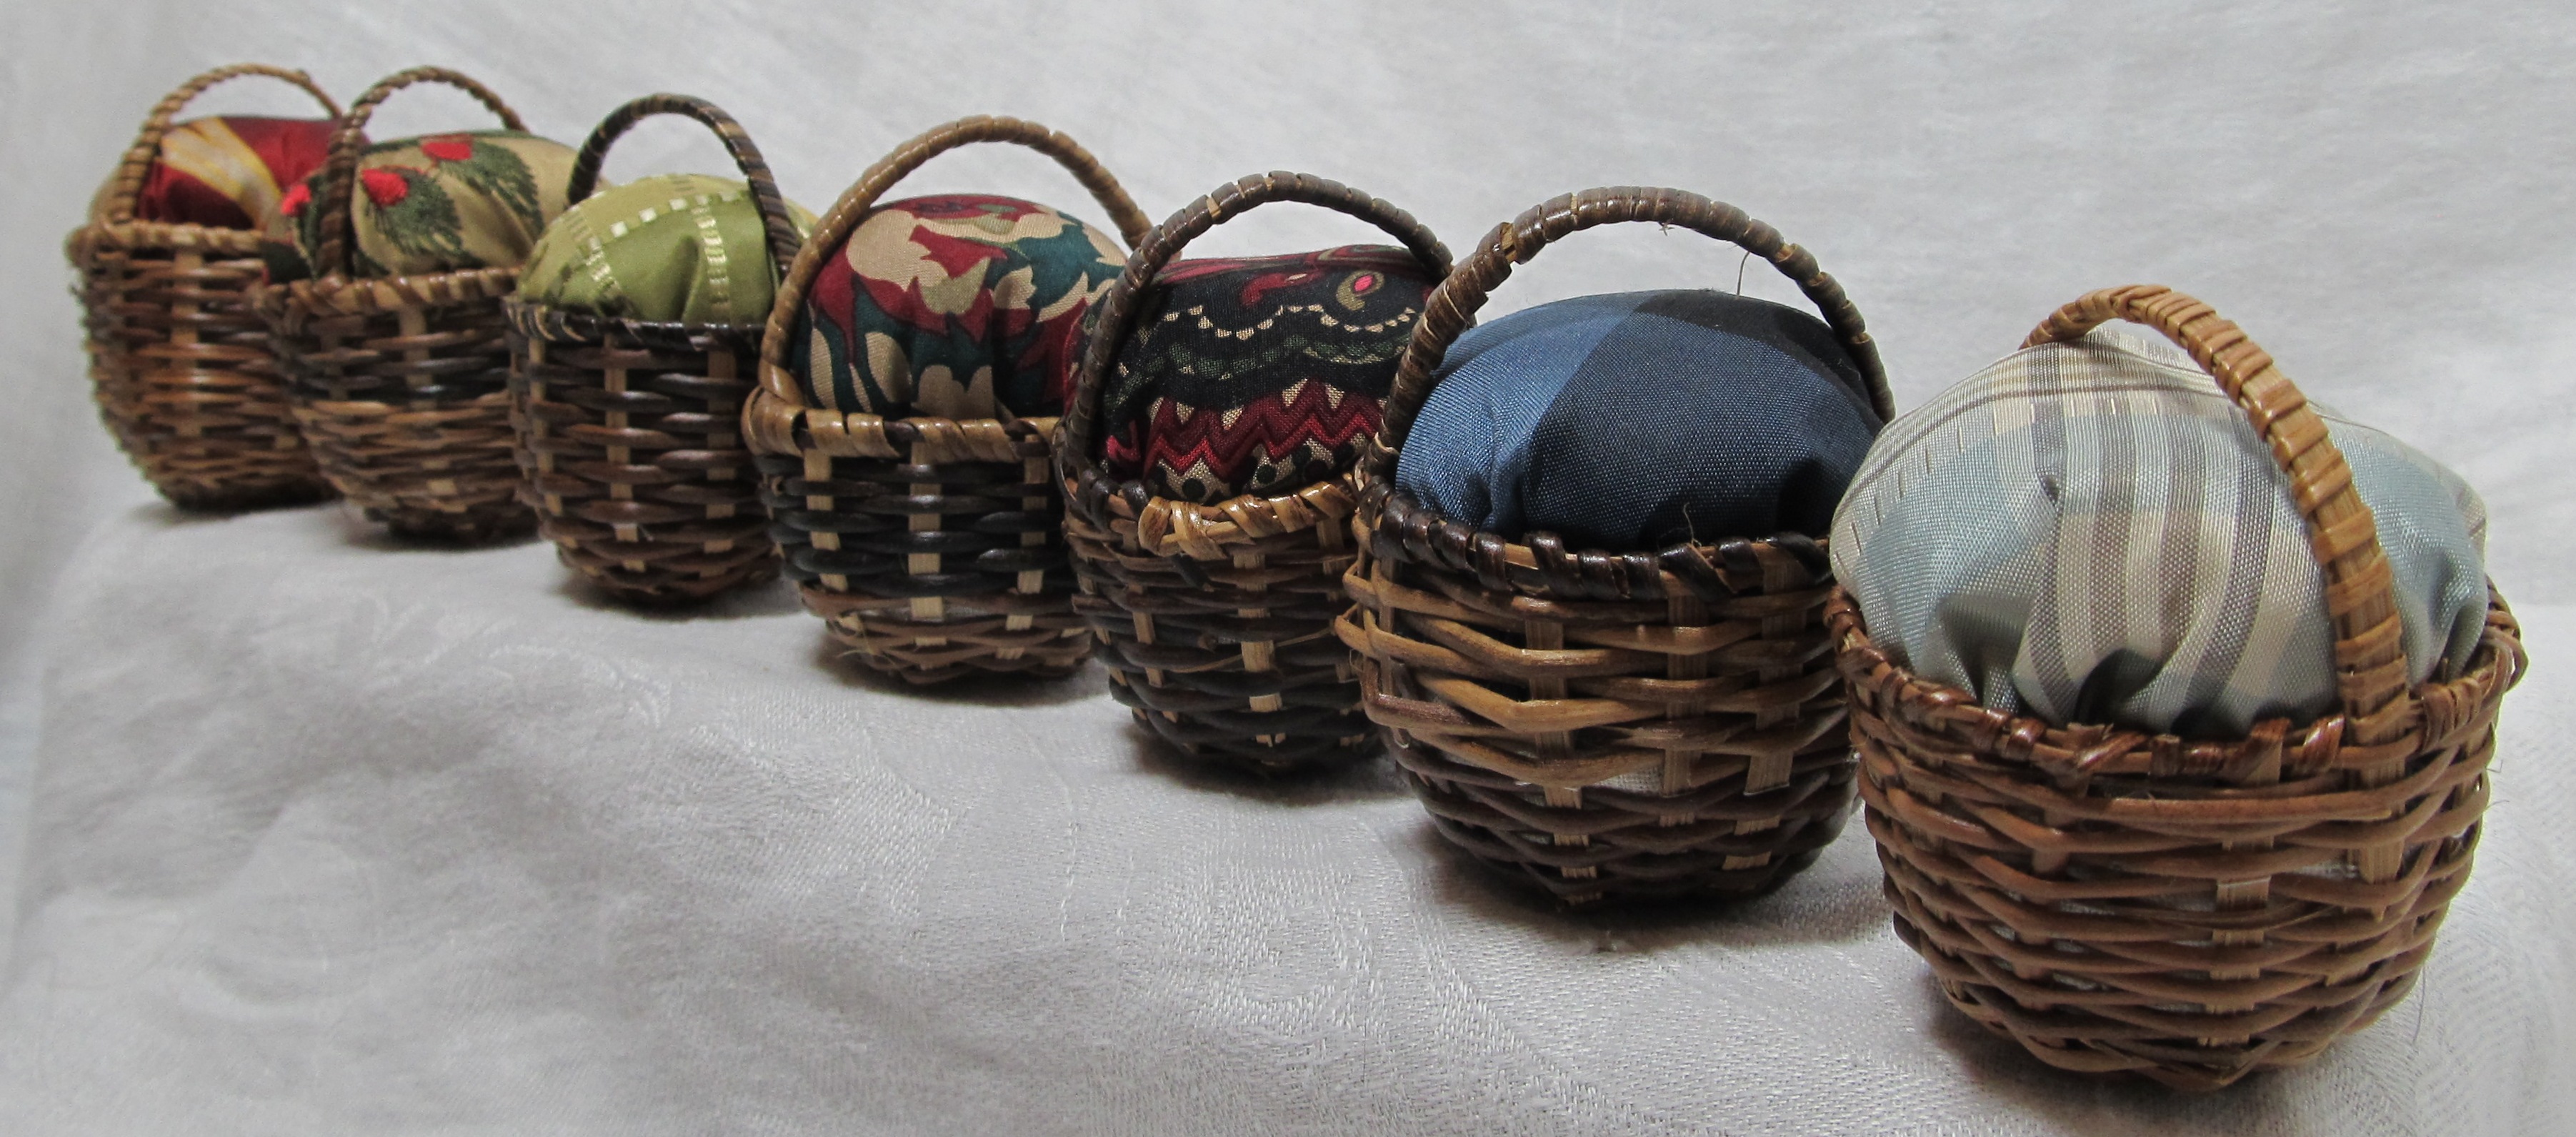
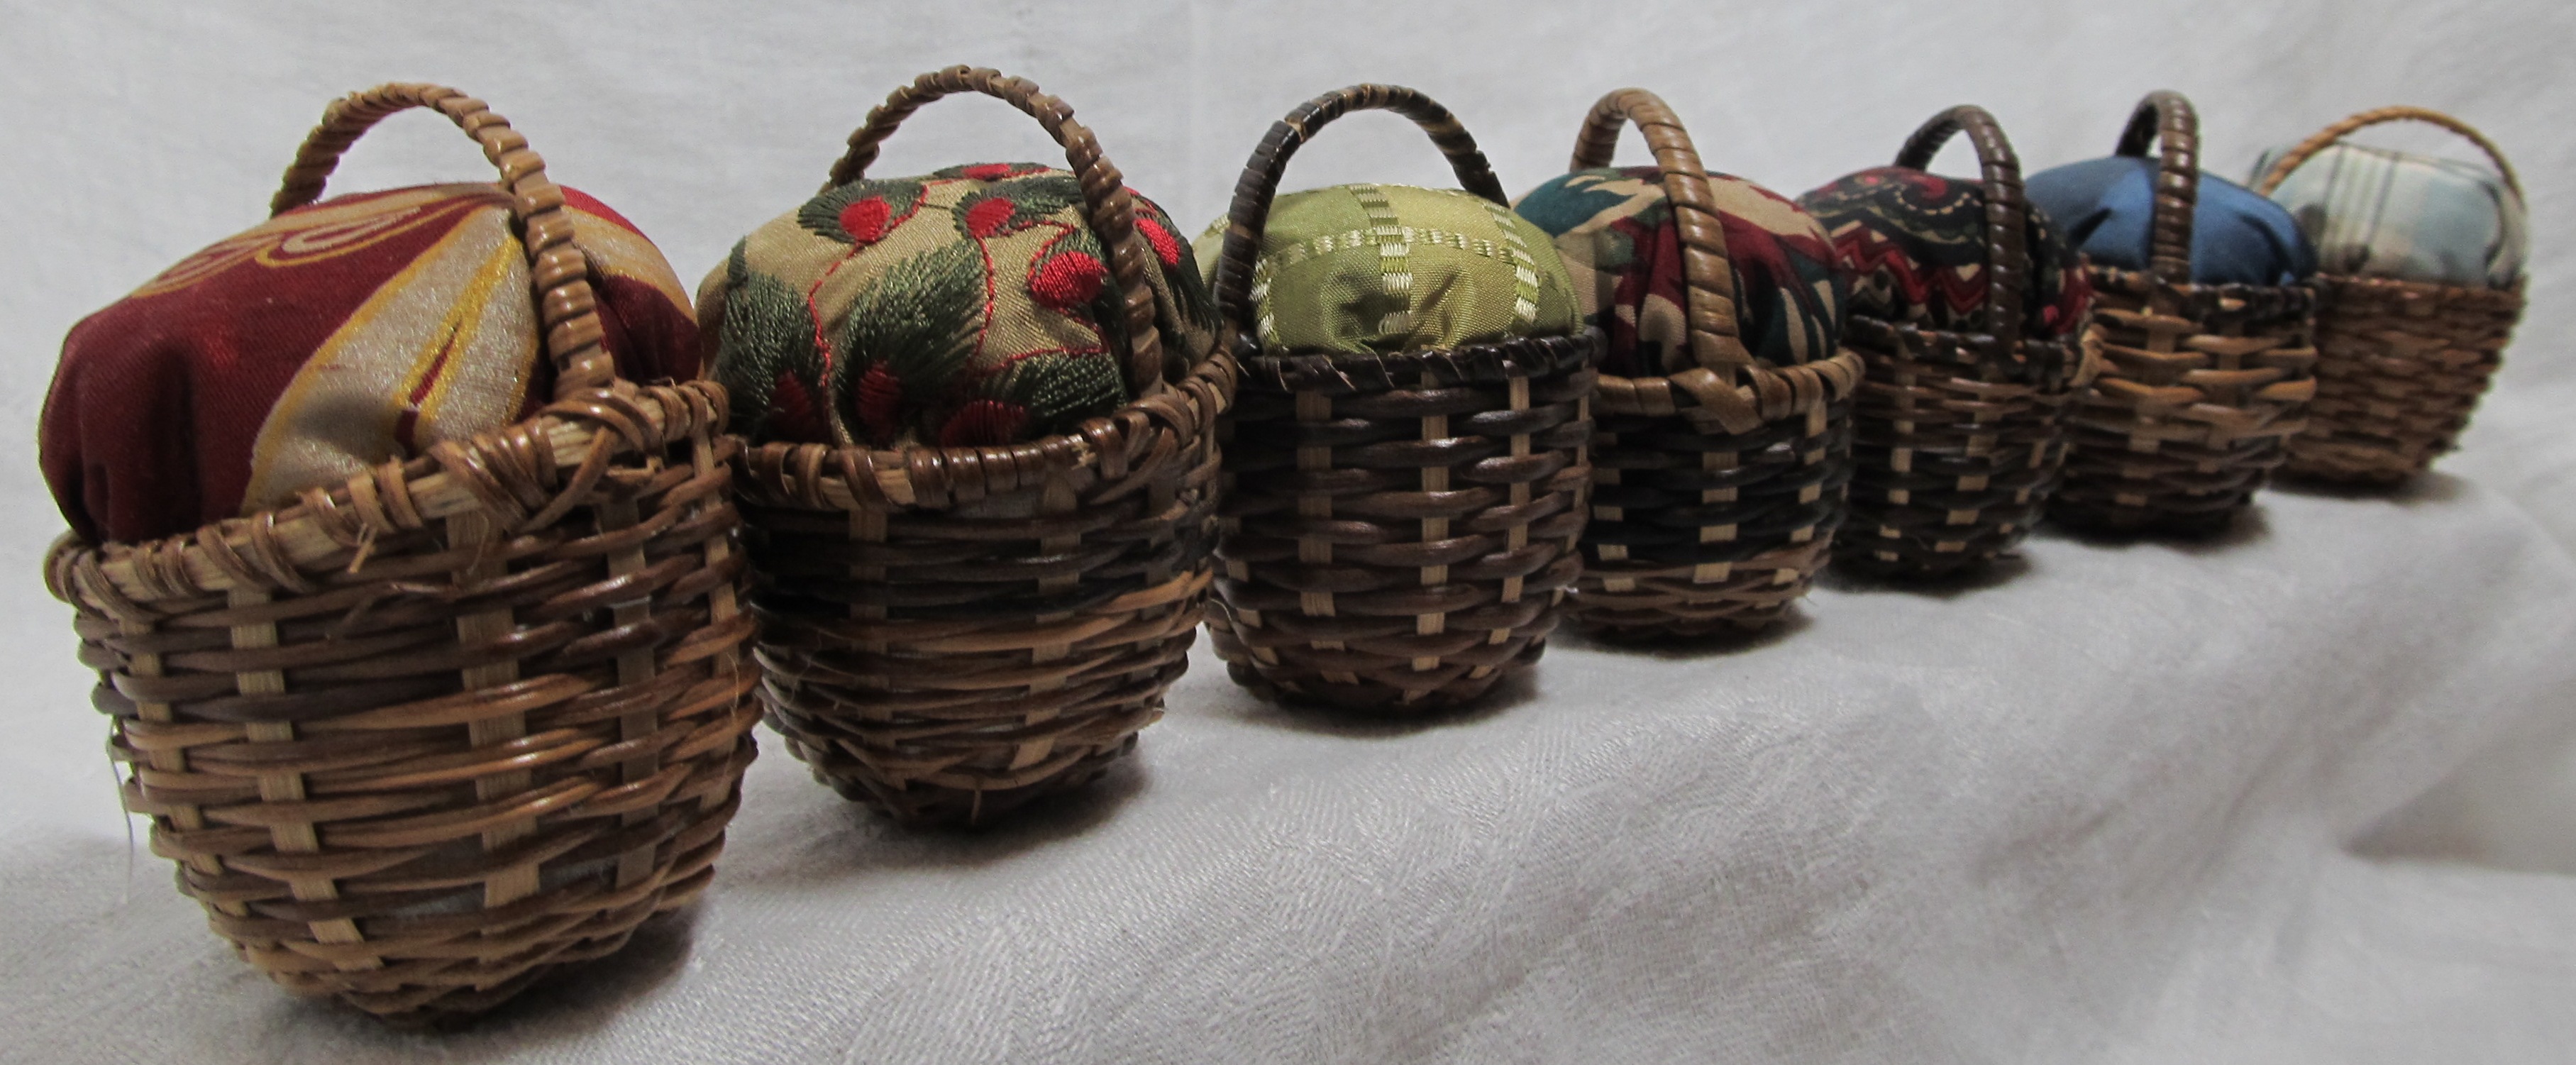
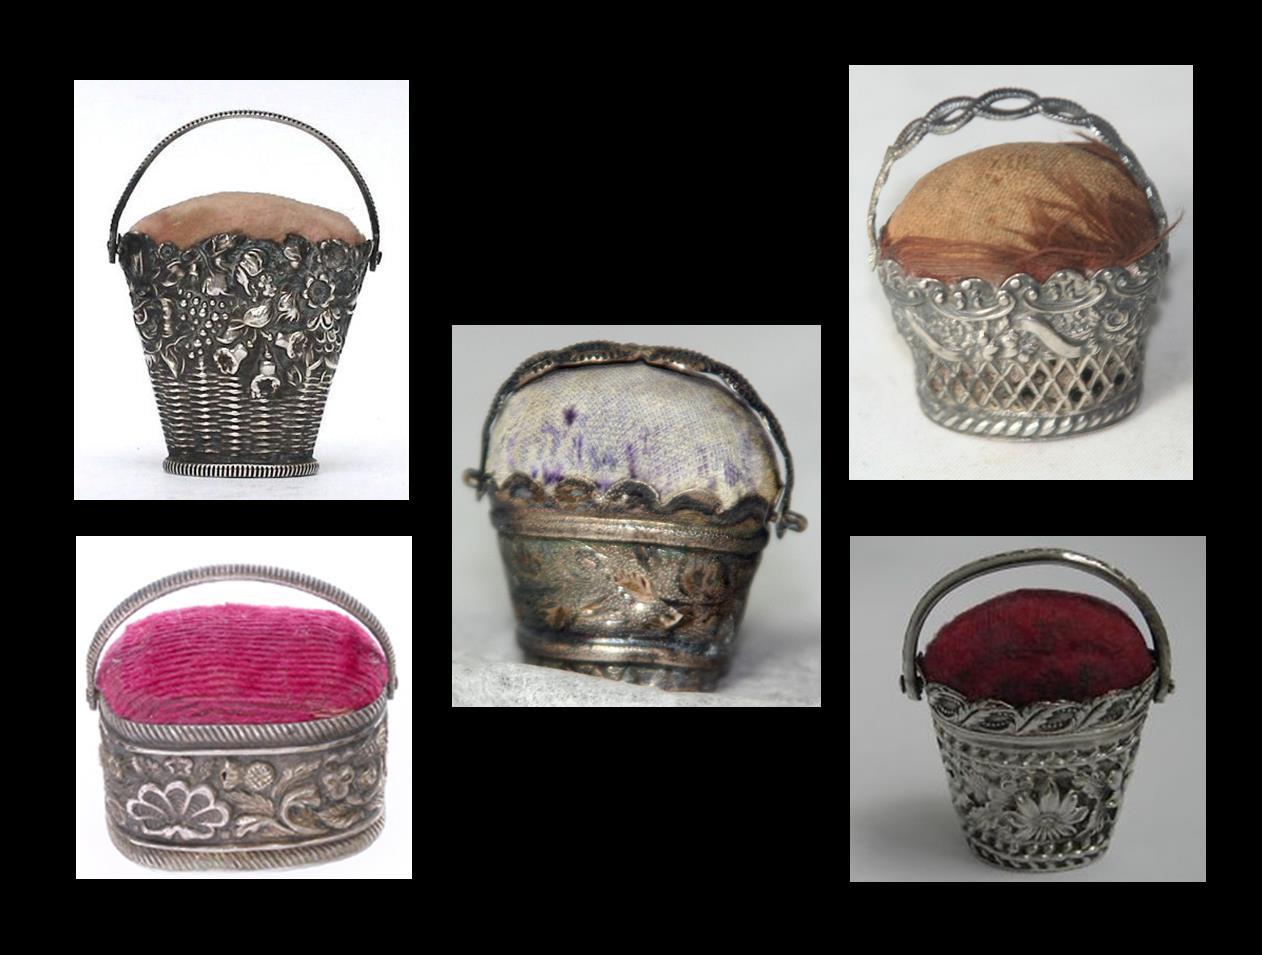
Basket Pin Cushions
I was going to write a whole post about basket pin cushions. But, I have a migraine coming in. So, you get pretty pictures:

Millinery Care and First Aid
I have written a couple posts in the past about caring for or storing our bonnets. Lately, a few specifics “uh-oh” fixes have been asked of me. So, I thought it would be good to put together a more detailed article on millinery care and first aid. Here I will be talking about Straw millinery only.
Preventative Care Your Bonnet
The best prevention is to store a bonnet or hat on an archival stand, under a glass dome with its own security system. ….. A dream, right?
(If I could have all the storage space in the world and start over – I would attach two stands to the inside of the lid of a tote (I think they are the 15 or 20 gallon totes) With the lid as the bottom, the tote becomes the top. I could then place a bonnet on each stand with the ribbons rolled up. No wrinkles, no dust, no issues. Again, that is my dream.)
I’m going to boil this down to my list of dos and don’ts:
Do – Keep you hats and bonnets on stands
Do Not – Use foam heads for storage. These will release chemicals that will discolor your bonnets. Even covered with other fabric this can happen.
Do – Cover your bonnets some how to keep dust off of them. Yes, a box is best.
Do Not – Store in overly moist or overly dry areas. Moisture can cause mildew, mold and color issues. Dryness can cause silks to shatter.
Do Not – Store a bonnet on its face, side or bavolet. This will cause crushing, wrinkling and misshaping.
In Case of Mishaps
Rain – A gentle sprinkle can usually be okay with a gentle drying while on the bonnet stand. If you find you were stuck in a heavier rain with your bonnet on, first remove all flowers and ribbons from your bonnet. Hang your flowers upside down. I have this awesome stand from Wilton that was meant for cake making that works great. You may want to use clothes pins to hang them from a clothes hanger. Lay the ribbons flat to dry on a paper towel or old towel as not all ribbons are color fast. You may find you want to remove the bavolet as well. Lay it flat, net side up. Most bavolets can be pressed with the aid of a pressing cloth once dry.
For the bonnet itself, press any mishapings out with your hands gently against the counter if need be. Take a roll of paper towel. Unroll it to about the size of the tip of your bonnet. Place the bonnet face down on top of the upright paper towel. If you left the bavolet attached, let it lay open but not touching the bonnet. Arrange the pleats and work out any wrinkles carefully with you hands. Allow it to dry completely. In the case of a hat, you may need to shape the top of the paper towel roll to reflect the curve of the crown and lay a layer or two of towels over it to make a smooth surface.
Reattach the ribbons and flowers.
Wrinkled ribbons – Ribbons get wrinkled and crinkled when tied and untied. Bonnets should be stored untied with the ribbons neatly rolled into a coil. (I even roll some of mine around little ribbon pillows I’ve made.) Rolling the ribbons will help coax the fibers that were inside in the bow to relax back where they should be while keeping additional wrinkles from forming.
If you find your ribbons to be holding their wrinkles, you can steam them to help relax the wrinkles then roll the ribbon. You can also try pressing the ribbon with an iron using a pressing cloth. (Most silk ribbons are vintage with older fibers, while newer ribbons, even high quality ribbons are a combination of rayon, polyester and nylon. A low temperature and pressing cloth is safer than ending up with your ribbon stuck to your iron or breaking.)
Squashed Flowers – a Flowers can become squashed during wear or storage (or oopses). For velvet flowers, I find a light spraying of spray starch and reshaping with my fingers works best. Spray just a small area at a time, 1 or 2 square inches at most. The petals should be barely damp, not wet. Gently work the damp petals and leaves back into shape. Allow them to dry fully. If you have removed them from the bonnet or hat, clip the flowers to something so they stand up to dry.
For organza or other faux silk flowers, a light steaming may work to help coax the fibers in the petals to be manipulated and reshaped. Allow them to dry fully as well.
Crushed Frill – a A slightly crushed frill can be steamed and reshaped with the aid or a bodkin or hair pin. A severely crushed frill needs to be removed and pressed with an iron. Silk organza or cotton organdy should be able to be pressed on the designated setting. Lace should be pressed on a low setting with the aid of a pressing cloth. I try to press the frill while it is still pleated. (un-pleating and re-pleating is timely.)
Crushed or Shattered Straw – This is a though one. I’ve had a couple people ask me about bonnets that have been sat on or crushed in baggage. If the straw is not completely broken just misshapen, I suggest removing the flowers, ribbons, etc. Dampen the area(s) that have misshapened. Reshape the area(s) with your hands. Use objects in your kitchen for support if need be. Allow the straw to dry fully. If needed, mix some millinery gelatin or white glue & water (1:1) and brush it on the area for firmness and strength.
If a single or only a couple straws have been broken, it may be possible to replace or support those areas with additional plait if a matching plait can be found. To support, clean the break with fine scissors or nail clippers so the cut is along the diagonal of the plait. Unpick the stitches connecting that row of plait to those adjacent. Cut a piece of straw 2 or 3 inches long with diagonal cuts. Slide the piece into the fracture. Line it up carefully. Sew the piece into place catching the layers and the broken strips.
If multiple rows of plait are broken or it is a woven straw, the best chance is to realign the straw (dampened) and support it from the back with sinway or a piece of woven straw. The front of the straw will need the aid of a bodkin and/or tweezers to get the right look. You will want to use millinery gelatin or a glue solution to firm up the realigned straw. I would only recommend this if purchasing a new one is out of the question as it will be very intensive.
Dust or Cobwebs – If you store your bonnet or hat on a stand, you may get cobwebs. My favorite solution is a can of spray air, like the kind used for computers. Spray gently and at an angle.
Squashed Bavolet– A bavolet can get squashed during storage. If this happens, Turn the bonnet upside down. If need be, tie the functional ties together and hang the bonnet from the loop. Steam the bavolet encouraging it to flop over the tip and sides of the bonnet. Steam both the silk side and the net side. Smooth out tough wrinkles with your hands. Once the bavolet is back in shape, let it dry fully and spray with spray starch.
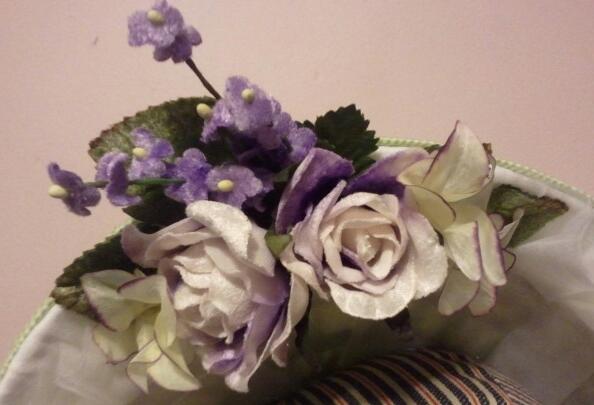
Grape Velvet and Lilies
 Every now and then I make a piece I love so much, I really, really don’t want to let it go. This is one of those pieces.
Two weeks ago, I was organizing my ribbon and rerolling the velvet ribbons I have. As I rolled this ribbon, feeling its lush softness, the image of it edging a hat came to mind. I knew this dramatic grape purple had to have a dramatic floral compliment.
The visual stuck. No, it screamed at me. Since I declared this past week was going to be hat week (and next week will be as well), I decided to sneak this hat in between my hat requests.
As I finished it, I fell in love with it. I am still going to let it go though (Etsy).
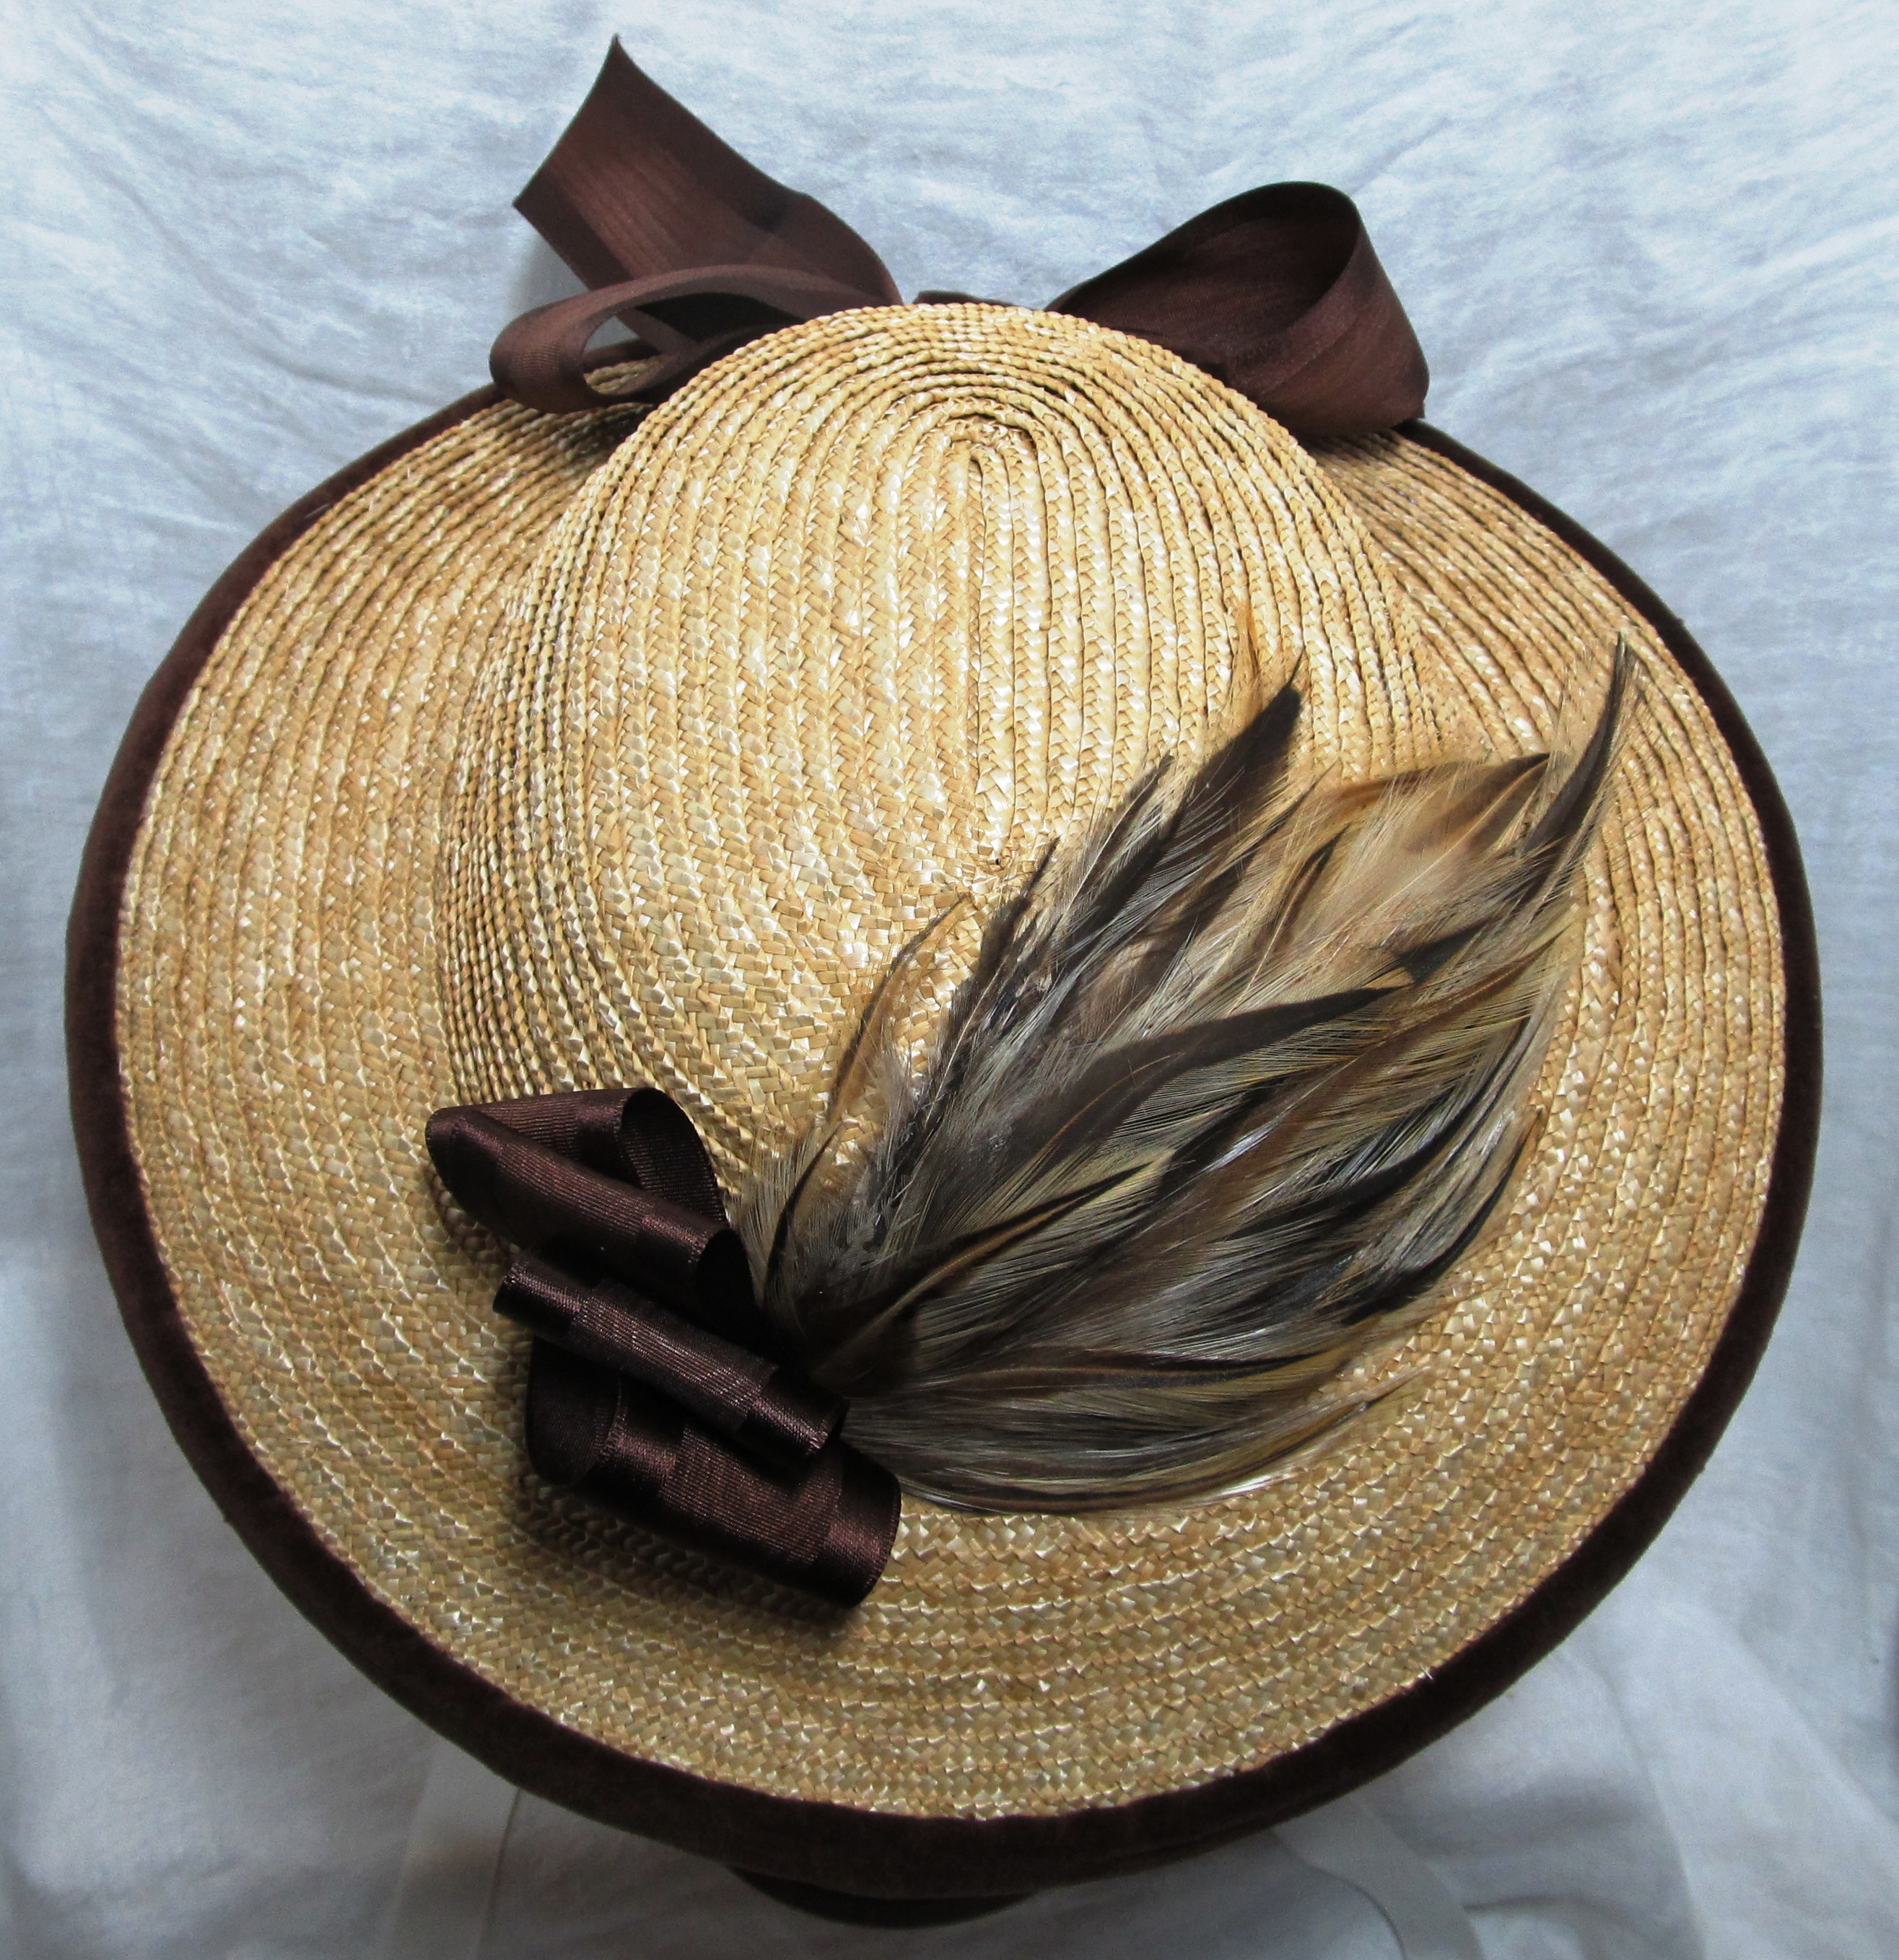
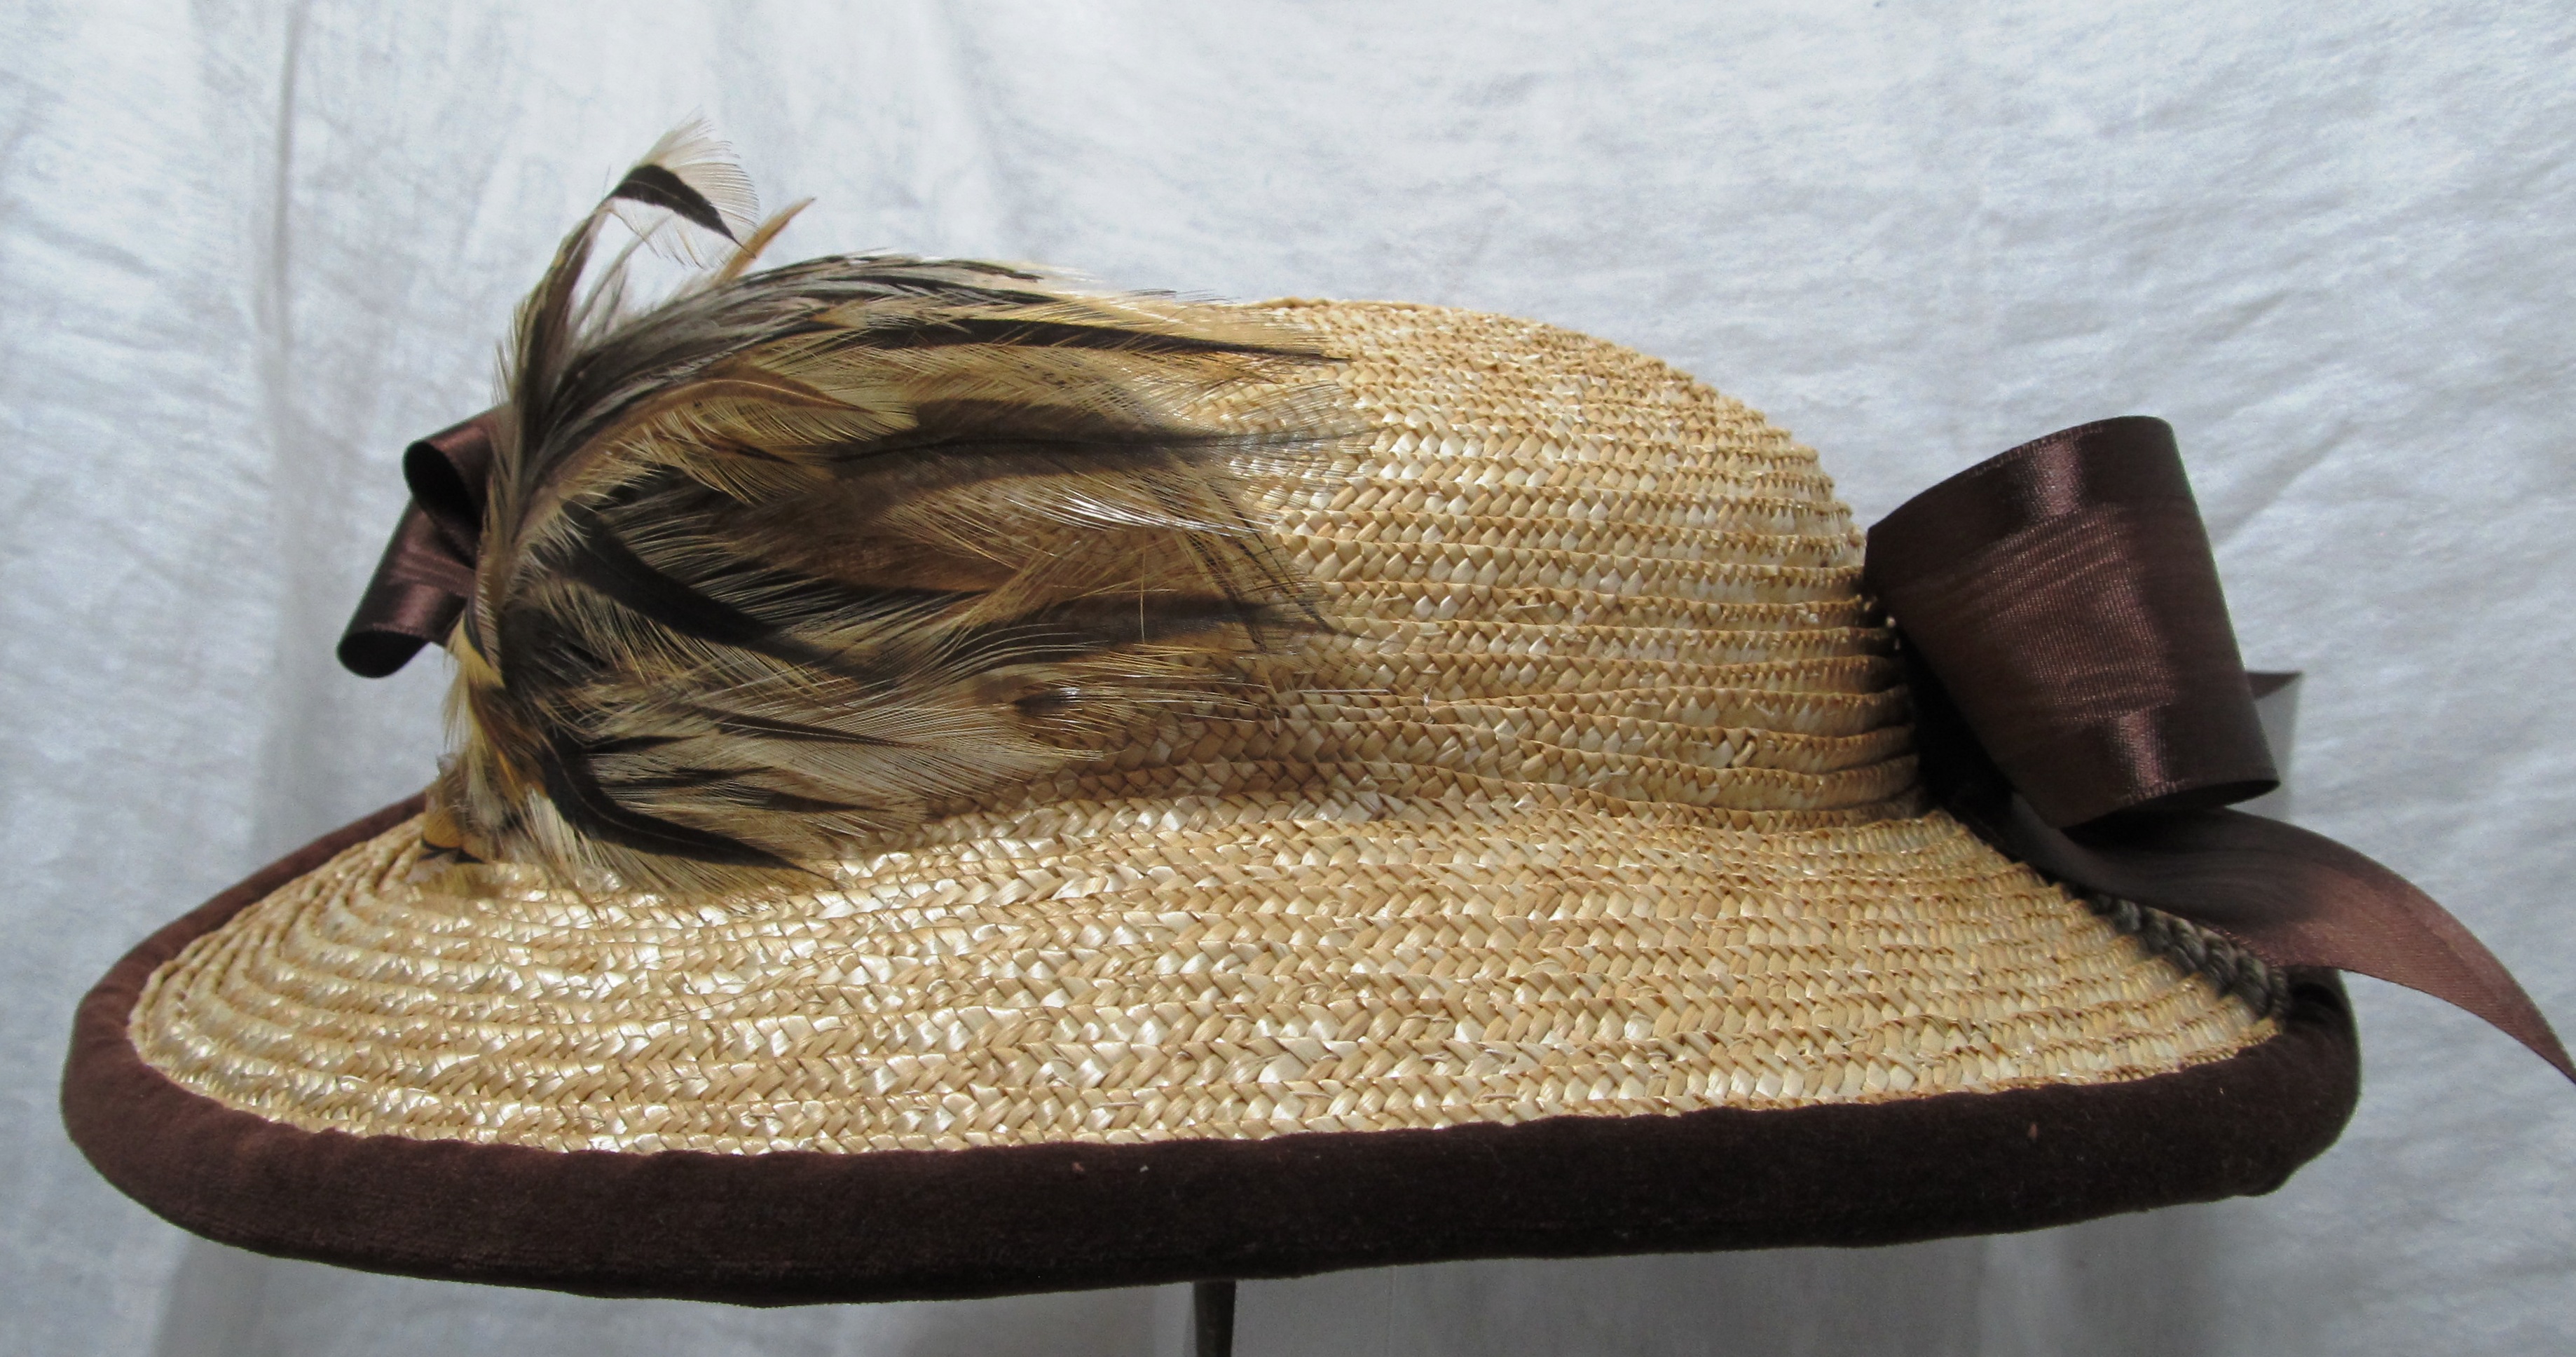
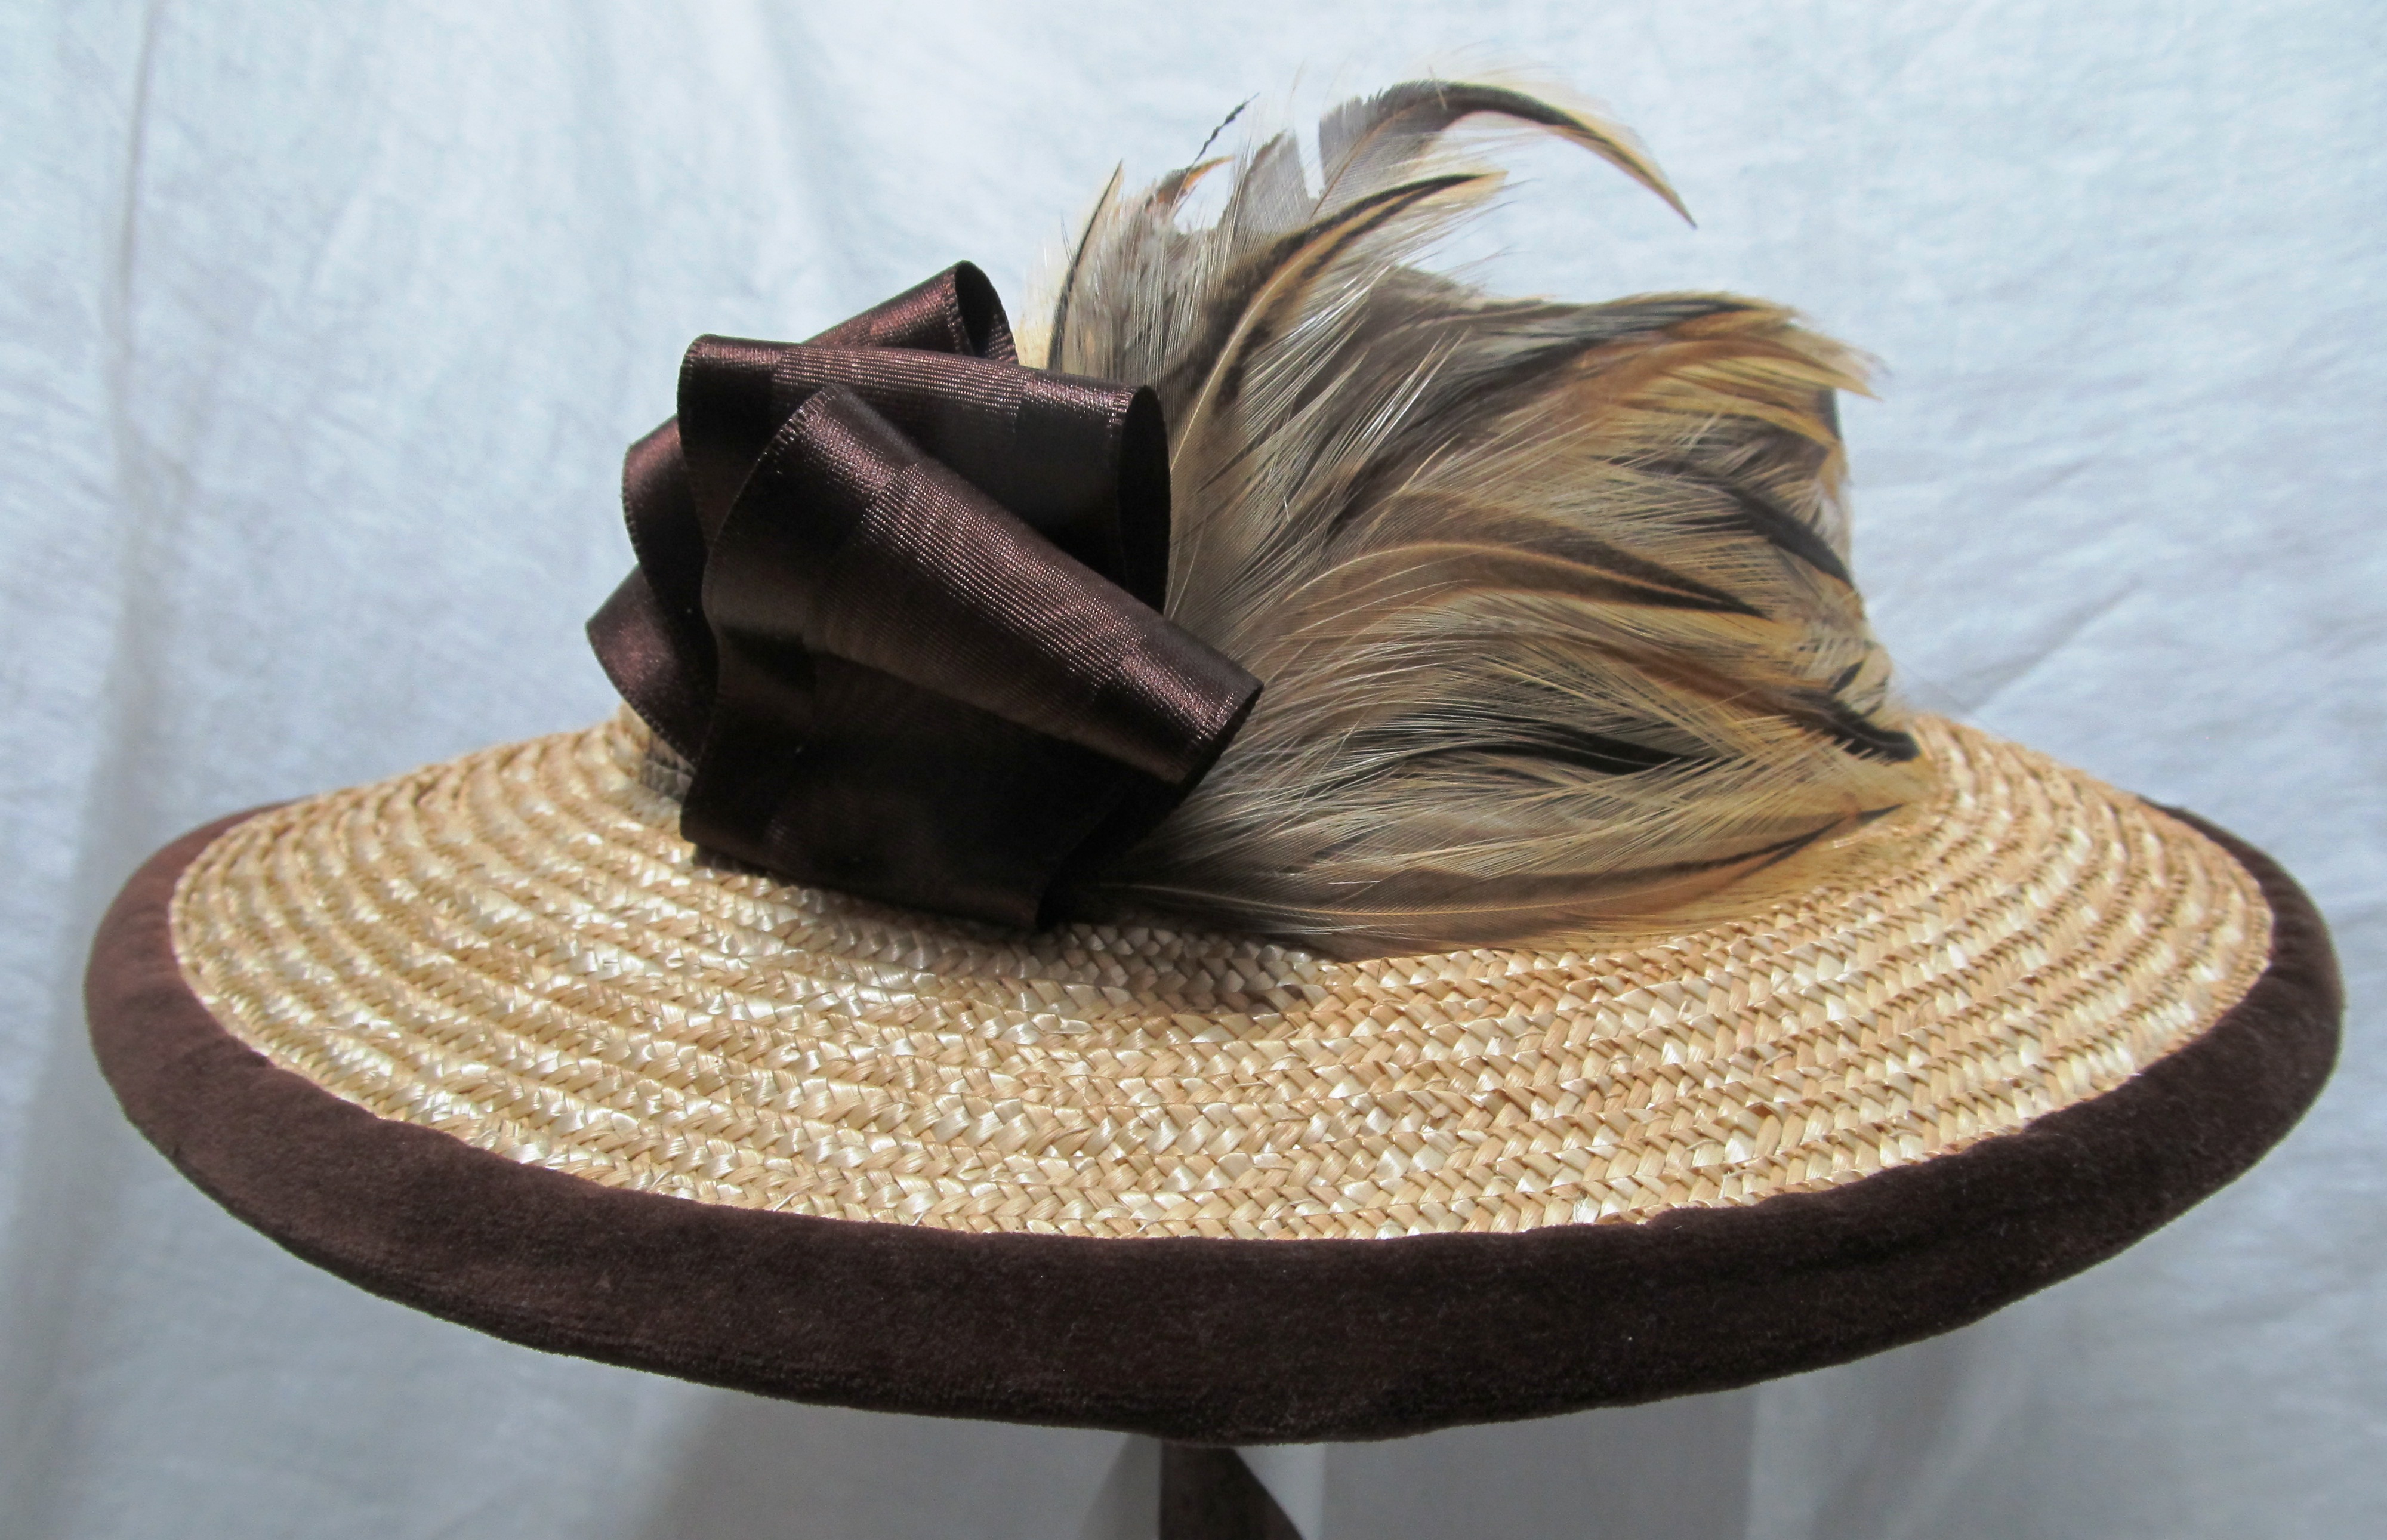
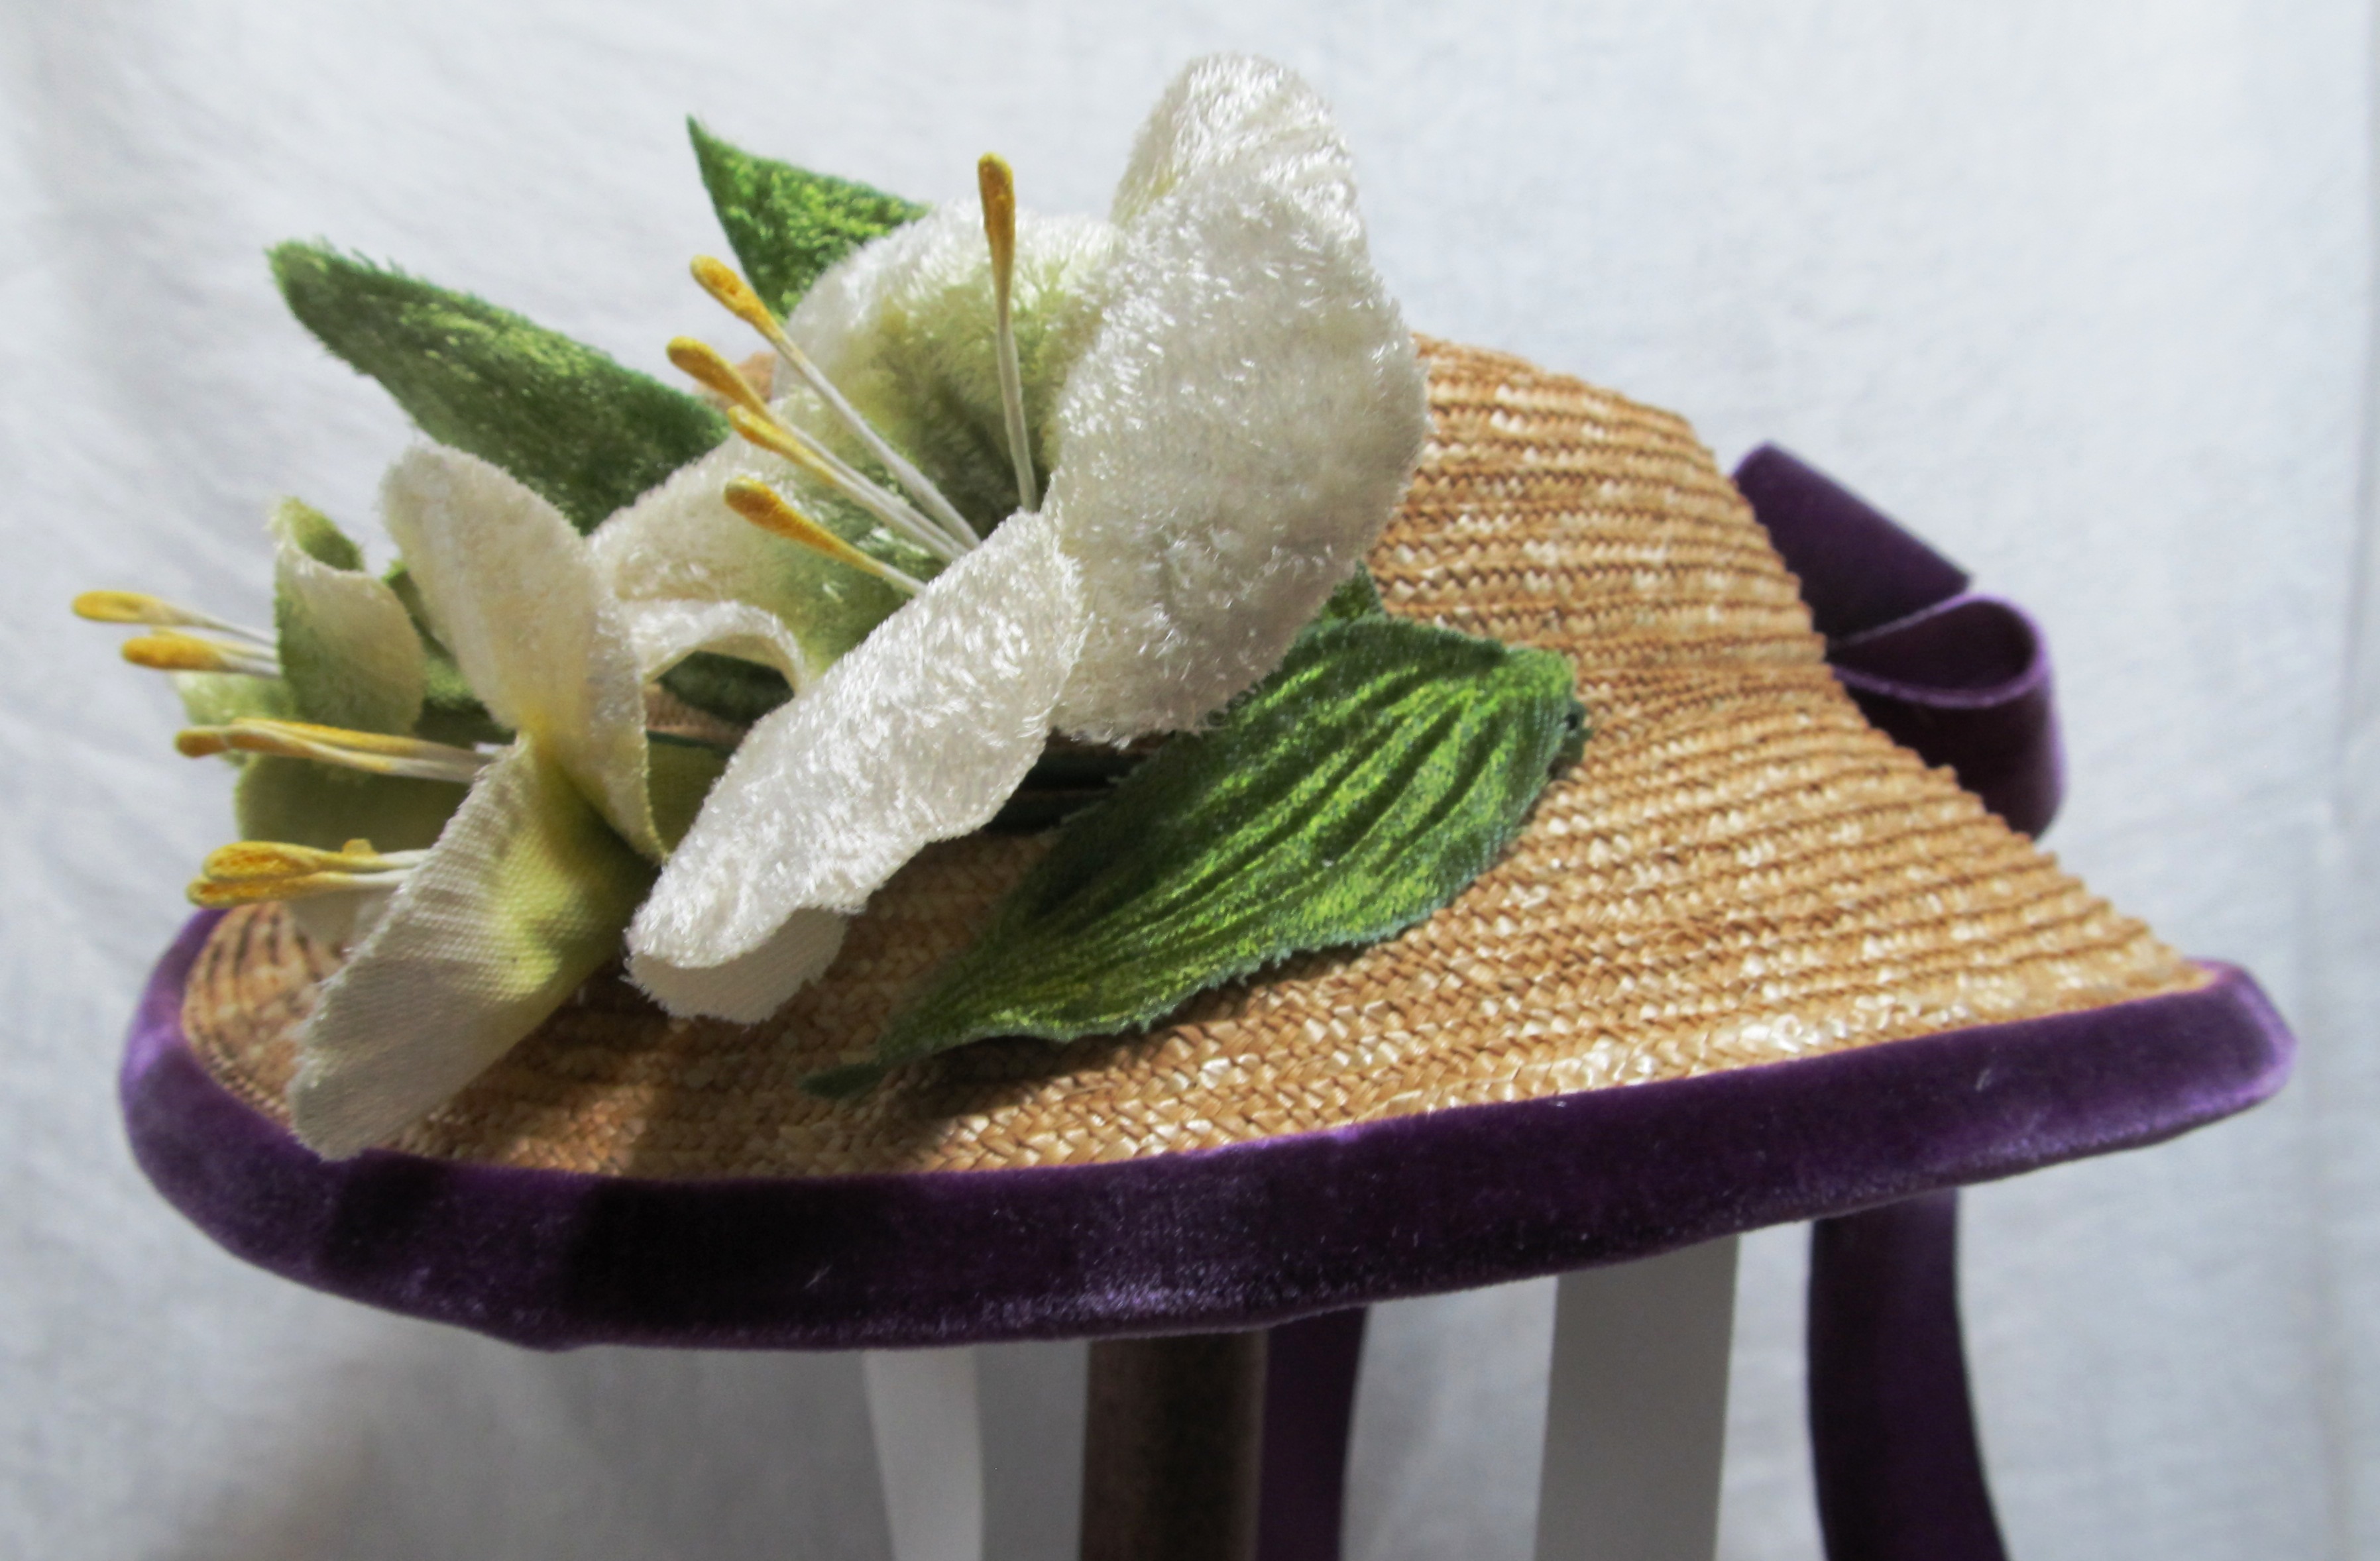
It is a fashionable straw shape hand sewn in a fine quarter inch Milan plait. The straw dried slightly darker than other pieces this year. I rather love the depth the color adds. The crown is shallow with a hint of shaping while the brim curves down all around with a dip front and back.
The hat is trimmed with over 3 yards of Hyman Hendler’s satin back velvet ribbon. They call it Raspberry. It makes me think of the grapes growing around the Finger Lakes and the tasty jams and wines they make. Accenting the lush velvet ribbon is a simple arrangement of dramatic ivory lilies.
I added a pair of silk ribbon ties that can be tied under the hair and help hold it in place.
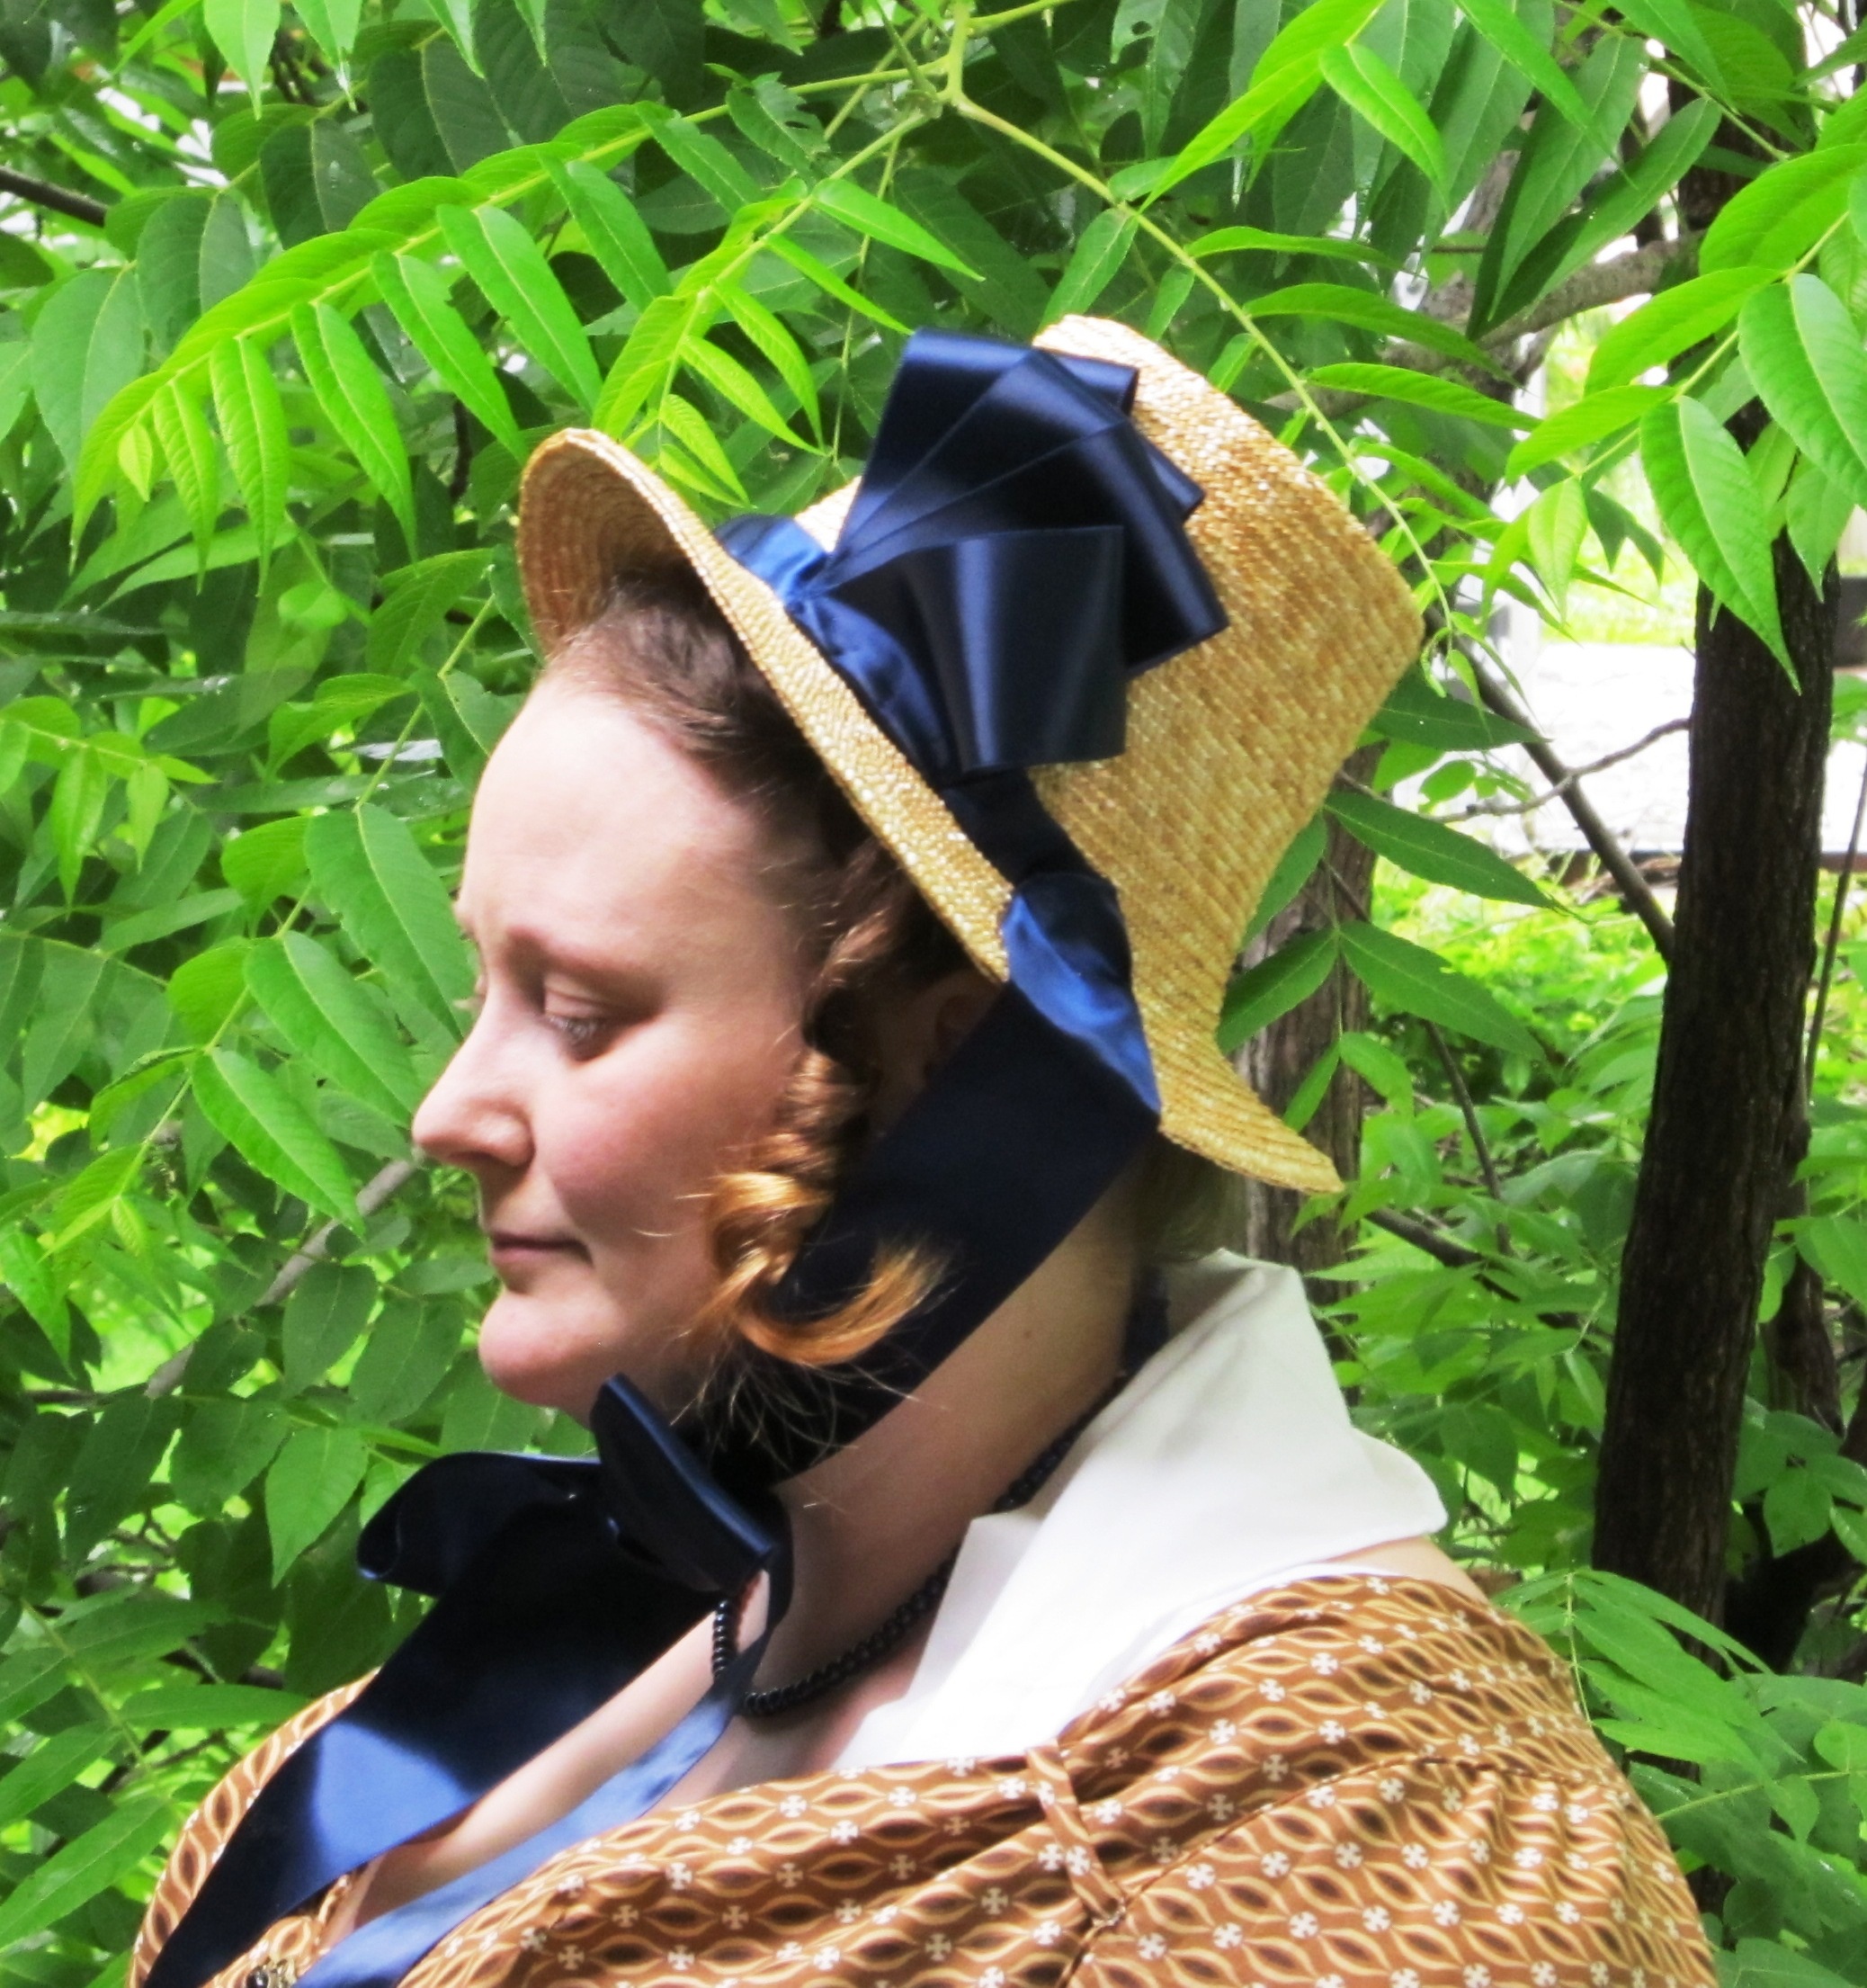
War of 1812 and Jane Austen Weekend at GCV

I rarely get photos of myself at events because I rarely take my camera or remember to get out my phone. I was very happy when Dan showed up to take some photos for me.
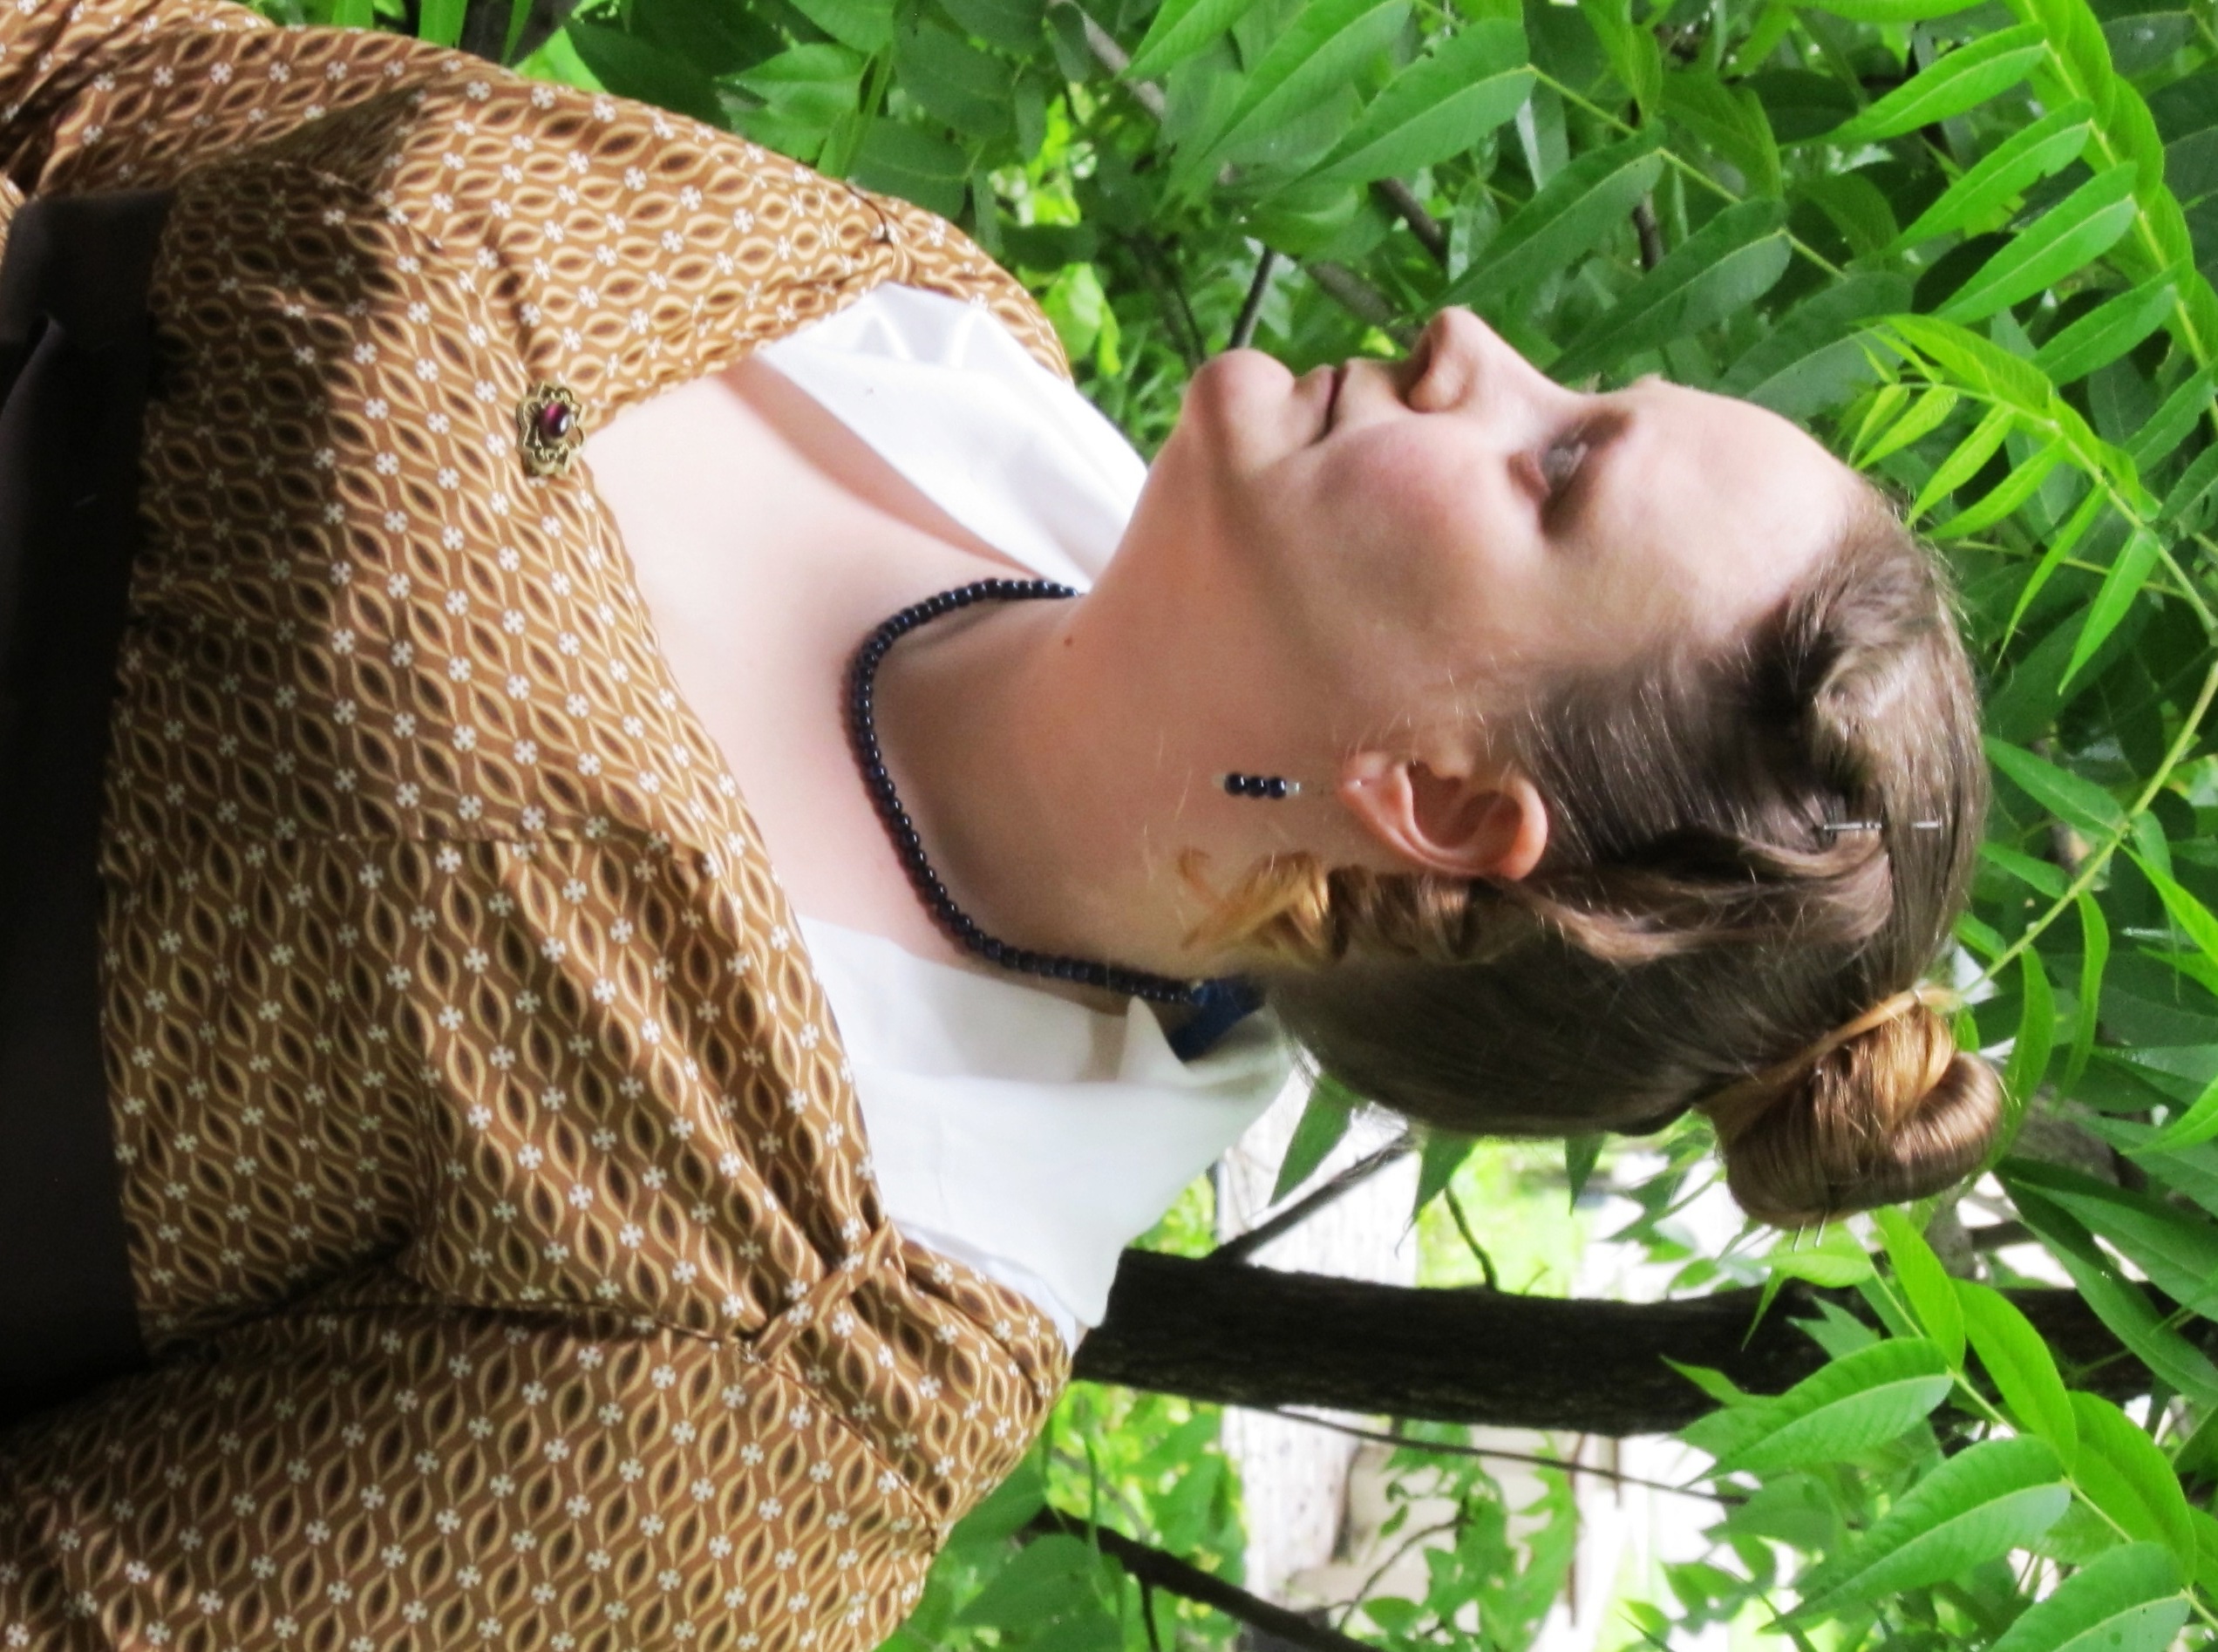
So, this post is less about the event and more about me. First, to the right, this is one of my new favorite photos.

The day itself was beautiful. After a stormy Friday and night, the day started a bit humid, but that dried off as the sun came out. The temperature was quite mild until just after mid-day, making it quite comfortable for me in the shade.
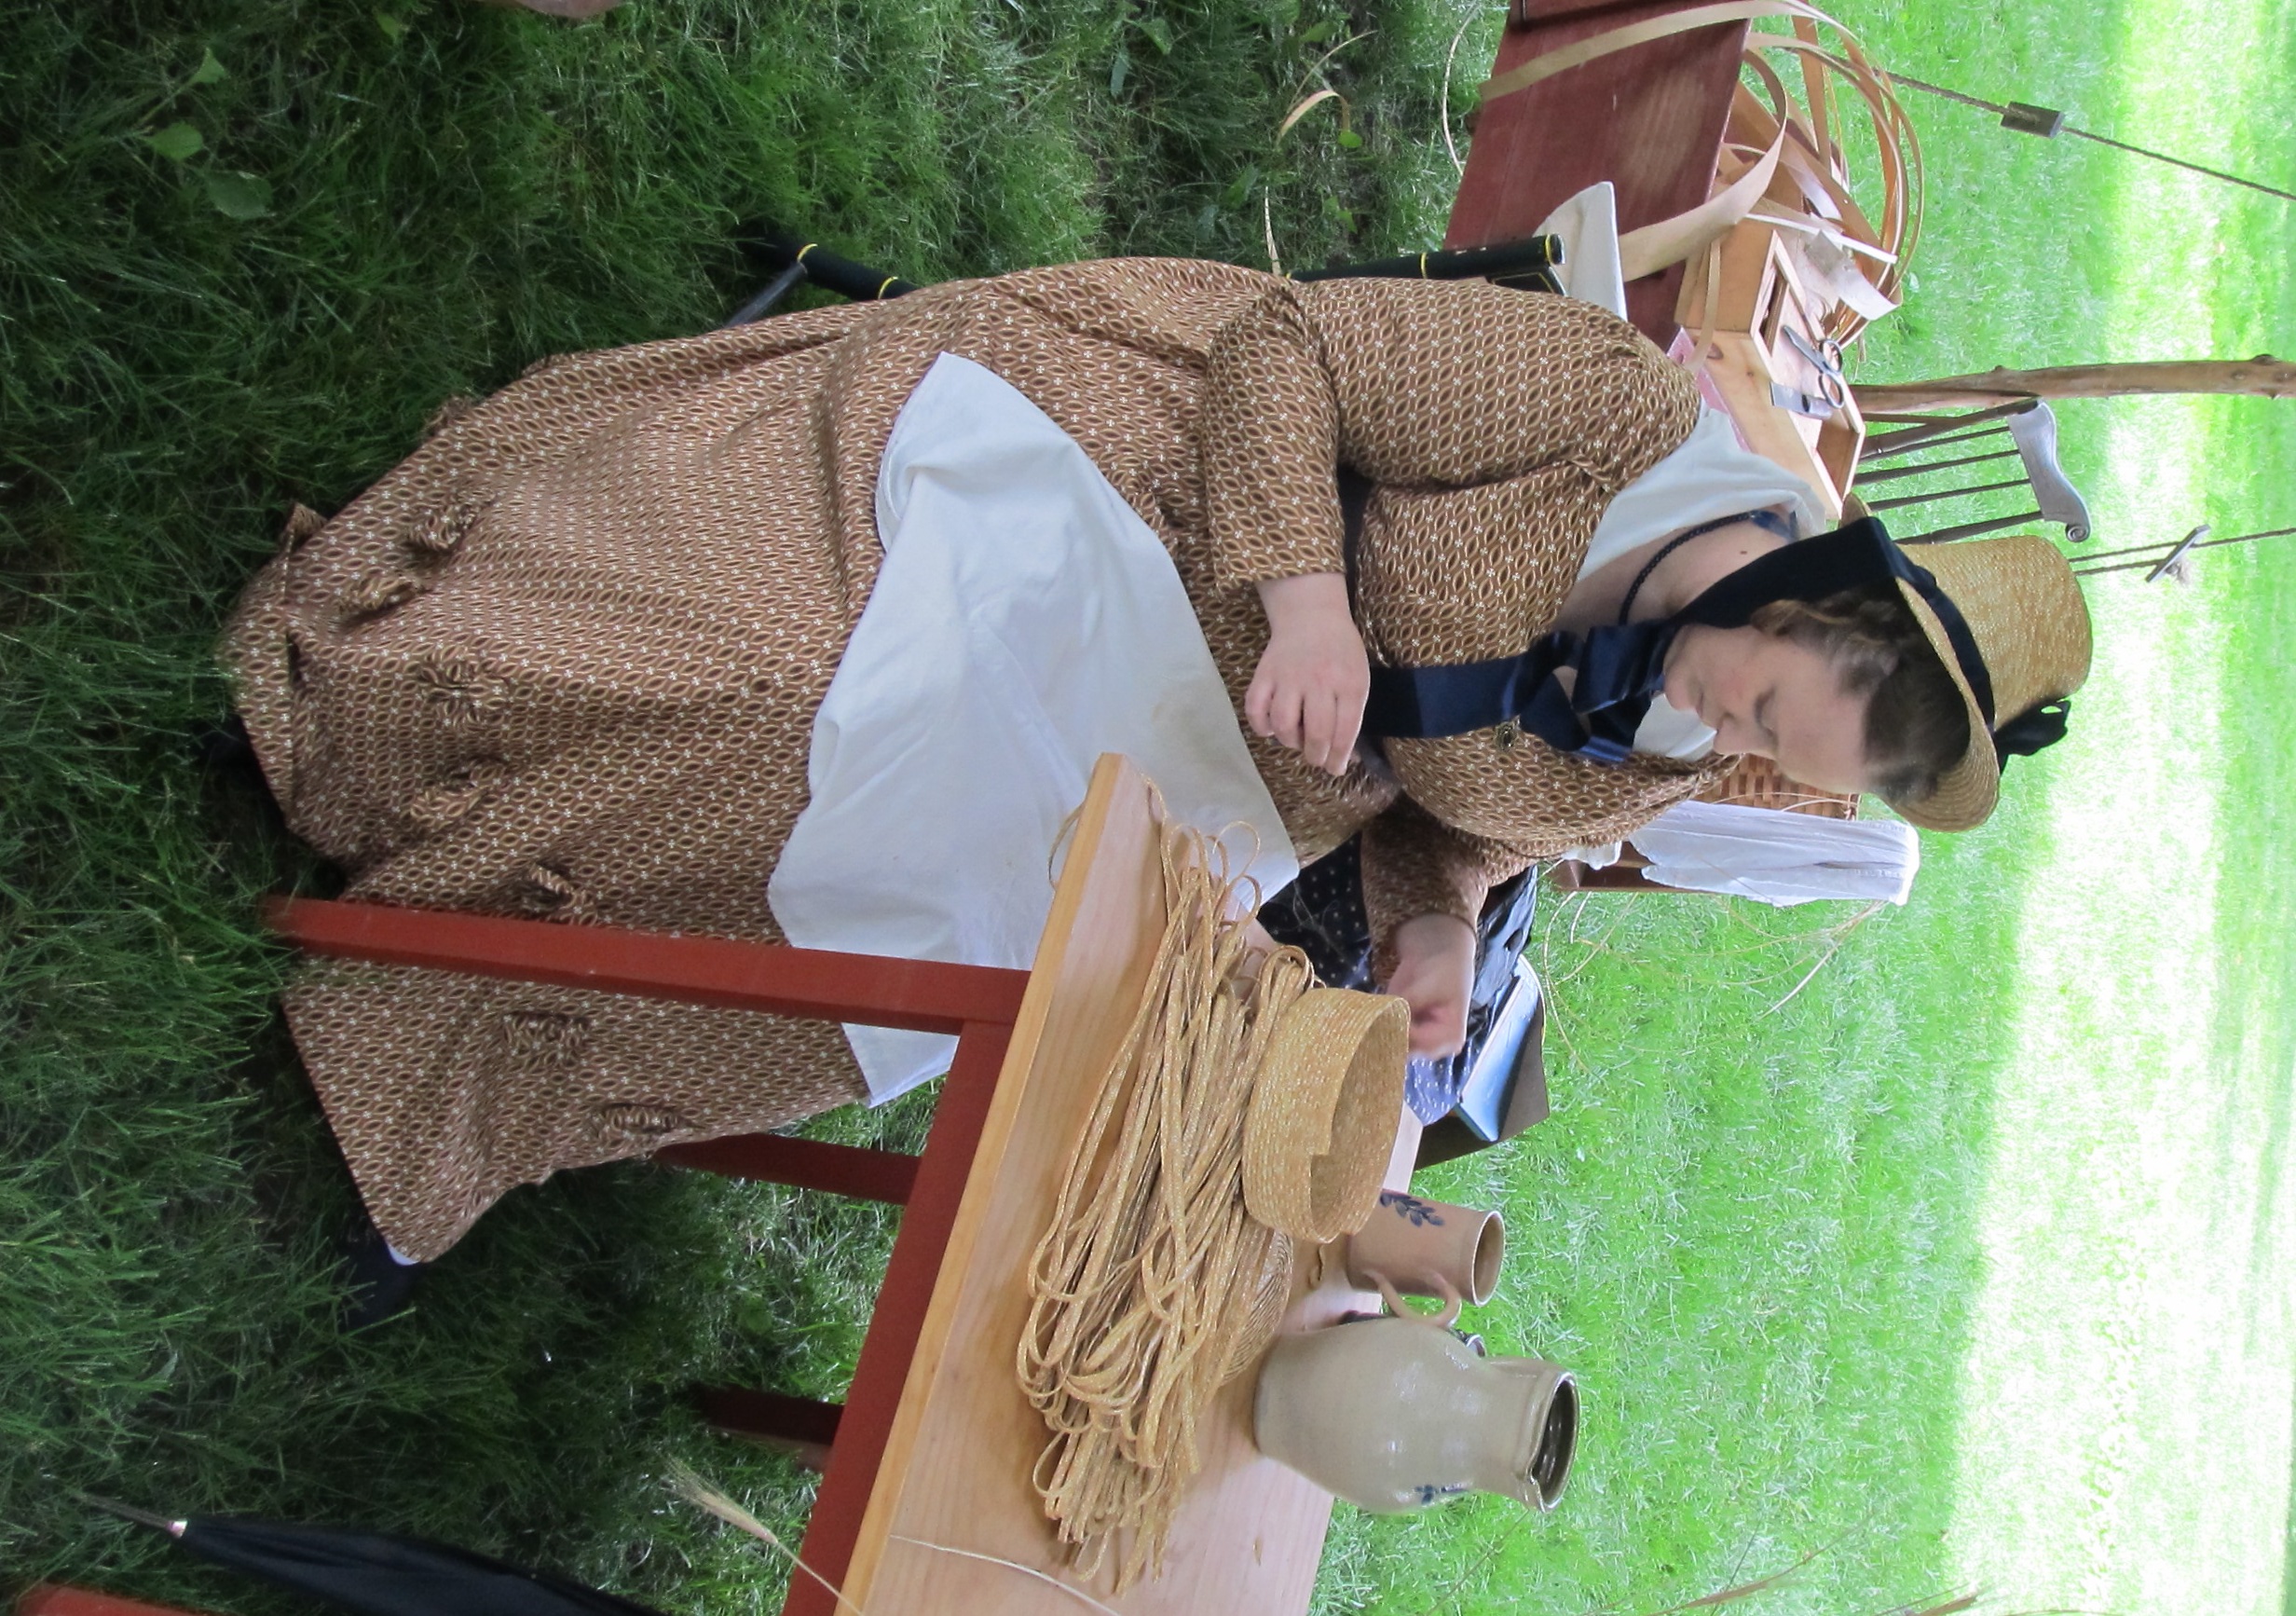
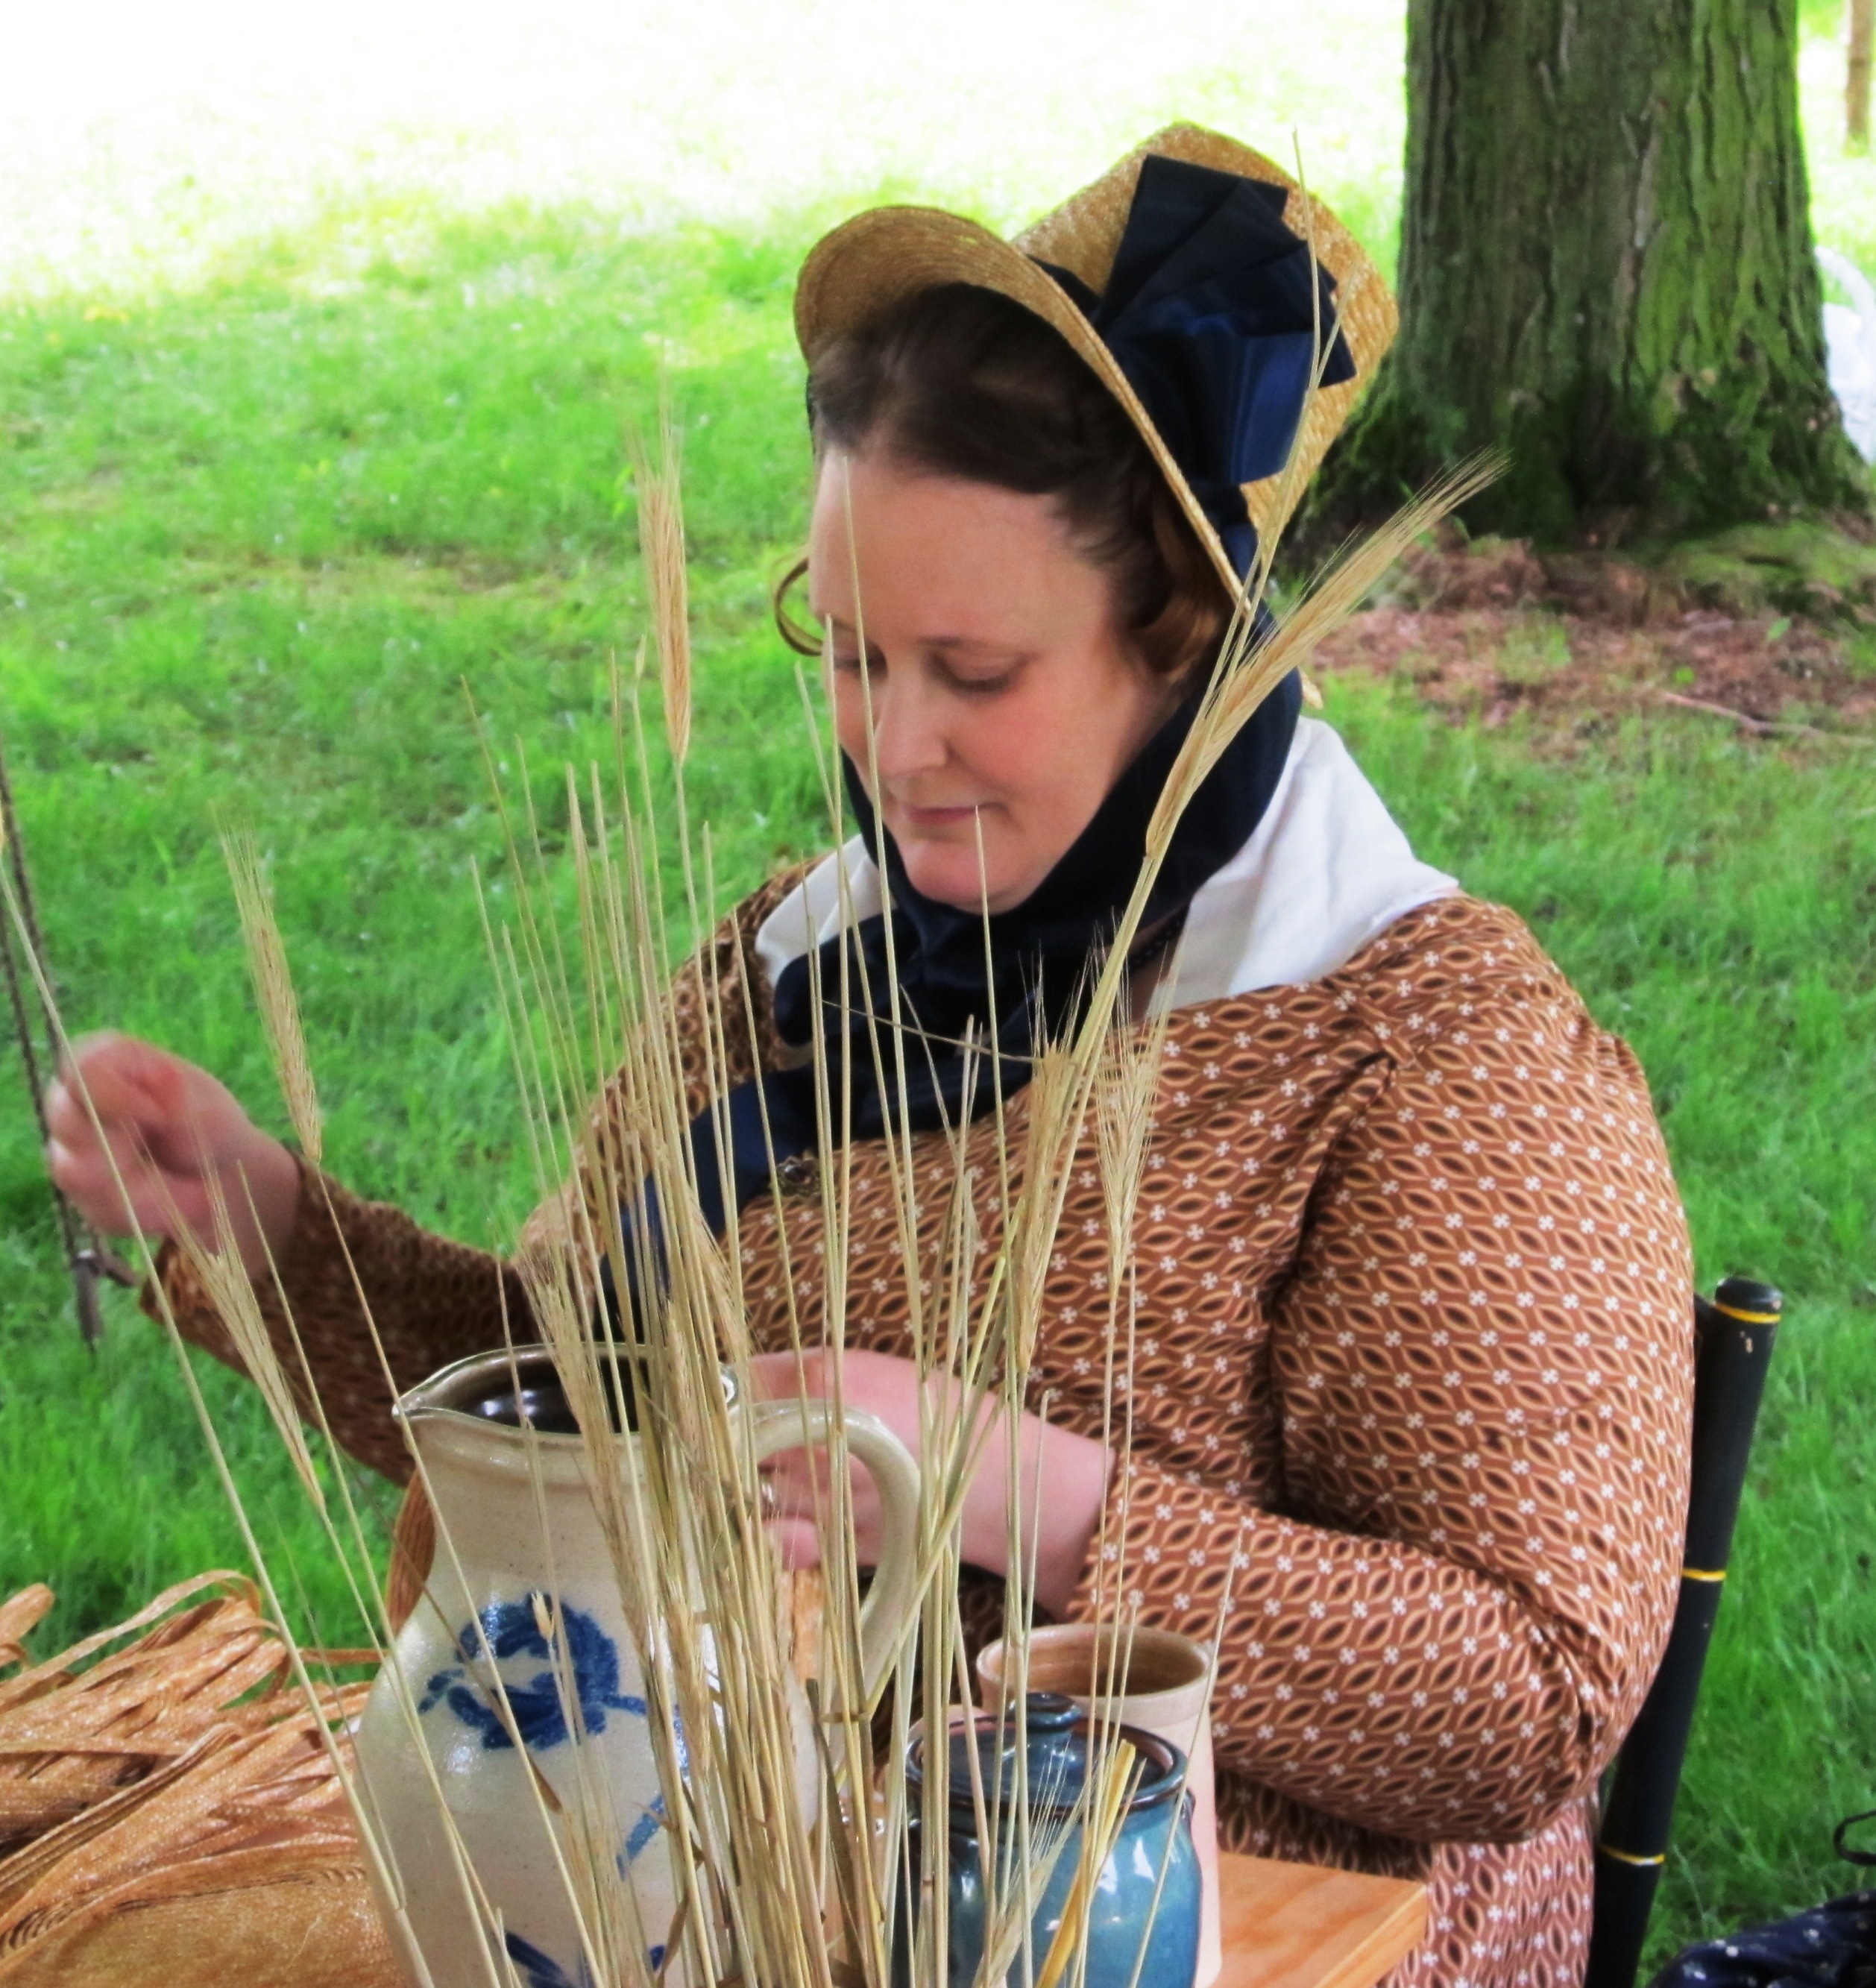
I spent the day demonstrating how I sew straw plait. I mostly worked on a Regency era bonnet and a little bit on a hat when the bonnet needed to rest.
 I met several wonderful people including a lovely milliner who was very pleasant to chat with. I was also able to put faces to names I’ve known for a while. (Though I was really hoping to meet the author of Kitty Calash. I suspect I may have seen her just beyond a few visitors while we were talking.)
I also had time to catch up with a few friends I don’t get to see over the winter. Some of us talked about a potential millinery day this fall.
Here is proof I actually had curls before leaving the house for the day. See… curls. They did get pinned up and then back as the day went on. But, yeah, curls. You can see the necklace and earrings I made here too. (I must figure out the trick to ribbon tied necklaces. Thank goodness for cleavage that catches falling jewelry.)
 Okay, so I need to do better about the smiling thing. The dress was very comfortable, the sleeves in particular. This is note worthy because I find sleeves to be a pain because of my large arms. Another note – I’ve never worn so many pins before. Once dressed, I discovered the cut of my bodiced petti and the cut of my bodice do not go together. Ooops. I guess this means I need another dress and another bodiced petti. Darn.
Here is a good look at the hat I remade. I am pretty happy with how it came out and very happy with how comfortable it is. The blue is just fabulous. 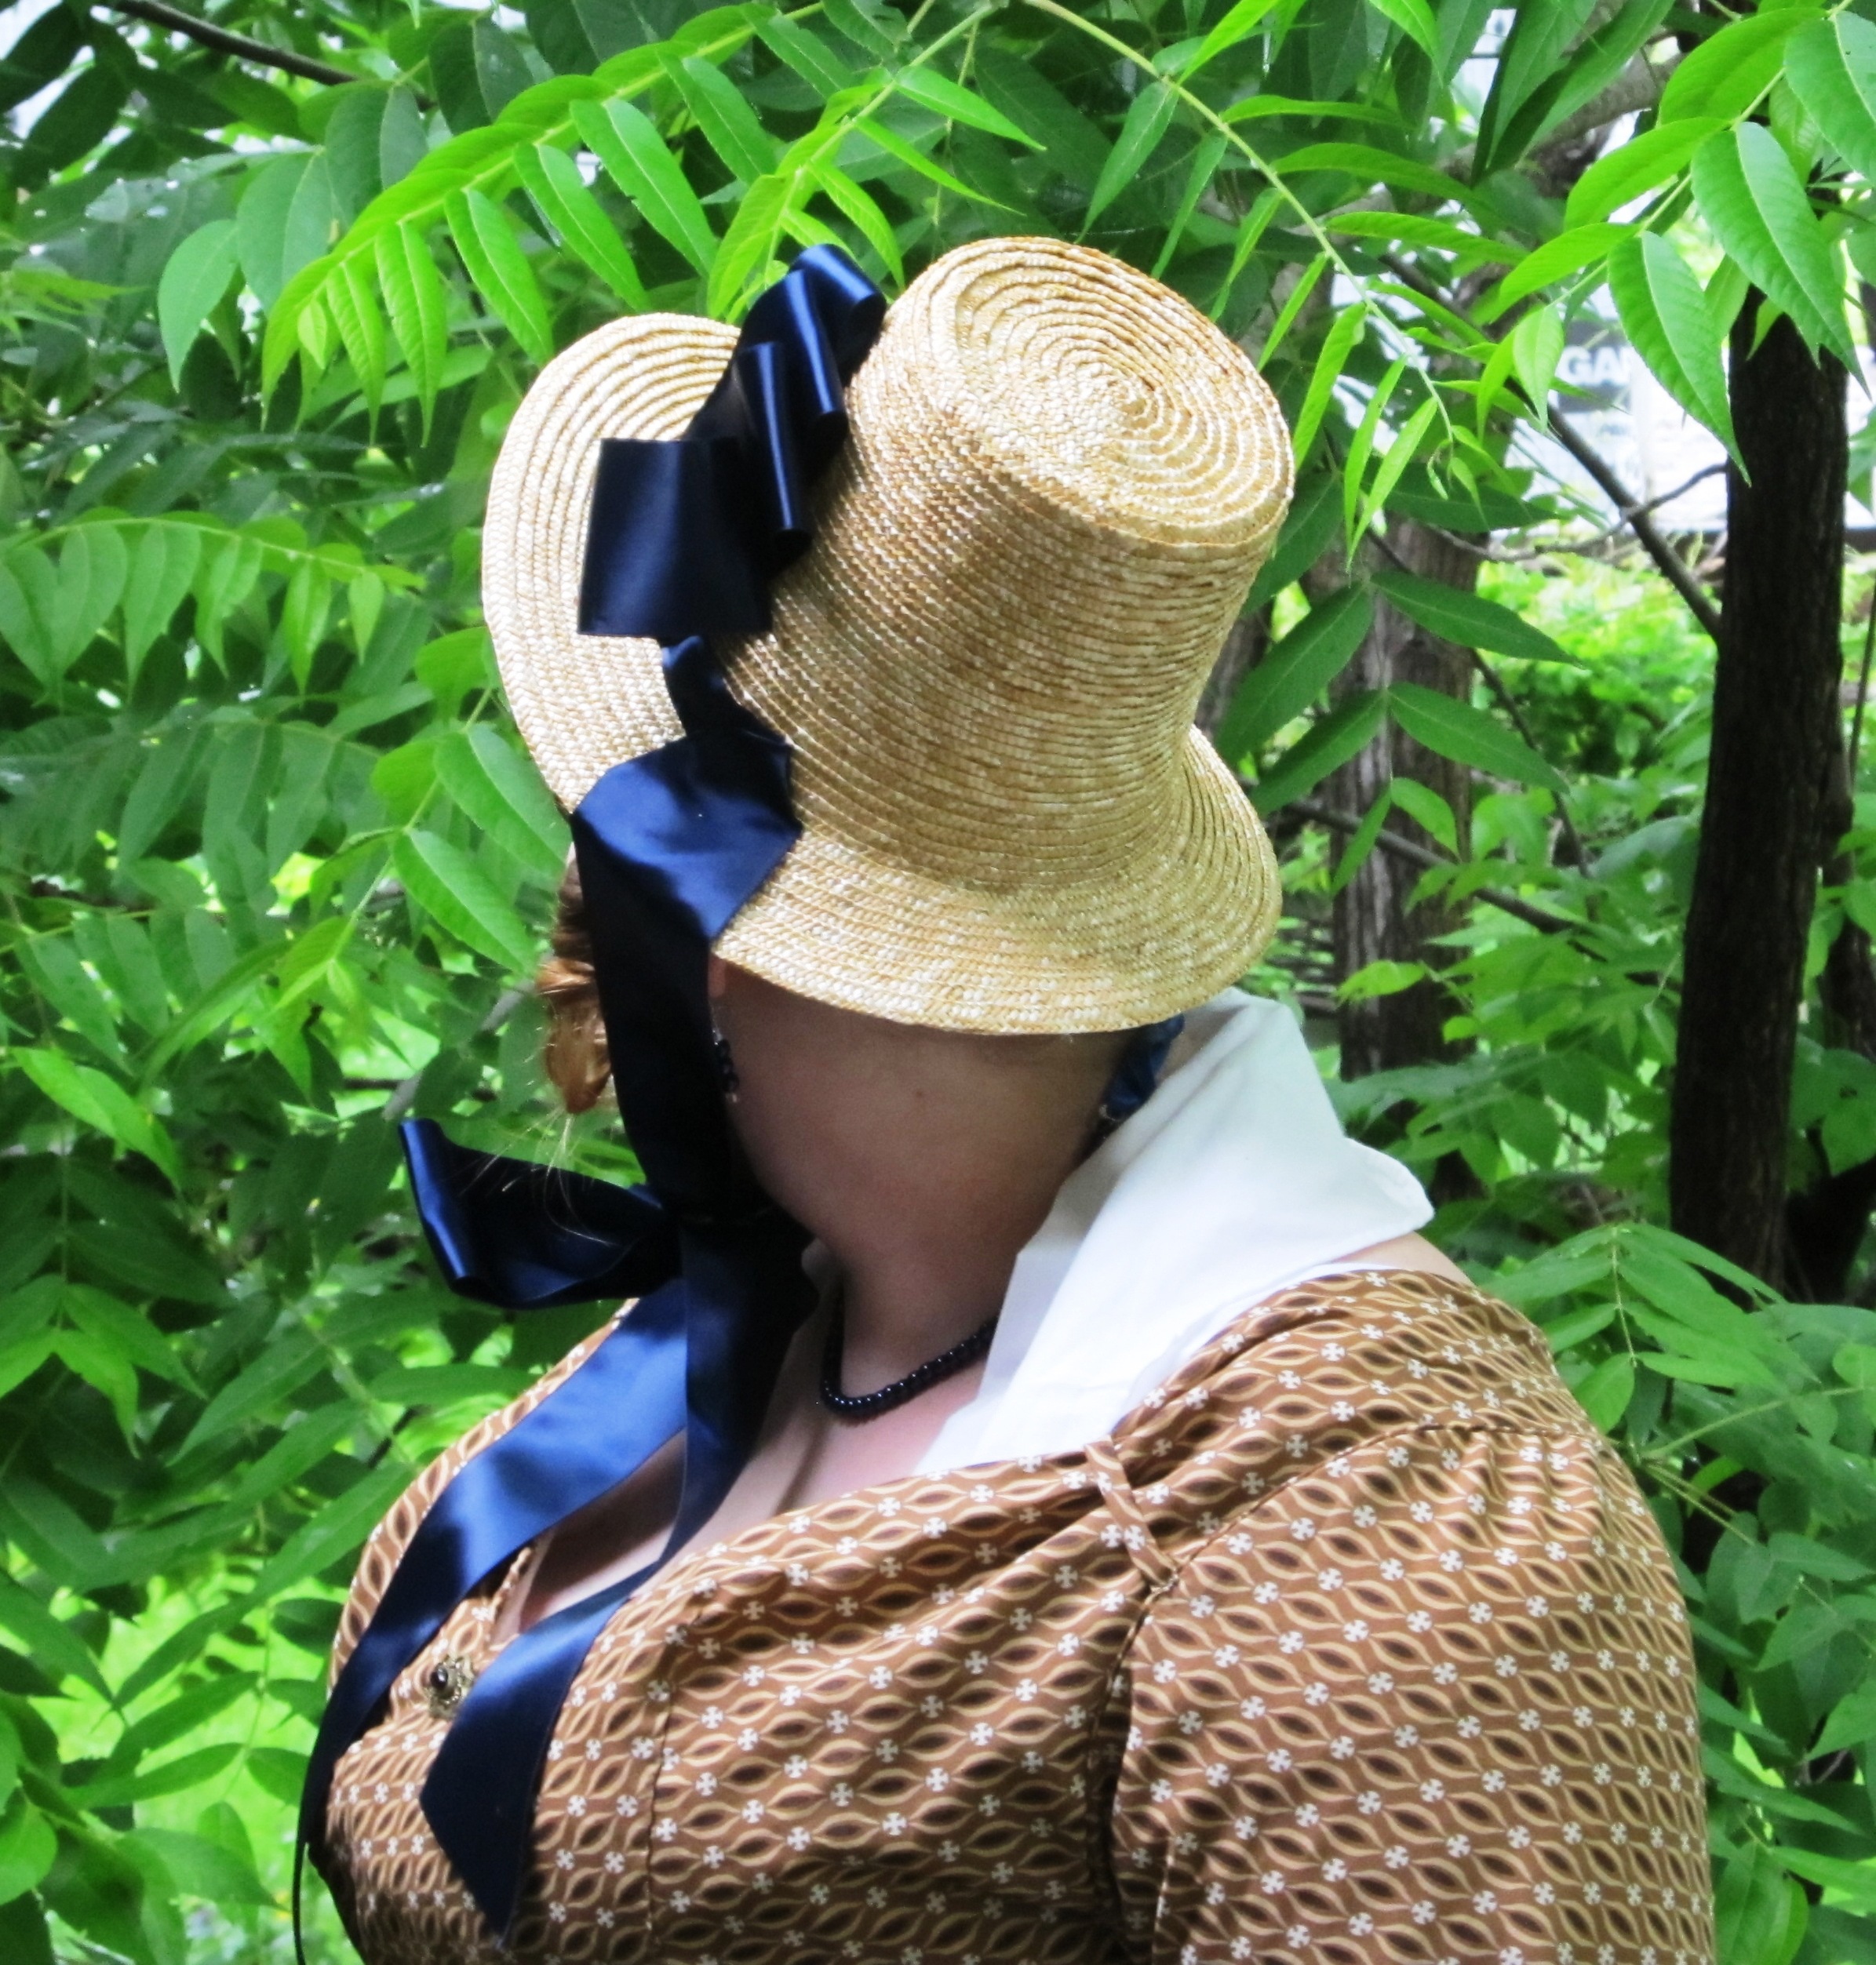
Millinery Decoration – “You pick it, I stick it”
I keep coming back to calling this the “You pick it, I stick it” option. Yes, corny. But, can you name the movie? 
I don’t keep a large supply of flowers, feathers and ribbons as many milliners do. My focus really is the straw. In the past, I have shopped with clients to pick out the trims for their bonnets or hats.
I have also had clients send me trims they love to decorated with. I particularly enjoy this process. A box arrives with an assortment of trims I know the client already likes, or loves. Then I get to have the fun of arranging. When I am finished, the completed piece and extra trims all go back to the client.
 I have decided to open up this option to new clients who purchase one of my straw bonnets or hats. Clients can pre-arrange with the purchase to send me their trims. I will finish and decorate the bonnet or hat for them. The final trimming cost will be based on the amount of time it take to finish the piece and any materials I will be supplying. Generally, this will start at $50 for bonnets. I will only take one or two of these per month.
Guidelines:
- The ribbon for the fashion ties and bavolet should be a Minimum of 3 yards of 3.5″-4″ wide. – Quality silk or rayon, not brittle. This is for the decorative ties and the bavolet.
- An assortment of millinery flowers – These should be wired and without any plastic materials. A variety of sizes under 3″ is easiest to work with.
- Additional ribbons in a variety of widths can be layered with the primary ribbon, mixed with the flowers or used for bows.
- Flowers and feathers should be color fast.
 I can supply:
- Cotton lining for bonnets or hats as needed
- Net to line the bavolet
- Frill in organza or net for bonnets
- Functional ties for bonnets
What Does a Milliner Do…. part 2
 Another nudge towards working with my tall hat was this illustration. I just love this. How I would love to have a yard of delicate silk gauze and narrow silk ribbon to play with this look. If only….. time allowed
Alas… with what time and the stash allows…
I reshaped the brim as best I could. I constructed it so the turn up part was a tad wider than the rest. It isn’t really noticeable once it is on.
I used this lush midnight blue satin ribbon in the ribbon stash. While playing with the ribbon, which has a very full body, the loopy arrangement fell into place. The rest I kept simple.
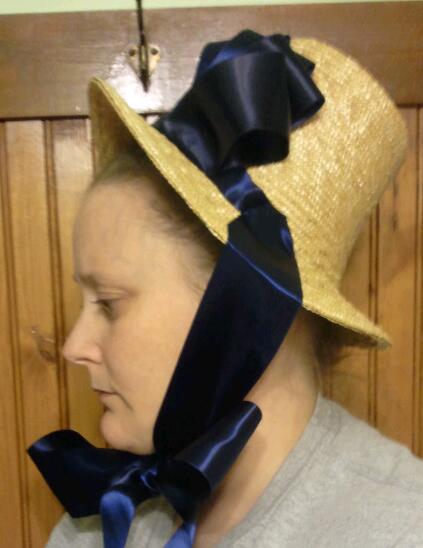 I’m happy with the quick arrangement. I’ll tie the bow smaller. I would like to add a fluffy while feather plumb wrapping in front of the loops. I picture one that sits only half way up the loop, not too big.
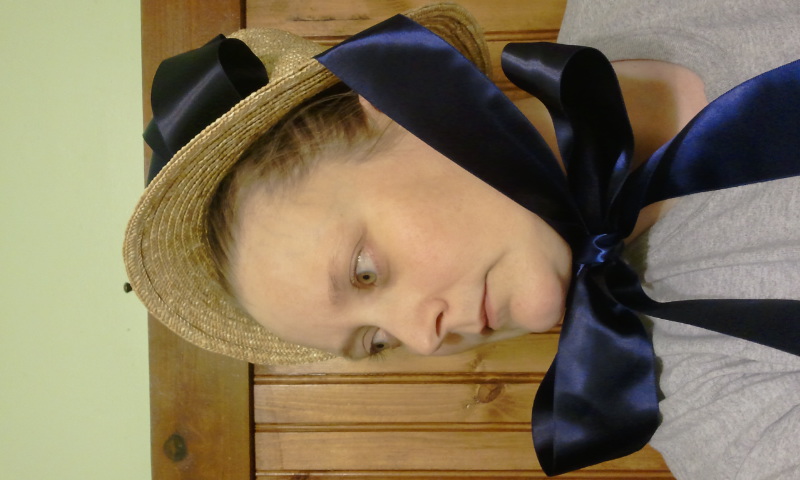
It should be comfortable to sew in. I can barely tell the hat itself is there. It is the ribbon I feel. It is odd for me to feel the decorative ribbon instead of a narrower functional tie. (This is something I must investigate further for this era.)
(It appears I need to rotate a photo. Sorry.)
What Does a Milliner Do….
….When it is two days before an event in a new to her era….
….. and she discovers she has no bonnet of her own for that era????
Yes. There is a moment of panic.
A bit of a background… I finally got around to making a Regency era dress. Actually, it is a late Regency dress, 1820ish with a cross-over bodice. Two Saturdays ago, Bevin asked me if I wanted to come out for GCV’s War of 1812 and Jane Austen weekend to demo working with straw plait. Of course I did.
I had a dress. I had straw. All good.
Yep, that was wedding brain mixed with end of the year brain.
Not all good. There are details. Those details started sinking in Wednesday evening before the event as a thunderstorm was rolling in. Bonnet. Ribbons. Shoes. Jewelry. Carry in. At least I had started two demo pieces, one bonnet and one hat.
 This (left) is the of the two types of bonnet I really want to wear this weekend. But, I sorta gave each of them a new home already. Alas, it will have to be the plait and gold silk bonnet I made over a decade ago. I shifted the one pile in the sewing room to get to the shelf with the totes of the bonnets…. 50s. 50s. 40s. next…. 50s, 60s, 60s, …. next…. Ack!!!!
It is not in the house. It is in the depths of storage. This is a problem.
 The choices become a) Make a new bonnet in two nights with very humid weather. b) Drive to storage, dig through in hopes of finding the misplaced bonnet. c) Pull the Romantic era from the shop, decorate it and make-do. d) Pull the tall crown hat from the shop, reshape the brim and decorate it. Mind you, this is in the midst of dealing with the most exhausting time of the year at school while helping balance out for and worrying about a couple very ill coworkers.
I decided to go with choice d…. This is the hat that is getting reshaped….
 These are the inspiration images for the reshaping and the decorating….
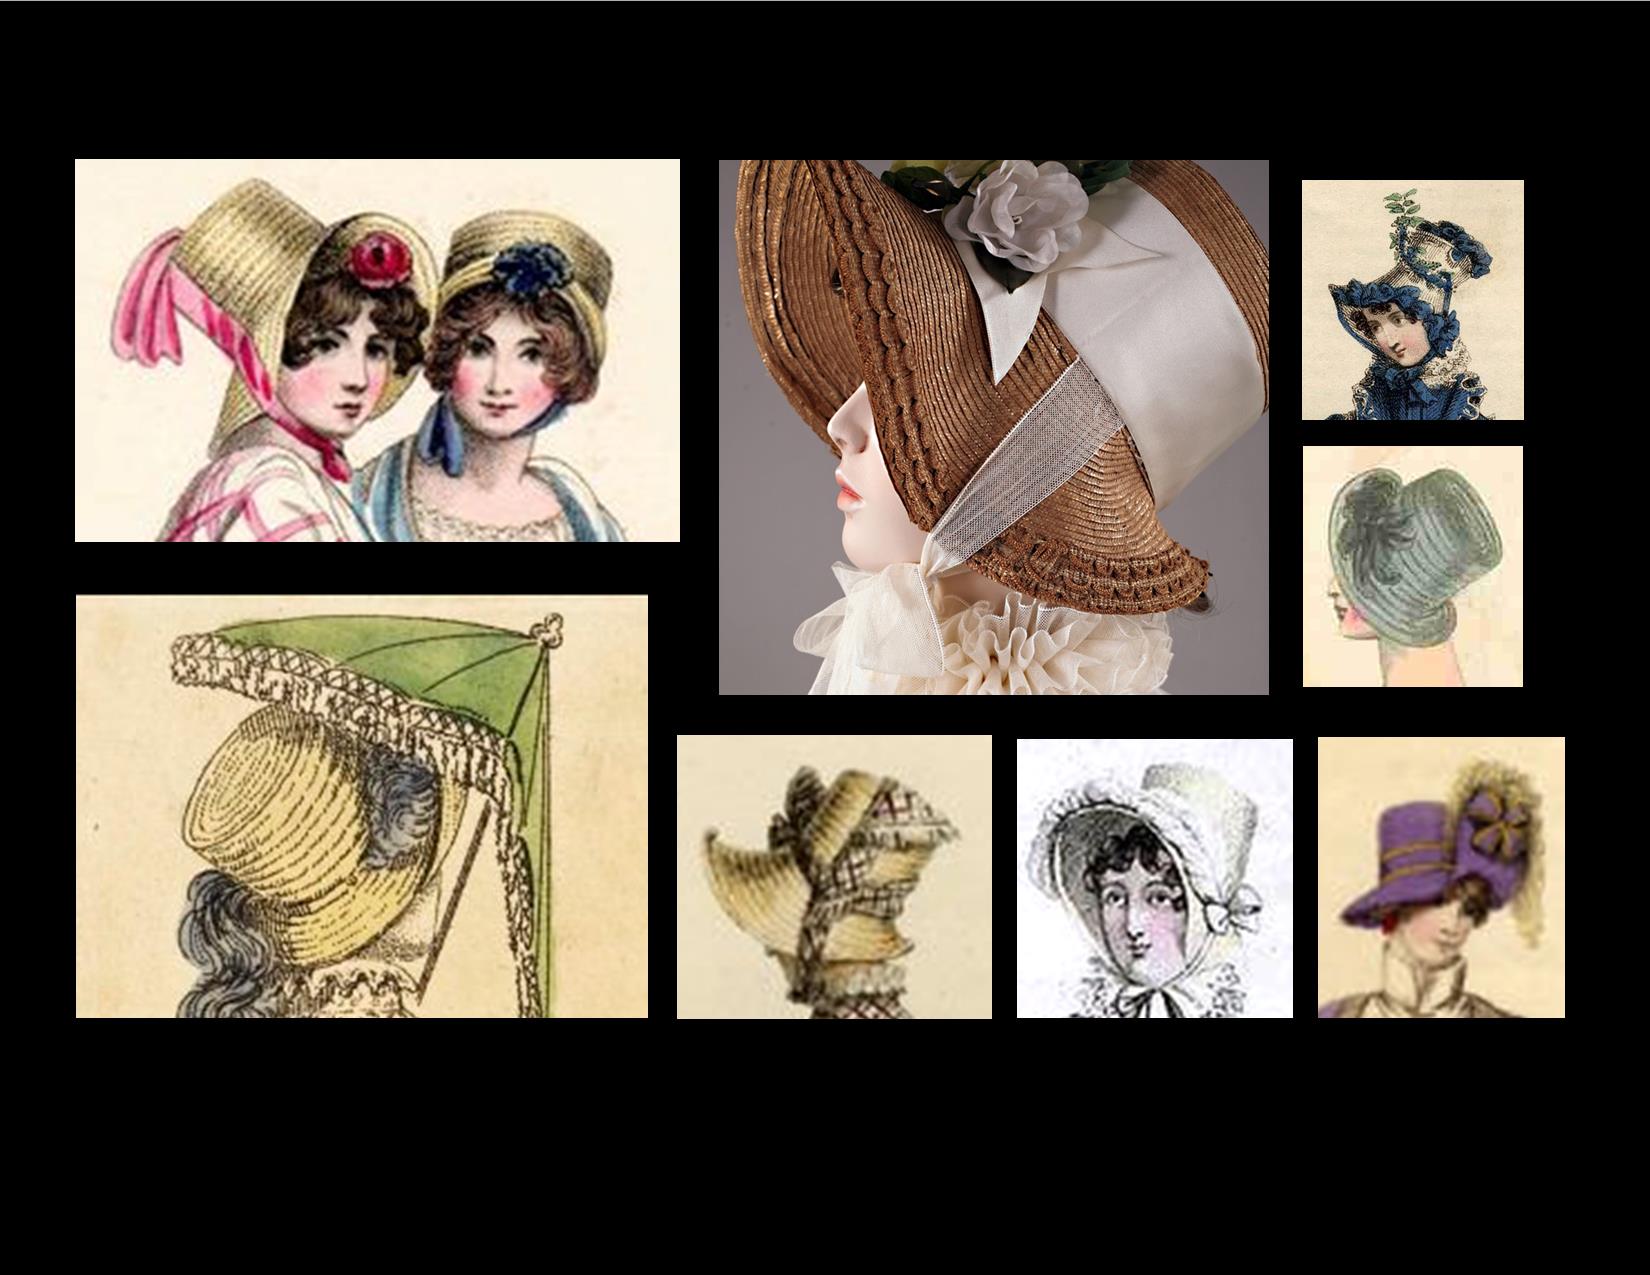
To be continued…
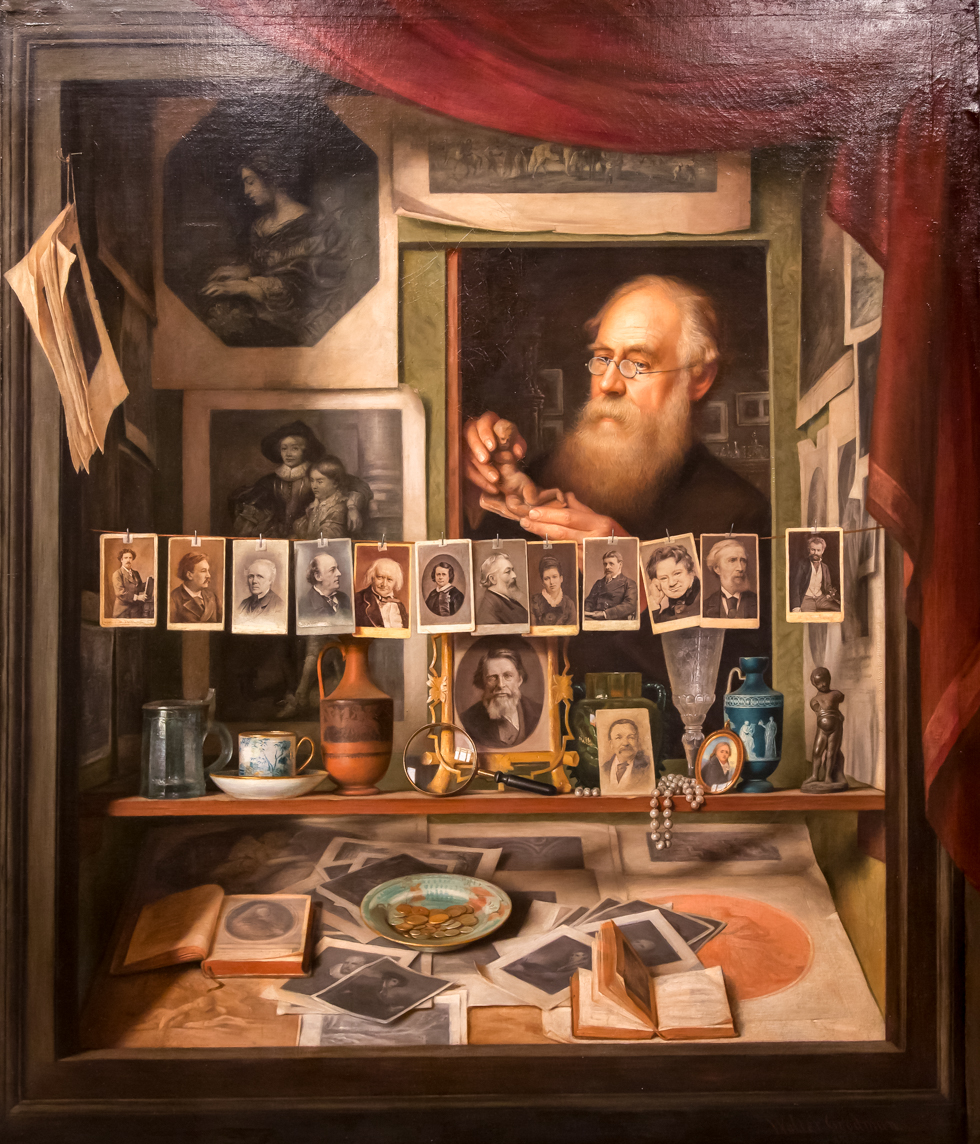
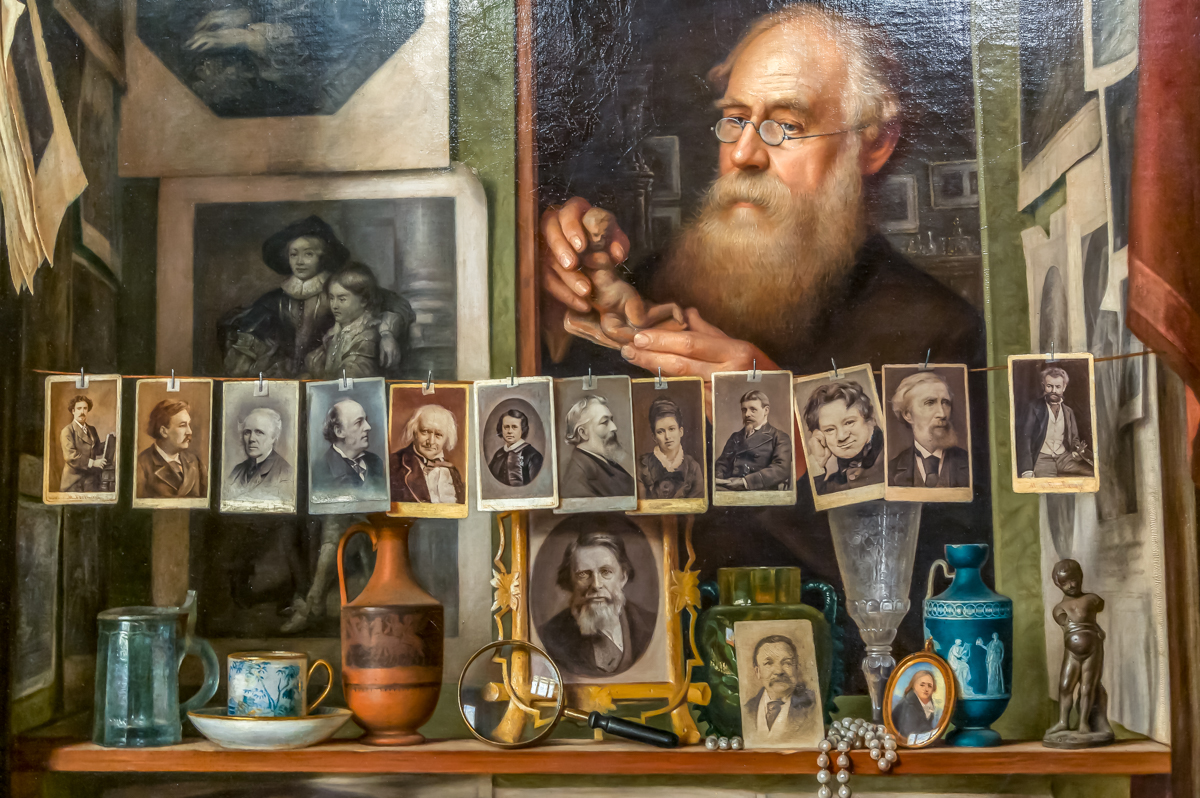
The Printsellers Window at the Memorial Art Gallery
I have been following this blog for a few months. The photos are amazing. Lately, local the artist has been sharing local images. This one is one you all must see as it has many layers.
at the Memorial Art Gallery in Rochester, NY they have this painting at the top of the stairs going to the second floor. Its called the Printseller’s Window by Walter Goodman and has dozens if not hundreds of items in it. The frame shown is part of the painting. It is in trompe l’oeil style where the image looks 3 dimensional and mimics a real life object or situation. There is an entire book written on this painting identifying the various people in the prints and photos.
Click images for a larger view:
A closeup:
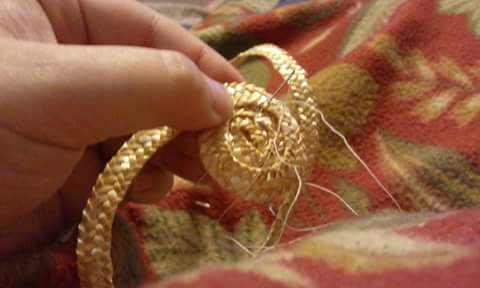
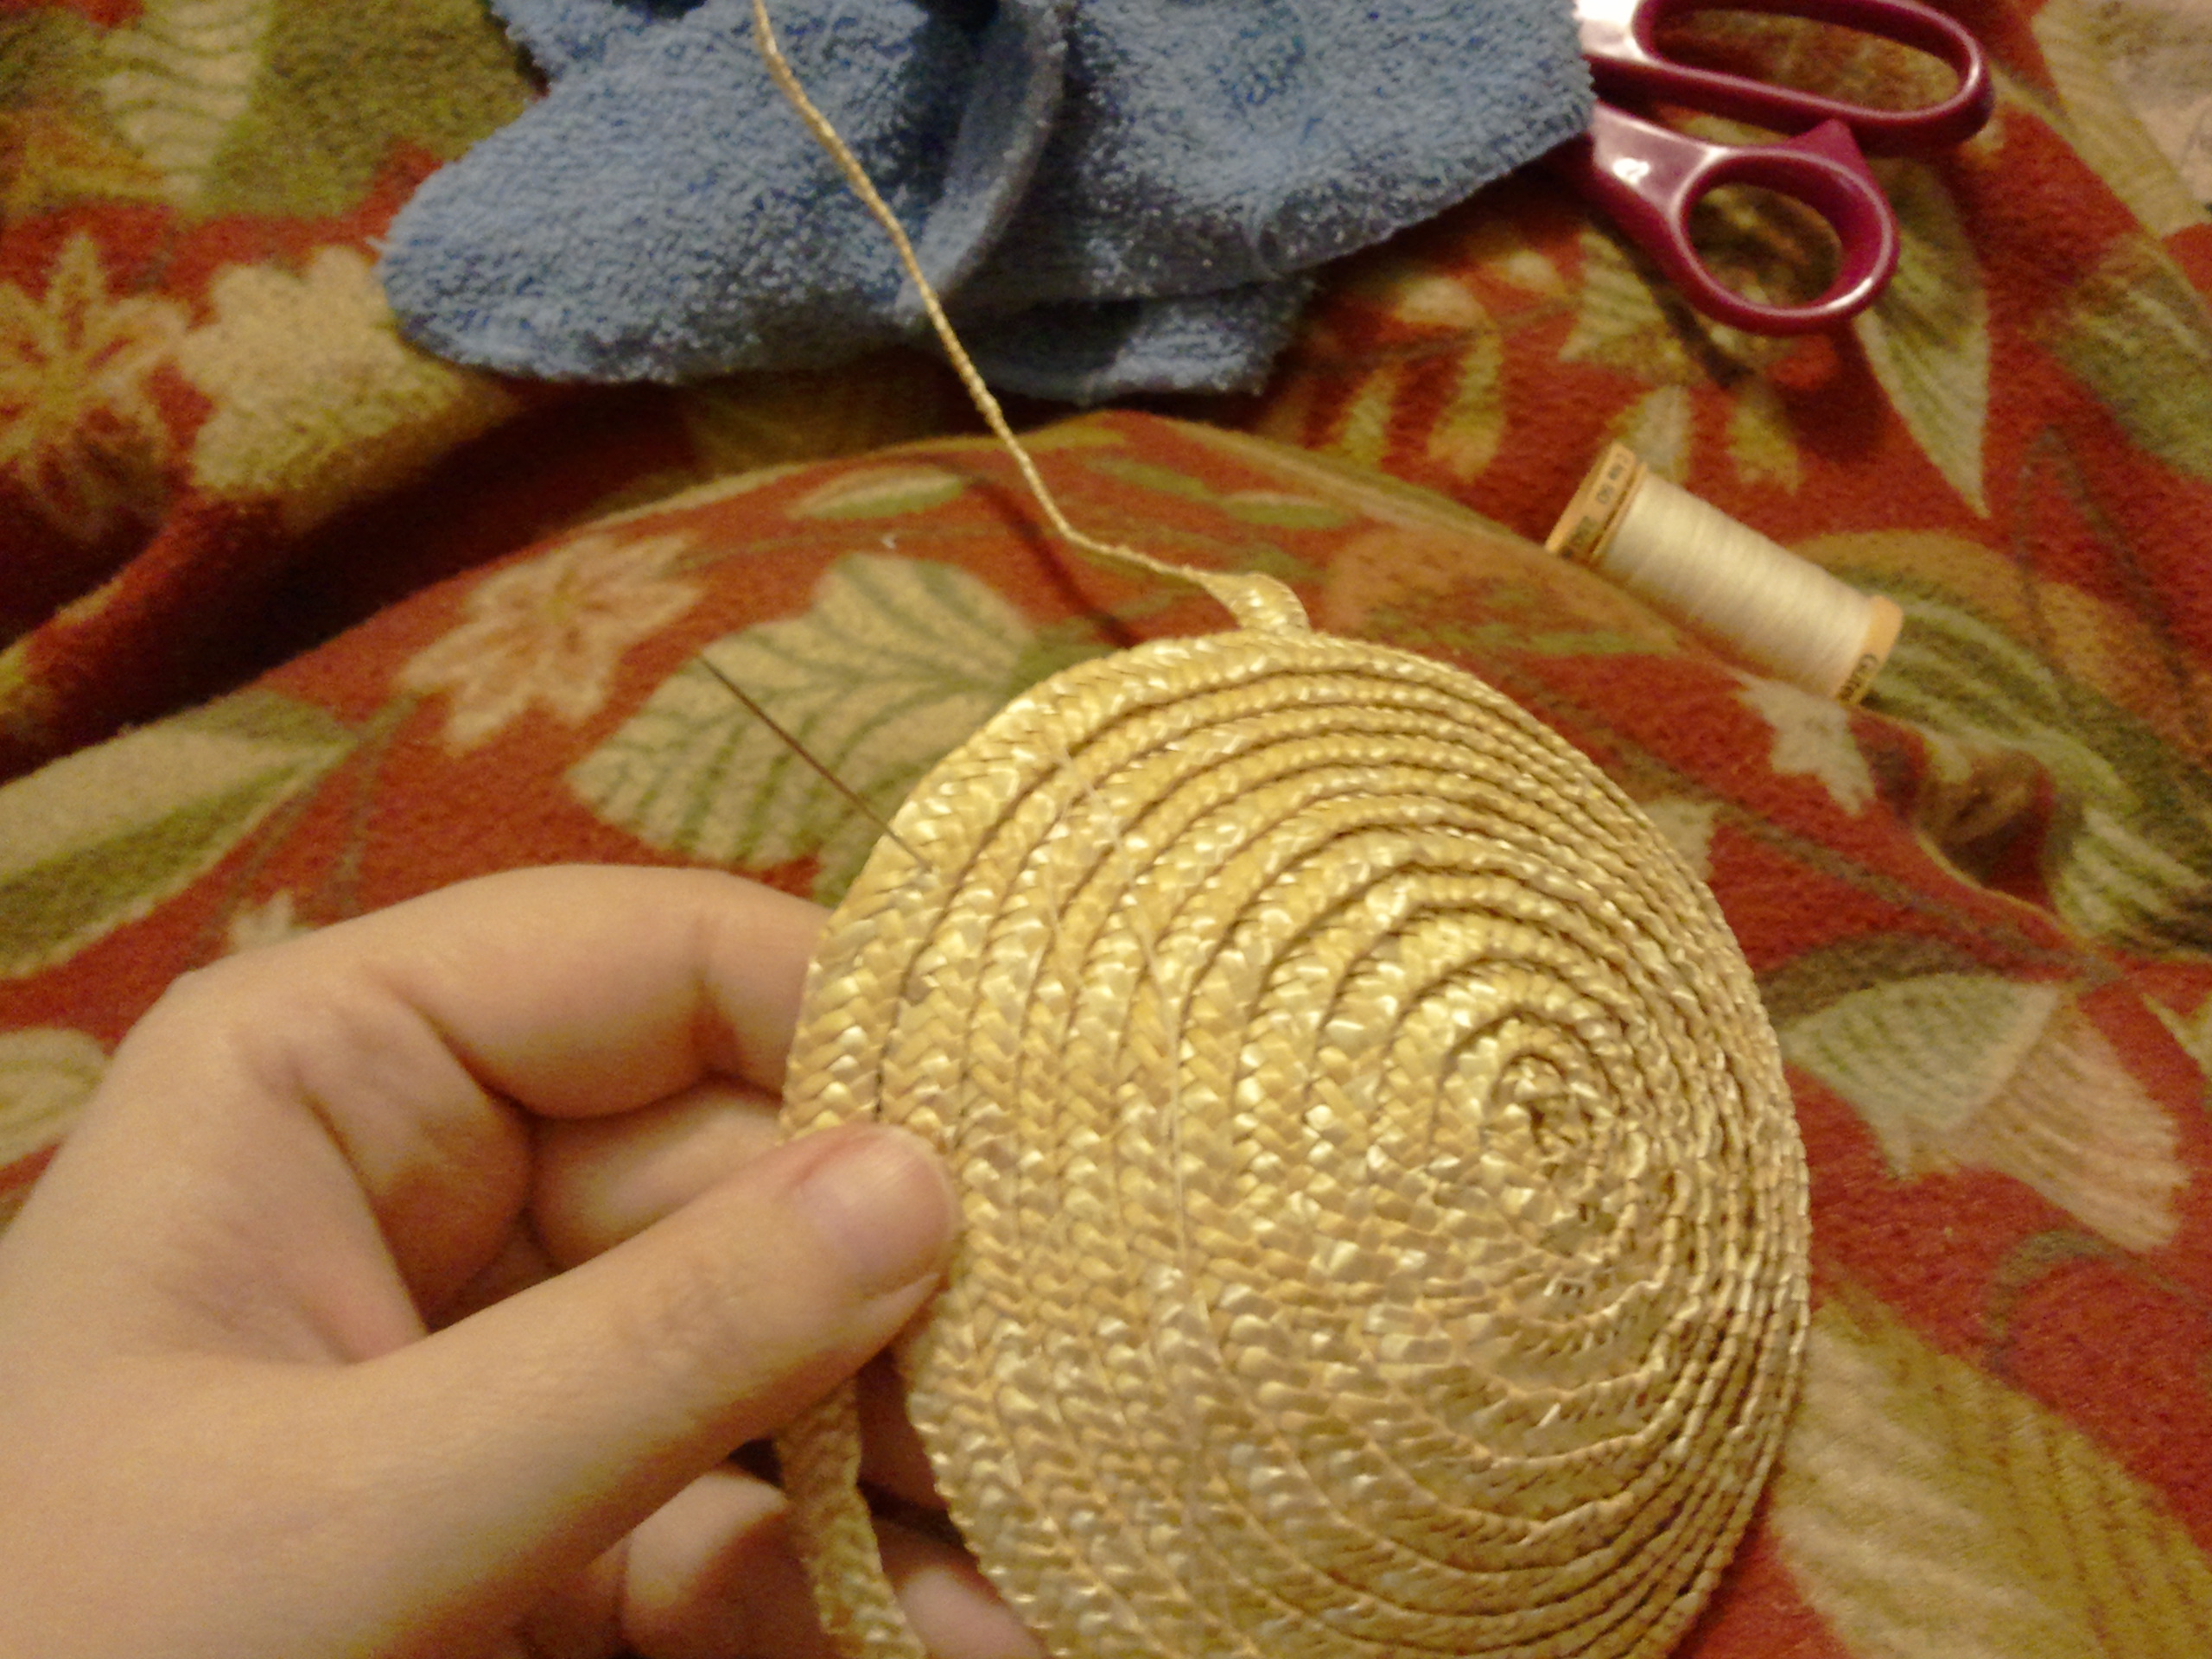
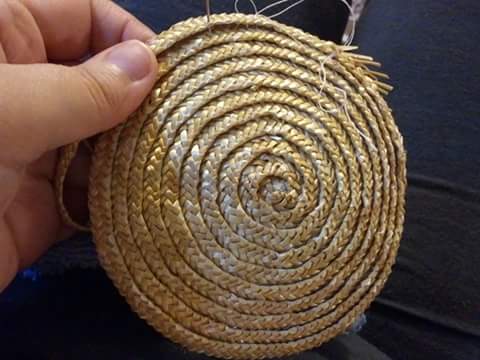
How I Make Bonnets….
This morning something came up in a FB group that let me know some people have a complete misconception of what I do when I make bonnets.
What I do Not do:
- I do not use pre-sewn hats, nor hat forms.
- I do not cut-down, nor reshape pre-sewn hats.
- I do not reblock pre-made hats or hat forms.
- I do not use synthetic thread.
- I do not machine sew straw.
What I do do:
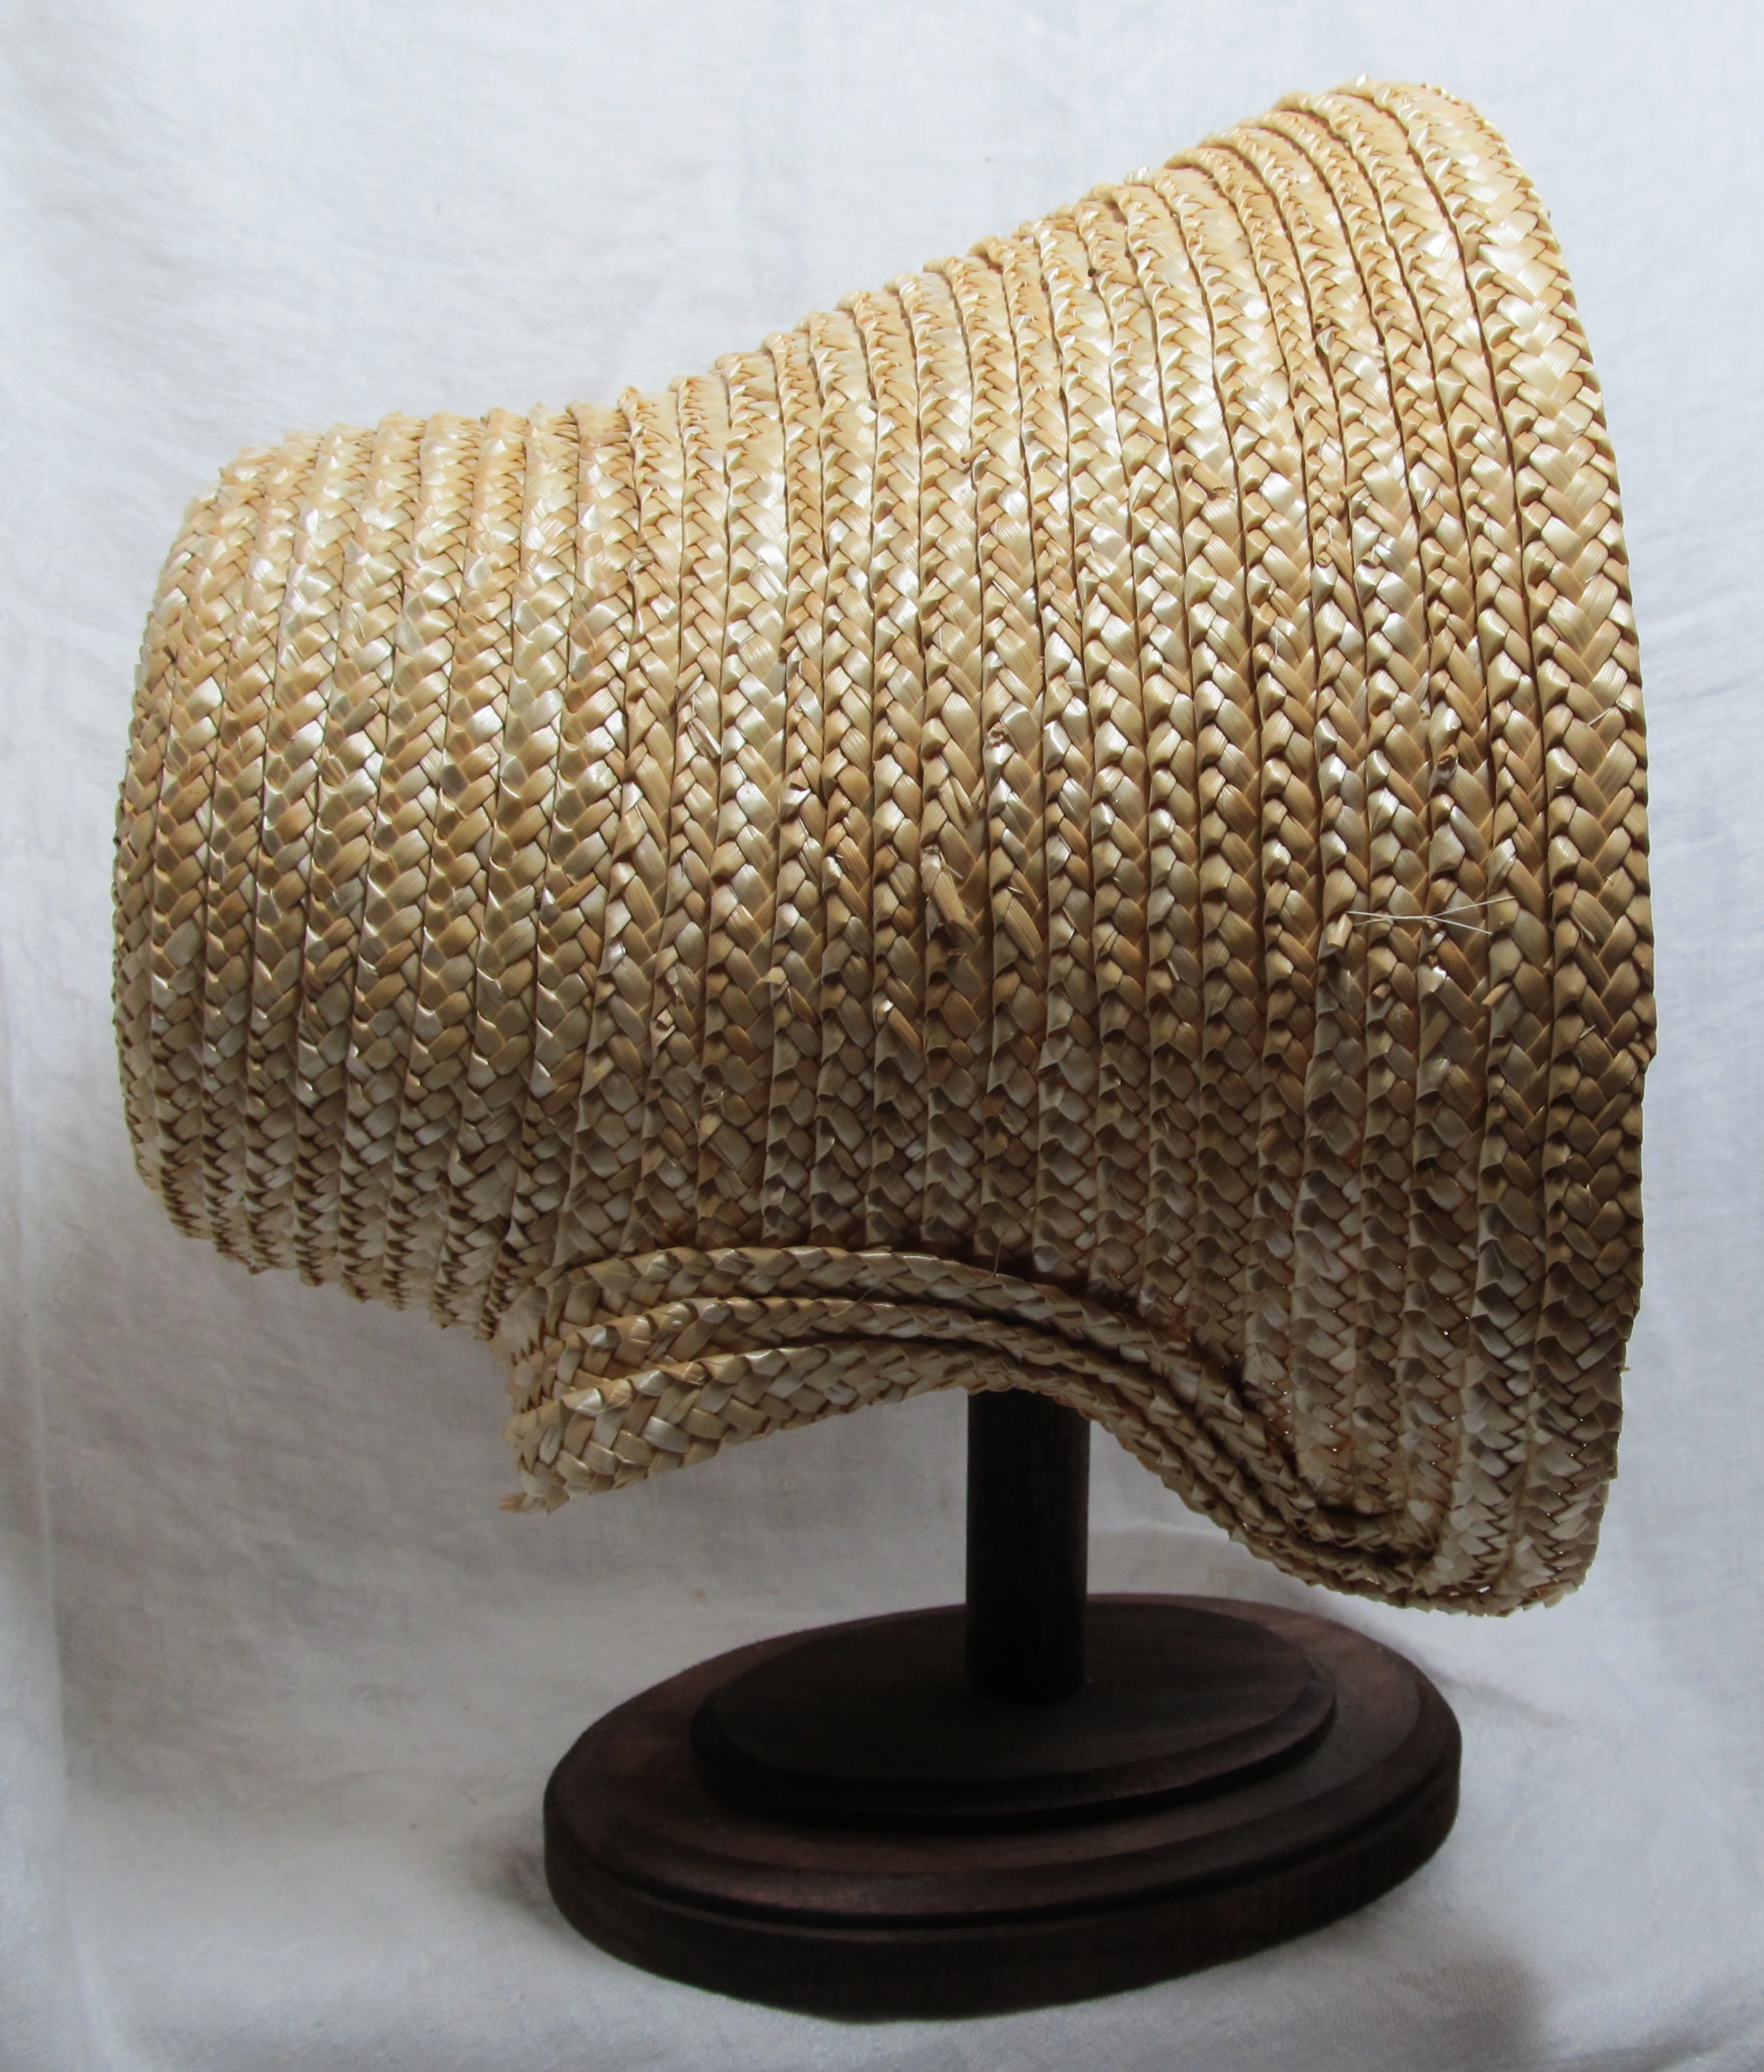
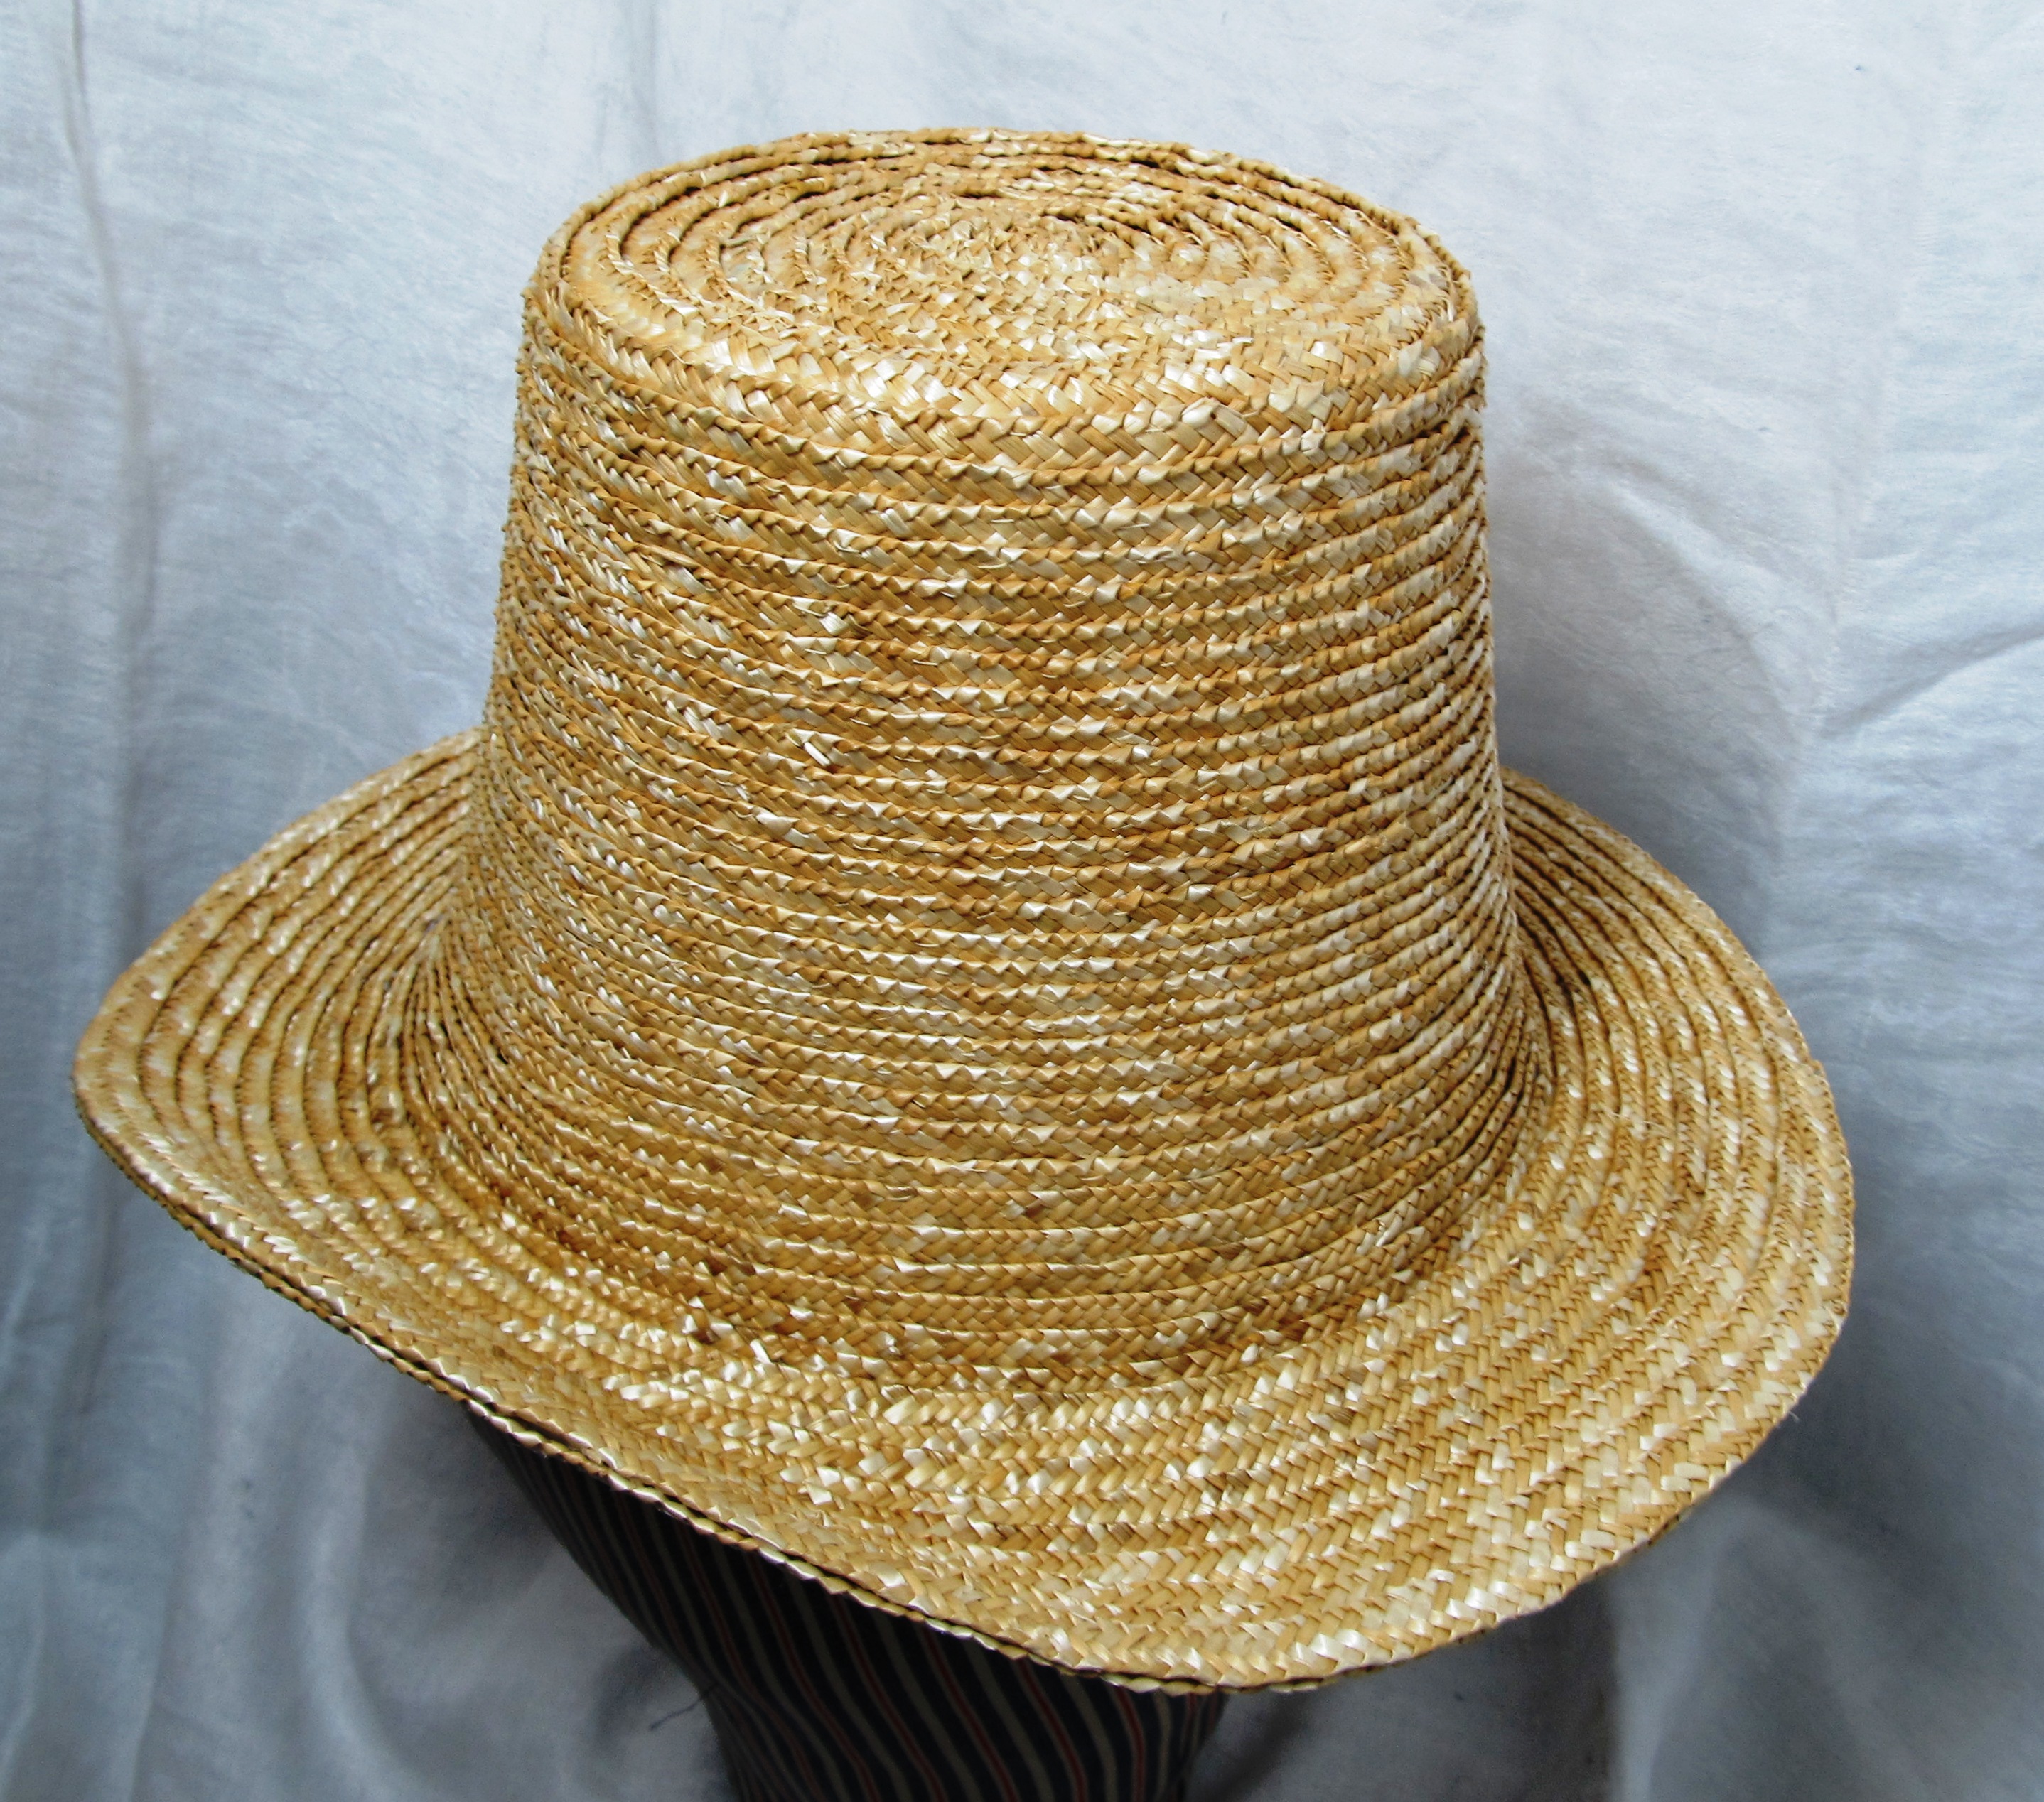
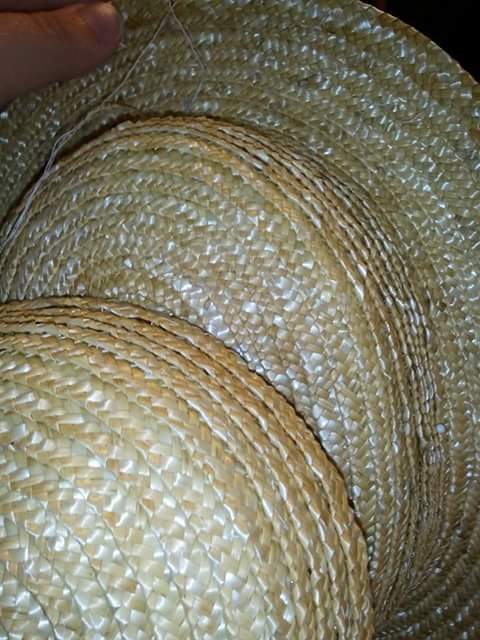
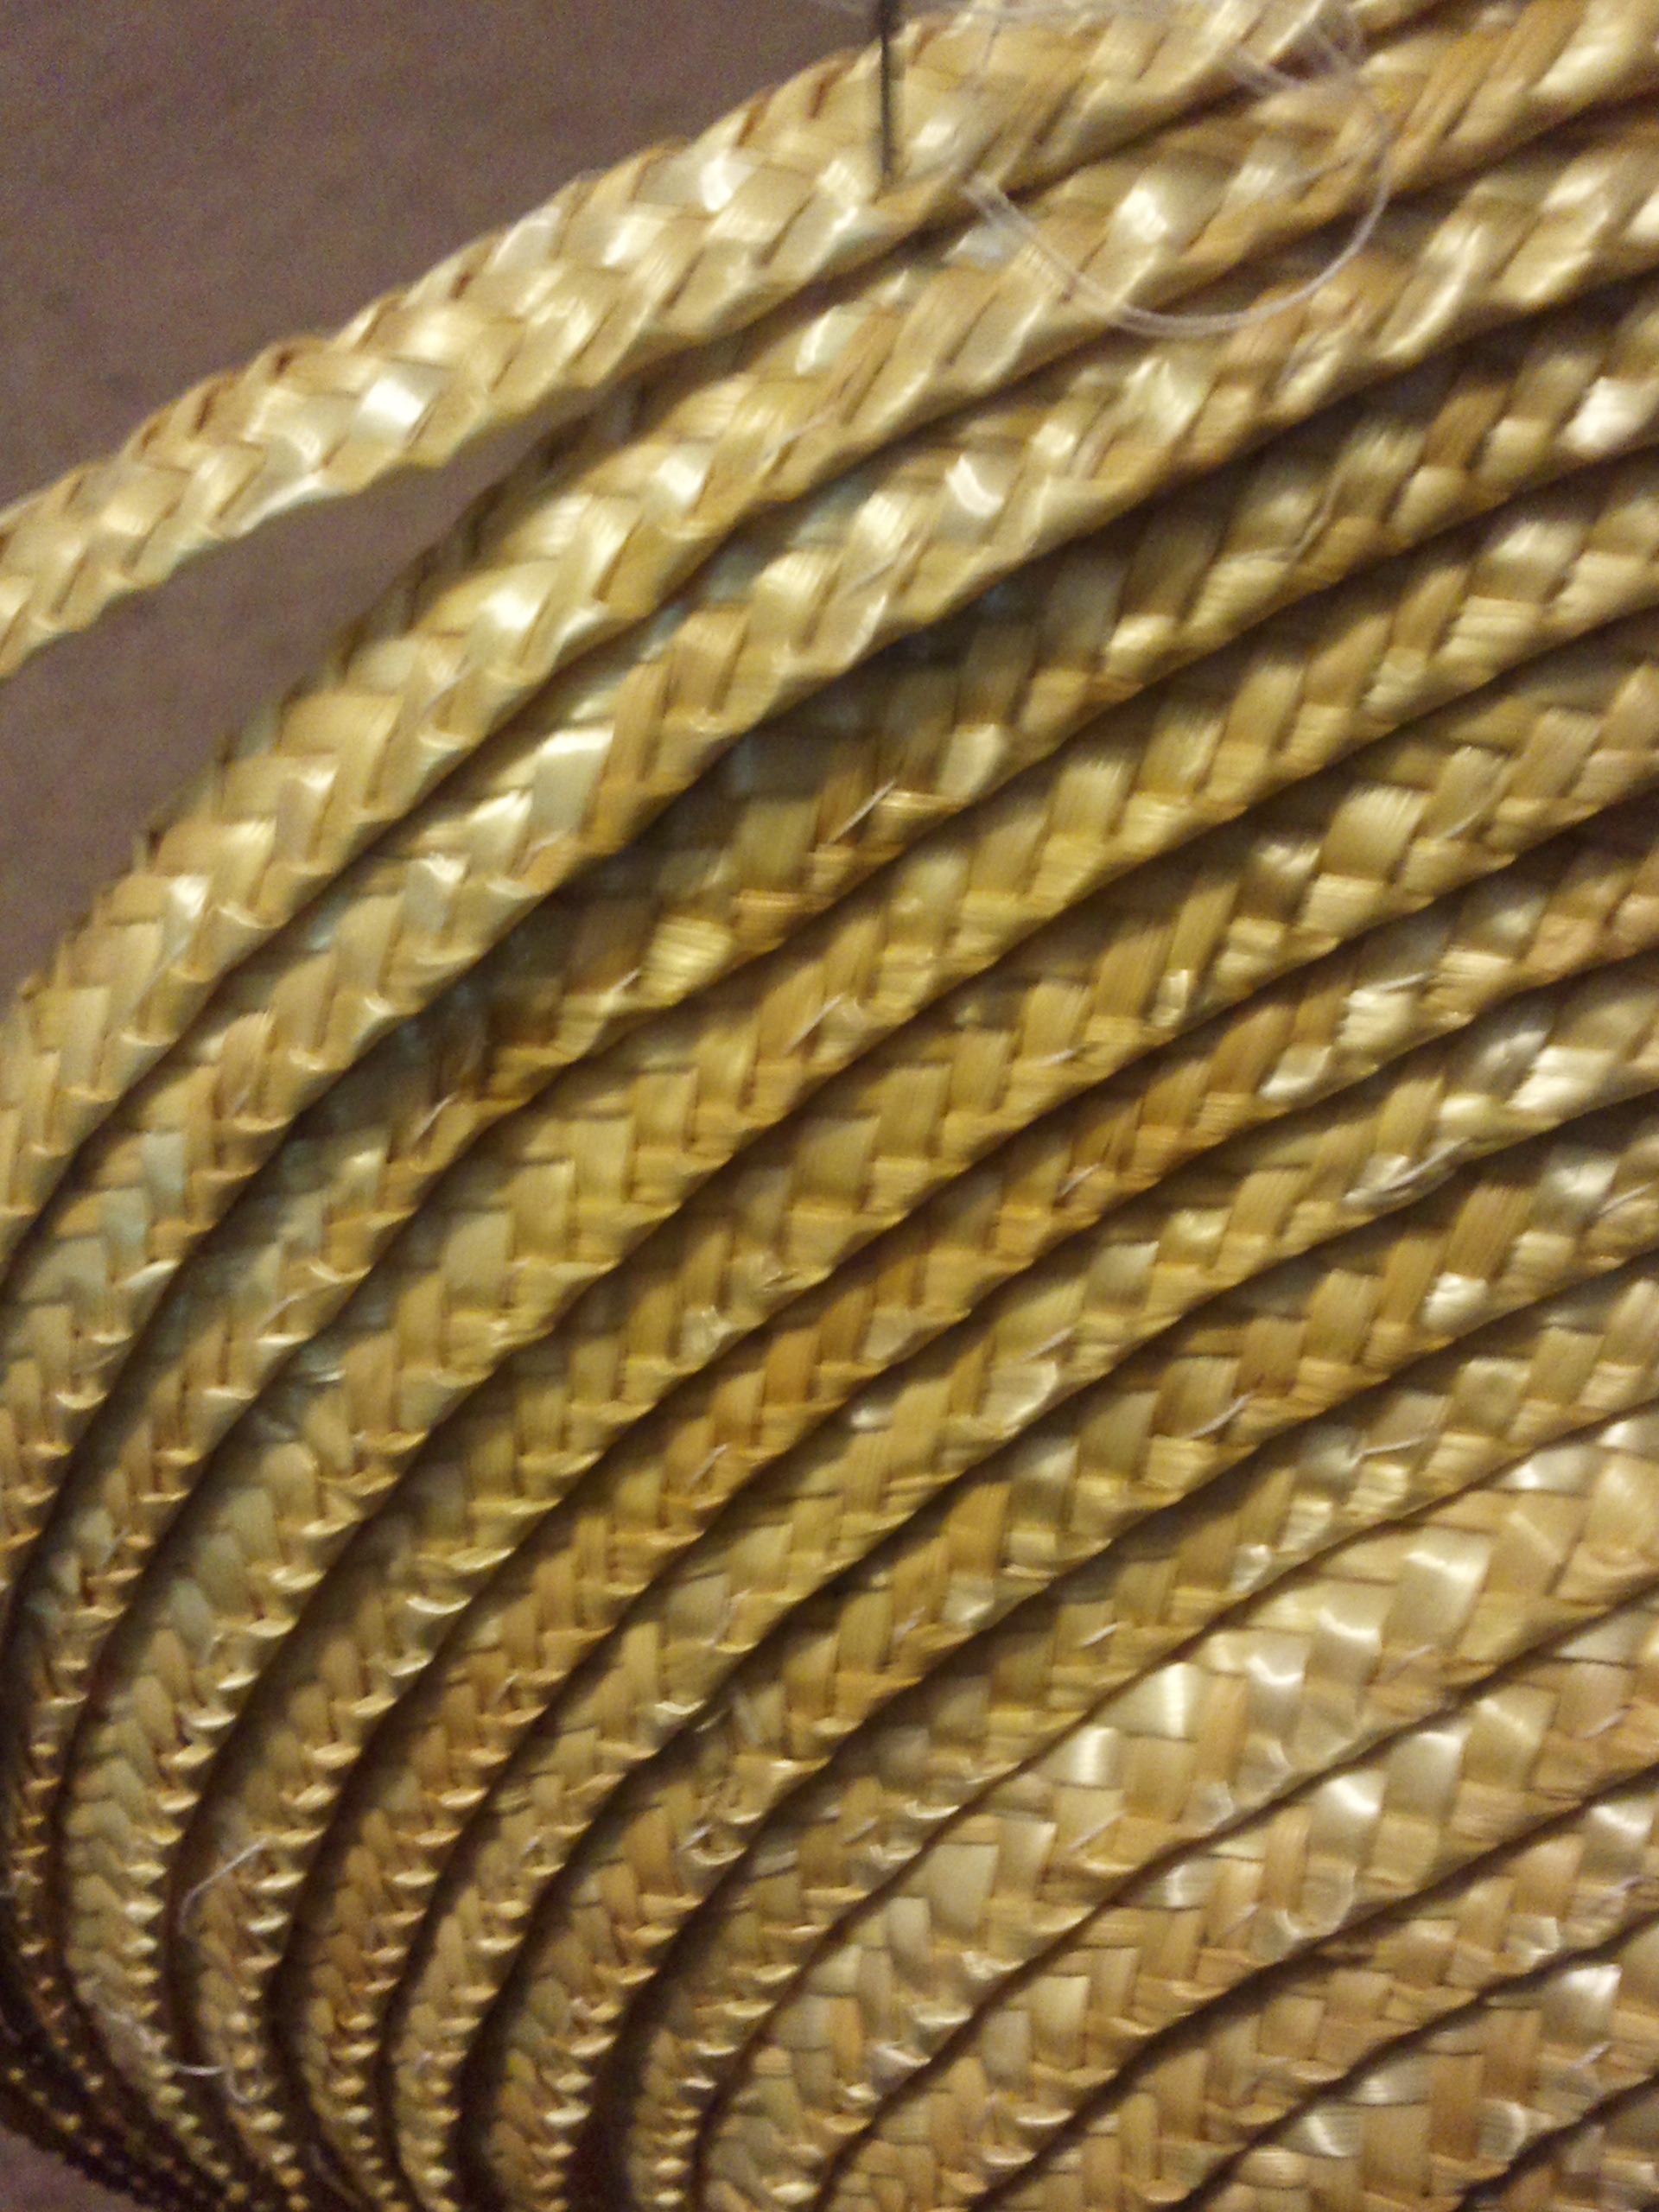
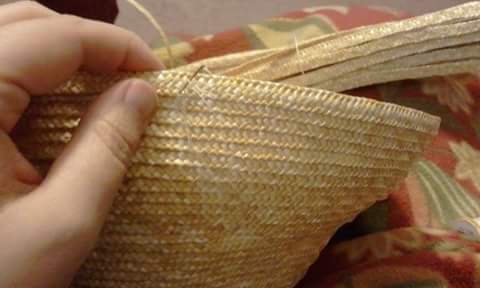
 I work with straw plait in a variety of widths ranging from fine to coarse, a quarter inch (fashionable) to three-quarters of an inch (coarse.) These straws have included Milan, French and a British straw among others. The image to the right shows a comparison of the coarse straw and a nicer Milan straw.
- I hand shape and sew each row of plait with 100% cotton thread.
- I develop the shape of each hat and bonnet by adjusting the curve and tension of the straw. This is how I get different brim heights and shapes. I also bend the straw to make it around the curves and corners found in the different eras I am working with this year.
- I wire each bonnet and hat by hand, again with 100% cotton thread.
- I block and size each piece by hand using one of two sizings. For some pieces I have carved blocks to aide in the shaping.
It takes approximately 6 to 7 hours to sew a small hat and 7 to 9 for a medium size hat, while most bonnets take between 8 and 12 hours with some more unique shapes or larger bonnets taking longer. Some pieces are blocked all at once at the end while others I am trying to get particular shapes in are blocked in stages. With humid summer days, it can take over 24 hours of drying before I am comfortable photographing or shipping a piece.
Here are some images of work in progress to give you a better idea:
See the different straw shapes I have developed based on originals this year in my 2015 Shape Gallery.


