About Pen-Wipers

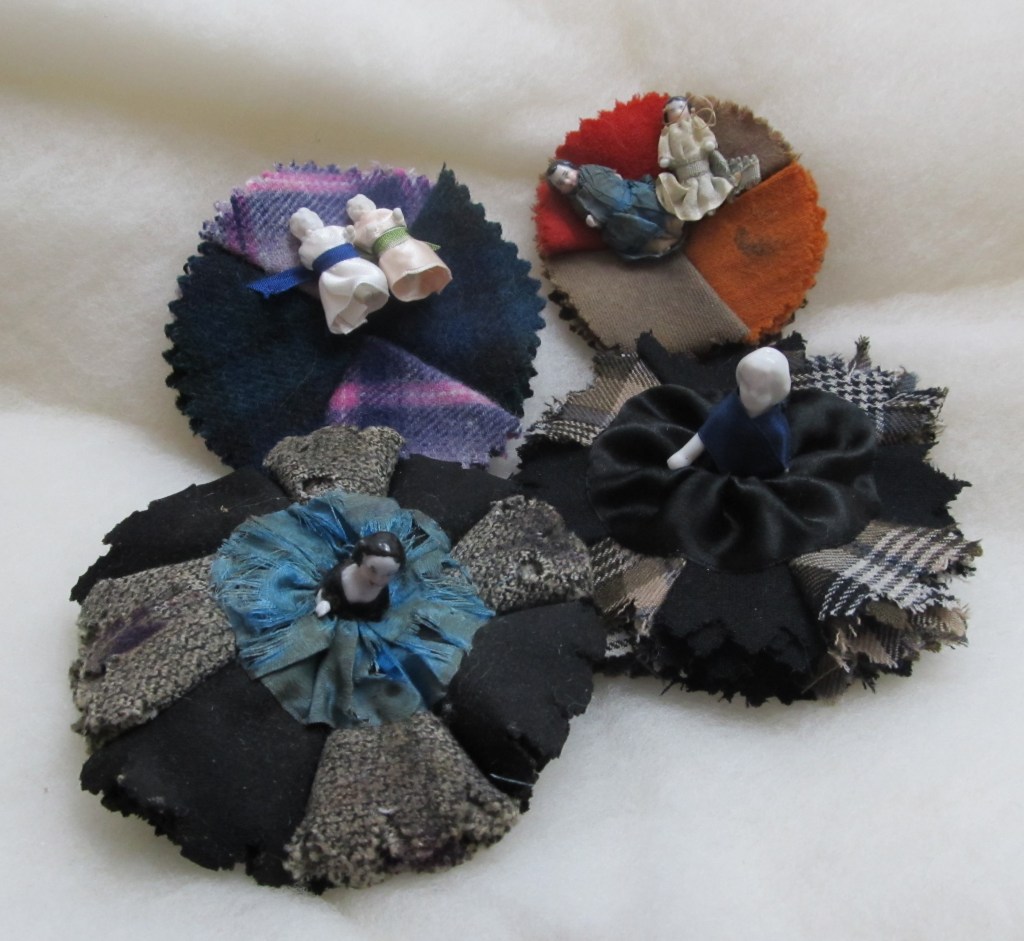
Whether penning a letter to a far a way sister or updating the household ledger, using a pen and ink called for the use of a pen wipe, or pen wiper. Through the Victorian era, pen wipers could be quite simple, entirely utilitarian, or quite decorative, comprising utility and fancy. In either case, a pen wiper was simply its name: a wiper for the pen. An inked pen could be dabbed off or cleaned upon the layers of wool.


At their simplest, a pen wiper was simply layers of wool layered upon each other or rolled together. The layers tacked together or secured simply. The wools used tend to be fulled, flannel, or worsted, holding its fibers tight as not to fray. Often the edged were pinked. With plain black wool being most frequently used as it disguises the discarded ink best, we see an assortment of colors, solids, and plaids used in pen wipers.


Directions for making pen-wipers were published in ladies magazines as well as books for young girls. They were often recommended as gifts. Lydia Child gives us a nice introduction to pen-wipers in her Girl’s Own Book:

“Pen-Wipers
These are very necessary accompaniments to a neat writing desk. The most common ones consist of two circular pieces of black velvet, neatly bound and caught together in the middle with two or three circular pieces of black broadcloth between them, for the purpose of wiping the pens. Some, instead of velvet covers, have bits of black broadcloth covered with bright-coloured round pieces, about as big as a wafer, laid oe over another, like the scales of a fish.
The butterfly is likewise a common form. The wings are of embroidered velvet, and the leaves between are of black broadcloth.
The most convenient pen-wiper is made of three pointed pieces of broadcloth, about half of a quarter of a yard long. Each piece is about an eighth of a yard, or two nails, wide at the bottom, and goes of to a point at the top. Each one is stitched up separately, and turned wrong side outward, when it looks lot unlike a tunnel. After they are made, the three are all joined together at the seams, and a tasteful little bow is placed on the top. The bottom can be bound or embroidered with gay colours, according to fancy. This form is peculiarly convenient, because the pen can be run into these little tunnes, and wiped without any danger of
inking the fingers. Pen-wipers should always be made of black flannel or broadcloth; other colours soon get
spoiled by the ink.”

Eliza Leslie includes directions for simple pen wipers. The first is essentially a book with pages of wool to wipe the pen upon:

A Pen-Wiper.
Take two old playing-cards, and cover them on both sides with silk, sewed neatly over the edges. Then sew the cards together, so as to resemble the cover of a book. To form the leaves of the book, prepare six or eight pieces of canton crape; double them, and cut them to fit the cover. With a pair of sharp scissors scollop them all round, and then lay them flat and even on the cover, and sew them in with a needle-full of sewing-silk. On these leaves of canton crape the pens are to be wiped. Black is the best colour.

The next is a garland of wool as a pen wiper.

“Another Pen-Wiper.
Cut our a great number pieces of canton-crape about the size of half a dollar, and of as many dif erent colours as you can procure. Lay them evenly in separate piles; let on pile be black, another red; some ples of blues, and some green. Let there be an equal number of pieces in each pile. Then stick a needle with a thread of silk in it, through the centre of each pile, and fasten the pieces together. When all your various piles are ready, make a small hole through middle of each, with a pair of sharp-pointed scissors, and run a silk cord through them all, as if you were stringing beads; arranging the dif erent colours according to your taste. You may make a string of pen-wipers of any length, from a quarter of a yard to a whole yard.
These are very useful to hang over a desk where a great deal of writing is done, and may be acceptable presents from little girls to their fathers.
They will look for the better having the edges scolloped. You may either fasten each cluster of pieces permanently to the string, so as to repairing stationary, or you may leave them to slip up and down like beads.”

Leslie’s third pen wiper comprises pasteboard and wool sandwiched between:

“A Third Pen-Wiper.
Cut out two circular pieces of pasteboard about the size of a dollar, or larger if you choose, and cover them with silk on both sides. Then get some canton crape; cut it into round pieces to fit the covered pasteboard, and scollop their edges in very small points. You may prepare eight to ten pieces. Put the leaves of crape between two pasteboards, and fasten them all in the centre, stitching them through and through with strong silk and a coats needle. Conceal the fastening, by covering it one each side with a tuft of ravelled of floss of a bright colour.

Come the turn of the century, Helen Campbell’s The American Girl’s Home Book of Work and Play (1902) has more elaborate penwipers in the chapter on gift making. First uses a baby’s shoe:

Baby-Shoe Penwiper.
Cut out of black cloth four circles three inches wide, and pink the edges. Fold each one across; then fold it again, so that the shape is like a quarter-circle. Take a baby’s shoe of red or blue morocco, and fill it with the folded circles, placing them so that the pinked edges project at the top. A pair of shoes will make two penwipers, and they are very pretty. If liked, the shoe can be fastened to a larger circle of pinked broadcloth.


A note regarding “Canton crepe” – Canton crepe as a recommendation puzzles me. When I look it up, it seems to be silk rather than wool. Canton crepe shows up frequently in searches for the 1920s as blouses and dresses. In advertisements, it is listed with other silks and/or from silk merchants. In the 1870s, searches show “Canton crepe bows”, again more likely silk rather than wool.

Based on feel, wool for pen-wipers tends to be a very tight weave in a medium weight with firm body. Some appears to have been filled with a soft surface, while some is quite smooth.

Published in: on October 20, 2021 at 1:05 am  Leave a Comment  

Fall Edition of In Detail – Now Available

This fall edition of In Detail may be of particular interest to my doll focused readers.

On Detail: Frozen Charlotte Pen-Wipers takes a close look at not one, but two pen-wipers made with frozen Charlotte dolls. The 22 full color pages detail the dolls and pen-wipers, and includes directions for making your own.

Published in: on October 18, 2021 at 1:05 am  Comments (4)  

Fall: Writing in Progress

I had a nice unboxing video going until…. Clara. This is take 2

Currently Working On:

  • Promoting my newly released Wadded Hood Workbook.
  • Writing the newest In Detail which looks at two doll pen-wipers. (Hopefully finishing Sunday.)
  • Writing a collaborative hood pattern, the Princess Capote.
  • Getting the pieces together for what I hope you think is a great holiday gifting offer.

If you want a Whimsy Witch Hat, don’t miss the current sale. I may pull them from the shop next week so people don’t try to order last minute for Halloween and have shipping disappointments.

Published in: on October 17, 2021 at 8:54 am  Leave a Comment  

What is a Wadded Hood?

A Wadded Hood, also called a Pumpkin Hood, is a style of sewn winter hood made in much of the nineteenth century and later eighteenth century. This type of hood is also known as a wadded hood or an “ugly.”

The wadded hood was commonly made with three pieces: the brim, crown, and bavolet, with the crown and brim occasionally combined. Rather than being quilted, the brim has parallel channels sewn across the head which were filled with wool wadding or down. Between these channels, narrower channels of cord help draw up the brim and give it light structure. Occasionally, some of these channels are cane or wire, though not as often as in quilted styles. The crown of this style tends to be small, with a row or two of additional wadding. The bavolet ranges from rather a rather short couple inches to as much as four inches.

The wadded hood is one of the, if not the, warmest style hood as it hugs the head snuggly. The draw back is there is no protection for the face.

The exterior fabric is most frequently silk taffeta. The smooth, tight weave helps with moisture control. Dark solid silks out number the plaids and lighter colors, which were also used. The linings tend to be polished cotton or cotton sateen in neutral browns and creams. Most pieces have a facing of the exterior silk.

I find wool wadding to appear more frequently in originals than down. The wadding fairly evenly fills the channels, though not as firmly as some quilted hoods. These hoods are quite soft. The bavolet tends to be very lightly filled, though I suspect some loss has occurred over time for some pieces.

When decorated, a bow tends to embellish the center back of the crown at the neckline. Some pieces also have a row of smaller bows or mock-bows along the top of the brim.

Learn more about Wadded Hoods and How to Make Your Own in my New Wadded Hood Workbook.

Published in: on October 12, 2021 at 6:30 am  Leave a Comment  

Wadded Hood Workbook!!!!!

I am trying to squeal or cry as I write this…….

Finally! After 5 years in the wanting and the making….

My Wadded Hood Workbook is Available!!!

This pattern, become workbook, contains a detailed look at a half dozen original wadded hoods from my collection and directions for making not just one wadded hood, but directions for combining methods into a nearly endless assortment of wadded winter hoods!

The workbooks starts a close look at original wadded hoods from my collection.
Next, it shows you how to make your own wadded hood with original cuts and methods. This includes multiple brim, crown, and bavolet options.

This purchase includes 3 downloads:

  • The Pattern Pieces (17 pages)
  • 2 files for the Workbook (53 pages total)

I tried to figure out just how many different ways of making a wadded hood: 5 brims….. 2 facings….. 3 crowns….. 2 bavolets…. mathematically that works out to 60 variations!

Find my new

Wadded Hood Workbook

in my Etsy Shop

Published in: on October 11, 2021 at 3:09 pm  Comments (1)  

YouTube Update

I apologize for the lack of videos lately. I have been so tired and distracted by the time I get home from work, I have nothing left for a good video. I also haven’t felt like I have much to say. I will get my act together an do better. I want to do some small crafts for the holiday season. Maybe some 19th century things. Maybe some ornaments. I am not sure.

In the meantime, I have changed the settings on some favorite videos from unlisted to public. I also updated titles and descriptions. This will make them easier to watch on YouTube. The unlisted videos I linked though the blogs are only visible on the blogs or link. So, you can still search and find them here.

I added a new playlist for the hand sewing videos. After the last couple, I received comments about how calming they are and how people like listening to my voice. I hadn’t thought of this before. So, I am going to try to record more with this calming idea in mind. They may have some women’s employment history. They may have stories. I’m not sure.

Published in: on October 6, 2021 at 1:05 am  Leave a Comment  

Silhouettes

For years now, I’ve wanted to have my silhouette cut by Lauren Muney of Silhouettes by Hand. When I heard Lauren would be attending the Genesee Country Village’s Fall Festival and Agricultural Society Fair, I knew this would be my chance. I was so excited. I set the money aside for weeks so I wouldn’t touch it.

On Saturday, Lauren cut my first silhouette. I followed her direction via FB to simply wear a messy bun. Glad I did. I love how this turned out. She captured the fun detail of my hair. I absolutely love my nose, which I’ve long wondered about since my nose apparently was a discussion point among hospital nurses as a baby.

This silhouette was backed with a natural white background and a scenic background. The latter is now set in a period reflective oval frame with a golden rim. This has joined my growing portrait wall. (Below)

Sunday, which was quite the rainy day much more reflective of the common weather for this weekend. I returned to the village with one of my bonnets (in a band box in a plastic bag in a canvas bag,) my soft crown straw with hand worked brim points. I would like to say I picked this particular bonnet, but reality is it was the one I could reach first on the great tower of band boxes. There are so many details in this silhouette.

Published in: on October 5, 2021 at 7:46 am  Comments (2)  

Which Witch Hat Fits Which?


I did a hat fitting for some of my dolls to see who could wear the current mini Whimsy Witch Hats.
https://dontpaintthecat.wordpress.com/2021/10/04/which-witch-hat-fits-which/

This is the extent of my millinery work this evening. I need to flip the projects in the work room, meaning transition the materials set up from Whimsy Witch Hats to winter

Published in: on October 4, 2021 at 6:57 pm  Leave a Comment  

Ag Fair Entries 2021

A year ago, I thought I would have a lot of entries for the 2021 fair because we missed 2020 and I had the whole of the year to sew. Nope. It seems, despite the incredible amount of sewing I did this past year, I sewed very little that was enterable and I also managed to forget much of what I made. Go figure.

On the up side, each piece I entered this year had a story…..

Chocolate Pocket – In early July, the village held their annual Chocolate Weekend. My challenge for the weekend was to come up with something Chocolatey to share. I selected chocolate color fabric to make into a pocket. This gave me the opportunity to talk about pockets with visitors. This was a big success as we had many great conversations. The pocket itself was pieced together freehand as young visitors helped select the order and positioning.
Straw Cone Hat – I was able to talk about women earning money through sewing straw for two events this year: the Civil War Era and Novel Weekends. This often thriving cottage industry gave women the opportunity to support themselves and even their families for much of the nineteenth century.
While neither era I demonstrated would have made a conical hat we now attribute to being a witch hat, the skills are much the same. About a year ago, I started wondering if I could pull off making a good cone hat or witch hat. The shape itself wasn’t the challenge, it was the size and the consistency. This summer, I jumped in and gave it a try. I am quite pleased with the cone shape. It is consistent, the hardest challenge, and has a little attitude with its curve. The brim is a little narrow as I ran out of straw. Go figure. I may give it a little decorative edge in the future. The inside is lined with green silk and a little cotton batting, hand quilted of course.
Corded Sunbonnet – I suspect by now many of my friends knows I carry extra sunbonnets for particular events. If you’ve walked into the millinery shop during CW weekend, there is a row of pegs with sunbonnets hanging next to the door. If there aren’t, that means they are all in borrowed use. I love seeing those pegs go from full to empty.
This particular white sheer sunbonnet replaces one my little sister borrowed nearly a decade ago. That bonnet was one made from a leno weave white sheer. We aren’t quite sure what happened, but that bonnet went from white to polychrome. (I wish it had been kept so we could dye it.) For years, many years, I had replacing that bonnet on my list. This past year finally allowed for the time to do that. Actually, it took my a year and a half to cord this. I know, kinda silly. I can sew straw endlessly for hours for days. Plain sewing… on fabric…. um…..

The next few entries are Pandemic stress projects. I found small projects requiring short amounts of attention and nearly instant satisfaction were what I needed during 2020 and 2021.

A Bowl of Balls. – Yup. This bowl is truly filled with stress reducing balls. Each one of these are pin balls from the nineteenth century. Each one can be made in a day or in several days if sewing for a short time each evening. The corded ball, (center and 3pm) is they first project I introduced during my lockdown YouTube show. This became such a favorite with people, I offered it as a kit in 2021. These two are made with silk threads left over. The ball at the top is one of my pillow pin balls, the project that became my “recover project” after surgery a few years ago. This project has small amounts of sewing that is gentle on hands that have been injured or are otherwise weak. One pillow at a time keeps you from doing too much. As it turns out, one pillow is all the energy I had most days after school in September. My goal had been to make two or three for the bowl. The last three are my newest pin ball made from paper pieced triangles. This one gives me 5th grade flashbacks.
Elephant Pen-Wiper – I have developed a fascination with pen-wipers. I love how a utilitarian item can become such a playful item. When I saw the pattern for this elephant come up in my feed, I didn’t care that I had no idea what it said, I had to make it. After completing this elephant, which I think is way too adorable, I learned this is the design that started what became the Steif line of animals. Love that.
“Duffle” Style Travel Bag. – One July morning, I made a bag in a day. A conversation with a friend reminded me I had the materials of one of the duffle style bags. When I woke up in the morning, I decided to make a bag. This one is made from memory, having made one years ago with the Shooting Star directions, using a circle and a straight edge. I didn’t bother measuring a thing. It is entirely handsewn, first basted together, then back stitched. It is about 150% the size of my previous bag, which is closer to the “Plaid shawl cover” size from Godey’s 1871.

Published in: on October 2, 2021 at 3:01 pm  Comments (1)  

Self Care – aka Ag Fair Day 1

This week, several people mentioned “time for self care” to me as I was physically & emotionally dragging, and everything was getting to me. Each time I heard it, I thought “I don’t know how.” What I did know is I was on my way to an epic physical crash. I think that was Thursday and Friday. Friday, when I got home I did crash. I on and off slept on the couch, crawled to bed where I slept some more. In the morning Clara woke me up for breakfast. After I fed her, I slept again. Yup.

I did finally get up and get myself together to go to my favorite day of the year: Ag Fair!

This is my attempt at self care.

The weather is beautiful. Absolutely not the norm for Ag Fair that often is accompanied by a dip in temperature and wet. Not this year. It is sunny. 70s or so.

As I drove into Mumford and approached the light to turn left, I saw a row of cars approaching from the north-ish. Each one turned on its signal to turn. Oh, this was nice to see. They might be going to the museum. Indeed they were. Each car turned into the parking lot and slowed. Wow. The parking lot was packed. It was somewhere around 10:40 and the parking was filled to the road. We were being directed to the back of the front lot. I can’t recall the last time I parked this far out. It put a huge smile on my face. (By the time I left mid-day, the parking lot was completely filled and the CEO was at the front gate directing traffic to the south lot. It was great to see. )

I was completely unaware of the amount of wool lint on my black shirt. I had been pulling hats out of the millinery room. Opps. I headed for Thompson Tavern. More on that story in a future post.

I spent the rest of the morning wandering here and there aimlessly. Aimlessly was nice. So nice. I watched a little of the herding demo. I watched a little of the circus demo. I browsed the tent of vendors.

Then I headed to the carriage barn for the “Blue Ribbon Competition.” I had a little surprise for a friend there. It is all about the smiles.

(Sadly many of my photos came out too blurry to share. The light is too low and I get a little too excited to stay still.)

This year’s contest definitely goes to the non-textile arts in my opinion. There were some wonderful entries:

These two cat pieces particularly caught my heart. The hooked rug is just so alive and playful. The child’s painting has an expression that tugs at heart strings.

As with tradition, I will put my entries in a separate post.

Published in: on October 2, 2021 at 2:07 pm  Leave a Comment