What are You Wearing on Your Head this Winter?

It certainly is a COLD winter so far for most of us. We’ve been seeing single digits for days with days to come. Some have it much harsher with double digit negatives. I hope everyone is doing their best to stay warm and keeping their fur and feather friends warm as well.

With it being so cold, it is a good time to talk about the nitty gritty of wine get bonnets or hoods. Well, some of it. I need to save so e stuff for the up coming book.

Let’s talk about silk verses wool. One of the most common questions I get about winter hoods is if silk is better than wool or wool better than silk. The answer is “Yes”. 

Both silk and wool are found in original bonnets from 1840 through the 1860s. Without tallying up those I’ve surveyed, including my personal collection, roughly 65%-70% of extant hoods have silk on the exterior and roughly 35%-40% have wool exteriors. Other materials show up as well.

Silk is nice for wet snow. Think about how an umbrella made of silk protects against the rain. In a wet snow, silk will hold up against the wet for a while. Eventually, the water will soak through. This happened then as it will now. Water marks can be seen on some originals. (There is a difference in water staining for when a bonnet was worn verses damage in storage.)

Wool helps with moisture for an extended time as well as providing insulation. Wool needs to be a smooth, tight weave though. A fuzzy wool, such as flannel, will act like a snow magnet, inviting it to cling to the fuzzy bits. Wool also needs to be very light weight. Thick or heavyweight wools are not regularly found on original hoods.

Left: Original hood with a solid color silk exterior. Right: Original wool hood with a plaid wool exterior. 

Moving on to the inside, the batting or wadding – The vast majority of originals use some type of wool for the wadding or batting. A significant number are natural, just cleaned and combed off the sheep. I’ve seen a nice mix of colors inside some hoods. Some originals are lightly filled, while others are quite densely filled. Some thinner hoods have a thin batting more similar to 100% cotton quilt batting. Yet a couple others have a layer of fulled wool inside, completely covered (not as a visible lining.) Wool batting is by far the warmest option, over cotton batting. I have not yet determined if the thicker, fluffier, lighter wadding is warmer or less warm then the denser, tighter wadding/batting. I can tell more wool does seem to be more warm. There is also a point where there can be too much warm.

Left: Original wadded silk hood with fluffy wool wadding. This is sometimes called a pumpkin bonnet/hood. Right: Original silk quilted hood with wool batting. 

I am going to leave the lining for the upcoming book. Linings are just too varied and fascinating for a single post.

How about wind? Some of us live in areas with amazing winter winds. There is a quasi-local event each February that sees frigid, harsh winds coming off Lake Erie and picking up some extra speed off a frozen pond before walloping us on the overlooking porch. For this type of event, I want both warmth and wind protection. A deep brim that reaches in front of the face with minimal rise will help keep the wind off the face. A long bavolet will help protect the neck. Another help can be longer sides or the long, lappet like sides.

Left: Original wool and silk hood with long lappet like sides. Right: Original silk and silk hood with long lappet like sides. 

I will be working on some new hoods soon-ish. In the meanwhile, you are welcome to make your own hood from one of my patterns. They are available for instant download through my Etsy shop. 

Published in: on December 31, 2017 at 10:44 am  Leave a Comment  

2017

It is that time of year. Time to reflect on the year past and look forward to the year ahead. Well, 2017 was quite a year. I could call this post simply “A Year in Review” or “Personal Reflections on 2017”, or something more accurately: “The Good, the Great, and the Ugly” or even “The Stone that Tried to Kill Me.”

It really was that kind of year, wasn’t it.

Here we go…..

The Good

img_20170215_175129.jpgThe world of millinery went rather well this year. By the time the snow fell again, I made 57 straw millinery pieces this year. I lost track of the winter hoods. I also added a line of evening headdresses, focusing on simple, classic looks of the mid-nineteenth century.

_20170718_150253Thanks to some wonderful people, a trio of original bonnet blocks arrived early in the summer. I’ve only been able to really work on one, Serenity, which I Love. (It was a mobility thing.) I look forward to working with the other two. I also had a beautiful custom block made for Regency era pieces. I still need to start the adventures with this block. Accompanying the trio of blocks, was a beautiful hand dyed length of straw awaiting being sewn up. (I’ve come to notice I do this thing where I save things I really, really want to do for the end or when I’m feeling particularly good. I need to fix that because this comes too close to the dessert or favorite food thing. You know, where you save your favorite part of a meal for the end so you can enjoy it, but then you end up too full to truly enjoy it.)

Shop at GCVM CW 2017 bI did make it to a couple events. I am aware that I made it out to the Independence Day celebration in modern clothes. Though, I don’t remember much at all. I did make it to the GCVM Civil War event in July. IMG_0333I set up my Millinery Shop and managed to pull off period clothes that didn’t hurt. I had two excellent helpers. Thank you Elyse and Elizabeth.  It wasn’t until packing up time that I did damage to myself. I also made it to Preparing for the Holidays, where I got to spend an exceptional day working with a great craftswoman.

The Great –

It is all a bit of a blur right now, but 2017 was pretty awesome for workshops.

In June, I had the pleasure of offering my Millinery in Miniature workshop for the national ALHFAM conference co-hosted by the Genesee Country Village. This was an incredible opportunity. It was great to get to attend parts of the conference as well. (see below)

_20171110_195408
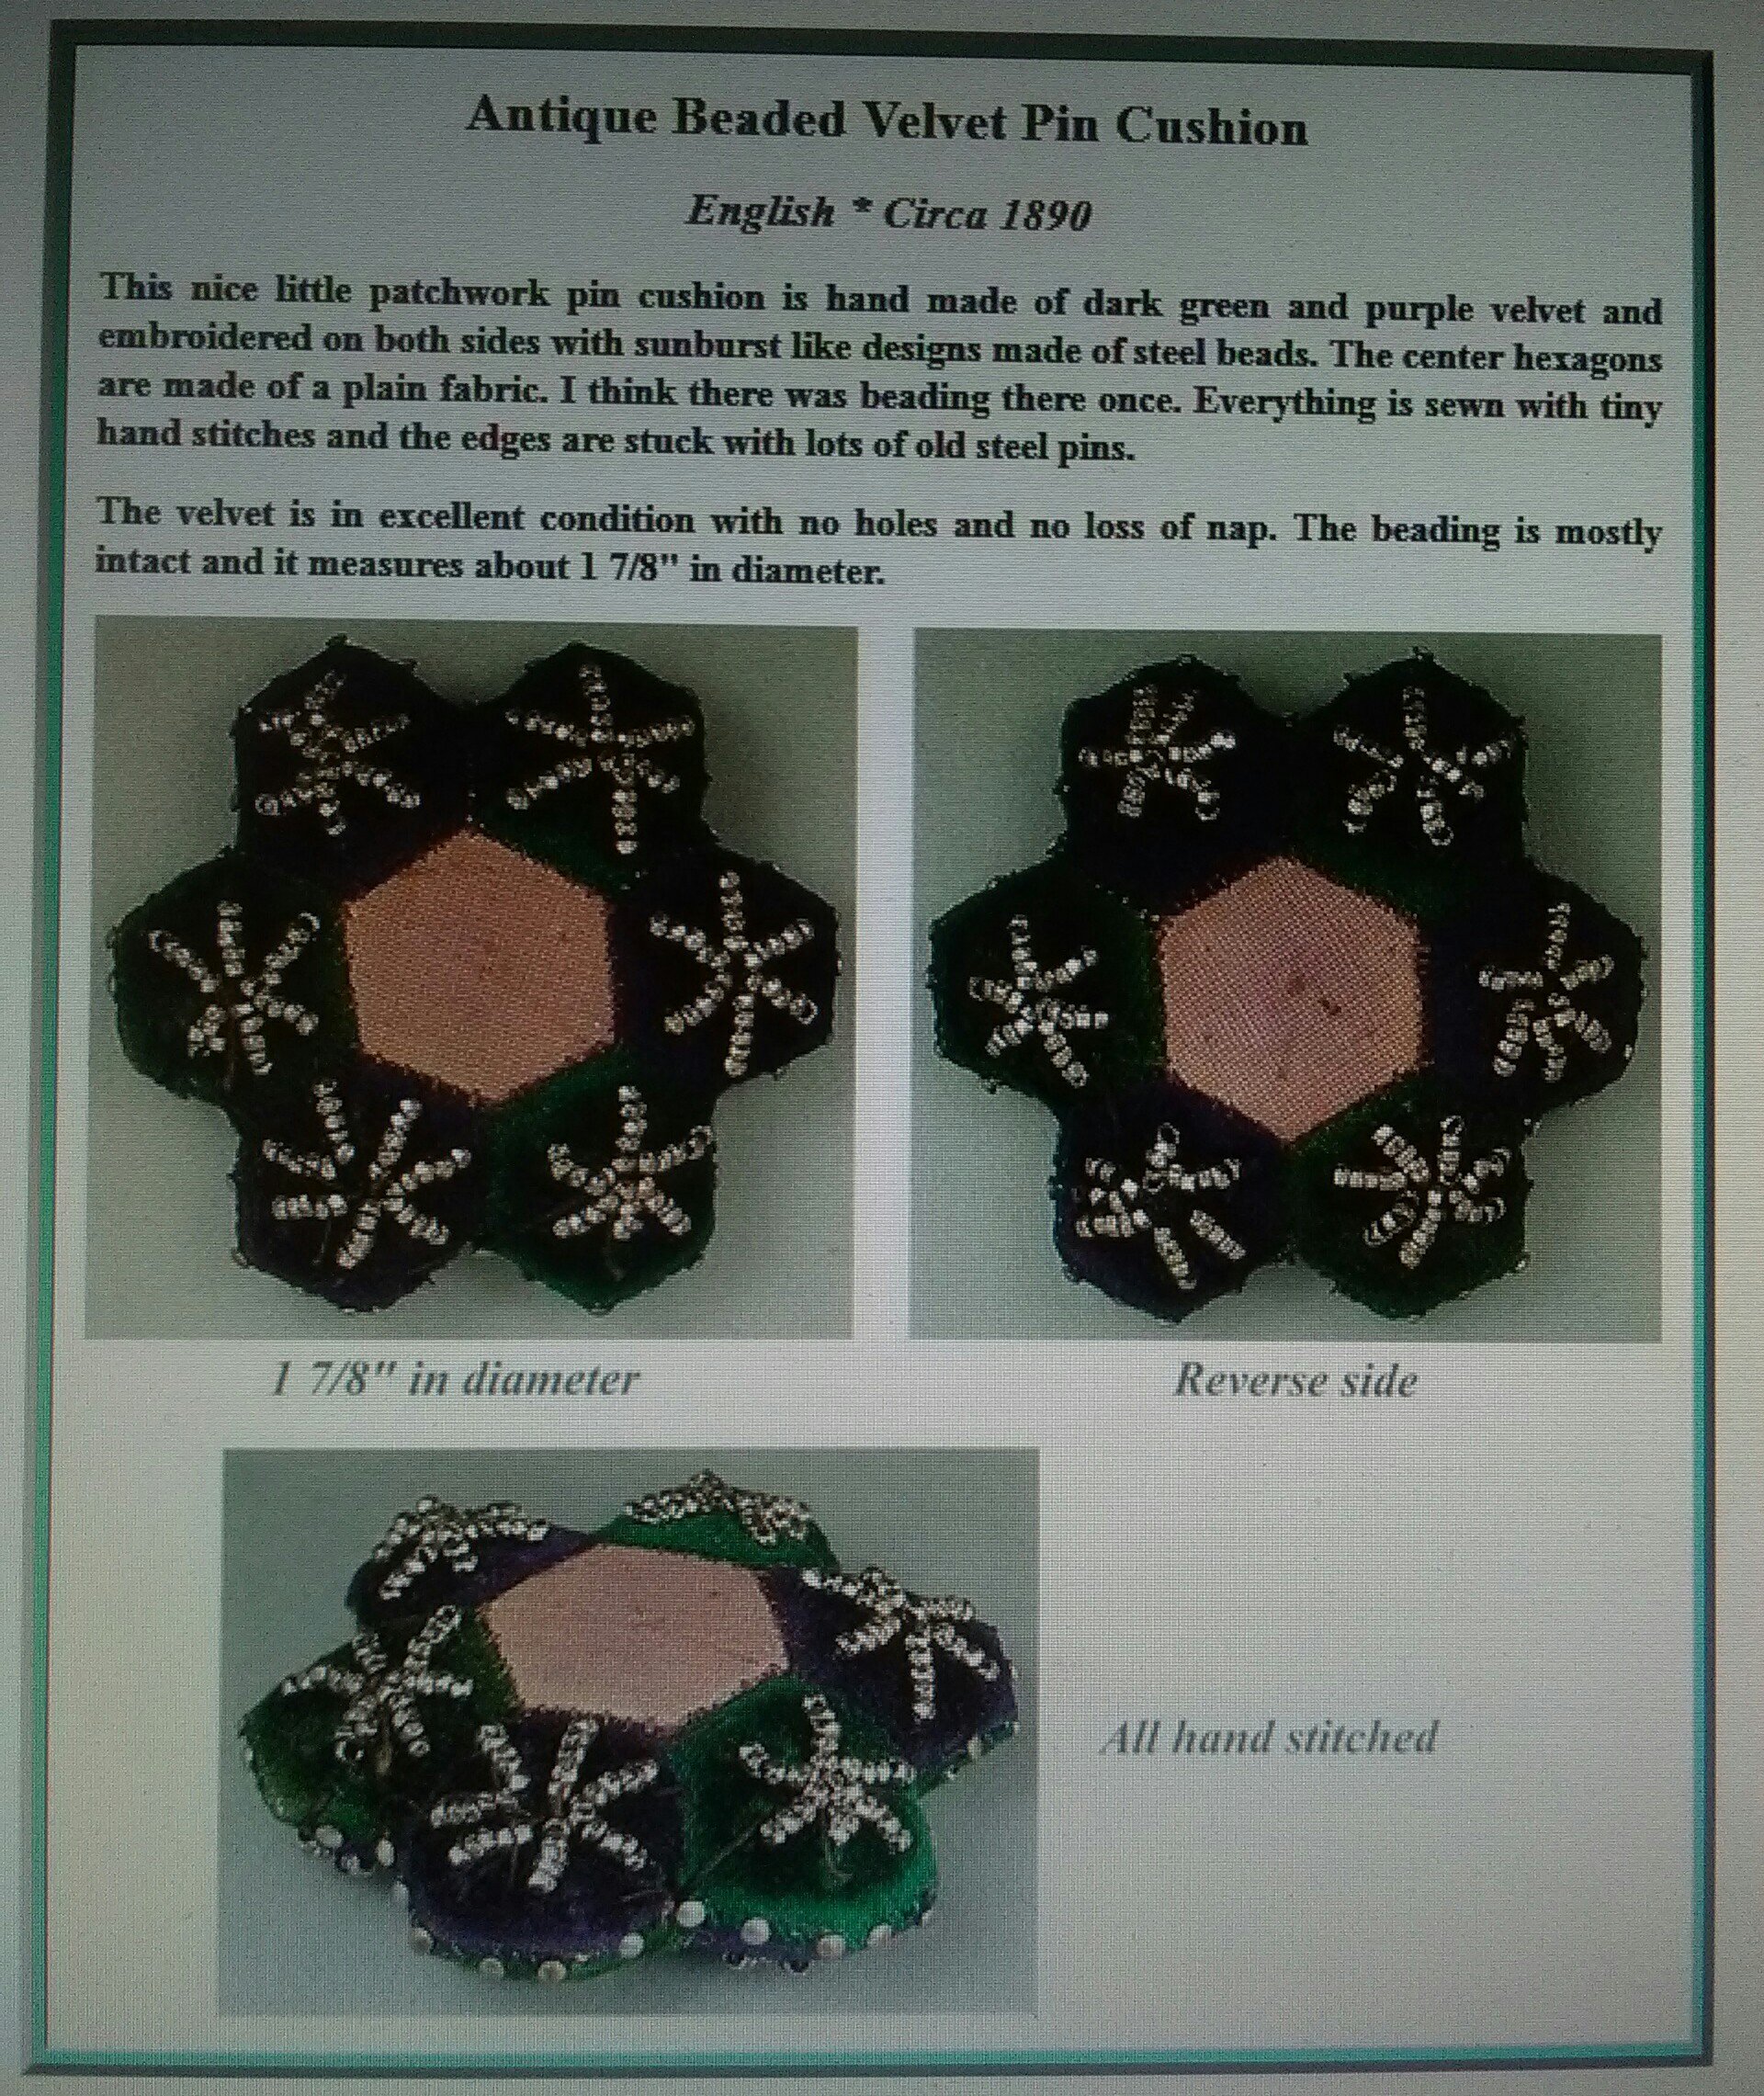
In November, I offered two very different workshops at the Museum’s Domestic Skills Symposium. On Friday, I offered Tools and Trims, a completely different, kinda crazy workshop looking at how to mimic the trims of the later 18th and 19th centuries. I spent much of the year acquiring pinking machines and dies for this workshop. On Sunday, I offered a favorite with a twist: A Pin Cushion Sampler. This year the sampler included Victorian favorites: a strawberry, a walnut, a seashell and and acorn.


The Ugly

bd1Ah, the ugly. That which dictated much of my 2017. I mentioned in my 2016 personal reflection that I started feeling ill around the time I was releasing my second winter hood pattern, November Thanksgiving-ish. As it turns out, that is when my gallbladder started spitting out stones causing all sorts of ruckus. I just had no idea. I figured I was eating something wrong, then had pulled a back muscle. Now I know I carry pain differently and have some stress coping mechanisms. It has made for an interesting, dysfunctional, challenging, eye-opening year.  Now, 3 ER/Urgent care visits and 4 surgeries later, hopefully we are wrapping up the gall stone drama.  (Please meet the 12mm stone that finally did me in to the right.)

2017 Goals

With 2017 playing out the way it did, many of my personal and millinery goals kinda just didn’t happen. I did not exceed my 2016 sales. I did not sell 100 publications. I did not explore straw techniques to the extent I wanted. I did not explore straw dying in the back yard. I did not set aside a monthly amount for a new house. I did not finish either of my personal fiber goals. I did not make it to Farmer’s Museum nor Rose Hill this year.

_20170820_131516On the other hand…. I did do pretty decent for someone who totally got her butt kicked by a 12mm stone. I actually feel pretty darn good about that. Despite utter exhaustion on many days and this weird pain in my side, I made some pretty great pieces this year, I kept the shop up, and learned a few things.

2018 Goals and Plans

In many ways, the goals of 2017 are a do-over. I do have three over-arching goals for 2018:

  • Focus, Streamline, and Simplify – This goes for my millinery, FanU pieces, and the Etsy shop. I was considering adding shop sections for vintage pieces. Nope. That just doesn’t do it for me.
  • Make time for the Joy. Some time around mid-November it hit me that I just wasn’t enjoying what I was making. Part of it may have been burn-out, part just the year. But, I became very aware that I need to take more time to do some projects that are just for the fun of it.
  • Sink my teeth into something. What this is going to play out to be… we shall see.

Don’t worry, there are some more specific things that are on the list for 2018:

  • I have a couple books to finish. Wintering Warmly has, um, ballooned or, um, something like that. There are some spacial, technical things I need to work out to get that on ‘paper’. To Net or Not to Net: Revisited is much closer to being available. I need to just lock myself away for a few days to get some solid writing and layout completed.
  • _20171128_060900If you haven’t noticed, I have started a monthly project post that I hope to continue through the next year. Each one will be something small with some guidance or direction on how to do it your self. They won’t quite be a thorough as the Sew Alongs.
  • Another blog goal is to write a Monthly Update. This was inspired by a favorite blogger I follow, Victoria Elizabeth Barnes. Her blog meanders beautifully between stunning antique finds and adorable foster kitties. I enjoy the way any one of her posts can have a little of both, as well as what is happening in her life, projects she is working on, what she is reading and such. My monthly update posts may fall just about anywhere in the month.


Published in: on December 29, 2017 at 2:00 am  Comments (2)  

Monthly Update

I am going to get a head start on one of my 2018 blogging goals: A Monthly Update post.

This was inspired by a favorite blogger I follow, Victoria Elizabeth Barnes. Her blog meanders beautifully between stunning antique finds and adorable foster kitties. I enjoy the way any one of her posts can have a little of both, as well as what is happening in her life, projects she is working on, what she is reading and such. My monthly update posts may fall just about anywhere in the month.

So, what have I been up to this December???

I have discovered the art of lazy couch laying. This is incredibly new to me. I don’t think I’ve ever come home from work for three consecutive evenings to lay upon the couch to do nothing other than sit, cat cuddle and doze off. It is delightful. It is strange. It is pretty cool.  

_20171128_060900In and around my experiments with lazy, I’ve made a few things. I started the month with ribbon pin cushions, weaving ribbons together. These were lots of fun. I still have more ribbon to make more. _20171128_060800I designed a bird ornament to make with my techniques from Fanciful Utility. This involved some adventures in wool fulling. Oh-so-soft. I stopped into my local quilt shop during our Hometown Holidays festivities to learn a new-to-me paper piecing technique. I loved the little ornament I made. Then the week following, I stumbled upon a way too similar pin cushion. So, I had to make that up as well. Then I found another sorta-similar. Stay tuned for that at some point.

_20171126_191040The shop had a nice December. After a crazy year, I was of two hearts on the shop going into December. Part of me wanted to stock it with all sorts of goodies. Part of me was in dire need of down time. See above to figure out which won. _20171126_190738


I finally ordered more archival boxes. I wanted to get those ordered before the snow fell. Luckily, it turned out Gaylord Archival had a great sale. I dedicated a chunk of last Saturday to getting the summer and fall arrivals properly re-wrapped and boxed. Once again, I didn’t order quite enough. I miss counted. Okay, I plum forgot about a couple extant hoods that I bought while in the hospital. I need to order some deeper boxes next time too. I was able to coax the original shape further back into a few of the wired and and caned than I had planned. I anticipate a major photographing session this winter or spring.

Published in: on December 16, 2017 at 2:00 am  Comments (1)  

Closing for the Season

I am closing the Etsy shop today for the season. E-books and e-patterns will still be available. I will reopen the shop some time after the new year. 

A huge Thank You to all who have supported me and listened to me whine through this past year. It was quite the adventure. Please enjoy this holiday season. I wish you all safe time with friends and family. 

Published in: on December 15, 2017 at 10:52 am  Leave a Comment  

Announcement from Ensembles of the Past

​Sara Gonzalez, from Ensembles of the Past, share a wonderful announcement. She will be exclusively producing the beautiful 19th century reproduction buckles created by Jeremy Richardson, the owner of JR&Co., who has ceased his production. Ensembles of the Past will be the sole manufacturer of these wonderful, high quality buckles. Sara says “I will be continuing the fabrication of Jeremy Richardson’s fabulous buckles, with additional styles to be added in the future. It is my hope that I will do justice to the endeavor Jeremy Richardson began, and I look forward to serving each of you through this new channel of my growing company in the coming days!”

Ensembles of the Past is currently offering the last of Jeremy’s buckles stock and pre-order buckles through the Etsy shop for $12 each. After, buckles will be $15 per buckle. Sara anticipates the first shipment towards the end of December. 

 
I own one of each. Yes, all six buckles between Lily and I. I love them. I find the quality to be exceptional, and the ease of wear wonderful. Having worked with Sara on fabric selections for my hoods, I expect she will continue the fine offerings Jeremy started. 

Please take a moment to visit Ensembles of the Past to purchase yours today. 

Published in: on December 10, 2017 at 1:01 pm  Leave a Comment  

Hexagons, Now and Then.

Last weekend, I sat with a local crafter at Chestnut Bay, the quilt shop with the great reproduction room within dangerously close distance, making the cutest paper pieced wreath ornament. A cute, modern project that I wasn’t going to mention on either of my blogs because it is her project. Well, I am going back on my decision because I saw this listing on Ebay:

A velvet pin cushion in nearly the same shape as the wreath, just with a center piece.

(Apparently, I just missed it, it having ended on Monday. I hadn’t been looking at Ebay because ’tis-the-season-of-not-shopping-for-myself. Then, Pinterest decided I needed to see it anyway.)

Well, let’s see…. we have tiny pieces, velvet, little stitches, and cute bead-work.

Of course, I am going to have to make this thing.

My version uses a silk/rayon blend pair of silks in forest green and russet brown. I really like how the velvet looks around the paper base. It does get pretty bulky on the back though. Mine came out larger, 2 1/2″, using the same hexagons as the wreath. I made two changes: The center is wool and packed fuller with batting rather than a fabric over a paper base. This way the center could be a pin cushion as well. I am so-so on how much I like that. I set the beads in trios rather than fives because i am a bit tight on beads. 

Published in: on December 8, 2017 at 8:56 pm  Leave a Comment  

December Project – Ribbon Pin Cushions

c.jpg

Woven Ribbon Pin Cushions have been catching my eye for a few months now.

There are only a few examples out there, that I have found. Most of them seem to be coming up on auction sites, often with the all too popular but not authenticated Shaker attribution. (I can not say whether or not ribbon pin cushions have a Shaker connection.)

_20171128_060900
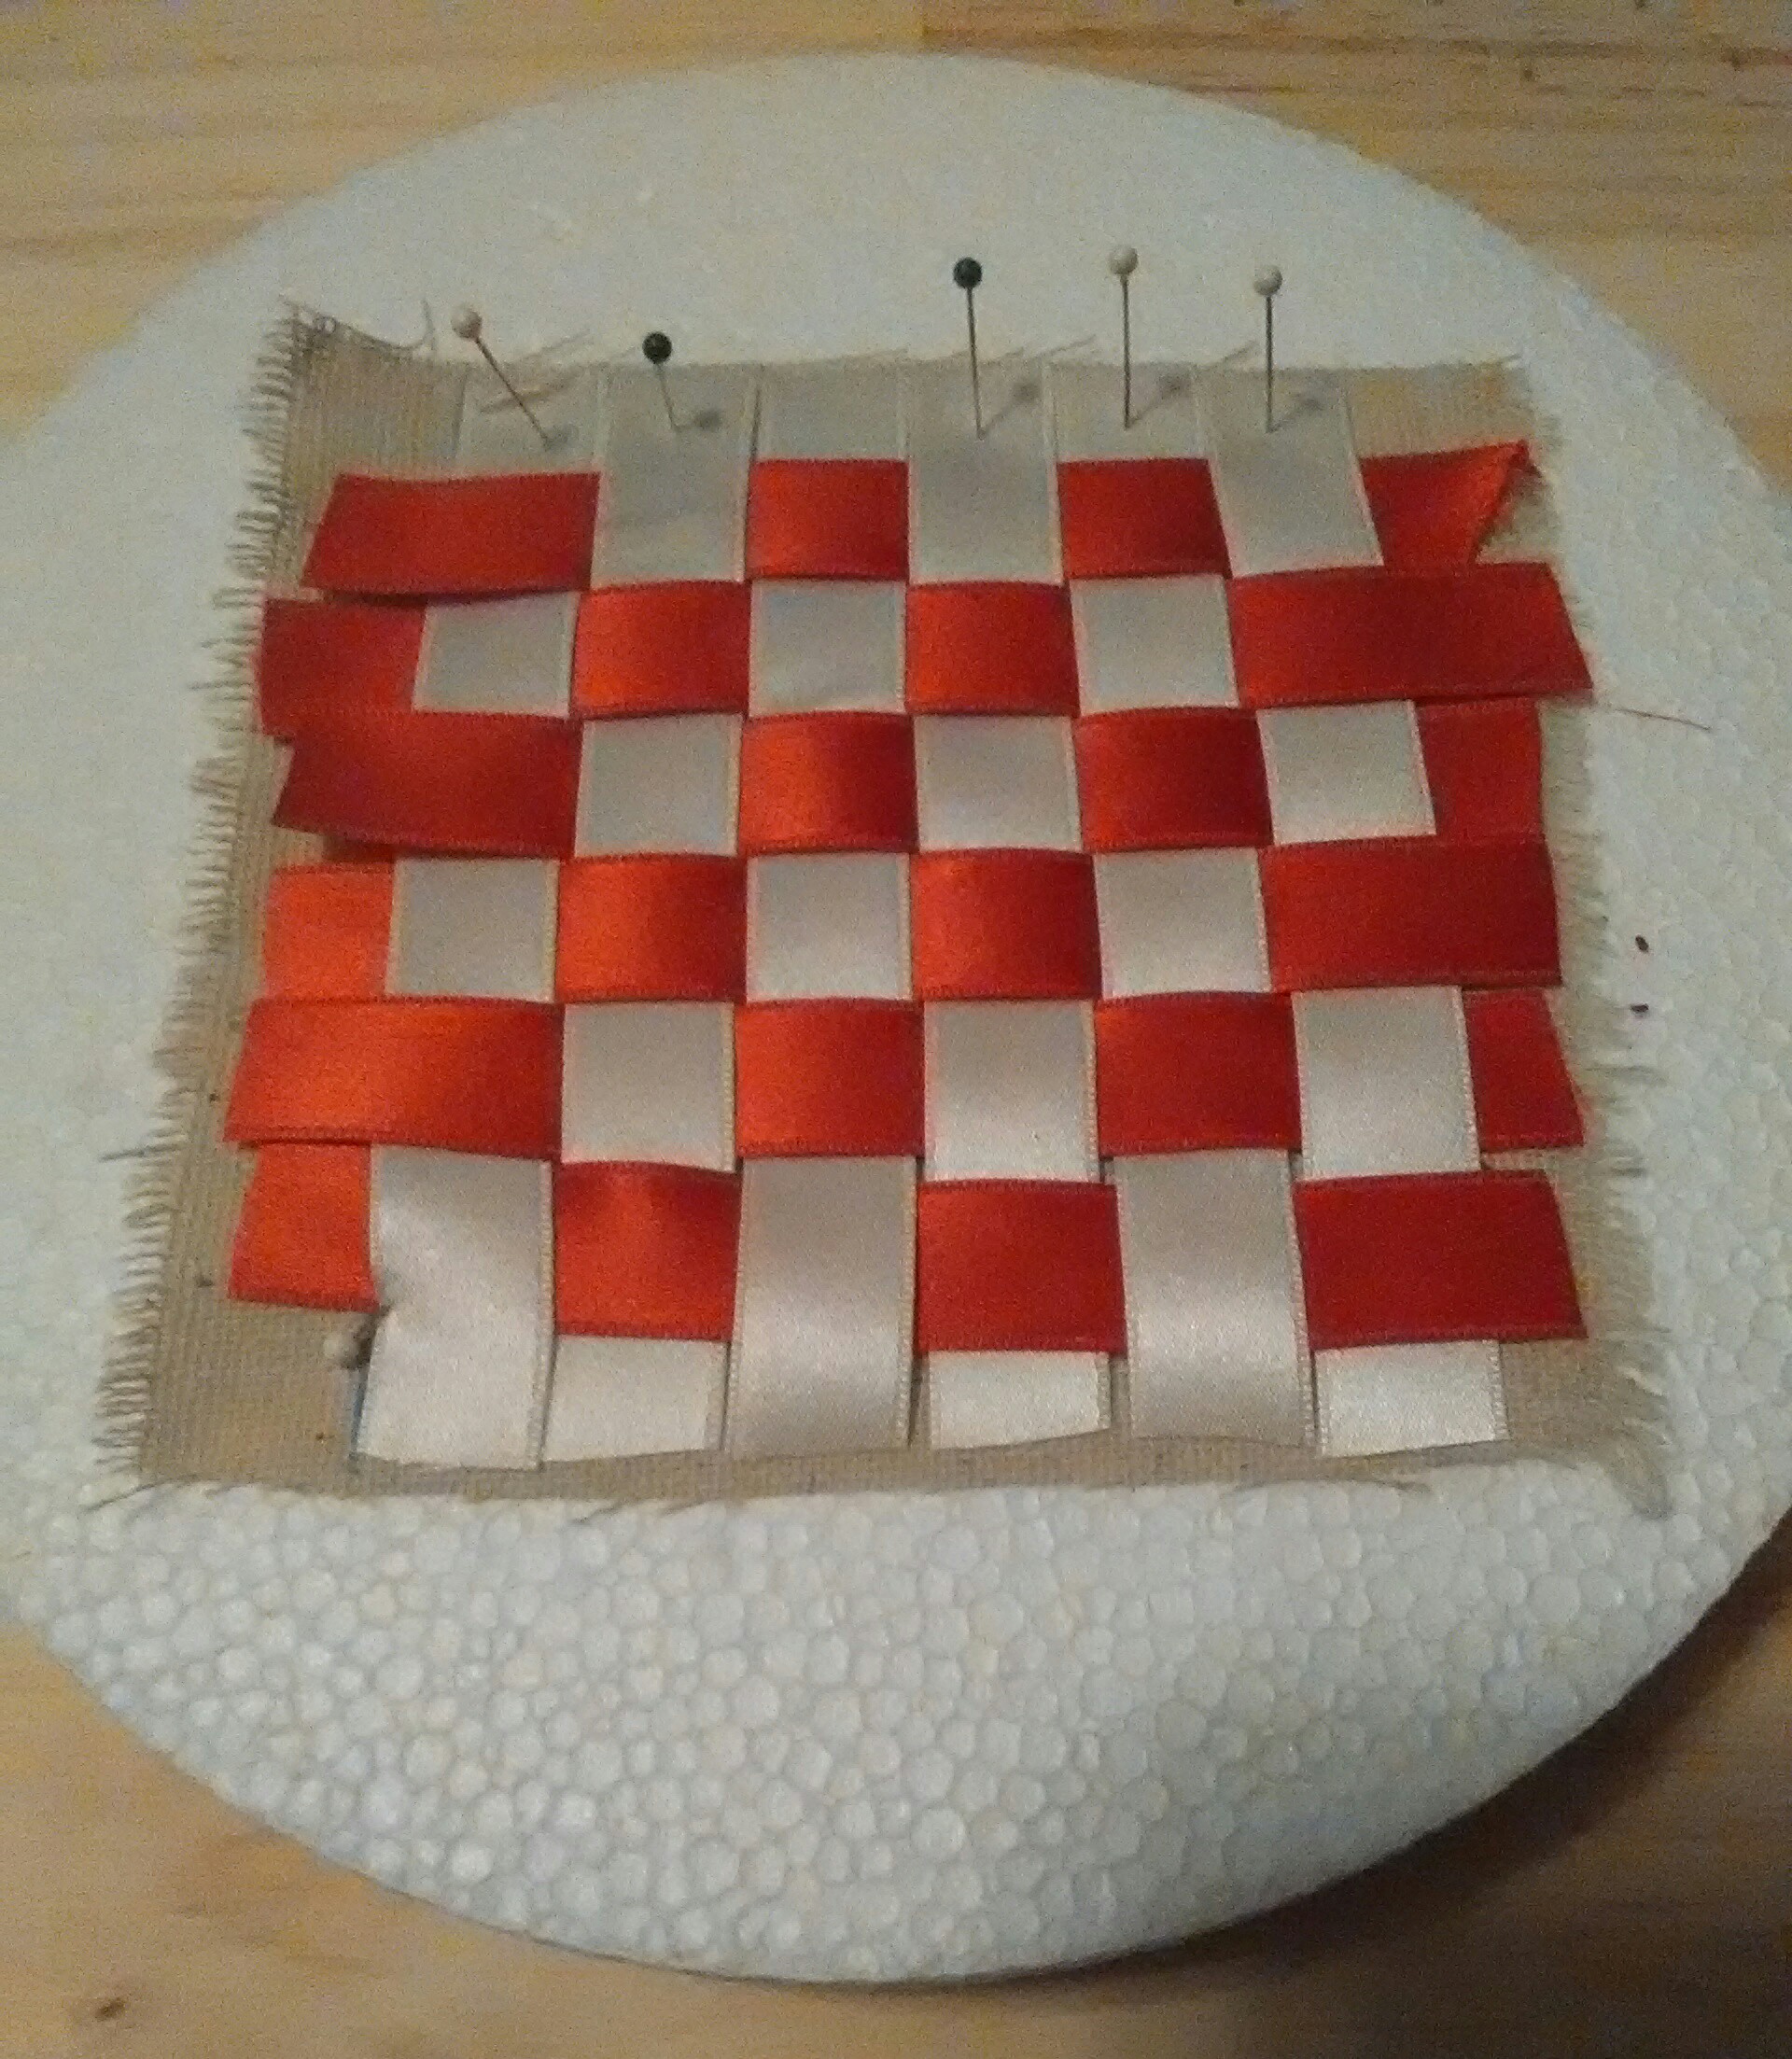
These pretty pin cushions combine two ribbons woven together either square on the cushion or on the diagonal. The ribbons are most often in contrasting colors, though not always.

A bow can often be found in one corner or connecting two corners.  Sadly, the bottoms are not shown often enough to get a good survey of what materials are used. So far, one I have seen in photos has been edged with a cord.

For the first few I made, I used the half inch cotton sateen ribbon from The Ribbon Store. I like the body and weave of this ribbon as well as its density of color. I found this ribbon was very easy to work with in this project because it was easy to weave, staying in place without flopping around, and had strong edges without fraying. I used a foam circle as a platform to pin and weave the ribbons on. Woven, the ribbons formed a roughly 3″ square. I basted the woven ribbons, at the cut ends, to a 4″ osenburg foundation. (I accidentally deleted these photos as I went to upload them. Sorry.) I used some ivory wool for the back. I had wanted to use a firm white silk taffeta. But, I can not figure out where I put that.

As you can see, I also used a wider white ribbon in the center of the green and white pin cushion.

While working on the cotton sateen examples, I had Carole at The Ribbon Store looking for silk ribbons and narrower cotton sateen ribbons. I wanted seasonal colors because I had a secondary idea in mind. She came up with a nice color assortment.

The silk ribbon acts differently than the cotton. No surprise there. This is most apparent while weaving the ribbon. The silk is slipperier and doesn’t want to snug up to it neighbors as well as the cotton. It is lighter weight and possibly less thick, or least less dense then the cotton. This effects how the sides of the cushion sit. I find the silk makes a smoother edge than the cotton, which can have more fullness. I suspect the cotton would wear better over many repeated pin stickings as the weave of the ribbon itself is tighter. I can’t say that I like one over the other though. Each has its own advantages.

Want to make your own?

You will need:

  • 1 yard each of 2 different color ribbons about 1/2″ wide
  • Backing fabric (wool or silk)
  • Lining fabric (Photos show osenberg. Muslin works better.)
  • Batting

Cut 6 4″ lengths of each ribbon. Cut 1 4″x4″ square of the backing fabric. Cut 2 4″x4″ squares of your lining fabric.

Place one layer of the lining fabric on a pin-able surface. You may find it helpful to mark a 1/2″ seam allowance and/or center points on the fabric.

Lay one color of your ribbon running vertically. Pin the tops of each. Begin weaving the second color starting at the pinned top, leaving a 1/2″ for the seam allowance. As you weave, be sure to keep the ribbons as snug together as they will allow.

When you have finished weaving, I recommend adding a pin diagonally in each corner, holding the ribbons to the lining. See the bottom left here:

Baste the layers of ribbon and lining together. Keep your stitch just about 1mm to the outside of the woven area (just outside the seam allowance.)

Layer all your layers: lining – ribbons – backing – lining. Stitch around three sides.  On the 4th side, leave 2″ open in the center for turning and stuffing. Use the basting line as a guide, sew just on the inside of it. This should put you right on the edge of the ribbon weaving. I recommend very small stitches 1-2mm in length. If you tend to have loose stitches, try a back stitch to hold the layers together.

Trim the corners. Turn right side out.

Fill the cushion densely with batting. I prefer wool batting. Other options to consider are wood shavings, bran, walnut hulls and wool scraps.

Once full, close the opening with a whip stitch or hidden stitch. You may wish to add a bow or loop in the corner.

Oh, that narrow 1/4″ ribbon? For miniature versions of course. This one is just over 1 1/2″ square.

Don’t miss theBird Ornament over on Don’t Paint the Cat.

Published in: on December 1, 2017 at 7:00 am  Comments (2)