October Reflections

I am a full week late on writing my October Reflections. (I’ll probably back-date this later in November.) The last week and a half has completely gotten away from me.

October was certainly filled with lots and lots of projects – The Winter Millinery Series, sewing for the Holiday Shop, preparing for the Domestic Skills Symposium, and some straw millinery.

October started off with the Agricultural Society Fair at GCVM. This is a long time favorite part of the year for me.

I hope you have enjoyed the Winter Millinery Series. I have enjoyed sharing some of my pieces with you. I will admit it has caused me to want to add even more pieces to the collection. It has also started me reevaluating what I should do with the collection itself. I had been planning to do an e-book, but I haven’t found time to do proper photos and writing. If you could take a moment and give me some quick feed-back, I would appreciate it:

Winter Millinery Survey

I finished a handful of straw pieces this month, earlier this month.

I spent most of the month making giftable goodies for the Holiday Shop in my Etsy Shop. I am very excited about the pretty items I am offering this year.

That kinda blurs me into November. So, let’s look ahead:

Winter Millinery Survey Please

Published in: on November 7, 2019 at 5:00 am  Leave a Comment  

Winter Millinery Series (7)

I have decided to share select pieces from my winter hood/bonnet collection. Every few days, I will post a new piece. My collection currently spans most of the 19th century, though lightly at the very beginning and end. The pieces I share will be from the early and mid-Victorian eras, roughly 1830s through the 1870s. All but one of my pieces originate from the United States.

Today’s winter hood is of the same style as my second winter millinery pattern. It has a deep brim and elongated cheektabs/lapets. This hood is constructed with a basic three piece construction – brim, crown, and bavolet. This hood has a black silk taffeta exterior. Black silk lines the interior of the brim while brown polished cotton lines the crown. The bavolet is unlined.

The brim is pieced together to get the large piece. The piecing is finely done making it difficult to spot. The easiest one to see is a horizontal piecing on the left hand side about half way up. This piecing can be seen nicely in this photo that also shows how the bavolet is attached:

20191105_055300.jpg

Notice how the bavolet is completely unlined. This is rather uncommon for winter hoods. I have seen some where there is an exterior and interior fabric with no batting or wadding. Completely unlined is unpractical in terms of warmth and moisture protection. This bavolet is simply gathered into the neck edge. There is a hem at the bottom which is tacked on each side to the cheektabs/lapets. You can see how the binding for the neck edge continues down along the inner edge of the cheektab to the point where the bavolet is attached.

This interior photo shows the same area. The neck binding adds strength, neatness, and comfort to this seam area. One thing of interest is the remains of a ribbon (just left and above center) along the neck edge. There are corresponding threads in the same spot on the other side. This shows functional ties were at one point place rather far back on the head. I find this placement can be helpful if in a windy climate.

20191105_055451-1.jpg

There is evidence of what may have been ribbons on the inside of the cheektabs/lapets. These holes are either pin holes or thread holes.

20191105_055451-2.jpg

Alright, I kinda fizzled with this writing…

I do want you to see the inside of the crown. This shows both the layers as seen in the seam area and how it is set with denser gathers towards the top.

20191105_055426-1.jpg

Two damage spots let us see inside to the lining:

Similar style hoods:

(Left to right: Pink silk with longer lapets in the Greene Collection at GCVM. Green silk exterior with pink silk interior in Anna’s collection. Green wool exterior with pink silk interior in Anna’s collection.)

Note 1 – Additional Winter Millinery can be found in posts from September though November, 2019 using the search term: Winter Millinery Series or clicking here.

Winter Millinery Survey Please

Published in: on November 6, 2019 at 1:00 am  Leave a Comment  

What is a Pen Wiper?

A pen wiper was used to remove the excess ink from the nib of a dip pen.

They could be simple or decorative, purchased or handmade.

Directions for making them could be found for children in An American Girls Book and A Girl’s Own Book as well as for adults in the pages of Godey’s Lady’s Book.

Handmade pen wipers came in all sorts of shapes from leaves to butterflies to animals. Some are all wool. Some are beaded. Tis is one page of my tablet folder:

You might be able to tell from the images I saved that i really like the animal kind. But, pen wipers originally caught my attention as I was assembling images and articles on doll projects.

This is an original pen wiper with two penny dolls I chanced upon when it was labeled as a pin cushion. This is the piece that inspired me to make the wax doll pen wiper.

Here are some of the pen wipers I’ve made in the last few months:

Published in: on November 3, 2019 at 12:03 pm  Comments (2)  

Pen Wipers for the Holidays!

Every now and then I’ll be working on a project when I realize this is the project Grandma would really like. I usually mean one Grandma or the other. But, today as I sat down and started dressing my little wax dollies, I thought Grandma would really like this and realized I meant both Grandmas.

There’s something about the cute fiddliness of this I think they would both enjoy. Grandma K was very crafty, loved to quilt, loved rug hooking and fun projects in general. Grandma 2 liked little detail projects. She enjoyed needlework and later on decorative, beading projects like ornaments and stuff. In my chest to favorite goodies I have an envelope of little note cards she made with button dolls on the cover. Each doll is made with a button for her face and little trims as decoration. Dressing these little wax dolls reminds me of those.

I started my day with dressing wax dolls and adding them to their pen wiper bases.

I finished up my day making tiny wool mice for another batch of pen wipers. This was Clara’s selection.

Yes, I showed her a bunch original photos and let her pick.

We should not be surprised she picked mice.

The first batch of mice are the simple partial circles just made really, really, really small. I filled them with local wool batting. Then gave them little faces. The eyes are glass beads, picked to go with their bases. Their ears are tiny thread loops sewn like button loops. They got added to their wool bases I made the other day with a little bit of ribbon.

The second batch uses the design in original directions for a mouse pen wiper. I used wool instead of cotton canyon flannel described in the directions. These are also filled with local wool and have glass bead eyes. These have cute thread whiskers.

I was so focused as I sewed, I completely lost track of time and didn’t notice I hadn’t moved much for 6 hours out of a 10 hour sewing day. My feet were soooo cold. And, when I stood up…. Well, you can guess what my back said…. It was totally worth it. I love how these pen wipers came out.

Please consider giving one as a gift this season.

Find them in my Etsy shop!

For more information on my pen wipers:

Published in: on November 2, 2019 at 8:19 pm  Comments Off on Pen Wipers for the Holidays!  

My 2019 Holiday Shop

I am so excited to share what will be available in my 2019 holiday shop.

I will begin listing items in my Etsy shop today and continue as I make pieces. Please keep in mind there will be a very limited number of the filled sewing boxes and the pen wipers.

If you are attending the Domestic Skills Symposium at the Genesee Country Village & Museum next weekend, you will have an extra special shopping opportunity.

(Please take a moment to visit my friend Christine’s shop for amazing, sparkly jewelry: https://www.christineandcodesign.com )

Edit: A special thanks to Colleen Formby for noticing what I called a little crochet hook may actually be a repro tatting or purling pin.

Published in: on November 1, 2019 at 1:00 pm  Comments (1)  

2019 FanU Holiday Project

I am excited to offer this Silk Stocking Needle-book for this year’s FanU Holiday Project!

Nov 2019 a

When I saw this adorable silk stocking needle-book, I knew it would be a delightful option for this year’s project. To make it extra fun, I am sharing directions on how to make the original needle-book as well as a smaller pin-keep and ornament.

The original needle-book is larger than most needle-books, being 7 1/4″ from foot to calf (18.2cm) 3 13/16″ from toe to heel (9.7cm), and 2 15/16″ across the calf (7.4cm). The foundation is two layers of thin pasteboard for each the front and back. The exterior is covered in a blue on blue clouded silk taffeta in a large floral motif. The interior is a tissue taffeta in solid pinkish-red. The edges are bound in tiny whip stitches worked in red thread. The two wool needle-pages are quasi-polygons with the front edge slightly curved. Both pages are bound with an irregular blanket stitch worked in red thread. One of two thread hinges remains at the ankle. I believe the other was previously at the back of the calf. Three bows remain on the needle-book: at the back of the ankle, at the front of the ankle, and at the top of the calf. A fourth may have once been at the top of the front calf as well. Each bow consists of two ribbons: a yellow and red/orange underneath and a black on top.

Nov 2019 b

Closer looks at some details:

20191016_123650.jpg

This damaged corner shows a few things. It let me see just how thin the pasteboard is on this piece. I do suggest we use the fairly standard pasteboard most of us have on the backs of notebook. There is a thicker version I like for boxes, but that would actually be too thick for this project. Along the edge of the fragment piece, you can clearly see the whip stitch used for binding the exterior and interior fabrics.

20191016_123810.jpg

This interior corner shows the binding whip stitch as well. This gives a good view of the blanket stitch on the wool needle- pages. This photo also emphasizes the curves this stocking shape has. I think these curvy lines are what make this shape so appealing.

20191016_123715.jpg

This close-up shows how each bow is really two bows stacked on top of each other. I rather like how the use of a two color ribbon gives the suggestion of three ribbons.

The Project:

Please download this PDF for directions on making the original size needle-book, a smaller 4″ pin-keep, and a 4″ ornament. You will need your copy of Fanciful Utility to do this project.

November 2019

Examples:

Needle-book

Pin-keep

20191028_185110.jpg

Ornaments

20191028_122145.jpg

Published in: on November 1, 2019 at 1:00 am  Leave a Comment  

Pumpkin Hood

I have decided to share select pieces from my winter hood/bonnet collection. Every few days, I will post a new piece. My collection currently spans most of the 19th century, though lightly at the very beginning and end. The pieces I share will be from the early and mid-Victorian eras, roughly 1830s through the 1870s. All but one of my pieces originate from the United States. (I do have to retake some of tonight’s photos. My phone camera just doesn’t play well with lights.)

Tonight’s winter millinery pieces is the classic pumpkin hood.

Okay, a little play on words tonight…. A Pumpkin hood on Halloween… Haha?

First, let’s talk about the name: pumpkin. When I first started hearing people call these fluffy hoods “pumpkin hoods” I was skeptical about this being a period name. But, if you hop over to HathiTrust or Google Books, you will find a speckling of search results for “pumpkin hood” including entry and donation lists, as well as references to “old fashioned pumpkin hoods.”

This pumpkin hood is made with a light weight, soft matte black silk taffeta exterior. Inside is a brown cotton lining that may have once been polished and a silk faille facing with soft ribs. Beneath the silk exterior is a light color lining. This style hood is constructed with a single brim/crown piece and bavolet. (in some pumpkin styles a small piece is used it the very back.) There are 5+ softly filled channels that feel as though there may be down inside. Between each loft is a corded channel sewn with a running stitch. A ruffle is formed at the edge of the brim in front of the cord.

The back most loft channel is gathered together as many pumpkin hoods. This lower portion of the channel is turned inside creating the taper on the outside. This makes an elongated heart or teardrop on the back of the hood. This is topped with a ribbon arranged in a bow. This is the same design ribbon used for the ties.

The bavolet was constructed separately of elongated trapazoids, silk and lining. The finished top edge was gathered tightly and attached to the bottom edge of the crown/brim. This technique makes a look similar to gauging.

Inside, the neck edge is covered. Notice the hem of the bavolet with the very even stitches.

Here is the front interior edge showing the cotton lining, silk faille facing, and silk taffeta ruffle.

This is the interior looking at one of the corded channels. This cord is approx 3mm thick, based of feel. It is not overly stiff.

Note 1 – Additional Winter Millinery can be found in posts from September though November, 2019 using the search term: Winter Millinery Series or clicking here.

Published in: on October 31, 2019 at 7:36 pm  Leave a Comment  

Winter Hood

I have decided to share select pieces from my winter hood/bonnet collection. Every few days, I will post a new piece. My collection currently spans most of the 19th century, though lightly at the very beginning and end. The pieces I share will be from the early and mid-Victorian eras, roughly 1830s through the 1870s. All but one of my pieces originate from the United States.

For this edition of the winter millinery series, I have a video to share. This video is of my first observations of this winter moments after I opened it.

Here are some detail photos:

Brim quilting and turn back.

Bavolet quilting and bias piecing

Brim quilting and basting at brim edge

Interior with soiling on lining.

Crown quilting

Interior showing hand stitching of silk facing, how the ribbon ties are attached, quilting on lining.

The neck seam or bavolet seam is bound in silk while the crown to brim is raw.

Cotton or linen warp threads along the sides of the silk ribbon.

Note 1 – Additional Winter Millinery can be found in posts from September though November, 2019 using the search term: Winter Millinery Series or clicking here.

Published in: on October 23, 2019 at 1:05 am  Comments (1)  

Plaid Winter Bonnet

I have decided to share select pieces from my winter hood/bonnet collection. Every few days, I will post a new piece. My collection currently spans most of the 19th century, though lightly at the very beginning and end. The pieces I share will be from the early and mid-Victorian eras, roughly 1830s through the 1870s. All but one of my pieces originate from the United States.

Today’s winter bonnet is a plaid silk adult size bonnet. The structure of this piece classifies it as a bonnet rather than a hood. This piece loosely dates between  the 1840s and 1870s, though the small crown tip and shape of the wide cheektabs with the shorter bavolet makes me think it is an 1840s example. 20191014_102802.jpg
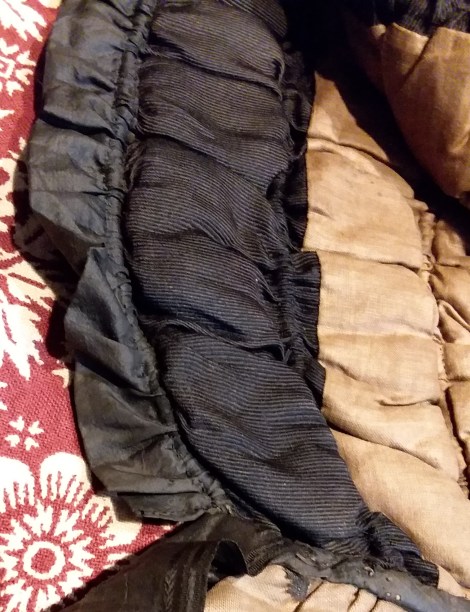
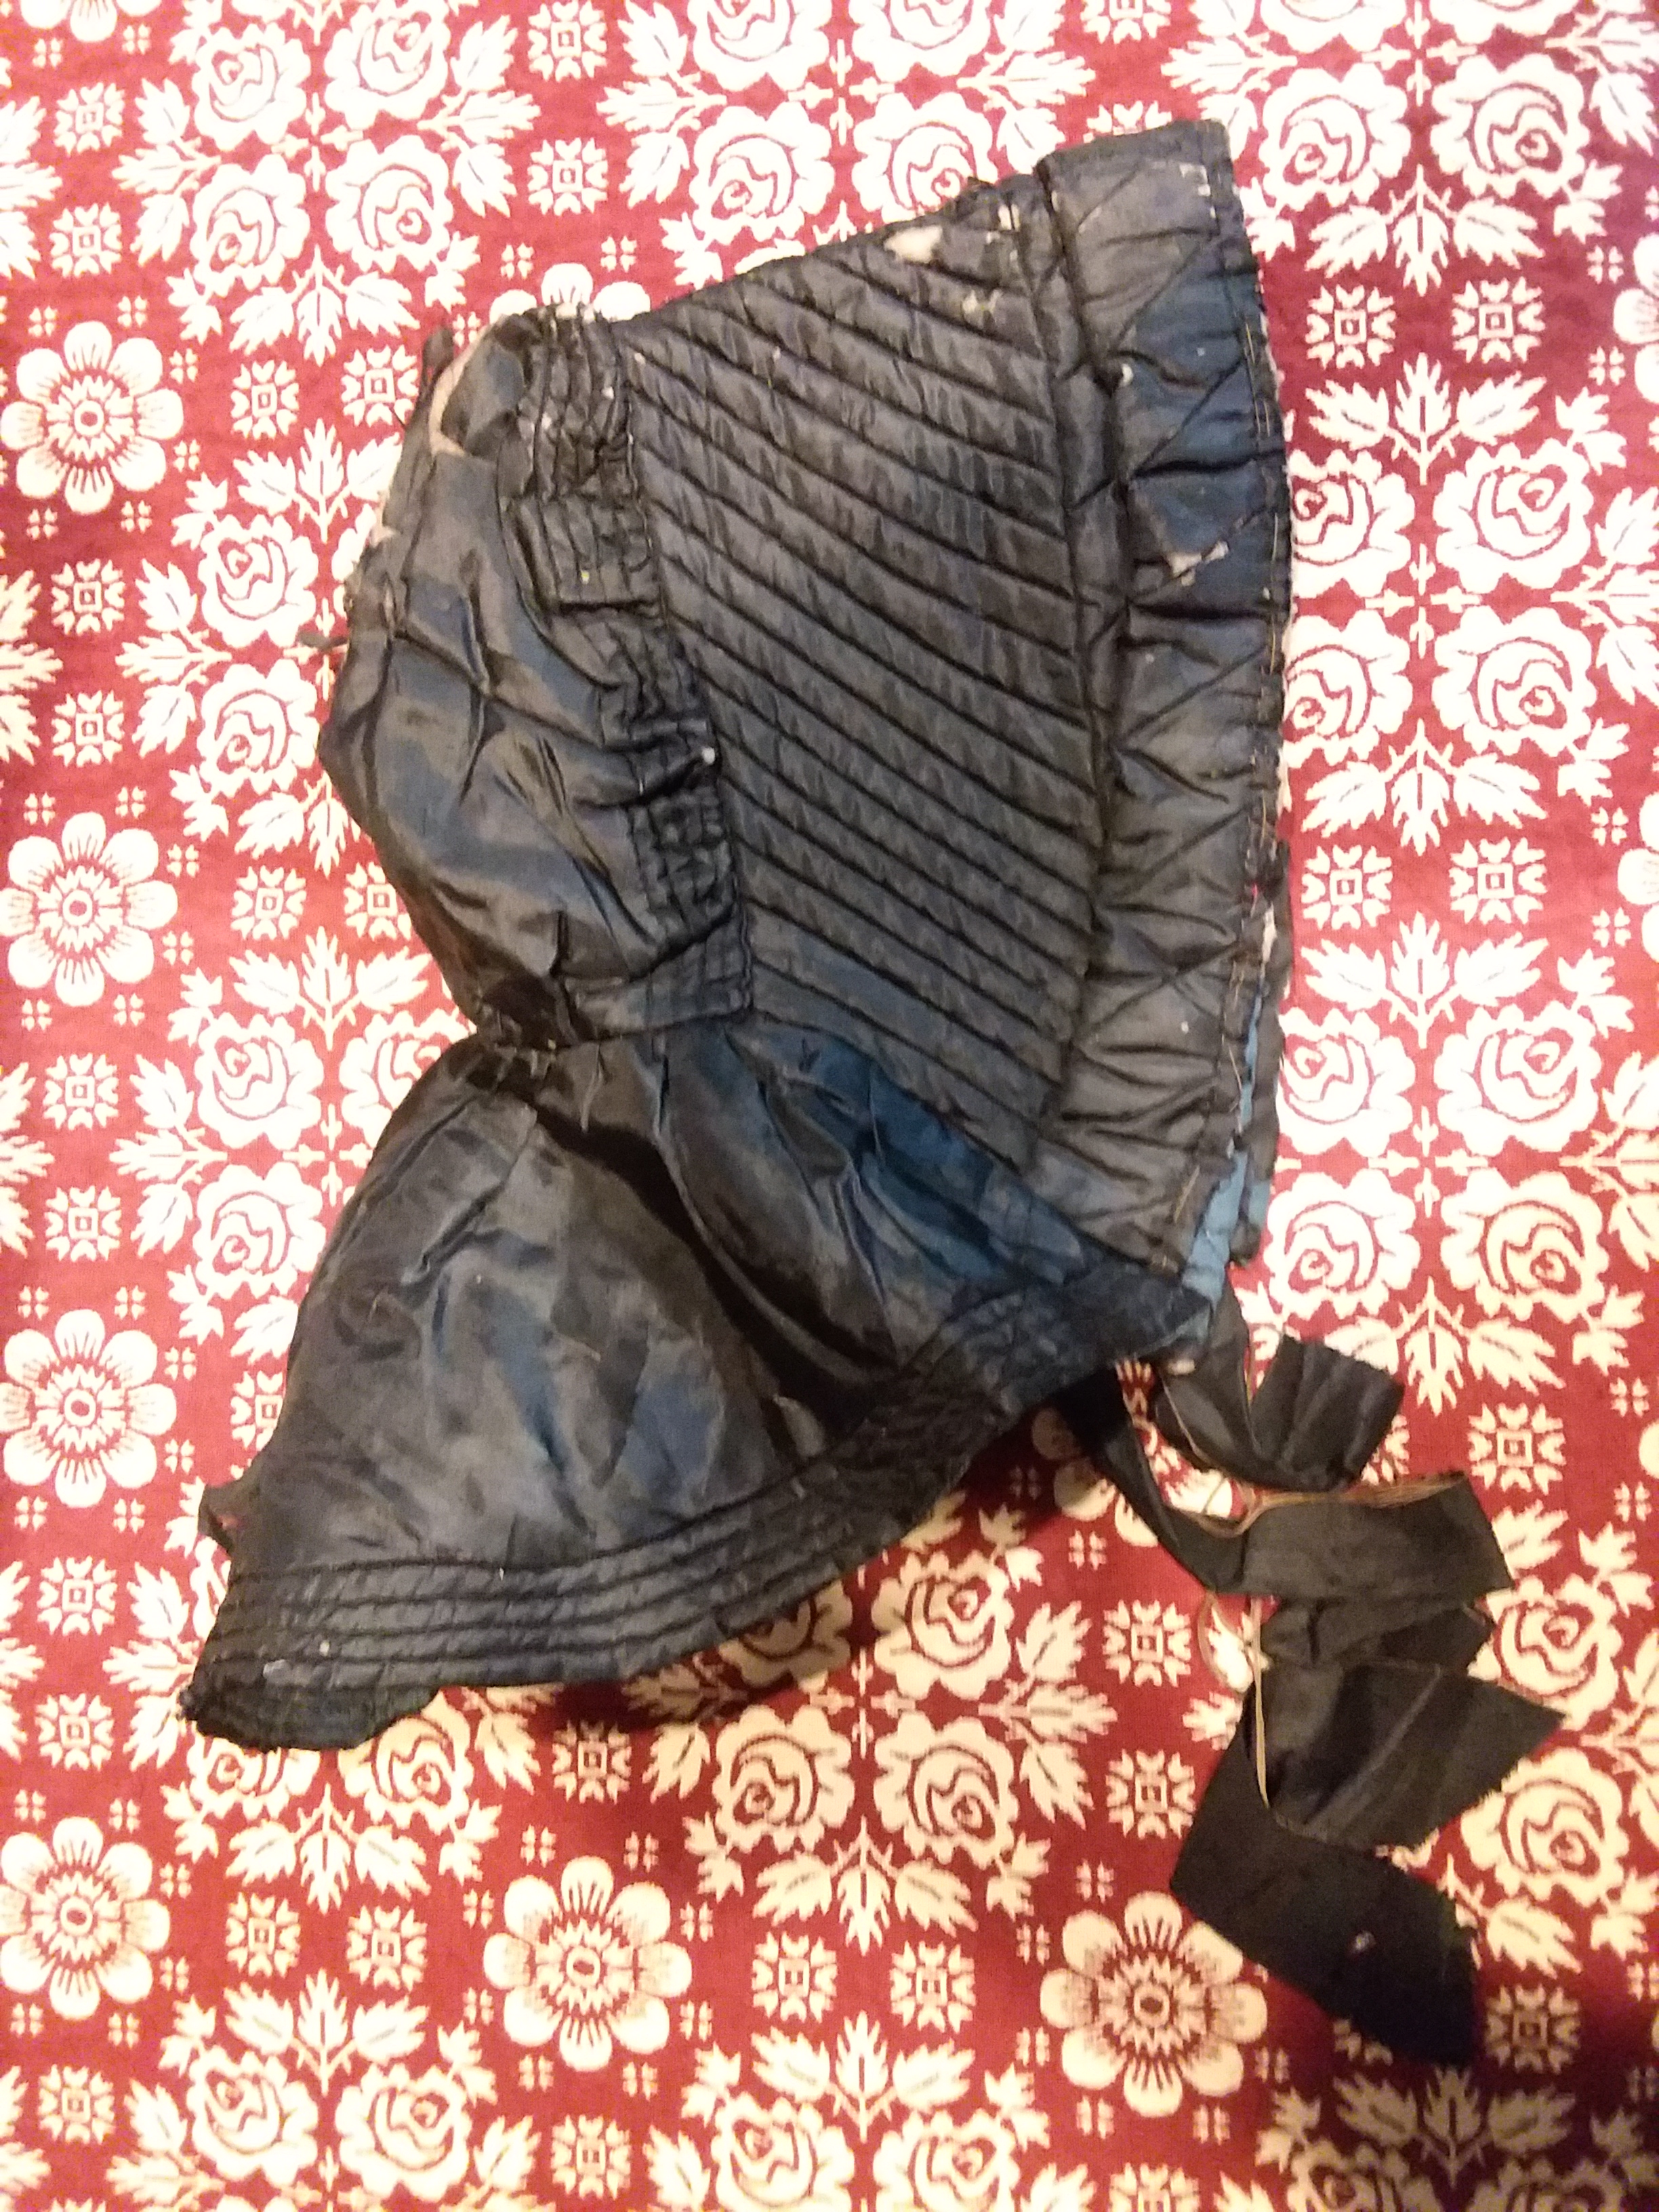
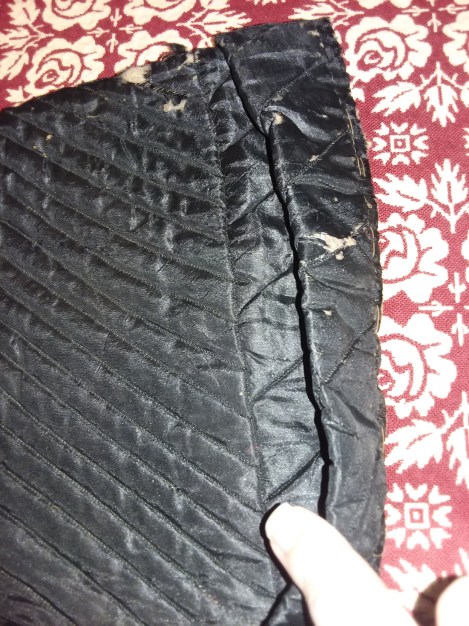
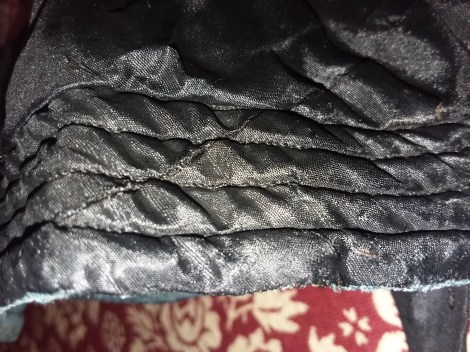
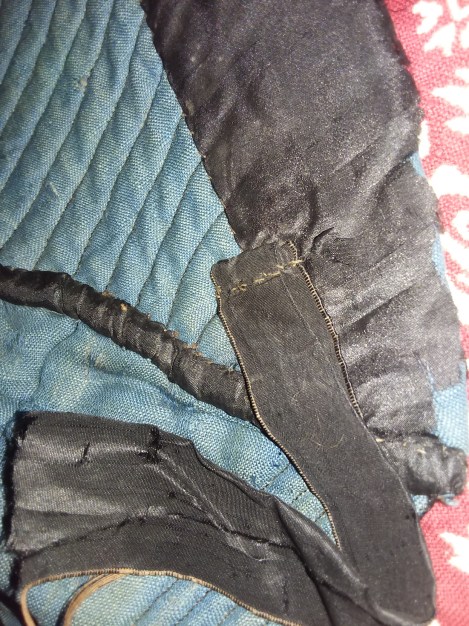
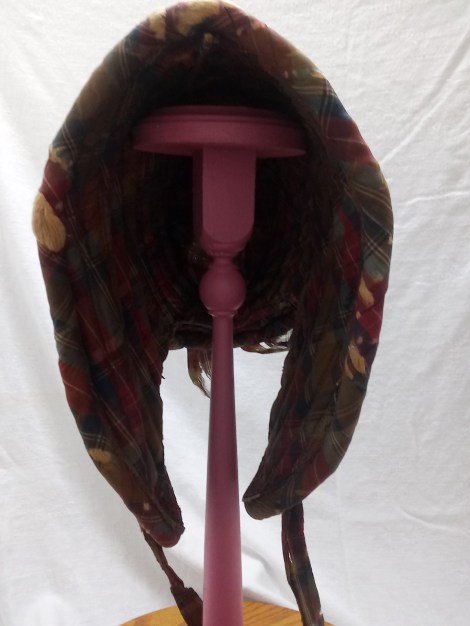
A single plaid silk fabric is used throughout for the exterior as well as the interior and for ties. The plaid is asymmetrical in one direction and symmetrical in the other. The entire bonnet is handsewn. Channels of puffs and cord alternate through the brim. While the majority of these are evenly spaced, a couple alter slightly to follow the shape of the bonnet. One in particular, the eighth from the front, widens at the bottom to accommodate the curve transition from the cheektab to the neck edge.

20191014_103013-1.jpgWire, cane, cord, and buckram are used to support this bonnet. Wire is found around the front edge, around the cheektabs and even along the edge of the bonnet. Cane is found in the channels immediately behind the brim edge puff and through the front section of the brim. Further back, the narrow channels between the body puffs are a dense, exceptionally firm cord. At first, I thought these channels also had cane, as other bonnets have. But, I can feel a diagonal ridge indicating a twist in cord. Buckram lines the interior crown tip of this bonnet.

Do compare the left side of the bonnet above with the right side of the bonnet below. You can see where the brim wire has been bent. This brings attention to what can happen to wired and caned millinery during storage. The vast majority of winter bonnets I have seen have the wires and canes bent or broken from being stored flat. This bonnet was lucky. Or, actually, has such a firm “batting” that it made it difficult to store flat. 20191014_102730.jpg20191014_102928-1.jpg
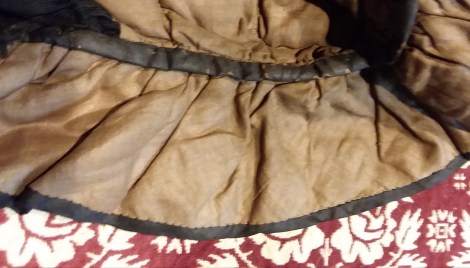
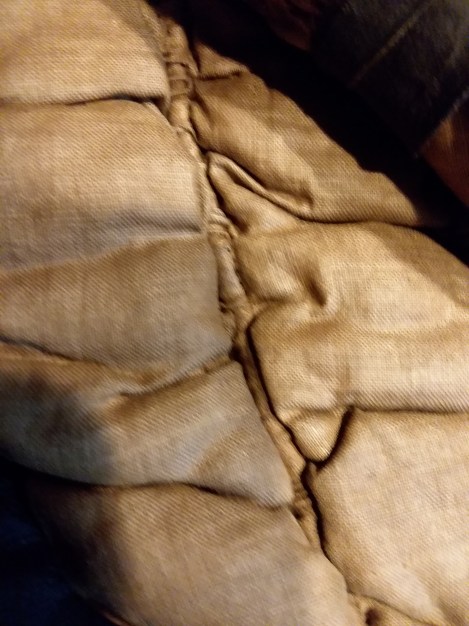
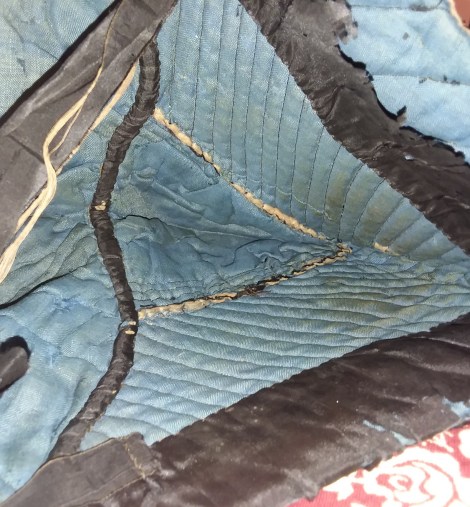
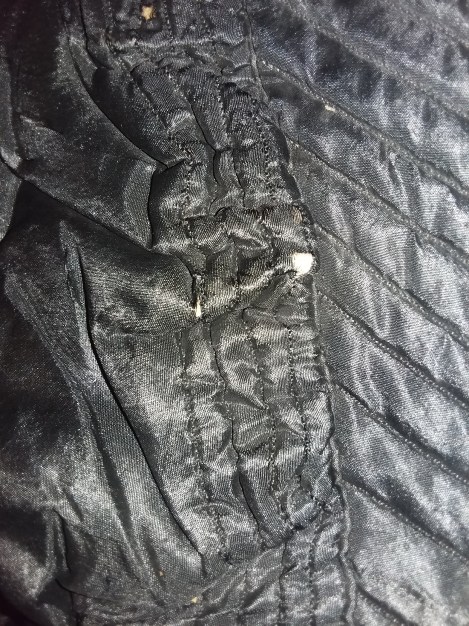
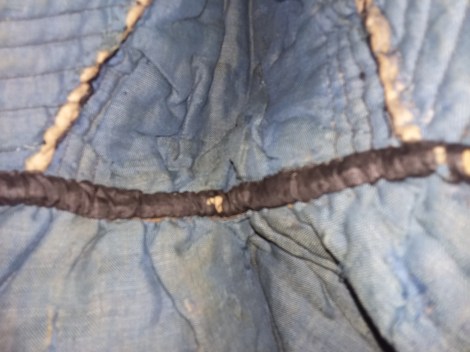
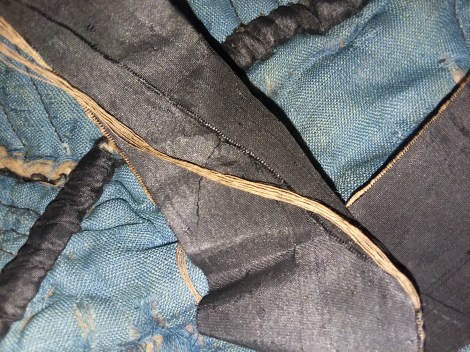
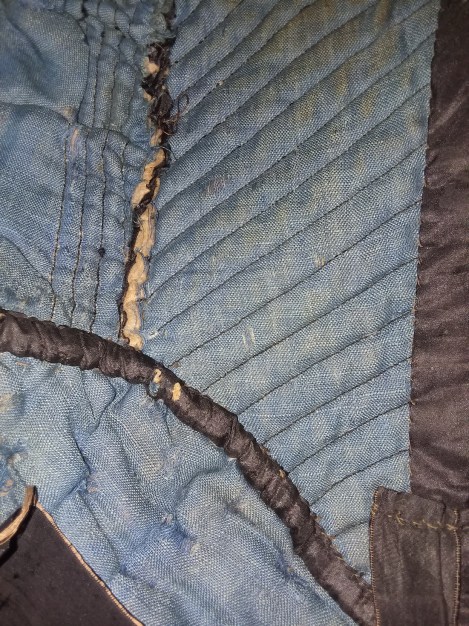
This brings me to the interior. Normally, I use words like “batting” or “wadding” to discuss what is inside a bonnet or hood. Instead of using wool batting, this bonnet is filled with what appears to be bundles of cotton/wool* string. This area where the silk has worn away shows just how densely the string has been packed inside. This is Not something I see commonly. The bavolet is filled as fully as the brim of the bonnet creating a triple tier bavolet rippling around the neck. (Notice you can see the cane, wire, and buckram (which may be willow) in this photo. The back bow is made from the same silk as the bonnet.)

20191014_102753.jpg

20191014_102913.jpg

I have to spend some time with the ties and bow on this bonnet. I find they are remarkably unfrayed for what looks like faux ribbon cut from the silk.20191014_102819-1.jpg

This detail of the cheektab interior shows the wire along the edge and the cane. 20191014_102955.jpg

20191014_102745.jpg

Note 1 – Additional Winter Millinery can be found in posts from September though November, 2019 using the search term: Winter Millinery Series or clicking here.

Notes: * I have not yet looked at the filling under a microscope to determine it is cotton or wool. 

20191014_102812.jpg

20191014_102739.jpg

Published in: on October 16, 2019 at 6:00 am  Leave a Comment  

Quilted Winter Hood

I have decided to share select pieces from my winter hood/bonnet collection. Every few days, I will post a new piece. My collection currently spans most of the 19th century, though lightly at the very beginning and end. The pieces I share will be from the early and mid-Victorian eras, roughly 1830s through the 1870s. All but one of my pieces originate from the United States.

Today’s piece is an adult size hood.  The exterior fashion fabric is a black taffeta with a satin weave dot. It was received with the brim folded back. Black lace is attached to the edge of the brim. I will examine this process closer. Notice how the pieces for this and its overall shape differ from the previous two, making it a winter hood as apposed to bonnet.

The exterior appears to be constructed of two pieces – a single brim, crown, and sides of the bavolet, with a trapazoidal piece for the back of the bavolet. I will look closer at this when I sit down with the piece. The back is gathered where the bavolet meets the crown.

Close-up of the fabric:

Close-up of the lace:

The interior uses a shot silk and a polished cotton. The silk has shaed of gold, green, and purple depending on how the light hits it and where the soiling is. The diamond quilting is only through the silk and batting. The rectangle placed on the lower part of the brim may be a patch as the opposite side has a different shaped piece of polished cotton.

Note 1 – Additional Winter Millinery can be found in posts from September though November, 2019 using the search term: Winter Millinery Series or clicking here.

Published in: on October 9, 2019 at 6:00 pm  Leave a Comment  
Tags: