A page that made me squeak

I can not say just how excited I was when I flipped to this page the other day. I’ve been fond of this type of purse/bag for some time now. I think what interests me is the tight gauging needed to attach the outer silk to the inner shape. This has such a beautiful look and is very fun to do.

Published in: on July 18, 2012 at 6:04 pm  Leave a Comment  

CDV Stories

I still can not decide whether to share the trio of CDVs I found of sisters or to save them for those who pick up my shawl book. I bought them specifically for the book. But, they are justso cool.

Instead, I’ll share the story of the CDVs that are now in the freezer.

Yes, you read that right.

While Dan and I were driving through the Adirondacks, we saw several antique shops and yard sale signs. But, since we were zipping along and very, very eager to get to the relaxation of Plattsburgh, we didn’t actually stop. Until we knew we were much closer and slowing down as we came into a little town that is. It also helped that it was definitely time to walk around a bit. We found quite the little shop. (though not as “wow, awesome” as the small shop tucked into a barn on the way back that had the most amazing dark wood bed for a fraction of what I would have guessed.) Inside there was a nice variety of antiques, well-organized. There was a beaver top hat in its leather case, both in incredible condition, a nice lap desk lacking a price tag, a hand-carved sewing bird, a whole room of well cared for vintage textiles and much more. Now when comparing the state of the linens to the state of the ephemera….. well….

When I saw the stack of CDVs I was excited of course. I’m on a continuous quest to find good images with shawls to add to the shawl book. (I’m likely to keep adding until just before it goes to press.) I picked up the stack. It felt cool. Hmm. As I flipped through, they felt damp. ooooo. not good. As I kept flipping, mostly seeing children and later adults, I started sneezing and sneezing….. and sneezing. Ugh. Very much not good. Since they were all 50 cent, I picked  out the three early 60s images including one that may or may not get used thinking maybe just maybe I could rescue them.

They went right into a plastic baggy in the truck to keep them from spreading their ick. Not the best container…. but their ick…. As soon as we got back, they went right into the freezer, receipt and all.

Honestly, I don’ t know if I’m going to be able to kill everything and get the moisture out enough for me to ever feel safe enough to put them with the rest of the images. These may need to be scanned really well and kept only as electric files. Sad that they got this bad.

Once they are out of the freezer, I’ll add images of them.

Published in: on July 9, 2012 at 5:48 pm  Comments (4)  

Fanciful Utility Pre-Orders in July!!!!

Fanciful Utility will be ready for pre-sales in July!! Please visit the Sewing Academy for a video preview and to order.


Some updates from the Publisher:
1: I need to have the last details from the bindery on the final price, but it won’t be more than Dressmaker’s Guide ($30), and includes all the projects and templates and techniques, plus you’ll gain the skills you need to design your own project from imagination or an extant example, so it will be a very valuable book for dozens of projects to come.

2: When we get that final pricing back, we’ll finish coding the shopping cart, and open full reservations immediately. If using a credit/debit card, your information will process about a week before the book ships. We’ll add cover shots and such when that shopping card goes live. The book has black & white illustrations, templates, and a color photo section of the gorgeous samples Anna made for the book project.

2.5: We are looking at the probability of offering two different binding options: normal perfect bound (softcover with spine) and spiral spine.

3: We’ll be able to process credit and debit cards with Visa, MasterCard, and Amex logos, and yes, we’re pleased to be adding a PayPal option as well!

4: Books will be shipping by the end of July, if not sooner (this is based on the binding house schedule; they usually try to push us up the line toward the top, because they’re lovely!).

5: You’ll be able to reserve and pay for your copy at http://www.thesewingacademy.com… and don’t worry, we’ll have the announcement and link put up LARGE on the front. 🙂

We can’t wait to see snapshots of what everyone will make with the book! You’ll all be thanking Anna for making this great resource available.

Regards,
Elizabeth Clark

Published in: on June 30, 2012 at 5:41 pm  Leave a Comment  
Tags:

Embroidered Shawl update

The shawl’s embroidery now has more detail in he cone and two of the major vines started. There is a little more needed for the outer curve of the right hand vine and the left hand vines. Then it is time to focus on the flowers. I have an idea of how I’m going to do them for the vines. The flowers that go in between the blue fir stitch an the brighter green still need to be determined.

image

Published in: on June 21, 2012 at 7:11 pm  Leave a Comment  
Tags:

Developing a Traveling Impression

I’ve done a little rearranging of the categories for the blog. Hopefully this will make finding what you want a little easier. In doing so, I’ve added a new long-term project – “Travel Impression”. While I’ve decided not to do many, if any events, until we get settled properly, I’ve also decided to acknowledge the theme of travel that has constantly popped up time and time again over the years and actually focus on this interesting area by developing an educational impression on travel. As I work on this, I want to share my research, planning and process with you.

A little back story – Last fall I had the opportunity to develop an impression of a woman traveling across NY in the 1830s using rail, canal and stage. Two weeks ago, while talking with Bevin about the linen plaid recently added to my stash, she suggested a travel dress to expand on last fall. That was a combination of a ‘light-bulb moment’ and a ‘duh moment’. I felt like that answer should have been staring me in the face. Back when I started CW reenacting, we often used travel as a significant portion of our interpretation (we had the luxury of our events being village, home or train based.) Since then aspects of travel have always been of passing interest to me. Developing a travel impression is an excellent way of bringing together many material culture pieces as well as aspects of social and regional history.

So… Step 1 – Make a list. How I love t0-do lists.

Travel impression

            (1850, 1830, 1840, 1860)
Develop files on (arrange research and fill in the gaps)
Travel images
Types/Time/Instances of Travel
            Cold weather travel
            Hot weather travel
            Long-distance & over-night travel
            Rail, canal, stage, private (carriage, wagon)
What a woman traveler would have had
 List – Acquire & make (note the advantages and disadvantages of each.)
Types of luggage
            Trunks
            Bonnet trunks
            Bonnet boxes
Types of bags
            Large carpet bags
            Small carpet bags
            Travel bags
            Small bags
Travel attire – Differences between travel attire and everyday attire
Safety while traveling
 
Coming soon … Step 2 – The items to make list and the items to acquire list
Published in: on June 20, 2012 at 5:11 pm  Leave a Comment  
Tags:

Trunks in a Shop

We saw several trunks a moment ago. I’ll come back and add a little about each. For now, can you guess which I want?

image

image

image

image

image

Published in: on June 17, 2012 at 1:07 pm  Comments (2)  
Tags:

New (to me) Plaid Shawl

Thanks to a text message from my sis-in-law, I made it to one of my favorite place’s fundraisers where I picked up this shawl. With these colors it just had to come home despite the fold fractures.

It is 63″ by 128″.

There are plenty of moth holes and fold fractures. But, I’m going to have to spend some time looking closer at the damage spots because I noticed something as I was measuring it. Along the sides, the red areas are shorter than the other color areas. I’ll need to determine if these areas have worn differently, if they were trimmed back (there is very little red fringe but plenty of blue and green) or something else.


Published in: on June 16, 2012 at 12:54 pm  Leave a Comment  
Tags:

Shawl Embroidery progress

The base of the cone motif which will get more texture & color added then get covered with floral vines and leaves. Or such is the plan. (I have an idea for a second one too.)

image

Published in: on June 15, 2012 at 5:33 am  Leave a Comment  
Tags:

Straw Bonnet Critique

As I promised, here is a critique of one of my bonnets. I’m going to try to honestly cover the good, the bad and the ugly.

A little background first- This is a straw bonnet I made while in New Mexico. We were invited to an event at Ft Sheldon by some local friends. We had just a short time to pull everything together. I realized I didn’t have any millinary with me that was appropriate for the very sandy, red-dusty terrain I saw in photos. This bonnet was made in a few days out of materials I found in Alamogordo since there wasn’t time to order anything.

Now, a look at the materials. 

The straw came from a vintage hat from a thrift shop. It is just about 3/8ths of an inch thick and rather smooth. This is about as wide as I would suggest for a fashion straw bonnet. The width of the plait and the width of the split straw borders on what would have been considered ‘coarse’ in the 1850s and 1860s. The coarser the straw and plait, the cheaper. The finer the split straw the finer the plaits or other straw work can be and thus the more expensive. The straw plait was completely unsew from its original state, soaked to let the sewing holes fill back in then let to dry to an almost dry state. Then it was sewn back together into the bonnet.

The white lining is made of white cotton voile I had on hand. I stiffened this with lots of my husband’s uniform spray starch despite it already having a fairly full body for a cotton sheer. (I’ll talk a little more about this later.) The spray starch method is not one I would normally use preferring a material with more body and stiffness already.

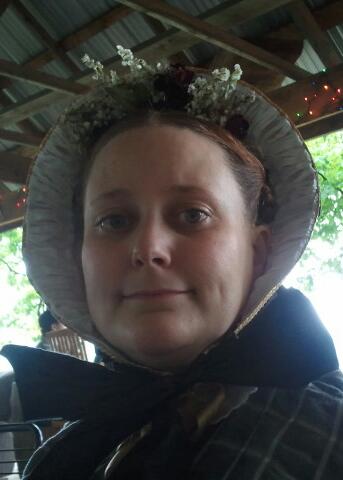
The flowers came from the local floral shop. They were the closest to natural looking I could find. These are rather sparse/thin for my preferences and what appears to be the level of fullness in period images

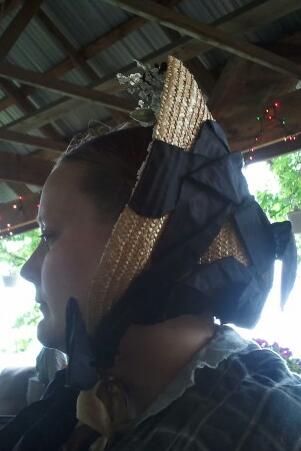
The ribbon and bavolet, or curtain, are silk taffeta I had in my stash. The ribbons are cut straight on the grain. The edges are frayed on the body of the bonnet and sized with a glue mixture to keep the silk from fraying more. While this can be seen in a few examples of extant bonnet, it is less common than ribbon which has a selvage edge. You would not see the ribbon fashion ties set on the bias.   The width, about 4″, is common for mid-century fashion bonnets. The ribbons are an adequate length. I would not suggest going any shorter. The ribbon does stand fairly well despite spending the mid-day out in the rain and thoroughly damp.The bavolet is cut and pieced on the bias. The bias in the bavolet helps with the fullness. As you can see in the side view of me wearing the bonnet the bavolet is rather limp. This is because I do not have any net backing the silk. If I had net, I would hem the net into the silk or tack it to the silk. Then I would pleat the top of the silk and net as one.

Just under the taffeta ties, is the silk functional ties. This is 1″ wide silk ribbon

Now, let us look at shape and parts.

Looking at the side view of me wearing the bonnet, this is what happens when I put on a bonnet without a mirror, using the side of the car instead. The bonnet is angled backwards more than I would like. While it doesn’t need to be perfectly vertical, it certainly should be more vertical than this. To adjust what I see, I would sit the tip slightly higher on my small bun (I often wear my hair with braids flat against the back of my head, but opted for a bun instead which does stick out further from the back of my head.) with the top of the brim angled closer to vertical.

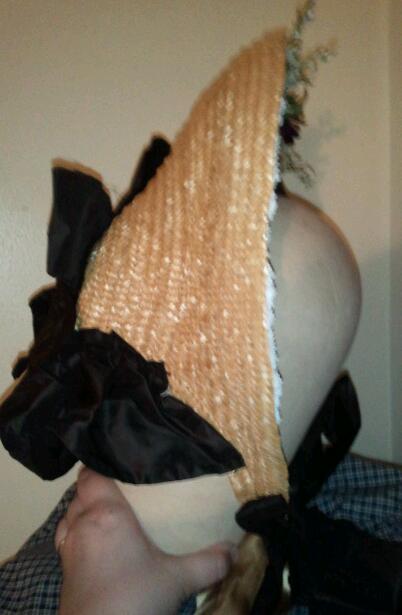
Looking at the overall shape of bonnets, one of the first things I see is the transition line from the tip though the crown to the brim. This should be a gentle transition not a drastic one. See how in this straw the transition has gentle curves? Compare that to this original straw bonnet which has a markedly deeper tip or this lovely original black straw

 As I noted the depth of the tip in the original compared to mine, we can look at that next. Yes, mine could be deeper. I think one or two rows of plait moving into the crown would make the difference. One thing to keep in mind when looking at the tips on straw bonnets is that they were not flat. Instead, they rounded from the back of the tip to the sides. Sometimes this was a small curve, other times it was more ball-like.

 The cheek tabs are an area that was quite the challenge when I started working with straw. At first they were thick and angular. But, as I looked at more bonnets, I saw cheek tabs were more narrow with a nice curve to them. Sometimes they were almost pointy.  

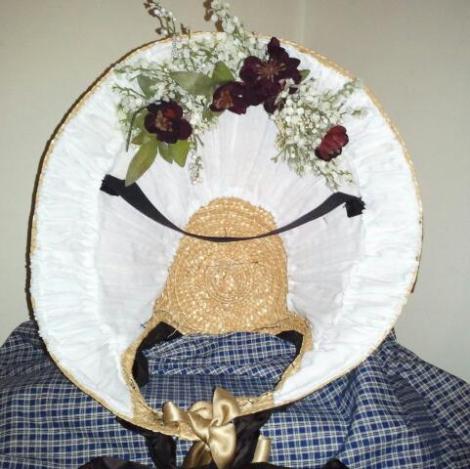
 Back to the frill. It isn’t frill enough to be a true frill. I would much rather have another layer of stiffer material double box pleated with the raw edges filling the edge of the brim. When thinking frill, think full and three-dimensional. The flowers need to be much fuller too.

The black across the inside is the velvet band that holds the bonnet on my head. I love these. They work wonderfully. Even with the bonnet perched at the odd angle on my head, the rain coming down and repeatedly wacking myself in the bonnet with my umbrella, the bonnet stayed put without feeling like it wanted to move at all thanks to this strip.

I’m sure there is more I can pick apart on this. But, that is all for tonight.

Published in: on June 13, 2012 at 5:06 pm  Comments (2)  
Tags:

Straw Bonnet Critique

When someone asks for an opinon on a bonnet, it can be difficult to try to explain what is not quite right about a bonnet for a variety of reasons – technology based conversations, trying to be sensitive, not knowing who will take offense, etc. Well, this is the bonnet I made in NM out of what I could find at the local shops in a couple days for an event we never actually made it to. I’m going to go through it this week talking about the shape, materials… basically ‘the good, the bad and the ugly.’

image

image

image

image

Published in: on June 11, 2012 at 5:34 am  Leave a Comment  
Tags: