Today is the FanU “Red Swap” Sign-up Day

RedsToday is the day to sign-up for the FanU The Red Swap!

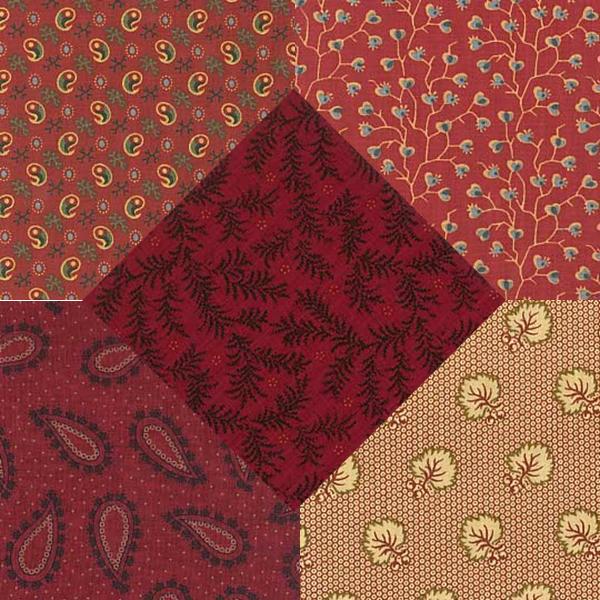
For Red Swap, we will exchange Red color fabrics from the 19th century.

We will mail our fabrics on February 28th.

Please read all the details below. 

To Sign-up, simply comment below with your email and mailing address. (I’ll erase those before approving your comment, so the whole world doesn’t have that info.)

What is a Swap?

This is a chance for to exchange fabric with a small group of people. Each group will have 8 people exchanging pieces of fabric. All you need is a half yard of fabric and envelopes along with your copy of Fanciful Utility.

To Participate:

1: Sign Up Day!
On sign-up day, groups will be assigned on a first-in basis; the first eight will be the first swap group, second eight in the second group, etc. **Please be certain you will be able to fully participate by mailing your fabrics on the Mail-Out Date.**

The Red Swap Sign-Up Day: February 20th


2: Mail-Out Day:
Place a 9×9″ piece of fabric suited to the mid-19th century in envelopes for each of the 7 other people in your swap group, stamp them (be sure to double check at the post office, but the small 9×9″ pieces should mail in a regular envelope with a normal stamp),8 and send them off no later than the Mail-Out Day.

The Red Swap Mailing Day: February 2th


3: Get Fanciful!
Use your Fanciful Utility templates and techniques to make a project from the book, or copy your own from 19th century sources. We’ll all look forward to seeing your projects! You don’t have to sew right away, but don’t keep us waiting forever to see all the fun things!

(If you need a copy of Fanciful Utility, you can purchase them from the publisher at www.thesewingacademy.com

Fabric Guidelines:

  1. For the cotton and silk categories, your fabric should be early to mid-nineteenth century appropriate. (If there is a want for an earlier or later group, we can do that.) Prints and motifs should reflect those available in the 1840s, 50s and 60s. Cotton should be 100% cotton. Silk should be 100% silk.
  2. To keep the swap and sewing possibilities interesting, please avoid solids as best we can.
  3. Fabrics that do not work well for sewing cases should not be swapped. These include sheers, gauzes, heavy, thick, easy-to-fray, slippery and stretch fabrics.
  4. For the “crazy swap” category, think crazy quilt in a sewing case. This could include satins, velvets, textured fabrics. Quality synthetic fabrics are invited.

Swapper Guidelines:

  1. Please be certain you can fully participate in the swap before you sign-up.
  2. If something arises after you sign-up that will effect the date you are mailing your fabrics, please email your group so everyone is aware.
  3. If you fail to fully participate in a swap, you will not be able to sign-up for future swaps. (We do understand medical and family emergencies. I need to be able to ensure swappers will receive fabrics when they send fabrics out.)

Q&A

Yes, you can participate in 1, 2 or 3 of the swaps.

Yes, if we end up with multiple groups, you can participate in more than one group to swap more fabric. If you participate in 2 groups, you should swap 2 fabrics.

Yes, you can swap large and small scale prints.

Yes, you can swap now and sew later.

Yes, we would love to see what you’ve made with the swapped fabric.

Yes, you can use your own fabric in your swapped project.

Published in: on February 20, 2015 at 6:00 am  Comments (9)  
Tags:

Regency Shape

imageimage

I have long loved the shape of these bonnets. I have no idea why.


You’ll notice these two have similar shapes with two very different constructions. The one with the scallops has the brim shape develop from arcs coming off the crown. The one with the black ribbon gets its brim shape with arcs that circle the brim.

I tried the first method.

???????????????????????????????


image

I am not entirely happy with how it turned out.

I tried and tried to get that transition from the crown to the brim right with that little flare up.

The straw was determined to go straight, flat, flareless. It is a bit more like this illustration. A bit.

As a result, the crown looks like it is sitting at an odd angle. It is very tempting to try to take that crown off and re-position it. On problem. Every single one of those rows is layered into the crown. Not going to happen.

So, half a hank of Italian plait later… here it is.

??????????????????????????????? IMG_5919 ???????????????????????????????


Published in: on February 17, 2015 at 10:30 am  Leave a Comment  

Veil Finding –

I think this is a white veil.

It is also over on Etsy from the same seller. 19″x41″

Published in: on February 15, 2015 at 8:25 pm  Leave a Comment  
Tags:

Veil Finding – Not a Doll Shawl

This might be my favorite “not a…” yet.

It is currently over on Etsy.

Published in: on February 15, 2015 at 8:19 pm  Comments (1)  
Tags:

Ribbon Hairnets

New Thumbnails hairnetsThere has been lots of discussion lately about how to make ribbon hairnets. Here is a set of directions I posted on the Sewing Academy back in 2007.

Please be sure to take the time to read To Net or Not to Net and to look at original hairnets before proceeding. This will give you a better idea of appropriate materials, fibers, widths and weight.

Okay, a quick 7 am modern method of making an easy ribbon net….. Let’s see if I can make any sense this morning.

This is for a simple, basic ribbon net with no decorations, made with silk or velvet ribbon cut while woven. There is a way to do it with one long piece of ribbon. I don’t think I am awake enough to describe that clearly. It really is better with pictures.

You are going to want a surface to work on, either something to pin the ribbons to or to hold the ribbon ends. For the first ribbon net I made, I used a large 12 or 14 inch embroidery hoop. A large pillow will work nicely as will a piece of cardboard. Draw a circle 12 to 14 inches in diameter depending on the size of your head and the amount of hair you have when done up. Use a compass or a dinner plate. Now decide how close you want your ribbons to sit. If you have 1/2″ wide ribbon, 1/4″ space is good. If you have 3/4″ ribbon 1/4″ to 1/2″ is good.

Cut two ribbons 2 inches longer than you circle is wide (14″ or 16″). Center them in a + on your circle. Pin each end at the edge of the circle. This marks the center of your net. If you need to mark out a grid for your ribbon placement, just measure your spaces and ribbon width away from center on all 4 sides. Or, you can just eye it. Measure 4 lengths of ribbon for above, below, right and left of the center +. Cut them and lay them down in place, the decided distance from the previous ribbons. Repeat in sets of 4 until you reach the edge of the circle.

Weave the ribbons over & under each other as you would a basket bottom. I like to work from the center out. Adjust your ribbons so they are set your chosen distance apart. Pin each end on the circle. With a matching thread, tack each + point with thread. When all the + points are stitched, work on the edges. Unpin one ribbon end. Turn the end under creating a half inch loop. Stitch the loop securely. Repeat this for every ribbon end.

When all the ends are looped, take a length of ribbon or plain elastic and run it through all of the loops. The elastic will need to be roughly 3 times the diameter (less than the real circle’s circumference) to bring the sides of the net in once the elastic is tied. The ribbon can be 3 to 4 times the width depending on how much ribbon you want to tie the net with.

Chandra M shared photos in the SA thread of her hairnet using these directions with brown velvet. Take a look.

A couple years later, but not much more awake (it has been a long, cold week), I have this idea in my head that one of those round knitting thingies may work nicely as well. It may even make the single strand of ribbon version easily doable. You could weave the ribbon across one direction, then back across weaving, using the little tabs. Sew. Then slide the ends off.

Published in: on February 13, 2015 at 10:49 pm  Leave a Comment  

Where Do I Find….?

Fanciful Utility: Victorian Sewing Cases and Needle-books is available directly from the publisher, ESC Publishing.

Straw Millinery, Drawn Millinery and Winter Millinery are all available in my Etsy Store.

Handmade Sewing Cases and Needle-books are available in my Etsy Store.

From Field to Fashion and my Quilted Hood Pattern are currently out of print. When they are back in print, they will be available in my Etsy Story.

Published in: on February 11, 2015 at 6:00 am  Leave a Comment  

FanU Readers

I noticed Fanciful Utility only has one rater with only 4 stars on Good Reads. Okay, so, I pouted a little over only one rater.

Please, take a moment to rate Fanciful Utility.

Published in: on February 9, 2015 at 4:00 pm  Comments (3)  

Fanchons for 1865

There are only two Fanchon bonnets left in my Etsy store.

Here are a few finishing ideas.

image

Bonnets of April 1859

“In bonnets, chip, crinoline, crape, and straw are used singly and in combination. On the street, Leghorn and the plainer straws have made their appearance. The Leghorns are exquisitely fine, and trimmed in a variety of ways. Ribbons approaching the straw color are much used, mixed with blue corn-flowers, to give the desired contrast; sprays of grass, black and maize-colored wheatears, laburnum, acacia, etc etc. For young ladies, wreaths of a single flower, as roses, the daisy, the violet, are used upon chip, crinoline, and all the purer straws. A violet crape bonnet with wreaths of purple azalias—a bonnet of chip, with a soft crown of blonde and thulle, and cordons of Chinese Westeria—bonnet of white crape and blonde, with blue marabouts, twisted towards the curtain; plaiting or torsades of blue crape, lightened with marabouts inside the brim; strings of blue ribbon and thulle lappets. We give one or two styles that will illustrate the trimmings referred to.” (Godey’s Lady’s Book, April 1859)

d e f

Published in: on February 9, 2015 at 6:00 am  Leave a Comment  

My First Regency Bonnet

imageOkay, technically, my first all straw Regency bonnet. I did make a silk & straw about a decade ago. Skills have improved since then.

imageWhen I started this piece, I had another bonnet in mind. But, the straw quickly told me it wanted to be this bonnet I had seen just before. I complied.

Then, as I worked, I became very worried I was going to run out of straw. This is indeed the very, very last of this hank of plait.

image

image

image

imageOriginal bonnet 1, 2 and original site.

Published in: on February 8, 2015 at 11:56 am  Leave a Comment