First Millinery of 2016
I am excited to say I just listed my first millinery pieces of 2016.

As you can see, these pieces each have something special. Yes, this year, I am going to do a few pieces with something extra. I have both purchased decorative plait and hand-sculpted decorative plait that I will be adding to a few special millinery pieces.
Oh, I also carved some new hat blocks in average and larger sizes. These have the curved top. I also did a flatter top.
First, here is a scallop edge on a hat worked in a narrow plait of a beautiful natural gold.


Next, is a looped edge on a hat in a lighter gold natural plait.


I also added a small toque style hat that I forgot about. This little lady needs someone to finish and show it off. I listed it at a low price so it can have a quick home.


Looking at the Cost of Millinery
 I just photographed the first millinery pieces of the year. As there currently is discussion in at least one Facebook group about the cost of attire and what historic artisans make, I thought it would be a good idea to revisit the cost of millinery.
This has been a topic I have addressed a few times in the past. I wrote “Why are Bonnets so Much” in 2014, sharing again in 2015. Prior to that, I created a chart “The Cost of Authenticity” in 2010.
This time, I will focus on straw millinery, as that is what I will be focusing on this year.
One significant factor in the cost of straw millinery is the availability of straw. Suitable straw plait is becoming more and more difficult to find. Modern trends have shifted to cellulose and plastic materials. Vintage straws have the risk of being dried out. The growing doll fascination is finding narrow plaits to be sold by the yard, which just is not plausible for millinery pieces that take several dozen yards. With one of my trustworthy suppliers, a hank I used to buy for $16 is now $22 plus shipping, which has also increased quite a bit over the years.
Straw Bonnet and Hat forms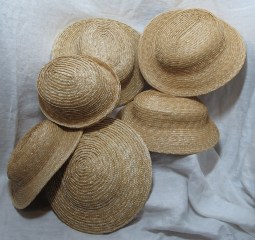
- Straw plait ($20-$55 a skein depending on origin, plait and color)
- Millinery wire ($20/coil)
- Thread
- Needles
- Sizing/blocking ingredients
Straw Bonnet Finishing
- Lining ($10-$15/yard)
- Facing ($10-$20/yard)
- Organza, net or lace for frill ($10-$30/yard)
- Bavolet net ($32/yard)
- Silk or Ribbon for Bavolet ($5/length to $60/length)
- Ribbon for functional ties ($2.80)
- Fashionable Ribbon ($4-$60/yard)
- Flowers ($10-$75)
- thread, needles, etc
Straw Hats Finishing
- Lining ($10-$15/yard)
- Ribbons ($2-$30/yard) (narrower)
- Flowersf ($10-$40)
- thread, sizing, etc
I hand sew all my millinery. Some straw is easy to work with. Other straw is very tough on the hands, both the skin and the muscles & joints. Some milliners have permanent wear, even damage to their hands. We need really good moisturizers and muscle rubs to keep the hands going.
Depending on the millinery piece and the straw, it can take from 6 hours to 18 hours to hand sew a form. This includes row after row of plait (the narrower the plait, the more rows), edging, wiring, binding and blocking.
Work Bags from the 1st Sew Along
Now that the final directions for the first 2016 Sew Along have been shared, photos of finished work bags are coming in. Here are just a few of the bags made in the past month and a half.


Alas, no home
These poor bonnets never did find a home last year. Each is waiting for the right time and person.
The first is one of my favorites from last year. I just love the combination of the velvet calla lilies and pink & green silk.
This is a smaller straw hat. (It fits my head perching forward.) It would be good for an adult with a smaller to average head or a child. Find it on Etsy.


This little hat is ideal for a late war to post war impression. Light weight, made of fine hemp-straw and silk, it sits back over the hair as it begins to rise. The inspiration for this bonnet comes from this 1865 wedding bonnet at the National Trust Collections (below) Find it on Etsy.


**Note: I am going to make a point to share my millinery work here first as the listings are complete. This means, to get the first look and chance at pieces, subscribe to my blog. You can opt to have the new posts go to a feed or your email.**
A “I want that”
You know those times when you see an outfit in a photo, painting or illustration? This is one of those times. In this case, it is all Kitty Calash’s fault for mentioning The Yale Center for British Art in her Frivolous Friday post.
This ensemble in the center of Wilkie’s The Pedler instantly caught my attention. Often, when I see clothes, I envision how they would feel to wear them. This looks all too comfy to me.
I see a shorter red wool or linen skirt with what may be a deep hem/hem-backing or another shade of red as a trim or a tuck, a long sacque style bodice closing at a high waist with a belt, from under the bodice hangs low a key and scissors, a kerchief with a border drapes around her neck, peeking out of the bodice/sacque is a white collar. As I know much less of this era, I am not quite sure what that white collar is. A chemisette?
For warmth, I would work the skirt/petti in wool and the bodice/sacque also in wool. For comfort in warmer weather, I would work the skirt in wool or linen with the sacque/bodice in something lighter. cotton? light linen?

(close-up) The Pedler, by Sir Davie Wilkie at The Yale Center for British Art.
Kneeling in the forefront, we have a back view of similarly tempting, comfy clothing.
We can see the side slit in her skirt. Her sacque style bodice is shorter, gathering in at a more natural location with the aid of the string/cord holding the blue cloth style apron in place. She has a smaller kerchief showing at her neck that almost appears to reach down the front of her, held under the blue cloth. I do like how that shade of blue is brought out by the golden color. (Lydia Jane, I think this is an outfit you will want to see.)

(close-up) The Pedler, by Sir Davie Wilkie at The Yale Center for British Art.
While visiting The Yale Center, be sure to look at First Class – The Meeting and Second Class – The Parting. Also, take a peek at Strange Faces. A story comes to mind for me. Besides that, she has a nice example of a turn over shawl and a bonnet.
You must see this
I lack words for how much you must see this….
1746-1823 album with swatches, sketches, illustrations and notes.
***Please see Carolann’s note below in the comments about the published version of this.***


GVHSA – Pin Ball – Resources
Articles and blogging about originals:
Articles and blogging on making pin balls:
- Koska the Cat’s “Strawberry Pinball“, “Knitted Pinballs“, “Pinball Beginnings” and “Pinball Progress“
Needlework ideas and patterns:
- A Pinboard for a pattern book
- Check out page 36-37, 93, 123, and a few others of this original Design Book.
Needlework helpers
- The Illuminated Ladies’ Book of Useful and Ornamental Work (start on page 160)
- The Illuminated Book of Needlework (start with the second page 97. The first part has a history of needlework.)
- The Lady’s Manual of Fancy Work. (Page 25 starts a nice showing of stitches for Berlin work. Page 41 starts an illustration free discussion of embroidery. Page 131 starts a section on color theory.)
- The Ladies’ Hand Book of Fancy and Ornamental Work. (be warned, this book is full of projects.) (Page 63 begins Berlin work.)
- Queen Stitch
Examples of a Turn-Over Shawl
A nice example of a Turn-Over Shawl is on Ebay this week. I hope they keep the photos up for a good long while.
A “Turn-Over Shawl” is A shawl that when folded in a triangle, shows all four finished borders. This is done by attaching 2 borders on the right side and 2 on the wrong side.
The three-quarter back view shows the Vs of the two border pairs. These are set on opposite sides so when folded over, both sets of borders form their Vs. You can see the “right side” construction of the top V in one of the photos. This shawl is made with a center piece of black wool, 4 paisley type borders and black wool borders that are frayed. The right and wrong sides of the paisley type borders can be seen in the other two photos. A border such as this one could have been purchased at the time.


There is another one over on Etsy as well. This shawl is 58″ square, within the common size perimeters for the mid-century. Again we can see the borders set in pairs on opposite sides so they will make Vs when the shawl is folded. While this border is narrower than the Ebay shawl’s, the way it is folded and photographed really shows how dramatic and lovely the look can be. The seller includes a teaser photo of one corner showing the right and wrong sides of the border. The color thread clearly shows the construction details. (btw – Please do not dry clean an antique shawl as the seller suggest.)


I believe Genteel Arts just did a workshop on making a turn-over shawl.
Additional examples:
http://www.meg-andrews.com/item-sold-details/Norwich-Turnover-Shawl/8011
http://www.clevelandart.org/art/2012.447
https://www.augusta-auction.com/component/auctions/?view=lot&id=14956&auction_file_id=33
http://www.powerhousemuseum.com/collection/database/?irn=149561
http://www.antique-textiles.net/shawls/1820-1825-turnover.html


