Sit On This

Okay. I’ve been having a cranky day. Button pushed.

Please for the love of artistic lines and historic timelines, Stop Sitting on That!!!!

Stop sitting on hard to find originals!

Stop sitting on chairs 50 to 100 years out of date!

Yes, folding chairs are fabulous. They also have very particular timelines and uses. Please, take a look at the folding chair articles I’ve done over the years. (Please, do not ask me to appraise your chair.)

2016-04-12-11.11.21-1.jpg.jpegRegardless of how fabulously easy folding can be, the reality is the Vast majority of civilians did not own folding chairs during the war. When they were manufactured for civilian use, they were for parlors, nice parlors, initially.

Consider a regular chair. Regular chairs are sturdy, strong, better for you buttocks, back and knees. Turned upside down, they can carry/pack things inside the legs.

Also, keep in mind where you are interpreting. If you are in a home or shop, there are chairs appropriate for each room. Your parlor chair won’t be in your kitchen, nor will your kitchen chair be in your parlor. If you are a refugee,  out an about in, oh, say a camp, you are not going to have the best chair from your parlor or kitchen.

I am starting a PinBoard for everyday chairs that you may be able to find reasonable reproductions or revivals of.

An easy to follow furniture guide: click here.


Published in: on April 12, 2016 at 12:05 pm  Comments (5)  

Today’s Millinery

Today’s hat is a large mid-19th century fashion hat with a low crown and sloping brim.

This hat, with a 20.5″ interior, will suit a larger head or with a full lining, an average size head. It can be dressed up with a ribbon, flowers or a feather. Look for it in my Etsy shop.

Published in: on April 10, 2016 at 10:04 am  Leave a Comment  

For 140th’s Civilian Seminar – April 9, 2016

A Practical Look At Sewing Cases

Sewing at home

The paintings and prints we looked at are saved on this “140th NYVI Civilian Seminar – Paintings” Pinterest Board. The examples of sewing boxes, cases, baskets, tools, etc. can be found on this “140th NYVI Civilian Seminar – Examples” Pinterest Board

It is important to look at examples prior to 1860 because these are the sewing boxes we would have grown up with seeing our mothers and grandmothers use; these are those we would have used in our teens and twenties. We wouldn’t always have a brand new sewing box from the 1850s or 60s; we may have had a box from the 1830s that we have used for many years. In some instances, children had their own sewing cases.Boxes can be simple or quite ornate, or somewhere in between.

At home, some women would have a sewing stand, also known as a work table. This feels more like a piece of furniture for many of us in the twenty-first century. As sewing stand would have drawers or compartments for sewing tools and thread, while providing a work surface. It may also have a catch/bag for threads and scraps. One fairly well known sewing stand is called a “Martha Washington”. It is important to know that while this type of stand was an earlier, 1810-15 Federal style (therefore functional but not fashionable by the 1850s/60s) some were made in the 20th century as well. (Here is a Shaker sewing stand.)

Sewing on the go

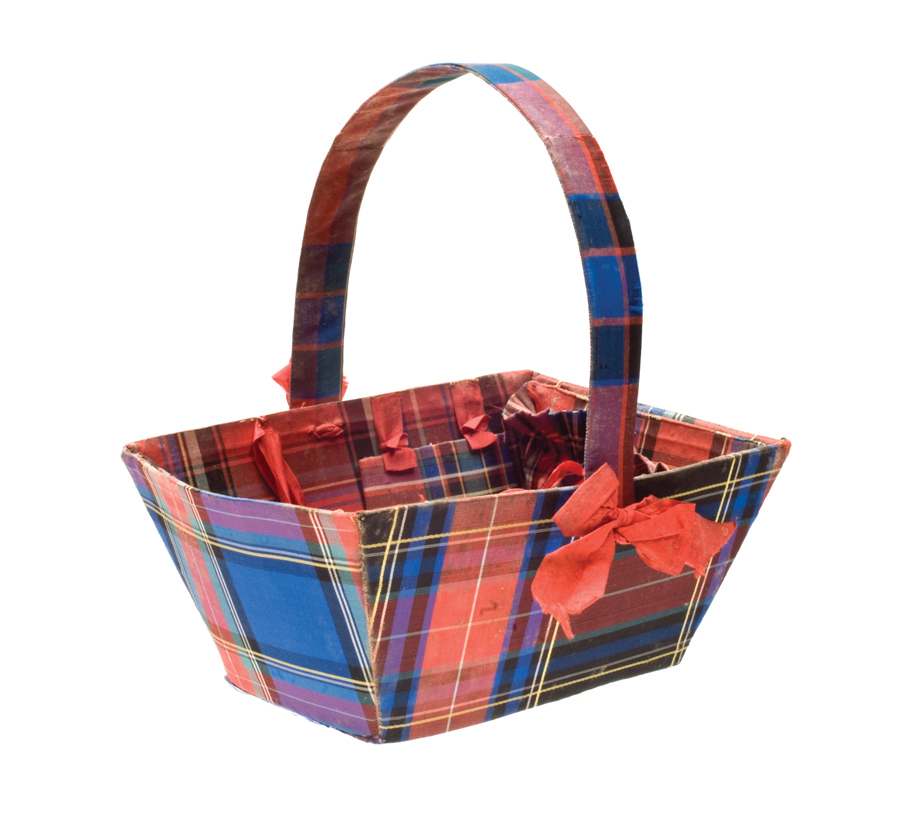
While some of the sewing boxes above may be suitable for travel, many of us want something that will transport easier. This can include smaller boxes, baskets and other sewing cases. Manufactured/purchased sewing cases, aka etui took a variety of shapes, including this one that looks like a book when closed.

For our interpretive purposes, we have several options for mobile sewing:

Making Your Own

Domestically made sewing cases were also known as work pockets and housewifes. They were both structured with pasteboard and soft to be folded or rolled. Some resembled books. Extant examples show they were made with leather, painted canvas, oiled silk, silks, cottons and wools. A work bag was also a good option. (Earlier example)


Filling Your Box

What you might want inside…..

Thread winder – Assorted thread winders –  Assorted thread winders –   Wood thread winders

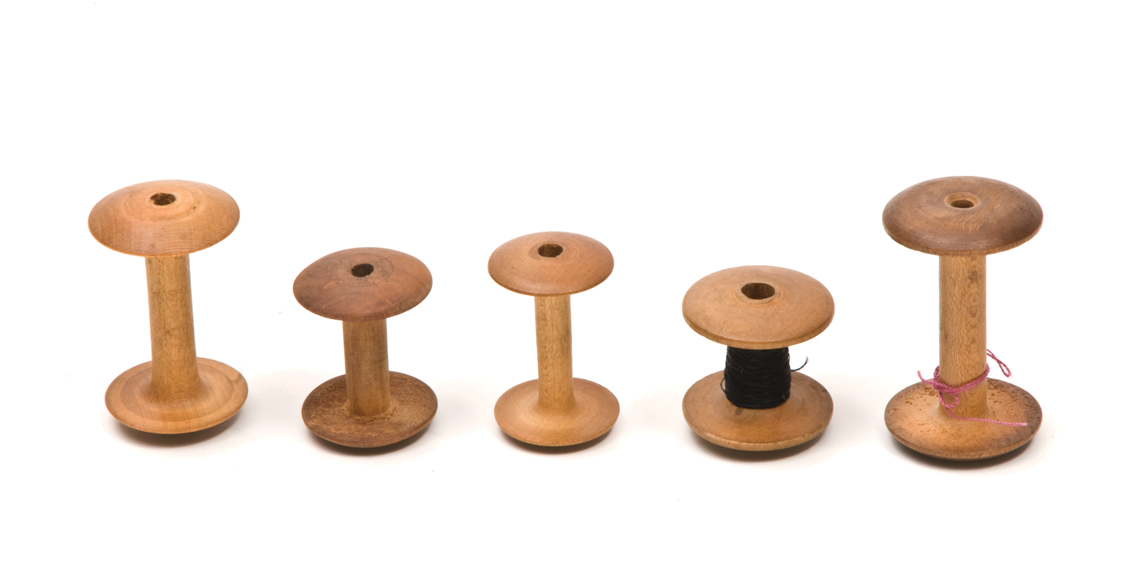
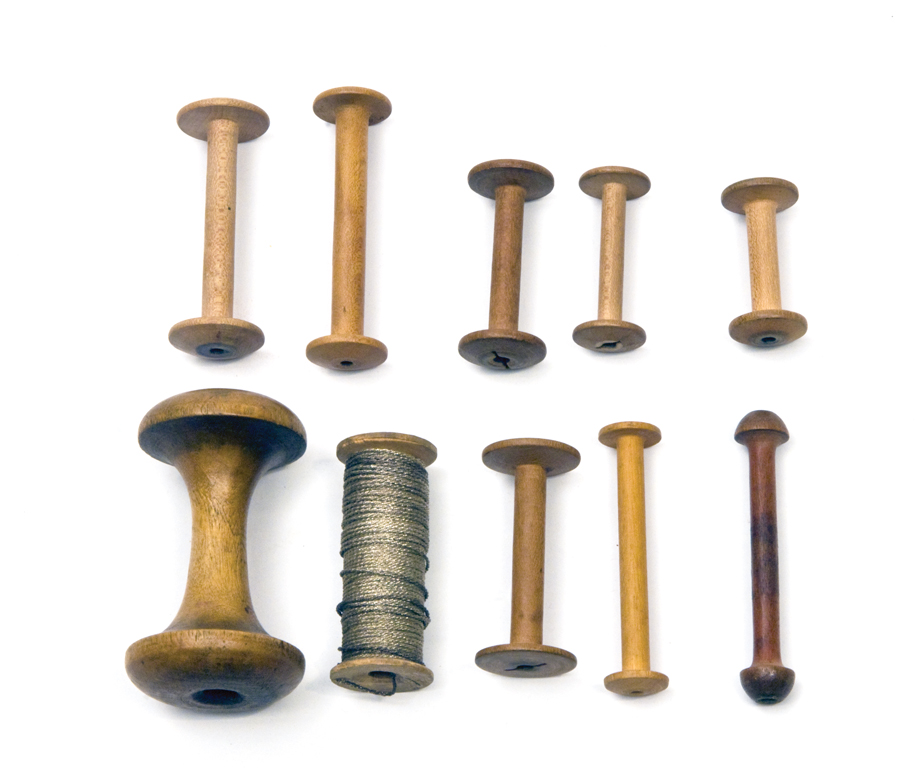
Spools –  original wood spools –  Original wood spoolsoriginal MOP spools,

Scissors – Scissors at the METTailor Shears

Bodkin – It seems the basic style of a metal and bone bodkins go back centuries. – a copper alloy 1600 examplea 1600s exampleA 1600s bodkin

Awl/stiletto – Original bone stiletto3 stilettos (and other tools) from Historic New England

Crochet hooks and Tambour Needles – Original tambour needle

Tape Measures – It seems original tapes are silk, linen and wool. I see some that are hand inked and some that appear to be printed (purchased that way) – an assortment of original measures

Thimbles – 19th century thimbles at the MET

Needles and what holds them – Original needle caseOriginal needle caseLots of paper needle packets

Small tin or pasteboard boxes – for pins, buttons, beads, what-not –

Wax and Waxers – Original MOP waxer, – Original silver waxerlater berry waxer

Other sewing tools: Bell gauge for measuring needles


Where to find reproduction sewing tools:

Resources and Printables:


Additional Readings:

—————————————

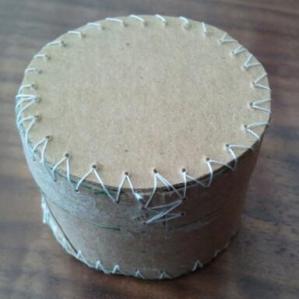
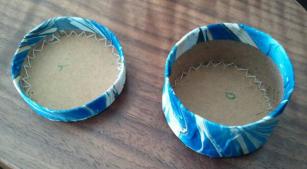
ADDED: Since several people mentioned they want to make their own sewing work box now, I thought I would add some online options.

Published in: on April 9, 2016 at 1:00 am  Comments (1)  

A Week of Sewing Cases 4

2016-04-03-13.31.04-1.jpg.jpeg
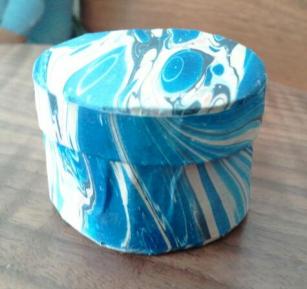
When laying out the sewing cases, boxes and bags, I knew I didn’t have a bandbox example of my own to show. Here is a really great example of a bandbox sewing kit. I’ve wanted one, but, haven’t had the time to find or make my own bandbox. While it would take a while to make my own, it wouldn’t take long to make one for Cali. So began the sewing bandbox, in miniature….

Pasteboard and thread were required for the base. Not having a clue how to shape a 1″ tall by 1 1/2″ wide circle, I grabbed the paper towel roll. (I’ll do better next time.) I quickly learned that pre-pierceing the holes in the thick pasteboard was a must. I think for a first time and a tiny size, this came out okay.

2016-04-03-13.03.27.jpg.jpeg2016-04-03-13.03.52-1.jpg.jpeg

I used the scraps from the sewing box. This marbleized paper sucks up moisture and puckers. This little box does have a few puckers that I wish it didn’t. I do think it will be easier to get the sides to line up nicely on the full size one. The photo is actually twice the size of the 1″ tall box. All in all, it is pretty cute. Cali now has a box of her own. She’ll need tools next. ( have a plan for that.)

2016-04-03-13.31.54-1.jpg.jpeg

2016-04-03-13.31.34-1.jpg.jpeg

Published in: on April 8, 2016 at 4:00 pm  Comments (2)  

A Week of Sewing Boxes 3

2016-03-28-16.31.15.jpg.jpeg
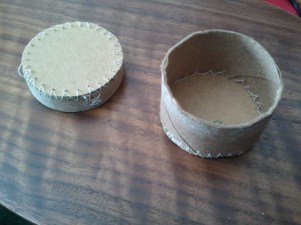
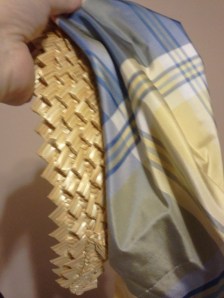
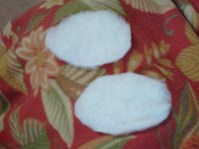
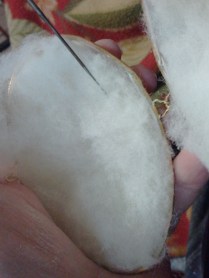
Along with the larger sewing cases, I want to show smaller ones.While ordering some additional tools, I decided to pick up a shell purse to try my hand at one of those cute shell cases.(
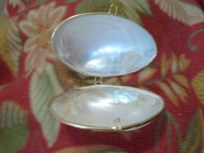
Ex 1, ex 2, ex 3, )

It couldn’t be that hard.

Wrong.

This will forever be known as the PITA shell.

There were several attempts to glue in velvet and silk linings. None of the attempts worked for me. I was sure tracing around the shell would easily give the right fabric shape. Nope. Nope. I then opted to try to fill it with wool batting that would then be covered with the velvet and edged with soutache. I’ve gone as far as the velvet. I don’t think I’m going to be happy with trying to glue on narrow soutache.

(I really should have done something more like this one, with the bag type pouch and page. The bag fabric would have been so much easier to glue into the shell, while the page could have sewn on)

The shell open.

2016-03-28-16.31.28.jpg.jpeg

The layers of batting…. 2016-03-28-16.31.55.jpg.jpeg

Trying to work the batting into the shell with a felting needle. Not a period technique. Not one that worked anyway.

2016-03-28-17.47.16.jpg.jpeg

Published in: on April 7, 2016 at 11:38 am  Leave a Comment  

“You really must see to your girl…”

Elizabeth Stewart Clark’s recent article, “Why We Blame Helen: Or, What Happens When You Improve” brings a favorite line to mind when, with a great sigh we say “Oh, Helen.”

I know. I can’t help it. My brain works that way.

Okay, I also have visions of an absent minded house-elf thanks to the fact that I am re-listening to the Harry Potter series as my drive-time audiobooks.

The reality is, Liz puts a very true phenomenon in a nice capsule, taking a personal stress many of us feel and letting it rest. In my 20s, I don’t know how many times I had finished a dress just to learn something new about construction.

Another thought Liz’s article brought to mind is what I call my “seasonal sewing syndrome.” For several months, I sew straw millinery. For several months, I sew sewing cases. Let’s just say the sewing techniques are very, very different. When I go from months of sewing with large needles and straw to fine needles on silks and cottons the stitches on the first piece is less than fabulous and ends up in the “blaaaa” box. It is like I have to remind my hands to function the way I need them to.

Published in: on April 7, 2016 at 6:03 am  Comments (3)  

Today’s Millinery

Given that the last couple hats were larger, it was time to do a smaller one. This fashionable, mid-19th century hat is for those with a smaller head (18″ to 21″ at the hairline.) It designed to sit high on the top of your head. It has a shallow crown and a brim that curves down all around while dipping further front and back. I can see this looking adorable with ribbons. Look for it in my Etsy shop.

Published in: on April 6, 2016 at 4:22 pm  Leave a Comment  

A Week of Sewing Cases 2

The second large box of the week didn’t start out as a sewing box. As I worked on sorting and labeling my tools, I decided rather than show all the bodkins together, scissors together, etc., it would be far more interesting to show the antique tools together and the reproduction tools together, side by side. So, a second box was needed. The first box I thought of, that I picked up to be made into a sewing box, is currently storing the doll tea sets with an oh-so-perfect fit.

This box was hiding under the sewing room dresser, forgotten about. It was a $1 garage sale rescue. I have a soft spot for pieces that have obviously had many lives and various remakes. This box was very much that with the replaced lock, as well as assorted nails and nail holes. (I forgot to take a before photo with the various adaptations.) Whether this box will remain a sewing box after the demonstration, we shall see. I don’t know if it is happy with its new designation. Actually, I’m not sure if it is happy with its odd, may be too modern paint. But, I’m afraid the box will fall apart if I take the paint off.

Anyway. Let’s start with the tray since the whole thing started with the need for a second tray. I did a fabric tray (and lining) this time around. Each piece of pasteboard, double on the bottoms and sides, was covered with fabric and stitched together. Okay, so the outer parts were done 3 times. Precise measurements, when adding reproduction cotton quilt prints, becomes too tight to fit. (also frustration and many more hours of work than planned.)

2016-04-01-21.32.53.jpg.jpeg

The lining of the box is actually pasteboard covered panels slid into place. I opted for this method because it meant the least amount of alteration to the box itself. The panels can pop back out as needed. It seems I did not take a photo of just the lining. So, here is a photo of the pasteboard that warped on the top and not yet laying flat.

2016-04-02-11.13.50.jpg.jpeg

With the tray inserted, it looks like a snazzy sewing box. With the latch on the lock face, it will hold closed pretty well too. (the lock itself does not work, just the latch.

2016-04-01-21.43.16.jpg.jpeg

Here it is with the reproduction tools. Each of those green tags tells where it was from or who made it. 2016-04-02-11.07.57.jpg.jpeg

The project meets feline approval.

2016-04-02-11.11.04.jpg.jpeg

Published in: on April 5, 2016 at 4:00 pm  Comments (4)  

A Week of Sewing Cases #1

Over “spring” break, in quotes due to the utter lack of warmth ending in an icy snow storm, I finally got around to working on the larger sewing boxes that have been on my to-do list thanks to the nudge a presentation the weekend following. The week was thus filled with working on sewing boxes and cases.

Here is the early 19th century sewing box I picked up last summer for a very nice price due it needing some tlc. It has pretty little mother of pearl inlays.

2016-03-28-10.34.35.jpg.jpeg

It was stripped of its interior when I bought it. The lid appears to have been changed at one point because that panel is rough and sorta beveled shaped. The brown tray is my attempt last summer at recovering it in velvet. While I loved how it came out…. one small problem…. it didn’t fit right.

I wanted to find a paper that would be true to the blue paper inside, assuming it was original, but I am not sure. I found a maker of beautiful, handmade marbelized paper, who found me two matching papers. I love the colors and the swirl density.

I started with making panels on pasteboard to cover the bottoms. (second guessing this because this is were the warping came in.) While the panels dried, I covered the sides. One of the tray supports popped right out. One was stuck tight. It was much, much easier to do the one that popped out. Once the sides were in and dry, the bottoms were able to go in.

I decided to do the tray in the paper with the dividers still in the velvet. This is because I cut and sanded the dividers, a pretty cherry, to fit with the velvet inside. I was afraid if I did the dividers in just paper, they would be too loose. You’ll also see the strip of metal sticking up. I wanted to see if I could insert these strips back into the tray. I had 2 and most of 1. I was not able to. 😦 I have them in the bottom of the box in case I figure out how to insert them. (Tried slitting the paper with a knife in one spot. It didn’t work.)

There are a few spots I am not happy with. There was some puckering and just paper unprettiness. The lock measurement must have been off.

Here it is finished, ready for tools.

2016-03-30-10.25.47.jpg.jpeg

This one will display the antique sewing tools for the presentation.

2016-03-30-10.26.14.jpg.jpeg

Published in: on April 4, 2016 at 4:00 pm  Comments (4)  

My Sheer Evolution

This is my first sheer dress made around 2000. It has major construction issues as I had no idea how to turn at the waist for a sheer. The fabric was oh so comfy. The skirt support was prior to me figuring out how to get better poof off my hips. The collar is too wide for 1861-4. (I have a eyes closed problem with photos.)
image

Here is my second sheer, made the same year or the next as the grey. This one does have a cotton strip folded into the turn. I put it under the fold…. It slipped…. I learned. This fabric had a very loose weave and snagged on everything.
image

I remade it to fit a significant weight gain, when we were unemployed. The remake was done on an air mattress.
image

Sheer dress three was the dress I wore for mourning Dad. (Yes, I now know sheer cotton may not be supportable for mourning. It was real mourning. I had little money. I was numb. Live with it.) This was a private gathering for just a few of just a few of us.
image

Jump forward many years….
The next two sheer dresses were from my green stage in 2013. They were the first dresses I made in what felt like a long time. The green plaid is a cotton lawn; soft, comfy, airy, easy to wrinkle. The green print is a loved gift, a block print from the V&A. It is also very nice to wear. It can not get wet.
image

image

The following year, in 2014, I made the matching fabric dresses for Lily and I that we wore for the GCV Mother’s Day fashion show. This sheer cotton shirting was easy to work with and forgiving. It does feel a tad heavier than the white & green dresses. These got hem tape.
image

The next sheer is an earlier dress. The fabric came from a friend. It is lovable both for the ease and the wear. I want to make new undergarments to truly benefit from the lightness of this dress. (Photo by Eileen Hook)
image

I’ll admit, I’ve loved wearing sheers so much, I have a hard time wearing some opaque cottons because they feel heavy to me. I have a couple more sheers in the stash. They seem to draw my attention so much more than the period prints.

Hmm. A couple more photos….
image
image

image

Published in: on April 2, 2016 at 10:06 pm  Leave a Comment