Sunday in the Millinery

Today stayed below 80 degrees. That rarely happens for this event. The morning rain did ease off… The sun came out… And it was a beautiful day.


This weekend was all about people for me.

I had an incredible assistant. Thank you so much, Anneliese for volunteering to help me out this weekend. You were phenomenal.

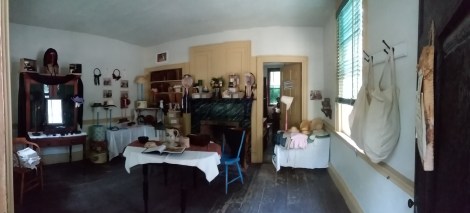
The shop was very busy with friends old and new stopping in to say hi, take a look at millinery, and even sew for a spell. The museum posted a photo looking at the millinery shop from across the square, on Facebook that made me laugh. The busy moment was taking this photo below showing off two of my newest hats worn by two lovely friends.

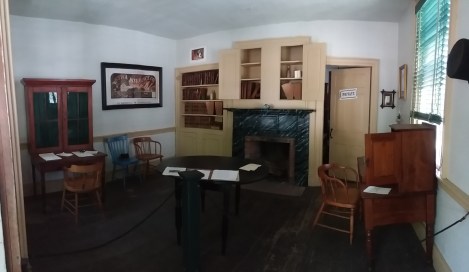
The shop was packed for each day during the battle in the village. I played with the panoramic setting rotating in a circle.

I am now at home. The shop is deconstructed. Itn2was so very nice seeing everyone. I will admit, it was such a whirlwind, it is kind of a blurr. So, I don’t dare do individual acknowledgements. I am sad I won’t see some friends for a whole year. I already have a list of improvements or enhancements for next year (a foot stool, a wall mirror)

I learned some things this year:

  • Glue stick does not hold up to rainy weather.
  • I can upload videos to fb from the village.
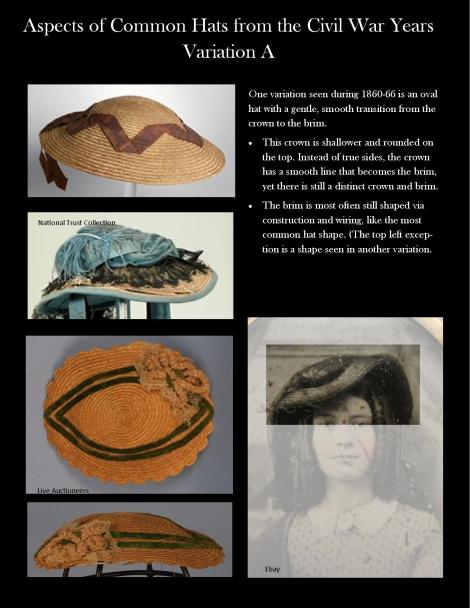
  • Interpretive millinery gaps bugs me.
  • Sewing projects will arrive on their own.
  • Write it down (and take a photo)

I am delighted to find my Millinery Shop was one of Dave Valvo’s first stop for photos. Please take a look at his photos:

Published in: on July 22, 2018 at 6:34 pm  Comments (1)  

Good Morning from the Millinery Shop

The weather was lovely as I arrived at the museum Saturday morning. It played out to be a very nice day, not getting too hot, with a nice breeze.

I had time to do a couple videos before people arrived.

Here is a second video looking at what I had in my sewing box.


Sunday looks like it may be damp or rainy or humid, despite a lower temperature. So, I won’t get to wear my V&A dress I love, because the block print does a bleeding thing. I may just brave my black and red wool. Crazy?

Published in: on July 21, 2018 at 8:10 pm  Leave a Comment  

This Is 20

Leaving my driveway today, I realized this is number 20. With a short hiatus while in NM, this is my 20th Civil War Event at the Genesee Country Village and Museum.

This deserved flowers.

The millinery shop is all set up for the weekend. Here is the before:

And after:

Published in: on July 20, 2018 at 9:47 pm  Leave a Comment  

Invisible Hair Nets

When looking at groups of 1860s photographs, we a significant number of women wore some type net net. Most frequently, this was a functional and/or invisible hair net.

These hair nets are an excellent addition to a reenactor’s or interpreter’s hair kit. This simple, correct accessory can greatly improve an impression or just help with a bad hair day. **Please remember these were worn over dressed hair.

Please pardon Clara’s guest appearance at the end.

I welcome you to learn more about hair nets by reading To Net, Or Not to Net, available through my Etsy store.

Published in: on July 6, 2018 at 4:52 pm  Comments (3)  

Common Hat Shapes During the American Civil War Era

There are 2 main componants to a hat from this era: the crown and the brim. Both thd crown and brim were particularly shaped to reflect the styles of the time.

When selecting hat for an 1860-1865 impression, please keep in mind the situation you are in as well as your impression. In many cases hats had specific purposes and places. These include those for the seaside, watercures, the garden*, and recreation. There are seperate posts for these. I welcome you to explore these. There are also hats appropriate to those of poorer situations, institutionalized or previously so situations, and blockaded situations. I will be adding a post looking coarse straw and the use of palm and other make-do fibers. (*note: a gsrden hat is different than one for gardening.)

common 1

common 2

common 3

common 4

Leaen more about this style here

This next style is called a “Mousquetaire” hat or a “Postilion” hat.
Mousquetaire hats have tapered crowns that rise about four to five inches, not quite double the height of other fashion hats of the early 1860s. The brim is shaped, with a curve dipping front and back. This brim is narrow, only a few inches wide. The decorations are primarily at the center front, reaching the height of the crown. A ribbon may or may not circle the crown with a bow or arrangement in the back.

Additional variations to be covered soon:

  • Smaller hats (Fashion)
  • Torque (High fashion without brim) and porkpie (High fashion with little upturned brims)

Please read these hat related posts as well:

Published in: on July 5, 2018 at 6:30 pm  Leave a Comment  

Capote de Paille??

Nearly two years ago to today I was looking into a bonnet shape a woman called a “capote”. Last night, while sharing the black straw piece I made, I was asked what a capote is.

During the Regency era, the capote seems to be a petite bonnet that hugs the head. Sometimes it stops close to the face. Sometimes it extends just beyond. Most often capotes are described as silk or another soft material. Occasionally we see a ” Capote de Paille” or a capote of straw. Here is a lovely example of a Capote de Paille.

Google translate likes to translate “capote” as “hood.” Visually, this sorta works for the Regency era pieces. But, is doesn’t quite work when we proceed into the century when pieces are clearly bonnets. In the upper right corner we see two 1840s-50s bonnets called capotes, translated as hoods.

Here are several examples of the shape requested two years back.

I have made a few of these since they were requested. Note: The black straw is currently available in my shop.

Here is another take on the Capote.

Published in: on July 3, 2018 at 11:00 am  Leave a Comment  

GCVM’s War of 1812 – Part 1 The Millinery

I have so much I want to say about this past weekend. It is easiest to start with the millinery.

I decided months ago I wanted to feature my tapered crown block and the beautiful block my friend, Julie’s husband made for me last year. I got started on my display pieces much later than it planned due to some work stuff, aka test exhaustion. But, when i finally got going, I really got going. The result was the biggest bonnet I have made. (first attempt at uploading a video)

I love this piece. The block let me make these beautifully straight sides on the crown that rises 5″ in front and 6″ in back. The brim has this great curve to frame the face. The back of the brim is shaped with layering the plait in on itself. I just love the look of straw as it makes those lines. Okay, so, as I am writing this I am second guessing selling it. It is up on Etsy at this moment. I may take it down. If it does sell, it will have to ship in a Big box.

Next is the piece with the tapered crown. This piece is going to a good friend. It is much like my own chapeaux, just with a wider brim. This brim is very flattering. The piece is also very easy and comfortable to wear.

This third piece is one I made last year for this event just before I went into the hospital. This has a shallow, wide crown with deep curves supporting the shapped brim. This one is not up on Etsy yet because I am considering decorating it.

Of course, there is the piece I worked on during my demonstration. This black straw may got have been the easiest choice given the overcast sky not givong optimal light. None the less, I finished the entire capote type bonnet, including the pretty braided plait that flares at the edge of the brim. (Yes, this in the shop)

Published in: on June 26, 2018 at 5:55 pm  Comments (1)  

Its been a year

In recognition of a particular special “anniversary”, I’ve decided to have a Sale!

My “Paper Beats Rock” sale will give you 10% off each of my e-books!
That includes:
From Field to Fashion
Paisley, Plaid, and Purled
To Net, Or Not to Net
And my hood patterns!

https://www.etsy.com/shop/AnnaWordenBauersmith?ref=l2-shopheader-name

Published in: on June 17, 2018 at 10:21 am  Leave a Comment  

Review of To Net, Or Not to Net

Thank you for the exceptional review Kristen! 

https://victorianneedle.blogspot.com/2018/06/book-1-to-net-or-not-to-net-revisted.html

Published in: on June 12, 2018 at 6:48 pm  Leave a Comment  

Pizza and the Piggy Bank

Or: Where to Spend It, Where to Save It.

This past weekend I fringed a plaid wool shawl for the first time in over a decade. I find fringing relaxing. This may or may not be odd for the unraveling it is and can symbolically represent. As I neared it’s completion, I thought about how little it costs and how much of a simple impression improver it is. This length of wool turned shawl costs less than the price of a pizza. My mind has since wandered to the other things that cost less than a pizza yet add to and improve someone’s impression.

Now, I don’t want you to get me wrong. I don’t want encourage shortcuts and overly-improvising for the sake of authenticity. I do believe there are things you absolutely need to spend the money one, or spend a great deal of time learning the skills for.

Where do I think you should put your piggy bank?

  1. A good , custom fitted corset. You need to get yourself in front of a quality corset maker and expect to hand her or him $200. Your corset maker needs to measure you up and down as well as around and around. She/he also needs to know where you squish and where you don’t. Need to save a little here? Get yourself to a workshop with a very knowledgeable teaching staff. This isn’t going to be a class where everyone makes the same corset. Nope. It has to be custom draping for each beautifully unique body there. Plan on this being a multiple week class with a lot of home work.
  2. Shoes. Don’t waste your time on cheap shoes past your trial period. Cheap shoes a pain both literally and figuratively. They will hurt the feet and the pocket book. Plan to spend $150-250 for a decent set of authentic shoes or boots. Then plan to spend a little more for the proper care, storage and maintenance. I’ll fully admit care for shoes has been a learning curve for me. But, it is important keep them clean and not dried out. Find out where your local shoe repair is, so you can get the soles replaced when the time comes. If you are a full time interpreter, this may be every year.
  3. Millinery. Now, I am not just saying this because I am a milliner. Okay, maybe a little. But, the reality is cheap millinery stands out like a sore thumb, just as quality millinery can be spied across a meadow. Plan to spend $180-250 for a full decorated bonnet and $130-200 for a full decorated hat.

Are you wondering why the dress isn’t on this list? I think this is a garment you can work on for less if you can sew. With all the online destash sales so easily accessible now, it is possible to get an appropriate dress length of cotton for fraction of a store price.ive even seen nice silk and wool go for under $5/yard. Please, don’t use this as an excuse to pay a seamstress less. If you don’t sew, plan to pay your seamstress for her/his time, skill, and knowledge of period techniques 


Now, you’ve read this far. You really want to know about those “less than a pizza” purchases. Right?

For reference, I am figuring a pizza in my area runs about $25 once I get my favorite vegetables on it. It is imperative to notice these are not solely  Civil War era items. They are also in random order.

  1. Wool shawl with fringed edges. This will take 2 yards of light to medium weight wool in an appropriate plaid or solid. I suggest waiting for a sale bringing the wool to under $8/yard to keep this under $25 with shipping. Or, you can keep an eye out for someone destashing a wool you like. Plan one two movies on the weekend to fringe the whole thing, or one evening per side. Check out my earlier post on fringing.
  2. Market-wallet. While I’ve known about the 18th century market-wallet for a while, I finally got around to make myself some. Love them. I find they are incredibly easy to make and great practice of hand stitches. Two can be made from a single yard of medium to heavyweight natural linen.
  3. Petticoat. I am of the opinion that one can never have too many petticoats to choose from. Okay, maybe there is a limit. But, really a well starched petticoat can make a world of difference to the silhouette. Most of us within a few inches of average height can make a simple petticoat of four to five yards of quality muslin or pima or Egyptian cotton found on sale. Add another yard to get a couple pretty tucks. Good muslin, that with a strong weave and full,not limp hand, can be had for $2.50/yard on sale or with a coupon. Look for pima or Egyptian cotton for sale at or under $5/yard to meet our price goal. I am assuming you have a mother of pearl or China button in your stash. If not, that is 20-50¢.
  4. While we’re talking petticoats, I’ll add a wool petticoat to the list. Two yards of tropical to light weight wool is plenty for a warm wool petticoat. You may also want to a yard of scrap cotton from your stash for the waistband and a lighter weight panel at the top to gauge with less bulk. This project is most fun by utilizing someone’s destash.
  5. A Pocket. Be it a pocket under the skirt (18th century into the 19th) or in the skirt, a pocket gets things out of your hands. It will also eliminate the need to have something to carry something in. A simple pocket can be made from a half yard of linen or cotton, tape or the same fabric for the waistband. The embellishment can be as little or as much as you wish. As you can see from the link, you are not limited to embroidery on linen or cotton. Pockets were made from many materials, and often from scraps.
  6. Work pocket. Okay, maybe I am a little bias here. But, I do think everyone should have a work pocket, or sewing case, or housewife. Whatever period term you choose, you should have one. I would Love if you made one from my book Fanciful Utility, but I am happy as long as it is accurately made of correct materials. A work pocket is a great interpretive device. They are like a story all rolled up in fabric. (Hmmmm, this give me a post or maybe even a workshop idea.) 
  7. Sunbonnet. I have a slightly different perspective on why a sunbonnet is important. While I do find shielding the face from the sun important, I want you to have an alternative headwear piece in case it is raining or hailing or there is a windstorm. I don’t want you wearing your silk or straw bonnet out in these conditions. Hop over to http://www.thesewingacademy.com for directions on how to make your own corded sunbonnet. 
  8. Okay, I have more to add. But it is the end of the week and I want to post this. I will add more and repost. 
Published in: on June 9, 2018 at 4:22 pm  Leave a Comment