I was excited to stumble across this image and collection this evening. While not mid-19th century, these early 20th century women were from weaving areas of Scotland and may have been related to weavers. In the image 5 examples of 4 different kinds of shawls – two solid, one large scale windowpane plaid, one plaid, and one border plaid.
Checks and Plaids
This week a friend asked advice about purchasing a shawl. The answer was a definite yes, as long as she sent me pictures. In the end, she ended up with two great shawls.

Her asking about the shawl in question brought up a couple points on shawls. Barbara was looking for a double square, wool shawl. Using some of her words, she was looking for a big fluffy WARM shawl and not a foo-foo shawl. When I get questions about a shawl being purchasable, the shawl is usually one from the paisley family or occasionally a printed shawl. It is less often I get questions about a common woven wool shawl. The reality is, it should be the other way around. The majority of the paisley family of shawls were on the higher end of the cost spectrum, being worn for nicer occasions. The printed shawls became a more affordable response, with the aid of advancing industrial processes, to the desire for nicer, fancier shawls. While many women, and men, may have owned a shawl from the paisley family, the average woman would have had more occasion to wear a wool shawl. In living history terms, we are more likely to be interpreting situations where a woven wool shawl is appropriate then a nicer paisley or printed shawl. A nicer shawl is appropriate for some dinners, some evening social events, some church services, some weddings and other ceremonies. An everyday shawl is more appropriate for wearing while sewing at home, going to market, visiting on a regular day, running out to the barn or chicken coop, gardening, volunteering at the aid society, basic everyday life. This everyday shawl, in my opinion, should be a staple in each interpreter’s wardrobe. Cheers to Barbara!!
Now on to her shawls.
The shawl she initially asked about was this beautiful double square red check. I was thrilled to see a surviving double square in a red check available. (a double square is a shawl that is twice as long as it is wide, usually 60″ by 120″, also called a plaid regardless of design.) What stuck in my mind as this shawl found its new owner, was the tendency of reenactors and interpreters to play it safe, buying what they see or are comfortable with, whether accurate or not. How does this related to this shawl? The check. When it comes to buying or making an everyday wool shawl, it seems we most often go with a symmetrical plaid or a solid (see the close-up of her other shawl below.) I don’t see a check like this worn often at all. Why? I have a couple thoughts. The first is we wear what we see and what we are comfortable with. Second, extant documentation under represents what I believe was actually available. Going huh? Basically, there are fewer surviving examples of small check shawls then women actually had. In general, there are fewer everyday, working class shawls remaining then the nicer paisleys, lace and higher end silks. A few things may have happened to cause this. The everyday shawls could have been worn out in their day. These shawls could have been deemed by the owner not worth saving. Or, at some point between the mid-19th century and now, the shawls were deemed not as important and worth conserving as other items. Either way, we have fewer examples of everyday shawls to look at and even fewer small checks. Does this mean they didn’t exist as much? Of course not. When looking at original images, we see small check shawls represented. This post-war image shows a small check with a border design. (Sorry, only one on hand until I find the right disk with more images.)
 Small check wools are an acceptable choice for a shawl when purchasing a shawl or fabric for a shawl.
I am very glad Barbara was able to acquire these shawls and allow me to talk about them.

Folding Chairs
June 2015 – I am receiving an increased number of requests for information on particular chairs and appraisals. While I love to see original chairs, I am not in a position to give advice on the value or restoration of chairs. I simply find patent furniture to be a fascinating research subject.
Here is some information that will hopefully help if you are considering a folding chair….
This 1855 Patent is one of the earlier 19th century folding chair patents. It has a simple side X construction with a slight curve in the back to leg piece. The seat is solid with a cushion set in.
 This chair from the New York State Museum, is circa 1866. This walnut chair was made in NYC by B.J. Harrison And Company. The museum’s descriptions is as follows “32 1/2 x 16 x 17 in. Curved crest rail above two side rails ending in molded rear seat rail. Beneath this are two dowels fitted to another molded rail. Oriental-type rug seat (not original).” The seat folds up with a side X pivot while the back folds down. A similar chair construction can be seen in this 1863 Patent.

 This circa 1860-70 chair is Marta Vincent’s. It has been repaired and recovered from the naked state in which it was found with the finish was completely worn off and the carpet seat was in tatters. The back splint has been replaced. The seat is now a piece of ingrain wool carpet supported by canvas.
Martha’s above chair is a similar folding shape as the chair in this post war photograph
 The shape of this chair’s curved pieces making the side X construction seen in many full-size chairs attributed to those who worked with Vaill. This construction can be seen in this 1870 Patent 1.

Added March 15th, 2010: A reader contacted me about a chair coming from a private collection. She has been kind enough to share this lovely child’s folding chair which looks much like the one in the photograph above. This chair has a great glowing patina. Notice the darker areas where the chair would have been picked up and carried when folded. The carpet seat is in good condition with deep reds and greens in a large, well centered design. The curves of the legs tend to suggest it was made by someone who worked with Vaill. The back piece is curved nicely while appearing quite solid.


Circa 1870-90. These chairs were manufactured by Edward W. Vaill. It is a side X construction with a second pivot point on the back and a hinge on the lower back leg. The top chair has an incorrect material. The bottom chair shows a floral or scenic design done in tapestry, possibly original or a replacement. In both cases, the wood is likely walnut Notice the curves in the leg and cross support piece. Also notice the turned finials on the top. Both chairs have paper labels found on the front cross runner underneath the fabric. The construction of this chair can be seen in this 1875 Patent by Wakefield, assignor Vaill. This is a similar patent from 1876.


 This chair is Marta Vincent’s. I think it could have been made between 1863 and the 1880s. It has the original red carpet, which she has supported with canvas underneath. It appears to have a back similar to the back in the Vaill chair above. The back to front leg cross piece has a slight curve while the other leg begins to show an S curve. It appears to be a walnut. Notice the location of the splits in the seat. These weaknesses are very much at risk of further damage if not supported.

 This is my chair, one Dad had for me that was found after he passed. I still have have yet to spend time really looking at this chair. It is an early Eastlake style from the last quarter of the century. The seat material is likely original.

 This rocker folding chair is Marta Vincent’s. When Marta found it, it was in pieced needing to be put back together. The seat and back are a vintage ingrain wool carpet with the sear supported by canvas and the outside back is covered in brown cotton sateen similar to the method of the original covering on the red one.
 This chair is as it was found. Though nicely intact, the seat and back may not be original. The turning and finials on this chair are quite different then the other chairs seen here. The closest patent I’ve found for dating is this 1881 Patent with a far more complex construction.
 This Chair is held by the Brooklyn Museum. It is attributed to P. J. Hardy as the maker while Hunzinger was likely the designer based on the style and the metal tag Hunzinger label. The Museum’s description is “Folding chair. Ebonized wood with gilt incised decoration, metal hardware, and original upholstery. Turned gilt incised members that terminate in small ball pads intersect at mid-point on sides, secured by small metal rods on which they pivot and allow folding action. Identical turned and gilt incised stretchers connect lower front and back legs. Dark red plush upholstery with central vertical machined floral tapestry panel. Multi-colored fringe to front and sides of seat secured with domed metal tacks. Slung narrow woven textile strips with red key pattern on white ground form arms attached to front and rear stiles with metal attachments; the attachment on back stile has pressed head of putti. Movable black metal members hinged to underside of seat at sides and attached to upper front legs below seat to secure chair when open for seating. CONDITION – Original upholstery faded and distressed, but intact.” For more on Hunzinger’s furniture, please visit this Hunzinger blog.
 Late 19th century folding chair with an Eastlake feel.
Post-CW Catalog of Folding Chairs.
A pre-Civil War English patent chair:
This is one chair I would have dated to later in the 19th century if I came across it in person. This illustration and description comes from 1824 though, in the Transactions of the Society, Instituted at London, for the Encouragement of Arts, Manufactures, and Commerce volume 43.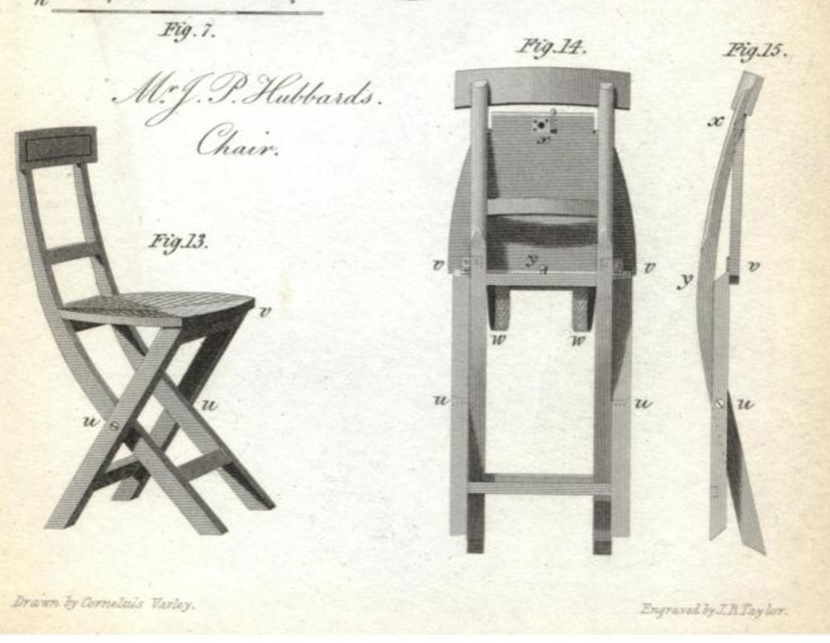 My previous research indicated folding chairs did not appear notably in the US prior to 1850. This illustration, 26 years earlier, is from London.
Folding Chair
The Silver Vulcan Medal was this session presented to Mr. J.P. Hubbard, Leadenhall-street, for a Folding Chair. A specimen which has been placed in the Society’s repository.
In camp, on board ship, and in other situations in which stowage room is very limited, demads are continually making on the ingenuity of the cabinet-maker, to compress into as small a space as possible all articles of domestic furniture when not actually in use. The common camp-stool, either with or without a back, thus forms the substitute for a chair; but the webbing does not make a very firm or convenient seat, and this circumstance induced Mr. Hubbard (who is not a cabinet-maker) to add to it a folding wooden seat, with a spring catch. The result is, a light chair of a very firm and simple construction, which may be afforded at a small cost, and when not in use may be hung upon a peg, or may be stowed away in any other manner, occupying not more than one third the space required for a chair of common construction.
Plate VII, fig 13, shows the chair when open or ready for use. It consists, like the camp-stool with a back, of two frames crossing each other, and united by the screw-pins u u; v is the wooden seat, having two hinges v v in front, and a hole x at the back to receive the spring catch y in the back rail, as shown fig. 14; beneath the seat are two pieces of webbing w w to limit the expansion of the two frames, and thereby to cause the spring catch to fall into its hole without any trouble: fig. 15 is a side view of the chair when folded.
Frequently Asked About Chairs:
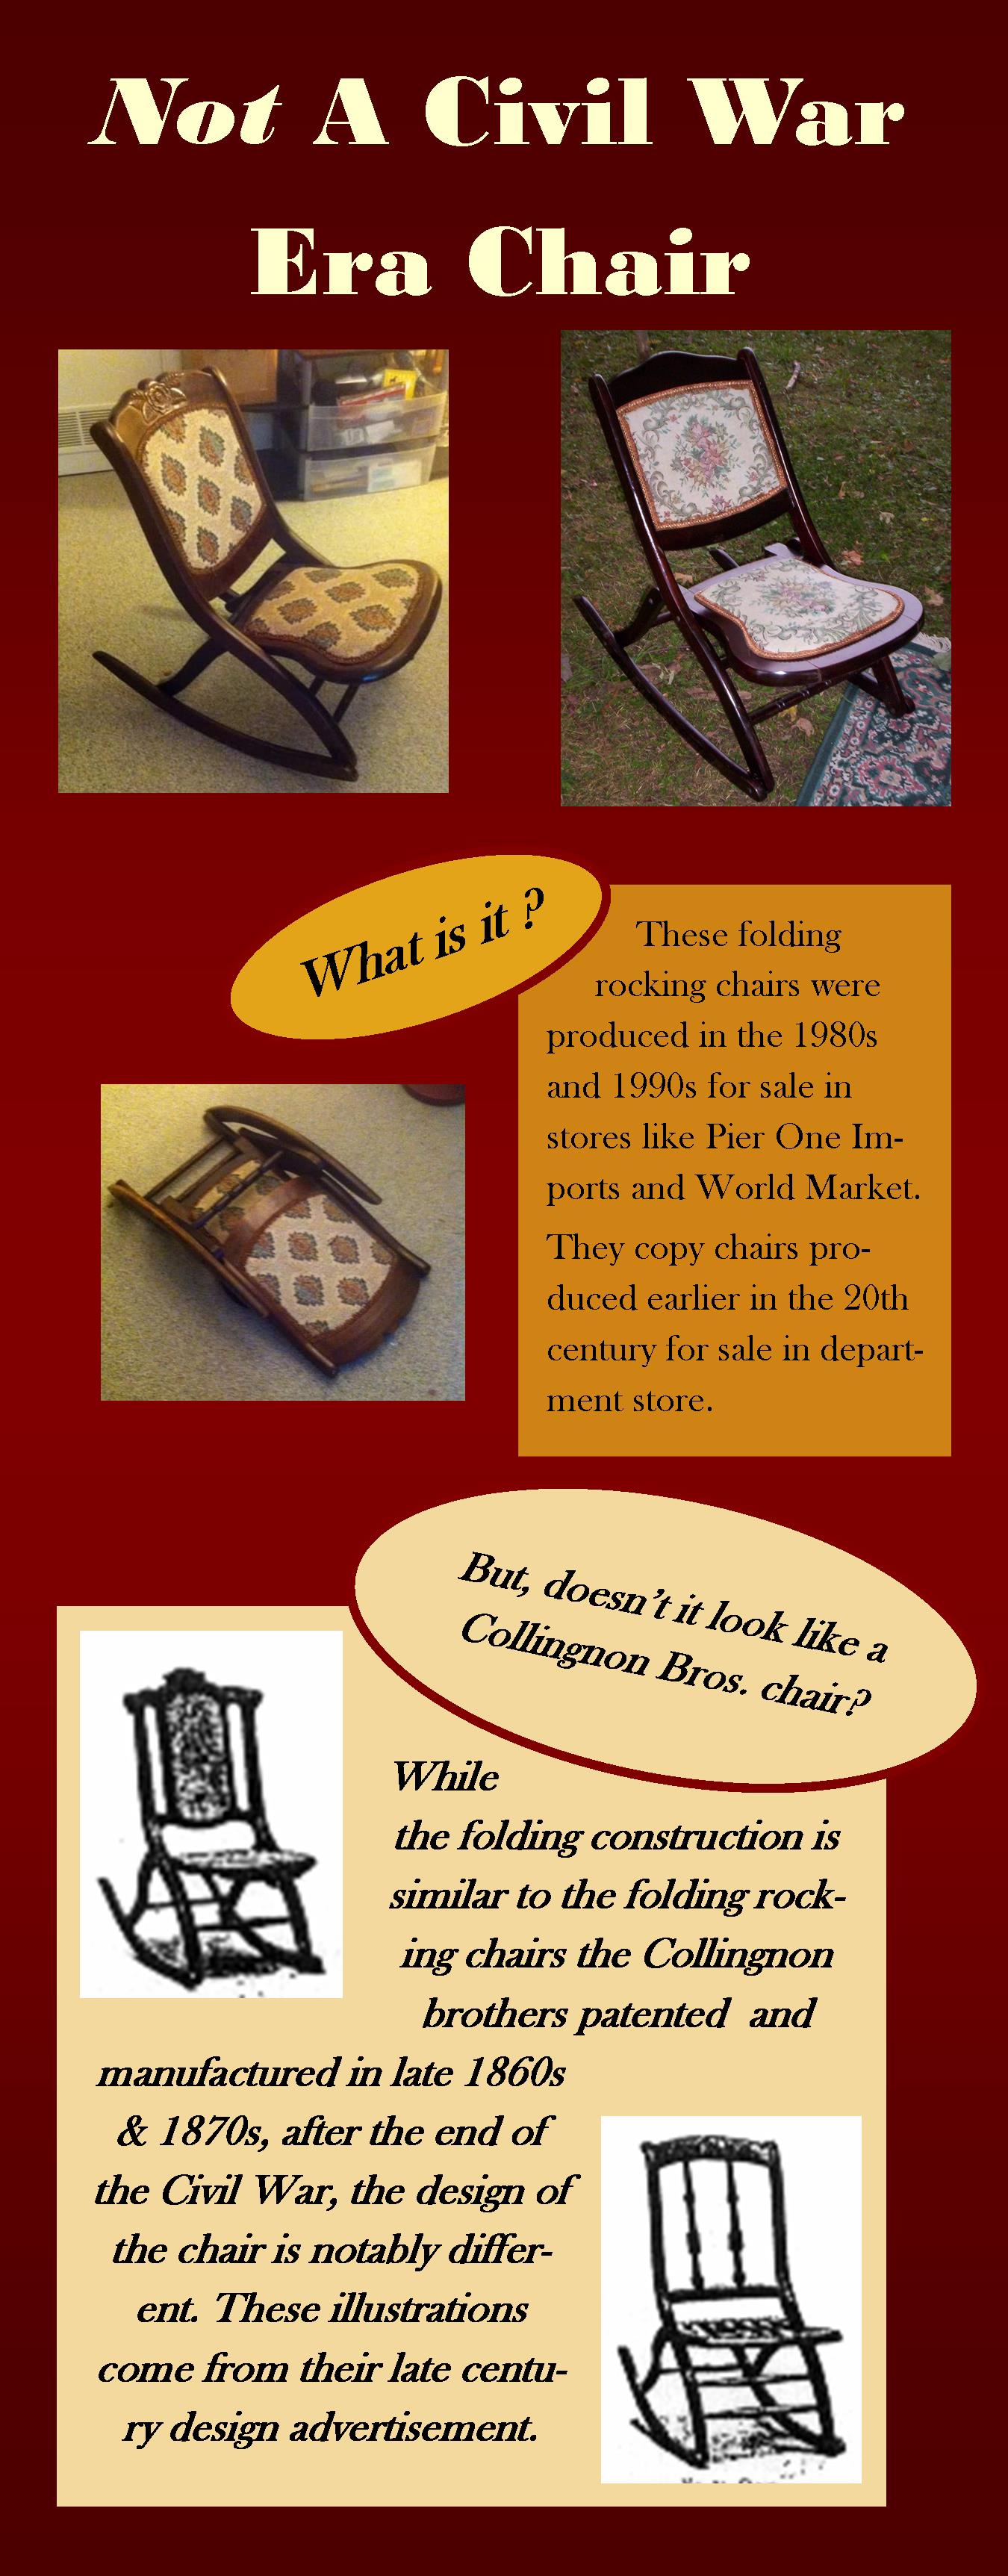
Folding Rockers like this one seem to be every where… good reason…. They were reproduced for stores like World Market and Pier One in the 80s. They are Not a reproduction of a mid-century chair. They are a reproduction of an early 20th century chair.
They are Not Collingnon Brothers chairs. Please cautiously read the Collingnon chair site. I find some pieces are unclear. I recommend looking at this set of search results for their patents, including the 1868 patent which if for a folding chair, not a rocker.
 21st century chair manufactured for camping, modern camping. Not a style produced during the Civil War.
Introductions & Greetings Suppliment
I’m hoping folks enjoyed the Church Steps article in the Citizen’s Companion.
I’ll be adding examples of introductions and greetings from literature to this post from time to time.
From a serial in The Ladies’ Repository
“Why” Elma exclaimed “Mrs Fessenden” taking her eyes off from her book “come here and tell me who has brought back as if by magic the rose to your cheek and the light to your eye.” “May I introduce them to you, Harriet?” “Certainly if it is not Walter Parker.”From The Victoria Magazine (A British reference.
“I’ll introduce you to the Colonel. Colonel Babbington, may I introduce an old friend and neighbour of ours, to you? Mr. Kilkee, Colonel Babbington.” “Kilkee of the Turret?” said the Colonel, holding out his hand. “Right glad I am to make your acquaintance.”Paper and Books
Just some notes I had tucked away on paper and books:
Book sizes
The size of a book’s pages is based on the size of the sheets of paper it is printed on and the number of pages printed per sheet. For example: for quarto, 4 pages are printed on a sheet of paper 19” by 24”.
I tried to find figures in mid-century texts. Most discussed at length the number of times a sheet of paper was folded but not the measurement of the finished page.
One neat thing I found was that the size of the book determined how long a person could take it on loan from the NY library. “Every member residing within ten miles of the library may detain the volume or volumes so delivered as aforesaid, if it be a folio, six weeks; a quarto, three weeks; and octavo, two weeks; a duodecimo, or a volume of less size, or a pamphlet, one week.” ( http://books.google.com/books?id=5_G8lqlwT1EC&pg=PR29&dq=Quarto++Octavo+Duodecimo+date:1800-1865&lr=&num=100&as_brr=3)
Modern figures from American Library Association
These figures come from http://www.trussel.com/books/booksize.htm.
Quarto – 9 ½”x 12” Royal Octavo – 7” x 11” Octavo – 6”x 9” Duodecimo (12mo) – 5” x 7 3/8” Octodecimo (18mo.)– 4” x 6 ½” 24mo. (vincesimo-quarto) 32mo. (Trigesimo-segundo) – 3 ½” x 5 ½” 48mo. (Quadrasedisimo-octavo) – 2 ½” x 4” 64mo. (Sexagesimo-quarto) – 2” x 3”
American Book Sizes:
From Royal paper 25” x 20” Royal folio 20”x12 ½” Royal Quarto 10” x 12 ½” Royal Octavo 10” x 6 ¼” Royal Sextodecim (16mo) 5″ x 6 ¼” From Medium paper 24” x 19” Medium Folio 19” x 12” Medium Quarto 9 ½”x 12” Medium Octavo 6”x 9” Medium Duodecimo (12mo) 5” x 7 3/8” Medium Sextodecim (16mo) 6” x 4 ½” Medium Octodecimo (18mo.) 4” x 6 ½” Medium 24mo. (vincesimo-quarto) Medium 32mo. (Trigesimo-segundo) 3 ½” x 5 ½” Medium 48mo. (Quadrasedisimo-octavo) 2 ½” x 4” 64mo. (Sexagesimo-quarto) – 2” x 3” From Imperial paper 30” x22” Imperial Folio – 22” x 15” Imperial Quarto – 11” x 15” Imperial Octavos – 11” x 7 ½” (based on The International Directory of Booksellers and Bibliophile’s Manual, Including Lists of The Public Libraries of the World, edited by James Clegg (London: Elliot Stock; New York: Dodd, Mead, & Co., 1899), Clegg’s International Directory of the World’s Book, (1894) and some math using Royal, Medium and Imperial printer size papers.)
The best or broadest covering source I found is this:
The International Directory of Booksellers and Bibliophile’s Manual, Including Lists of The Public Libraries of the World. Edited by James Clegg. London: Elliot Stock; New York: Dodd, Mead, & Co., 1899
Activites for Children
When we step back into the nineteenth century we have scenarios to create, projects to work on, dinner to cook, and visitors to talk to. We have plenty on our plate to keep us busy. Children who are new to the hobby or who are accustom to modern games and activities need a little guidance. Here are some Children’s Activity Sheets filled with some of the activities I’ve used for kids attending Pioneer Days Camp and at events. Please feel free to print these out to make part of a child’s kit for your family or group.
*One note – You will see corn husk dolls included. I do not have documentation for non-Native Americans in Western New York in the early or mid-nineteenth century playing with or making these dolls. As the Stone Tolan House was a meeting spot with a council rock, corn husk dolls were incorporated into discussion of local Native Americans.
I plan to work on a chores list as well. It will be full of child safe projects kids may enjoy while they learn and help teach visitors.
New Dress Design Kit From Bonnie Blue!!
Design Your Own 1860s Dress by Atlanta Shannon at Bonny Blue
This kit is such a great idea. It is good for seamstresses as well as those who have seamstresses making their dresses. Younger kids will absolutely love them.

NM Farm and Ranch Museum
It isn’t very often I am exceptionally impressed. I happen to have been so impressed by the Farm and Ranch Museum yesterday, I am doing a double post on both blogs.
Originally we were going for their once a year Antiques Day where they open up thier curatorial storage. The events listing I read said it was the 12th, Saturday. Nope. It was the 13th, Sunday. I’m so glad we decided to stay anyway.
The lobby is nice, open and airy. It is very welcoming. I noticed through the lobby’s wall of windows, there was a presentation area set up in their courtyard. Later we were to notice the large dining area fully set for a function. The receptionist went beyond welcoming us and taking our entry fee. She took the time to explain the museum, point out various things on the map and tell us about the trolley. (Very good since as we pulled into the parking lot, I realized I was one of those women who wore heeled sandles.)
The first exhibit was called What in the World. This is a collection of objects from the about mid-19th century to about the mid-20th century. This is the exhibit that caught my attention. It was wonderfully interactive. As you enter the exhibit, there is an introduction and a rack of clip-boards on the right. The clip-boards held your answer sheet. It was a game to see how many objects you get right. The objects were broken down into true/false, matching, word scrambles and multiple choice. Just looking at the break-down, one might think it is like a quiz. But, when you combine it with their displays, it was definitely fun. Each well displayed lighted object was simply numbered. For the true/false there was a simple statement about what an item was. You decided if it was true or false. Then you could flip up the text plaque to see if you were right. Similar flip-up methods were used for the matching with a group of objects and a group of text plaques with what they were used for. Under the flip-up was a further explanation. They also used a spinning roller with a selection of answers in combination with a covered window to reveal whether you are correct, and a type of turn disk where you move a small knob to reveal the answer. When you are done, you add up your score. We were meant to be curators based on our score. I’ll admit, I was not good at the word scramble. I had to just look at the object. Dan figured out the scrambles. There was one object I was able to point out to Dan that I would love to have; the crimper for doing edging. This room really showed well that interactive exhibits aren’t just for kids. I would love to see about doing something like this for an event public program or a seminar program.
The next exhibit was the one I was least familiar with, the Colcha, Embroidery. It reminded me most of Berlin work. Three things stood out, the interactive how-to section, the display of Colcha Christmas ornaments available for purchase and the feedback stand. The interactive piece caught my attention because it would have worked nicely for PDC camp. They took plastic canvas. Framed it with a solid 1″ frame on both sides. Drew the outline of a flower on the canvas. Attached a plastic needle and thread. On the wall was a nice directions board. (This is also the room where we notice the no photos sign. So, sorry, no pictures.)
The halls between the exhibition rooms were used nicely as display areas of vintage quilts, artwork, and a photo history of school houses.
The large exhibit room traced 3000 years of agriculture in the Rio Grande water shed area. My compliment on this room is how they created multiple levels with walking ramps that made the room feel like more then just a big gallery. The displays were well done with great textual explanations that weren’t to long but created a nice story. They recreated an early 20th century store and post office as well as a kitchen and parlor. Those were fun for me because it showed both items I remember using at home while growing up (no I’m not that old, we just had vintage and antique items everywhere.) and it showed items we see at mid-19th century events in a more appropriate setting. I really wish I could show pictures of that for references for people. The far other end of the room had the modern agriculture. I have to admit, I still just don’t get it, the dryness, the routing of the water in a completely different way than I am accustom. I think I really would have needed my brother there to talk through it to fully appreciate the concept. The only criticism is on Dan pointed out. There wasn’t a flow that we caught on to. I don’t know if we entered the time line wrong or what.
Next we went across the building and outside to the blacksmith shop. I was initially curious to see how similar or different it might be to the blacksmiths I am used to in the 19th century. We didn’t even get to the building before we got pretty excited. There was an area filled with wrought iron for sale. Then as we entered the building there was more, lots more. Oh, how I wish we had pockets of cash to spend. Now, if it ended at the items for sale, I would have been happy. But, the apprentice working that day gave a solid, informative and interesting presentation. The coolest thing is how much they recycle. He started telling us how they use the railroad spikes and horse shoes. Showing us the starting product and the finished product from the displays (for sale). Then he moved on to what must have made my jaw drop; the items made from garage door springs and truck springs. This was fabulous. As he talked and made his nail, he had my full attention. This is not an easy feat. Before we left, I had a mental list – folding grill, awesome tri-pod, several S hooks, simple letter opener. Dan wanted one of the railroad spike knives. I also asked if he could make things on request. Yes! I’m going to bring him a drawing of Grandma’s rug hook I lost at Granger to see if he can make it.
All in all, very happy with the visit.
Can I Fix It By Friday?
It is Sunday night. You’ve just made it home from a long weekend of living history. You are exhausted. But, you just can’t get out of your head that one thing; that one thing that you discovered just wasn’t quite right. The question is …. Can I fix it by the next event? Can I fix it by Friday?
We’ve all had this happen at one point or another. Okay, some of us have had it happen over and over several events in a row. Needless to say, it can be a bit stressful. You started this past weekend confident, happy with what you are wearing. Then you learned something. Now you are stuck with the question of what to do about it. Generally, it comes down to these answers:
1 – Change it Now.
2 – Set it aside to change later.
3 – Scrap-it and start over.
Most of us are anxious to have everything together and jump into number 1, have to much of a pile of number 2 and dread the thought of the time and money involved in number 3. Hmm, I wonder why we get stressed.
Lets take a breath and look at our options. Then decide which way is going to work best.
Option 1 generally involves items we absolutly have to have or items that are easier and less timely to change. In this case, honestly look at what time you have in the week or two before the next event. Deside what time you have available, as what materials you have on hand. If there are purchases you need to make locally, make them on Monday or Tuesday so you have them available when you have time to sit down and work. Leave the item out where you can see it and remember to work on it. All to often if we put it away, we will forget about it.
Option 2 usually includes items which we want but can live without for another event, or items that will take more time then is immediatly available. For these items, I suggest a similar plan to that in option 1, just spread out over a little more time. Again, remember to purchase or order materials you need early and leave the item where you remember to work on it.
Option 3 comes into play when something is significantly wrong or the cost of changing it out weighs the cost of replacing it. This last option can be a strain for many reasons. We may have already invested a good deal of time and money into its making or purchase. It is also possible that there is an emotional attachement to it. If the first is the case, consider options for different use or a new home such as a theater department. If the later is the case, I highly suggest find a new use in your home.
Now, lets take a look at some of the common items that tend to bug us on our drive home from an event and determine what we can do about them.
1 – You figured out your hairnet isn’t correct. If you really feel you need a hairnet, this is an easy and inexpensive change. If you can find a hair supply store, they carry fine hair nets that work great. If not, department stores carry something that is close and acceptable. You can wear this kind of net plain or with a decorative silk ribbon attached. To attach a ribbon, first pleat the ribbon decoratively, then attach it to the net. Wear your net with the top edge sitting on an imaginary line running from ear to ear over the top of your head.
2 – You discovered a piece of jewelry was not popular in the mid-19th century. This is one where you will need to consider replacing the item. Most pieces you can do without until you find a replacement. If this is a broach you wear at your neckline, chances are you will want something for the next event. If you are able to do a little research and shop for a new piece before the next event, that is a great option. If time, money or shopping distance is a factor, consider a silk neck bow instead. Make a 2 to 3 inch bow of silk ribbon, securing it with thread. Pin this in place at your neckline instead of a broach.
3 – You’ve been wearing an apron with straps and find you should be wearing a pinner or half-apron instead. This is an easy fix, assuming your fabric is correct. If the pinner section of your apron is the right shape, simply unstitch the straps. If not, you can either reshape the top to be a pinner or remove it. If you find your fabric isn’t quite right, this is a simple sewing project you can do with a minimal about of cotton fabric. I suggest making a new one.
4 – You have found you need or need different collar and/or cuffs. Many of us start out without a collar and cuffs or go for pretty crochet collars when we start. Luckily, collars and cuffs take a minimal about of fabric and time. To make a collar, lay your dress/bodice so one side of the collar is flat. Trace the inside of the collar line marking the front and back. Draw a perpendicular line out from the center back. Measure 1 to 1.5″ out from the tracing line all the way around. Connect this line with a graceful curve. Measure a 1/4″ to 1/2″ inside the tracing line. At the center front draw a line from the tracing line to the outer line which will give you an open V or a V that will best reflect the front of the collar for the years you need. Trace your pattern on a light weight cotton, and cut out. Hem with a tiny rolled hem around the outside. Bind the inside with bias. Baste the collar to your dress starting in the back. To do cuffs, measure the circumference of your dress’s cuffs. Add a half inch to this measurement. Cut 2 strips this length and 4″ wide. Hem all the way around a 1/4″ hem. Fold in half. Place one half inside the dress cuff. Baste in place.
5 – Your dress is in need of adjustments. Depending on the adjustments and your sewing skills, this may or may not be one you can complete by the next event. If you are unsure of your skill or time, I suggest not stressing over the adjustment if you don’t need it. If the adjustment is absolutely needed and you don’t have any other options, ask some one to help if you are not 100% confident.
6 – You have found a piece of furniture you have isn’t right. Due to the cost and other factors involved in furniture, I highly suggest option 2 here. Set what you are using aside, spend some time researching and take your time looking for the right purchase. If this is a table or an essential piece of furniture you must have, consider your options for borrowing from someone or what our original counterparts would have done when they were in need of this piece.
6b – You found a piece of furniture needs a change such as the hardware. This may be an easy fix if you or someone you know has the skills. If you just need to change out screws, take an example of what you have to the hardware store and find the appropriate replacement. (I’ll admit, I am accustom to hardware stores that are used to locals needing 19th century appropriate hardware.)
I’ll be adding more in the next few days. Suggestions welcome.


