Fanchon Bonnets

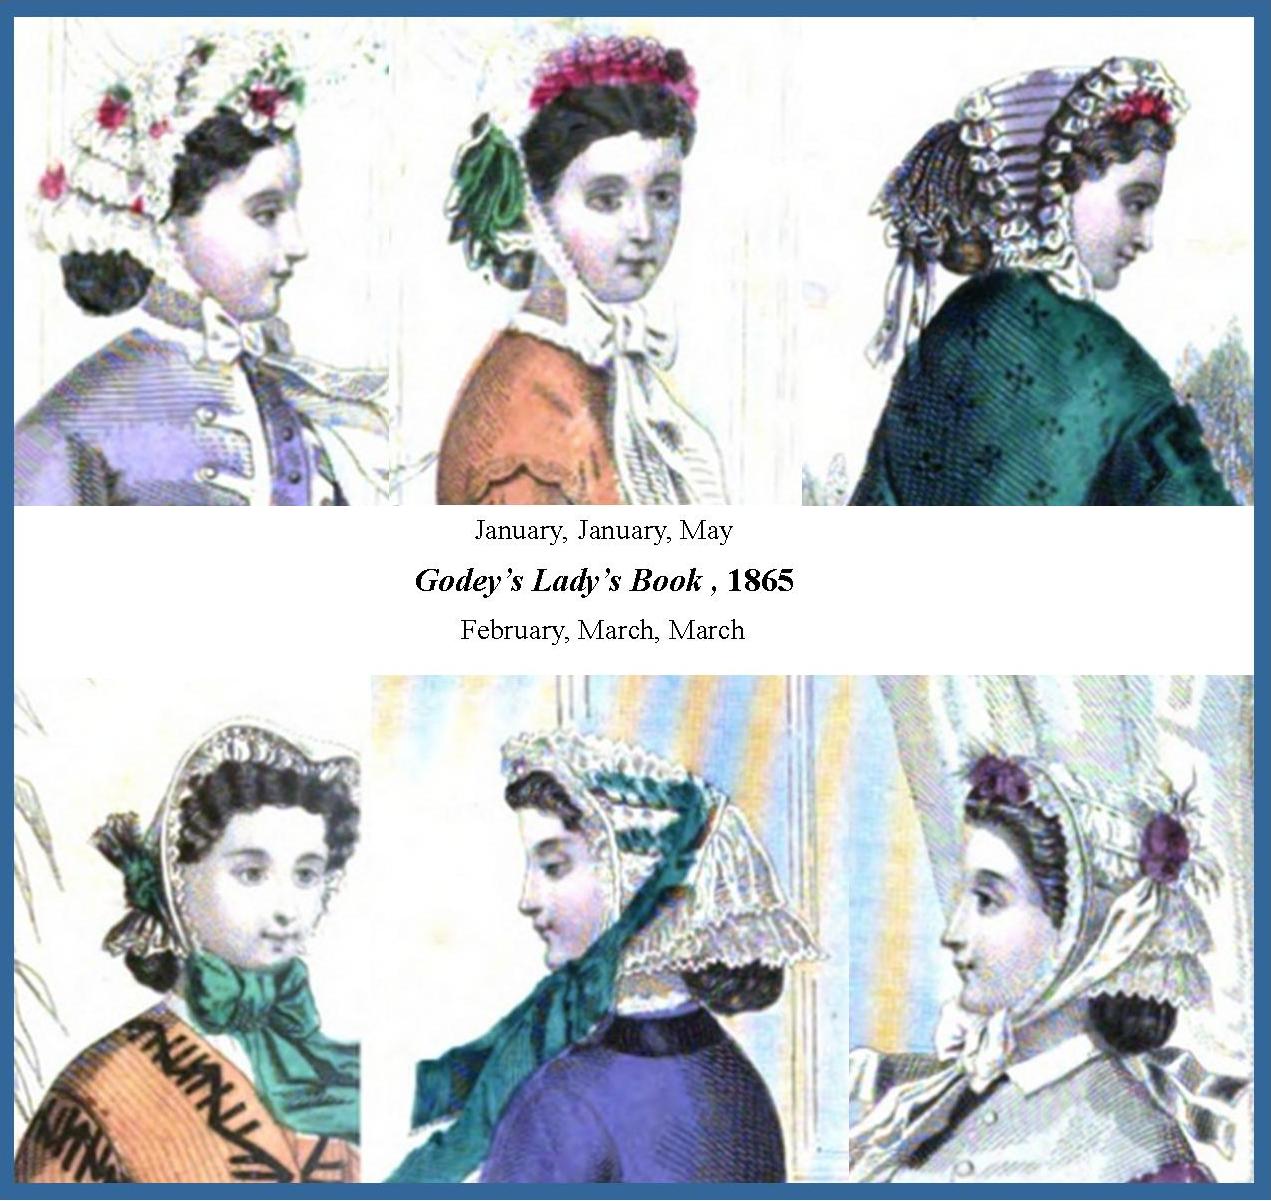
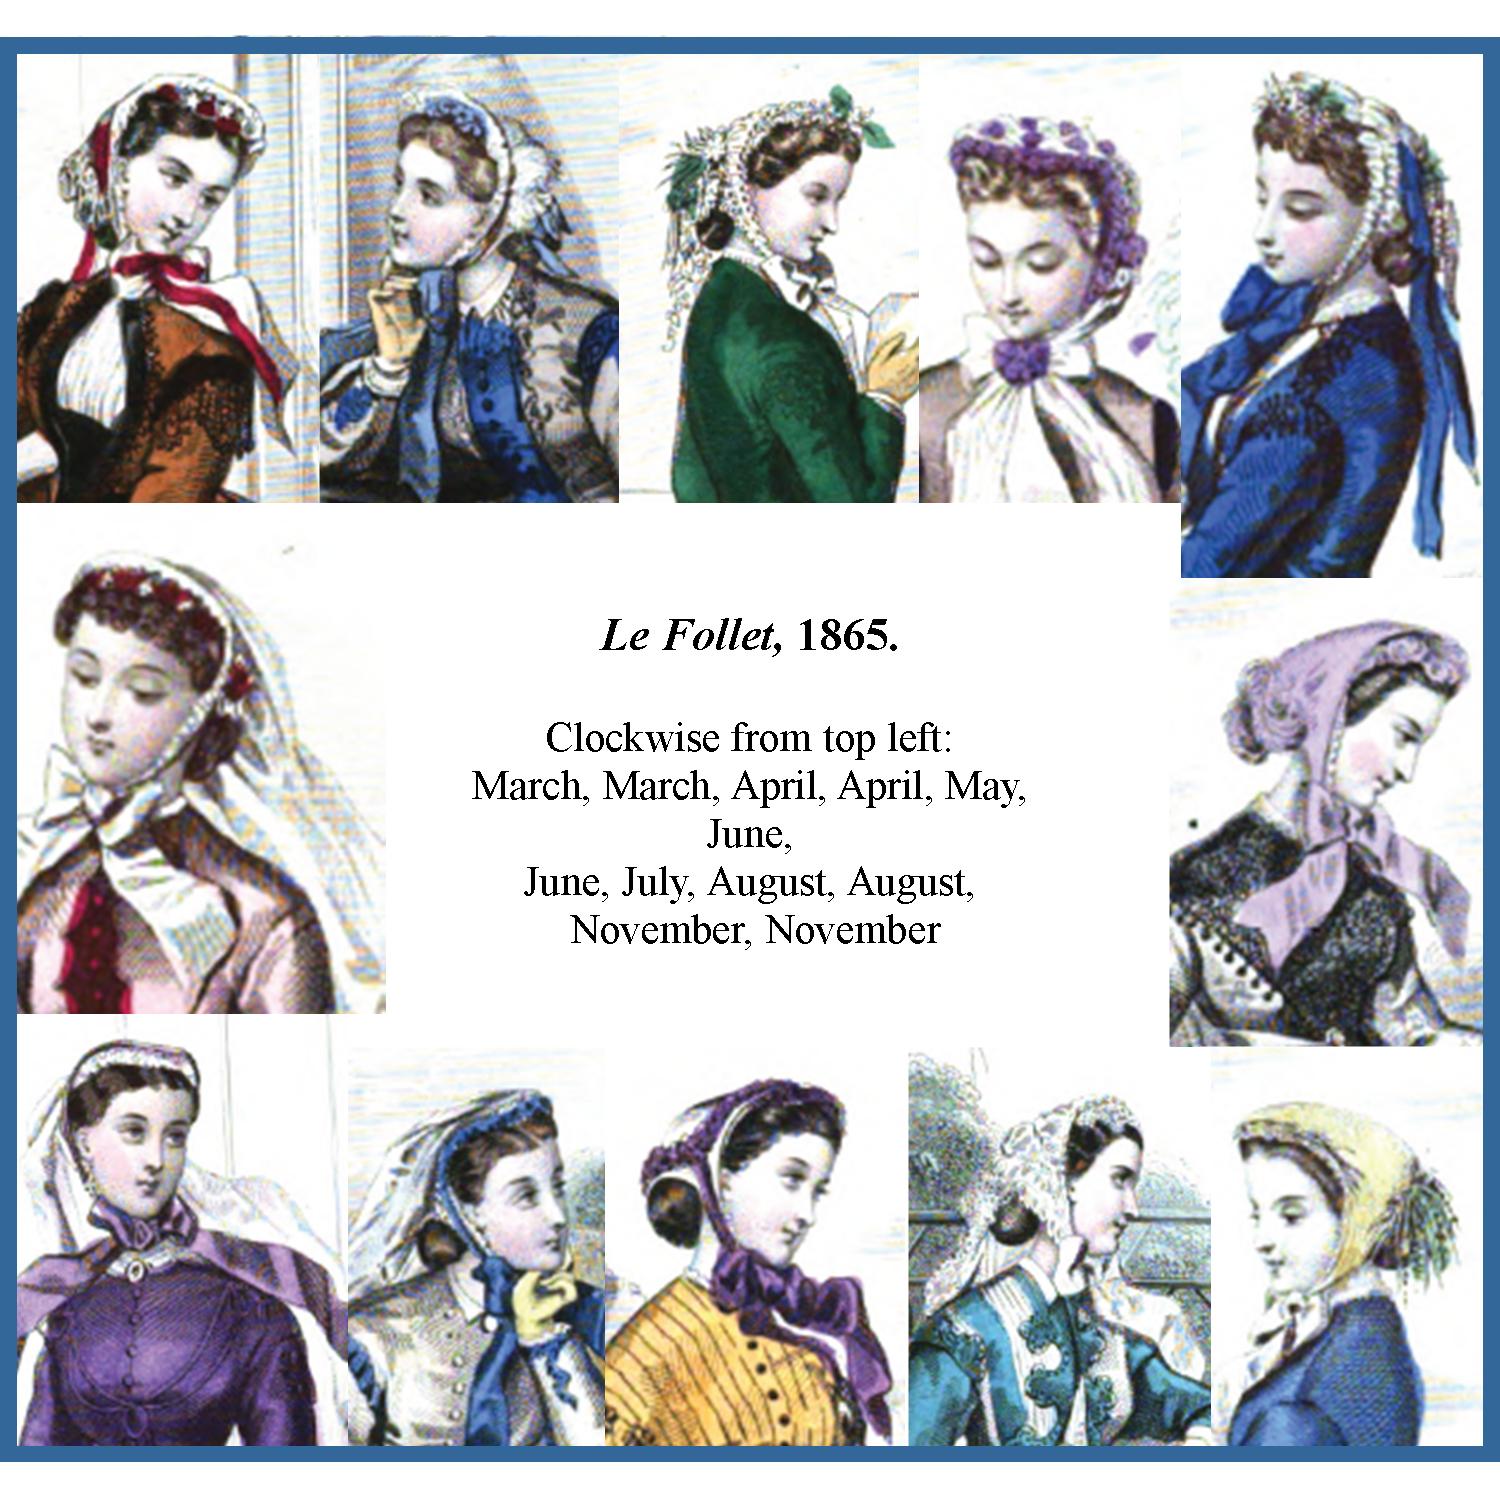
 What was popular in the spring of 1865?
The fanchon bonnet.
 Really, I just don’t get it. What were they thinking? Going from beautifully shaped bonnets through the 50s into the 60s… then…”hmm, let’s just make wonky triangles to stick on our heads.”
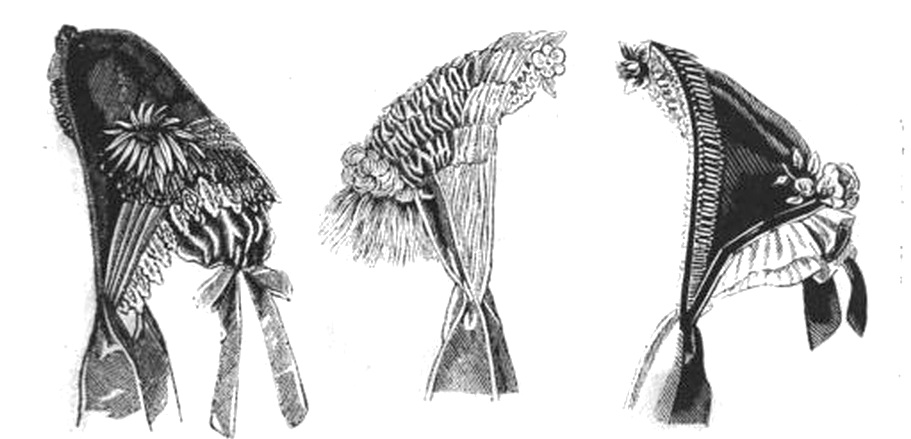
Okay, so what I see as “wonky triangles” they saw as “Half-handkerchief” bonnets. They were very easy to make, especially at home out of a wide variety of materials.
“The Fanchon, or half-Handkerchief style of bonnet which now prevails universally, is found by many to be “too common” – it is so easy to make at home, everybody wears a bonnet d la fanchon; and what everybody wears is not always acceptable, so the Empire shape, which is more difficult to improvise, is eulogized as “distinguished,” and adopted by a very small minority.” (The Australian Journal, 1866)
 The Fanchon was accompanied by the “la tarte”, the “Lamballe” and the Manderin. All on the smaller side. Not everyone of the time were impressed by this phase in millinery fashion. “At present the bonnet is not a bonnet…. It strikes our uninstructed minds as a misnomer to call a bason of crape a bonnet, and yet it is a bonnet according to Le Follet, and belongs to the genus of “Fanchon”…. Paying for a bonnet should be a pleasure, and we have no doubt it is; we trust, though, that the “Mandarin,” the “Lamballe,” and “La Tarte” are only temporary, and that a bonnet will not become so diminutive as to puzzle a very Owen of millinery, who might be asked to construct one from a future “Fanchon”.” (Every Saturday, 1866)
 We quickly see the Empire bonnet come to counter the Fanchon. This is a direct response to the dislike for the ‘commonness’ of the Fanchon both by milliners and fashionable customers. “None but those who take the lead in fashion wear exclusively the Empire bonnets. These have been a good deal modified in shape from what they were when they first appeared.”
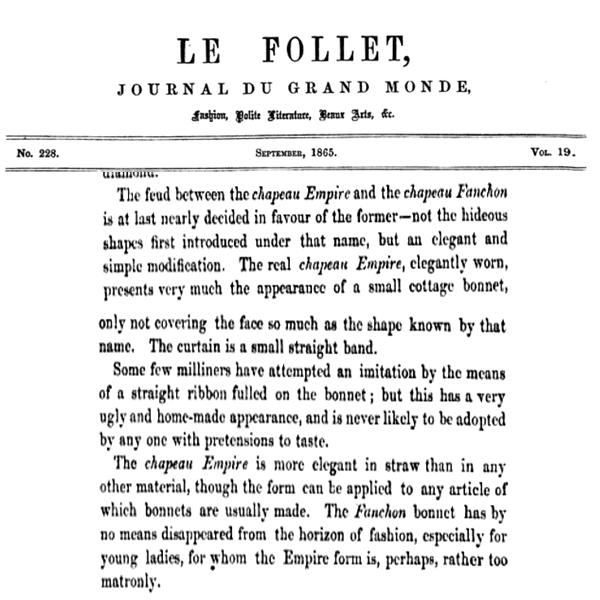
Alas, here we are, looking into a season when so many eyes are on the spring of 1865. So, I have made some straw fanchon bonnet forms.


![]()
Pleasing Black Bonnet
I lack a name for this winter bonnet.

Let me talk about the original I worked from first*.
The
original is smaller than most winter bonnets, eithe for a smaller adult or older child. It is plaid, a small but not tiny, colorful plaid. The channels are a half inch wide and firmly, very firmly wadded. I increased the size to that of a green bonnet I have of very similar shaping. Getting the measurements over the full channels was fiddly. I uses a string to go over each curve. The crown is actually the direct measurements from the green bonnet that was set nearly the same as the plaid. The bavolet is actuall two curves. Odd little bavolet.

I made one inch channels instead of the half inch channels, with cording inbetween. Those inch wide channels are a challenge enough to get wadded firmly and evenly. It will be more so for the half inch channels.

I finished quilting the crown on Friday. I basted it into the brim…. and promptly hated it. It was so incredibly full through the top of the crown it looked more like a late 30s or early 40 day cap crown than what I thought it should look like. It is a good thing I slept on it, because I was ready to make a whole different back that fit what we are used to seeing. I went back to the original and realized it was how I gathered the crown and basted it in. Set in right, like the original, I like it; it allows lots of space for hair and is comfy.

*I have been holding back on sharing the originals for a couple reasons. First, I am using them in a bigger project. This will either reach the public eye in a conference presentation format or book format. Second, I’ve had a few cases lately of people ‘borrowing’ my research and designs. This makes me hesitant.
Winter Blues
A soft silk in frosty blue, lined brown in polished cotton and batted with wool. (I’ll add more about this bonnet asap.)


The crown is full for those with larger hair arrangements.


When you stumble across yourself
You know those moments when you stumble across yourself on the vastness we call the web?

Lily and I some years ago. No, I am not sleeping. I’m working on sewing a sewing case. I think this was just before or just after the Sunday shower.
Here is one of those moments. Given how often I lament about not seeing the photos I hear or seeing being taken, I should be happy to see these. But, goodness, can’t I have a pleasant expression when people take photos? (Just do not try to look at the other photos from which I took these.)
This is at a tiny local event some years ago. We attended on the invitation and encouragement of Barb, who you can see in the lower photo on the left. She has put together a nice Widows and Orphans Relief Society impression, which is a nice platform for teaching. Knowing there would be a canopy of trees, we skipped the canvas and followed the shade through the day. We really did develop a bi-hourly routine of picking up the table and inching further into the shade. As such, I started the day with my bonnet. As the day progressed, the tree took ownership of the bonnet.

From left to right, Barb, Gail, myself and someone who joined us for a short while.
For us this was a demo and teaching event. I brought sewing cases to work on. Lily demonstrated writing with pen and ink. Gail brought her drop-spindle and wool. Each demo was one that could easily become hands on to the many children in attendance. People were fascinated by Lily’s writing. Actually, there were moments when fascinated simply was not a strong enough description. Through the day others joined us with sewing projects of their own.
“The Greene/Green Swap” FanU Swap – Sign-up Day
 Today is the day to sign-up for the FanU “The Greene/Green” Swap!
For “The Greene/Green” Swap, Swappers have 2 options. The Greene Group will exchange early to mid nineteenth century appropriate cotton fabrics that reflect a component of Susan Greene’s work in Wearable Prints. The Green Group will exchange Green color fabrics from the 19th century.
We will mail our fabrics on January 30th.
Please read all the details below.
To Sign-up, simply comment below with your email and mailing address. (I’ll erase those before approving your comment, so the whole world doesn’t have that info.)
What is a Swap?
This is a chance for to exchange fabric with a small group of people. Each group will have 8 people exchanging pieces of fabric. All you need is a half yard of fabric and envelopes along with your copy of Fanciful Utility.
To Participate:
1: Sign Up Day!
On sign-up day, groups will be assigned on a first-in basis; the first eight will be the first swap group, second eight in the second group, etc. **Please be certain you will be able to fully participate by mailing your fabrics on the Mail-Out Date.**
The Greene Swap Sign-Up Day: January 20th
2: Mail-Out Day:
Place a 9×9″ piece of fabric suited to the mid-19th century in envelopes for each of the 7 other people in your swap group, stamp them (be sure to double check at the post office, but the small 9×9″ pieces should mail in a regular envelope with a normal stamp), and send them off no later than the Mail-Out Day.
The Greene Swap Mailing Day: January 30th
3: Get Fanciful!
Use your Fanciful Utility templates and techniques to make a project from the book, or copy your own from 19th century sources. We’ll all look forward to seeing your projects! You don’t have to sew right away, but don’t keep us waiting forever to see all the fun things!
(If you need a copy of Fanciful Utility, you can purchase them from the publisher at www.thesewingacademy.com
Fabric Guidelines:
- For the cotton and silk categories, your fabric should be early to mid-nineteenth century appropriate. (If there is a want for an earlier or later group, we can do that.) Prints and motifs should reflect those available in the 1840s, 50s and 60s. Cotton should be 100% cotton. Silk should be 100% silk.
- To keep the swap and sewing possibilities interesting, please avoid solids as best we can.
- Fabrics that do not work well for sewing cases should not be swapped. These include sheers, gauzes, heavy, thick, easy-to-fray, slippery and stretch fabrics.
- For the “crazy swap” category, think crazy quilt in a sewing case. This could include satins, velvets, textured fabrics. Quality synthetic fabrics are invited.
Swapper Guidelines:
- Please be certain you can fully participate in the swap before you sign-up.
- If something arises after you sign-up that will effect the date you are mailing your fabrics, please email your group so everyone is aware.
- If you fail to fully participate in a swap, you will not be able to sign-up for future swaps. (We do understand medical and family emergencies. I need to be able to ensure swappers will receive fabrics when they send fabrics out.)
Q&A
Yes, you can participate in 1, 2 or 3 of the swaps.
Yes, if we end up with multiple groups, you can participate in more than one group to swap more fabric. If you participate in 2 groups, you should swap 2 fabrics.
Yes, you can swap large and small scale prints.
Yes, you can swap now and sew later.
Yes, we would love to see what you’ve made with the swapped fabric.
Yes, you can use your own fabric in your swapped project.
A Hood For Everyday Wear

This is the hood I cut for myself in December. I finally got round to quilting and sewing it. As I am hoping these last two weeks were the depth of our cold, I don’t think I’ll keep it.

It has a cream silk exterior that has applique-esque windowpane padded stripes on it. It is a soft silk with flat slubs. Inside is my favorite cotton lining. Just love this blue & red print. The batting is a super soft wool.


https://www.etsy.com/listing/219178299/victorian-style-winter-bonnet-in-quilted
The Tear-Drop Tip
One of my more recent collection additions has an elagant tear-drop shaped tip surrounded by tightly gathered stripe silk and a fluffy puffing of wool. It is on of those construction componants that just catches you with “how did she do that?”
It is also one of those things that just call to me, from the other room, “make me”… “figure me out.”
The original tip is made of layers about a third the weight/thickness of pasteboard. Theses layers are also wrinkled and crushed inside the layer of silk on the outside and lining on the inside. The best I can tell (for want of one of those probe cameras) there is a gathering of silk between the layers of almost pasteboard, but it isn’t enough material to be the gatherings from the body of the hood. (I think I figured out what she did with that bulk. Rather nifty.) The teardrop is piped with a thick silk covered cord. I went from thinking “that is going to be a pain” to “ah, that takes care of that.”
I’ll get around to doing the photos of this piece soonish.
Now, my creation of the week was all about figuring out this tip. The rest of the hood is just a basic wadded construction.


Favorite paintings of the week
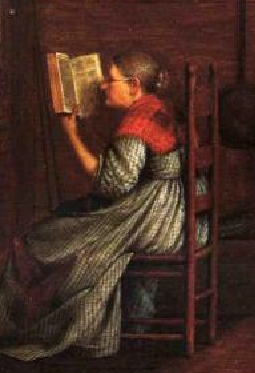 I stumbled across the painting Saturday Afternoon by Enoch Wood Perry, and was just captivated by the way the woman was reading.
Her feet are right up next to the fire. The book inches from her face.
The painting has so much more to offer though.
There are two different versions in terms of brightness online. This brighter one is easier to see.
 While this one has a richness to the color:
Either way, this painting is packed full of great pieces to look at and talk about.
Then I saw this, Women Weaving, by the same artist:
How I wish I knew where this was taken from. Several of the other pieces say New York.
The Ultimate Winter Wind Hood
 Here we are, the first bonnet of 2015.
This winter hood is taken directly from an original in my collection. The original is a dark, royal blue on the outside with black silk on the inside. I went all black for this one. This is one of those hoods where I really wanted to know why it went together the way it did.  All the measurements are as exact as I could get. I kept with the original seam construction as well, right down to the use of salvage which I’ve come to love for its great reduction in bulk. I did make two additional changes besides the color. The original has a piece of half inch broken cane. As it is only a fragment and the pinholes that previously held it only showing in a small area, I could not determine exactly where it ran. I have not included that. There is a piece of black ribbon attached flat along the bavolet seam on the outside that is just off. I suspect it was either added later to cover pinholes from where a decorative ribbon was placed or to cover wear. (Here is the Etsy link.)
 Now, I’m sure you are wondering why I’m calling this “The Ultimate Winter Wind Hood.” When I finished it and tried it on, I was greatly impressed by how wind resistant this hood is. The brim comes very forward of the face. At the same time, the ribbons inside the brim draw the interior of the hood down around the head, holding it snuggly and comfortably in place. The photo to the left an show you sort-of how those ribbons draw the interior down.
 The bavolet that appears flat and rather long is just right for keeping the wind off the neck. It sits right around the neck so to not let the wind catch underneath.
Trying it on was truly a moment of understanding.
 Back to the exterior, you’ll see an interesting combination of quilting. All the quilting is made of diagonal stripes spaced at 1.25″. But, the front of the brim and where it turns under to the inside the quilting makes diamonds, while the mid to back section of the brim is simply diagonal stripes. I happen to really like the way the look comes together. The bavolet and tip both have the full diamonds. (I can tell you, this is a lot of quilting.)
For 2015, I’m going to try to share the time and materials for projects. (which I know may be a little weird since many of the pieces will be available for purchase. But, I really like how others share their numbers on their blogs and for challenges.) So, here we go…
- research and drafting – I didn’t count.
- Cutting, marking, quilting and sewing – 19 hours
- Approx 2/3 yard of black silk taffeta
- Approx 2/4 yard of 1/2″ wool batting doubled
- 4 yards of 1/2″ black silk taffeta ribbon
- 1 yard of 1 1/4″ vintage black silk faille ribbon
- Black cotton thread which I almost ran out of.


