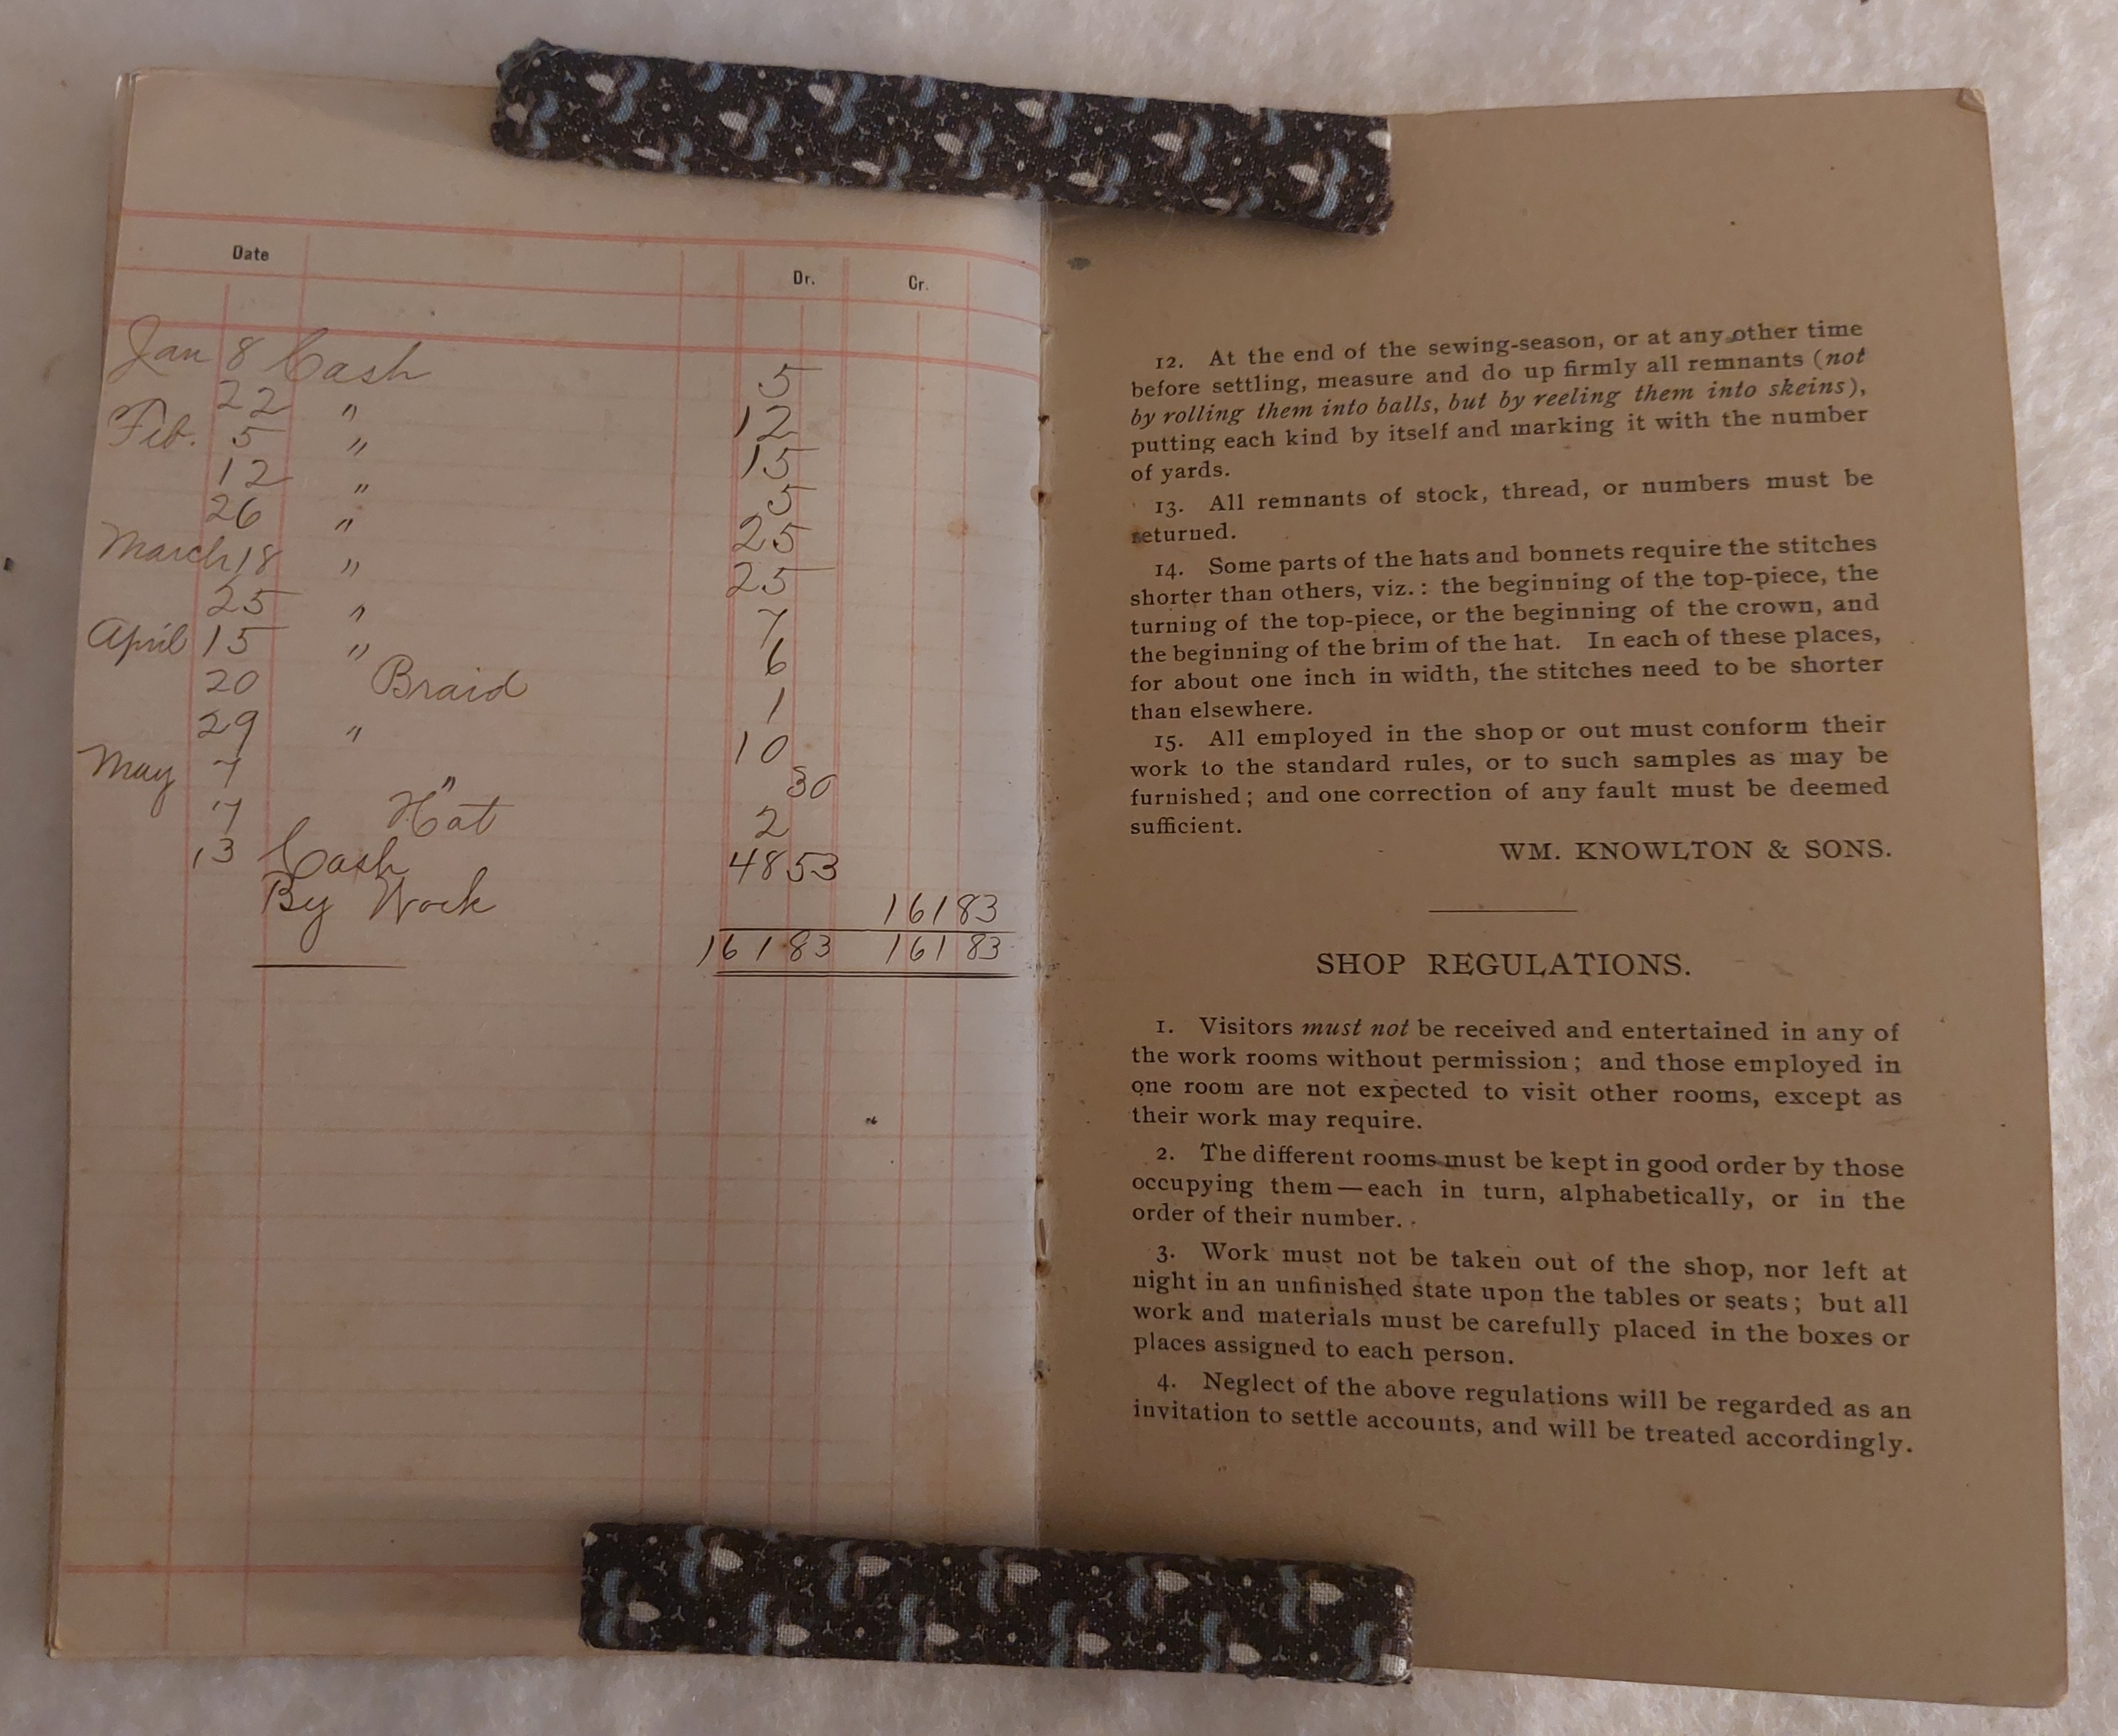
This past weekend, I did a presentation focusing on straw millinery as cottage industry. This developed out of a larger program I have been envisioning as Tools of the Trade, where an assortment of trades focuses on the tools they use.
I had planned on sharing the details of my plan following the event. As you read on Saturday, that is not where my mind was come that evening. With some delay, here is the breakdown of what I had in mind.
The goal – Open discussion about the different roles within the millinery trade and the materials used.
The tools and supporting materials (tools in bold):
Natural straw stalks
Straw Splitter
Split straw
Straw being braided
Braided straw
Straw hat in progress
Straw hat completed (easier to visualize than a bonnet)
Bonnet or hat block
Flower petal or leaf dies
Cut silk petals/leaves
Examples of completed flowers
Ribbons
Sewing work box with needles, thread, scissors, etc
Last minute, I made a reference book with images of original blocks and illustrations/photos of womenworking with straw. I’ve been trying to bring more reference materials with me in case visitor discussion needs it. For other recent events, I’ve brought reprinted books. This compilation was lighter and more condensed.
A similar interpretive discussion display could be created focusing on dressmaking. Tools included for discussion prompts could include a pinking machine, sad iron, flutting iron, and an equipt sewing workbox.
Every so often I start writing a post…. then…. it gets forgotten in the depths of the draft folder. This is such a case.
This first set of images uses a National Geographic microscope attachment. This magnification tool is sold as a toy, but can be quite useful. It attached to my previous phone very easily. (I have yet to try it on my new phone with its many camera lenses.)
Here I am using it with an assortment of CDVs. Each shows the neck closure in magnification.
Top Left: Possible lace collar, no ribbon, round broach. Top right: Narrow collar, wrap around narrow ribbon, round broach. Bottom left: Collar, small round broach. Bottom right: Collar, likely velvet ribbon bow.Top Left: Collar, ribbon bow set wide, small round decoration may be a broach. Top right: Fabric collar, ribbon runs under collar, some ornamentation unknown. Bottom left: possible lace collar, oval broach. Bottom right: Unknown collar, ribbon bow.
Respite. Not a word you would normally expect as an article title on a historical interpretation blog. Not a word I would have expected to be using.
That is what today was for me: Respite
This week was difficult… shocking…heartbreaking. It started Monday morning at 6am and kept shocking me through Wednesday when I realized my legs were shaking in class from mental exhaustion. As Friday came, I questioned if I should be trying to do today or if staying in bed was best.
I am so glad I stuck to my commitment.
Today was truly a day of respite. I was able to relax my mind and body. I think I was even able to rejuvenate a little.
I had excellent, meaningful conversations with visitors.
I was able to share the story of women and straw with them. I feel as though I was truly able to communicate fully the important connection I see between straw millinery and everyday women’s history. This meant a lot.
Here is an iceberg tip:
My talking pieces included wheat straw, straw stalks ready for splitting, straw splitters (original and modern), split straw, my mediocre attempt at planting, hanks of plaited straw, samples showing the range of straw, safe to bring blocks and a stretcher, some sample hats, leaf dies and cut petals.
My focus was meant to be on tools of the trade for the day because of the museum’s antique show taking place. With the weather being rainy, I realized the pinkers would not work at all and that negated the storyline of some of the other machines/tools I had in mind. So, I focused on the tools of the cottage industry end of millinery. I am very glad I did because this let me truly focus on that part of the story as it builds into the whole story. The other way around, the women sewing and plaiting at home seems to be lost. As I talked today, the power of a tiny straw splitter really grew for me. The idea that a tiny tool, small enough to disappear in a hand or be lost in the dirt, was the starting point for turning a tubular grass into a durable, lasting pieces of clothing, was wow.
As I talked today, I finished the closest hat, which I will wire tomorrow.
Did you know I share Exclusive Content on Patreon??
I do!
I share Exclusive Content about extant items and original documents on Patreon. Sometimes it is Victorian fancy work. Sometimes it is millinery history. Past content has included:
“The Milliner’s Girl” an excerpt from The Women of New York
Squirrel!!!! (My squirrel pocket’s design)E
Eva’s Book and Excerpts from Eva’s Book
Repaired! a look at how I repaired a miniature millinery block
Straw Explorations – A look at straw motifs and learning to make them
One Hundred Presents an excerpt from St. Nicholas’s Magazine
In Detail Exclusive: Heart Pin Cushion
An original millinery bill
Original straw bonnets and restoration exploration
Patrons also get access to In Detail publications as they are created. (Initially these were emailed. Then I discovered I could share them right in the posts.)
We’ve reached the end of my 3 month long series of Millinery Monday re-post. The idea was to share popular and useful previous posts each week. As we close and I plan ahead, I have a couple questions:
☆ What was your favorite post or topic?
☆ Is this type of regular series helpful?
☆ If you linked to a post from social media (such as Facebook or Instagram) did you read other posts while you were here?
☆ What did you find most useful?
☆ What would you like me to write about in future posts?
The ReShare Posts of the Last Three Months (plus a few others)
March 14 – Got Perch?
March 21 – Measuring Your Head for Mid-19th Century Hats
March 28 – Common Hat Styles
April 4 – Where Can I Wear That Hat?
April 7 – Oh Where, Oh Where… What Should I Wear…
April 11 – How They Wore Their Bonnets
April 12 – Why is this Good … Looking at Clothing
April 14 – I got this Hat. Now What?
April 15 – Making Friends With Your Bonnet
April 18 – Millinery Care and First Aid
April 18 – Hair Essentials Kit
April 28 – Wearing the Mid-Nineteenth Century Hat
May 2 – Improving Your Impression for Less than a Pizza
I am reposting favorite helpful posts each Monday throughout March, April, and May. This post will wrap-up this series. Starting in June, I will share posts focusing on the the questions I am asked most often when Intepreting.
With this soak-you-to-the-bone weather leading up to and likely through the weekend event, I am thinking about ways to keep dry. As I think through my list, I realize most of them won’t happen because the bits and pieces needed are buried deep in storage. That doesn’t mean I can’t share them with you.
Reenacting events inevitably mean walking, likely through grass or even mud. With wool boots, I find my rubber over-shoes a must. They slip right over my boots covering up to about my ankle. Extant rubber over-shoes were found when the Steamboat Arabia was uncovered. Those made by Tingley seem to be the closest.
Just in case, still pack extra stockings or socks for everybody.
A wool coat can help keep the wet off of most of you. A long paletot gives you great flexibility in the arms while buttoning up the front to keep you dry.
If you don’t have a coat, consider the largest, plain or plaid wool shawl you have. Wrapping this around you will help keep you dry.
We talk a lot about parasols in reenacting but not much about umbrellas. Use an umbrella, a period umbrella of course.
Skip the fashion bonnet. Instead opt for a sunbonnet or for a hood. Water can cause a bonnet to soften, warp and even run.
If you carry a bag, make sure it is water-resistant. You may want to try a pocket instead. A pocket hidden under layers of skirts can usually stay dryer than a bag carried out in the open. If you must carry medicines or modern technology put them inside painted canvas bags or zip-lock bags just incase.
For larger bags, choose one with a heavy carpet and good closure. If it has a leather or painted canvas bottom, even better. Leave the bandbox at ‘home’.
You will be happier with your tent if you have sod-flaps and overlapping doors. Also put down a good water barrier under your flooring. I find a wool rug helps control the moisture better than other fibers.
Inside your tent let wool rule. Wool rugs on the ground help keep the area more comfortable. Put a wool blanket layer over your cot or ticking first. Be sure it drapes almost to the ground on each side. This keeps the moisture from coming up from underneath. Make you bed how you prefer. Then cover it all with a wool quilt or blanket. This will keep the moisture from getting in during the day. If you are sensitive to a moist pillow, wrap it with an extra wool shawl during the day to keep it dry.
Don’t hang your clothes. Put them in a trunk or box with a layer of wool covering them to help keep moisture down. You may consider a layer of wool on the bottom as well.
As you settle in for the evening, light a candle or two (safely). Whether the candles really do help cut the moisture or not, they help psychologically.
What do you do if you do get drenched?
If you can lay or drape your dress flat that will be best. Hanging it can cause it to stretch under the weight of being wet. If you have a trim that can run, be sure to lay the dress so the fabric does not lay back on itself particularly the trim.
If your bonnet get damp, set it up on a hat/bonnet stand. If you don’t have on make-d0 with something like the back of a chair. Do not lay it on its side because it will warp.
If your bonnet gets particularly wet, try to blot the trimmings so there is no running water. If your flowers are pinned in or on, consider removing them so they will not run on the bonnet itself.
If your boots get wet inside, stuff them with newsprint or fabric to absorb the water. Do Not put them near the fire as they can be damaged. (most warranties do not cover fire damage)
If your corset gets wet, layer it inside material to press out any excess moisture. Drape it over the back of a chair to dry.
The week or weeks, I’m not quite certain with how busy it has been, I’ve spent time with my new millinery block. Here are the first two 1880s bonnets I made with it.
I tried two different styles, each based on what I see in originals. On the left, the first has a more circular, though slightly oval back and closed lower crown with a deeper “brim.” On the right, the second has a horseshoe or arch back with an open lower crown and a decorative brim edge.
Before continuing, I need to share that I am having difficulty with the naming of the bonnet parts because they diverge so much from what I am accustom to in the 30s through the 60s. Being so petite, these bonnets do not encompass the back of the head the way their predecessors did. While the 1860s bonnet perched on the head, the 1880s bonnet perches on tip-toe. There is little definition between the crown and brim. On the block itself the change is just a few degrees of an angle. So, I find myself saying “yes, that still is the brim.” or “yes, that is the crown.”
Back to the bonnets.
Here they are in profile. My model head does not show well how they will sit on the full 1880s hair style, which would suspend it above and behind the head. I found the block to create a bonnet slightly larger than I expected. Placed on my own head, the bonnets feel large. I have a small head and far from volumous hair though. Once lined and trimmed, I anticipate they will fit most well. I observed this type of bonnet often had a light weight polished cotton, often cream, brown, or black, gathered towards the center back in a way to cup the hard and hair.
Looking at the backs of original bonnet crowns, I saw circles, near circles, and archs or horseshoe shapes. I started the first bonnet, left, with an almost circle. This proved to not be the right proportion for this block. It tooms some fiddling. I do not anticipate starting for this block this way again. A circle may work better. The arch, or horseshoe, worked well for this block creating a back that fit with the block very well.
I was surprised to find this block, though smaller than my norm, to be more fiddly. This may change over time. I still need to better understand the nubs at the base of the crown.
For the first bonnet, I wanted to work around the whole block to get to know the shaping. This method creates the bonnet style with a full, closed crown. When working the rows around the whole bonnet, I found the plait wanted to flare ar the bottom of the crown, almost like a straw bavolet would. As this area is ofen covered with trims in photos, I need to examine more straw pieces of this style in person to decide whether to force the straw not to do this. I could easily see this style done with a decorative edge. I also see this as possibly working for a bonnet with a wider, deeper brim. Though, it may create a larger bonnet size wise.
For the second bonnet, right, I wanted to try the open bottom for the crown with the inverted V I was seeing on some bonnets. This block seems to be very well suited for this. I am please with the overall shape as well as the decorative edge. I have several decorative edged ideas in mind for this shape with the hop of mimicking the plait combinations of the time without access to those plaits.
These photos should give a sense of the sizes. The second bonnet is the smaller of the two. The first was blocked to the size of the block with the finishing rows added after. The second was blocked to the size of the block, including the vining decorative edge.
I ventured to the local fleamarket on Sunday. I like to go opening day, but this year I was extra busy. I made it a couple weekends in. I woke early with the assistance of a certain feline who wanted to be fed. I ate half a bowl of cereal and headed out. This allowed me to arrive shortly after 7, when finding a parking spot was easy, attendance was light, and some vendors were still unpacking. There were many empty spots, likely due to the forecast of rain and thunderstorms. Muddy ground and wet weather can be more problematic than it is worth.
The fleamarket was a local destination since childhood. As a kid, I looked forward to buying a little trinket with change, or, maybe if I was really lucky, finding a Breyer horse for a few dollars. Now, I still hope for that little trinket or Breyer horse. I also have an eye open for a few other things.
This year, I would like to find some small, doll size jewelry, sewing accessories, Victorian fancy work of particular types, a doll head for the ooops too big body, the right curio for the little dolls, hat blocks, and something curious.
Sunday there wasn’t much that caught my attention for coming home. There was one Breyer in the whole place, of the wrong size. No sewing accessories old enough. Nothing curious enough to fit my interests or research focus. I came home with a lone pair of gloves and this cdv.
This CDV caught my attention for what I am going to call Relatability.
It was her bodice that I saw initially. It is loosely fit through her bust rather than fitted smoothly. The fullness gathers in to the waist in controlled pleats rather than plain gathers or darts. This would make me think this is a more casual dress, but then, when looking at the sleeve with its embellishment and detail, it is seen not to be the case.
At home, I took some time with this image. Partly for a closer look. Partly to see how clear the camera on my sorta new phone does with cdvs. I am pleased with the latter.
The closer look showed me things I did not see standing in the morning sun with sunglasses and hat on. This woman was older but not old. She has wrinkles in emerging in all the natural places. She has graying hair in wisps. She has fullness at the back of the collar indicating the rolling of neck or shoulders that happens when working or reading over many years. She gave herself room in her bodice possibly for comfort, physical or mental, while her sleeves show an attention, creativity, and detail.
Each of these aspects are as much true of being then as now, now as then.
Here is the bodice fullness that first caught my attention. The fullness is brought into the waist with pleats rather than darts or gathers. I can tell you from experience this control lays differently, flatter at the waist than regular gathers do. It appeals to me as a fluffier woman who doesn’t know how my fluff is going to behave some days. *There may be a dart on the right. Count the third square from the right to see it. Also worth noticing is her choice not to wear a belt. The tendency currently in reenacting is to wear a belt. This is not necessary. I did not see this sleeve a when I first picked up the cdv. It is beautiful in both finish and concept. This appears to be a basic, slightly full coat sleeve with an epaulet-esque overlay and a cuff. Both the epaulet and cuff have a petal like shape used in the design. Each are outlined in a trim (below.)Looking closer at the trim, it appears to be a chain of flowers. I was impressed by what I could see in her hair. Usually, I look for the shadowy line that indicates a hairnet or not. But, in this image my eyes moved forward, first to the wisps of grey hairs just above her ear. These light color strands create such pretty waves. Then, I saw the the section above that wanted to be a curl that day. I can’t help but wonder if that curl frustrated her because it would roll smoothly into her coiffure or reminded her of days when she let ringlets of curls fall.The first close up I tried with the phone was of the collar. This was a 6.5 zoom, later cropped for upload. This shows not only the collar but also some bunching up at the neck. I think the specks are discoloration rather than a pin at the crossing of the collar, but I am not certain.Other than her ring, these earrings appear to be the only jewelry she is wearing. They are not a type I can identify.