Who are you? Who am I? OR Greetings on the Church Steps

Who are you? Who am I? OR Greetings on the Church Steps

By Anna Worden Bauersmith

            A few years ago, in An Introductions to Introductions, I discussed the guidelines for introducing individuals to each other. An essential part of introductions or greeting each other is how a person should be addressed.

In the twenty-first century, our modes of address are significantly more casual than the formal, public addresses of the nineteenth century. In our living history activities we need to be aware of the differences between how we great each other today and the prescribed way of greeting each other in the mid-nineteenth century. All to often we attempt to formalize our greetings but fall short by fully understanding the rules.

Before we proceed, let us review the order of introductions so we can consider them as we look at forms of address:

1st – Gentlemen are always introduced to Ladies. A woman is never introduced to a man.

2nd – Younger people are introduced to older people.

3rd – A person of lower social status is introduced to a person of higher social status.

Now, on to forms of verbal address to use when we meet each other in the nineteenth century. The proper verbal address of a person included his or her title and their proper name. A person’s proper name was the name he or she was given at birth or at marriage. For use in introductions this includes the last name or the combination of first and last name.

            In the United States, a person’s title was due them either by nature, occupation or election. In European countries titles among the gentry and peerage were due by heredity, marriage or bestowment as well as election and position within the Church . In these countries, a detailed system of ranking determined the social hierarchy for these titled individuals. Back in the United States, the most common titles for women included Miss, Mrs. or Mistress. At times, in the case of a visiting European woman the title Lady would be used. For men titles included Mister, Reverend, Doctor, Professor, Senator, Governor and military rank in some situations.

            The use of titles for men is fairly simple because a man maintains the title of mister unless he has achieved one of the other titles through occupation or election. If you were greeting your neighbor, Joseph Alexander, at the entry to Church, you would address him as “Mister Alexander.” If Nathan Masters, a new local doctor of medicine, joined you on the steps you would greet him as “Doctor Masters.” Lets assume that these two men have not yet been introduced. Your neighbor is in his forties, while the new doctor is rather young. Since a young person is introduced to an older person, regardless of social or economical standing, you could say “Mister Alexander, may I introduce Doctor Nathan Masters, our new physician.” The method of use of the title Doctor would apply to the titles of Reverend, Doctor, Professor, Senator and Governor as well. It appears, looking at period literature, that military titles of rank were not used as frequently in civilian situations frequently until considering higher officer rankings.

            Minor boys would also be addressed as Mister. For example, Mr. Alexander has a son, William. He would be addressed as “Mister Alexander” or “Mister William Alexander” denoting his youth. The title master is sometimes mentioned in period literature with minor boys. Back at Church, your son, Sam, and William Alexander have just arrived. William too has yet to meet the new doctor. As Sam is a minor, he does not have the social position to make the introduction in this situation. Either Mr. Alexander or you should make the introduction. As Mr. Alexander knows his son’s clumsiness and likelihood of being a frequent visitor to the new physician’s office, he takes the opportunity to make the introduction – “Doctor Masters, may I introduce my son, Mister William Alexander.”

            Titles for women change more frequently then for men. A women’s title depends on her marital status and her order of birth. The title Mrs. is for a married women. It is used in conjunction with her married last name. For example, your neighbor’s wife, Charlotte, is “Mrs. Alexander”. The title Miss is used for unmarried women regardless of age. The title Miss is used in conjunction with a woman’s last name or first and last name depending on her order of birth. The oldest unmarried daughter is title Miss followed by her last name. For example, the 20 year old eldest daughter of Mr. And Mrs. Alexander is Elizabeth Alexander. She would be addressed as “Miss Alexander”. This title of address would be due her until she is married. Younger daughters would be addressed with the title Miss followed by their first and last name. In the case of the Alexander family, their younger daughters, Isabelle (19) and Mary (17) would be addressed as “Miss Isabelle Alexander” and “Miss Mary Alexander”. The title Miss should not be used with the first name along. (The exception to this is occasionally the instance of a governess.)

            If you met any of your neighbors, who you are acquainted with rather well, in public you would address them as:

            Mister Alexander

            Mrs. Alexander

            Miss Alexander

            Miss Isabelle Alexander

Mister William Alexander

            And Miss Mary Alexander

            Recall how I said women’s titles change more frequently then men’s? Let us suppose Elizabeth has a fiancé James Augustus. James would call Elizabeth “Miss Alexander” in public. Elizabeth would call James “Mister Augustus”. Depending on the family and local proprieties, these individuals may still call each other by their proper addresses in family situations rather then use their first names. In the spring, Elizabeth and James marry. Elizabeth is no longer “Miss Alexander”; she becomes “Mrs. Augustus.” That is the easy part. But, Elizabeth’s change in title also effects her sister, Isabelle’s title. Isabelle has become the oldest unmarried daughter. As such, her address becomes “Miss Alexander.” Mary will keep her title the same until either she or Isabelle marry.

            To review, let us suppose it is a year later and we are again on the steps of the Church. Nathan Masters’ cousin Jacob Masters, has come to visit. Doctor Masters wishes to introduce his many friends in town. As they arrive James and William are chatting on the steps. In the past year, James was elected Alderman for the town. As an introduction, keeping in mind James socio-economic ranking, Nathan says “Alderman Augustus and Mr. William Alexander, may I introduce my cousin Mister Masters.” As our group of gentlemen discuss Jacob’s travels, Elizabeth and Mary approach. Since men are introduced to women, Nathan proceeds with the introduction “Mrs. Augustus, Miss Alexander, I would like to introduce my visiting cousin Mister Masters.” Upon this introduction, Jacob smiles and Mary’s heart flutters. It appears the titles of the Alexander family may change in another year’s time.

Published in: on January 7, 2011 at 11:00 pm  Leave a Comment  

An Introduction to Introductions

Originally published in the Citizen’s Companion

An Introduction to Introductions

By Anna Worden

I am frequently asked questions regarding proper introductions. Most questions make the subject seem more difficult than it actually is. This misconception can be attributed to a lack of information or overwhelming information. Some form of discussion regarding introductions can be found in most period etiquette guides. Magazines also carried the advise sporadically. With all this information, proper introductions can seem challenging or even confusing. But, I assure you it is not that difficult. There are two basic components to introductions, the proper way to address a person and the proper order of introductions. After these two components, all the little rules fall into place.


TWO BASIC COMPONENTS

The first step is to learn how to address a person. In addressing a person during an introduction, use a person’s title and proper name. Each person has a title either by nature, occupation or election. For women, this is most frequently Miss, Mrs., Mistress or Lady. For men, this can include Mister, Reverend, Doctor, Professor, Senator, Governor and military rank in some situations. A person’s proper name is their full last name, such as “Mr. Alexander” or “Mrs. Alexander”. Married couples are addressed by their titles followed by their last name, such as Mr. and Mrs. Curtis.  Eldest sons and unmarried daughters are addressed by Miss or Mr. and the family last name. Younger daughters are addressed as Miss, their first name and their last name, such as Miss Elizabeth Williams. You would address only your closest family and friends with a familiar first name or abbreviated name. In an introduction, this would not be used.

There are three basic rules to the order of introduction in the nineteenth century. Each rule is based on the idea that the lesser is always introduced to the greater.

1st – Gentlemen are always introduced to Ladies. A woman is never introduced to a man.

2nd – Younger people are introduced to older people.

3rd – A person of lower social status is introduced to a person of higher social status.

The first rule is clear cut and not to be broken or bent. Gender out ranks age and social status. The second and third rules can blur somewhat. Age out ranks social status except where the difference of age is minimal or the difference in social status is significant. For example: If a farmer’s daughter and a governor’s daughter, who are both in their 20’s, are introduced, the farmer’s daughter would be introduced to the governor’s daughter. Apply these three rules to any introduction and you will be assured propriety in your actions.

THE INTRODUCTION

First obtain permission from the parties to be introduced for the introduction.

After obtaining permission for the introduction, speak first to the introducee:

            “Miss —–, allow me to introduce Mr. —–”

Then turn to the introduced:

            “Mr. —–, Miss —–”

ADDITIONAL RULES


Obtain permission for the introduction prior to making the introduction. A woman has the right to refuse an introduction.

Children and teenagers do not have the social authority to make introductions. They also do not have the authority to agree to an introduction. Permission must be obtained from a child’s parent or guardian to make an introduction.

When introducing a group, say each person’s name only once.

When strangers to an area are introduced, it is appropriate to include their place of residence or in the case of a recent traveler, where they have come from. Some examples include:

            Miss —-, of Gloucester, or

            Mr. —–, recently of Paris, or

            Mrs. —–, recently returned from London.

This practice gives those being introduced a topic of conversation if one lacks.

An introduction at a public social or ball is for the duration of the social or ball only. The individuals introduced are not required to acknowledge each other afterwards. It is in the power of the lady to acknowledge the introduction later. (The socials at the majority of events would be considered public.) An introduction at a private ball is considered unnecessary since all attendees are considered respectable enough to attend.

There appears to be mixed advice on the bow verses the hand-shake. The earlier books lean towards only a bow, reserving a handshake for closer acquaintances. Some books forbid it for unmarried ladies.

Final thought – Remember, when you make an introduction you are speaking for the character of those you are introducing. Be wise in the introductions you are making.

Published in: on January 7, 2011 at 10:58 pm  Leave a Comment  

What can you make…..

Since I accomplished something quicker then planned tonight, I’m going to do a completely frivolous post (regardless of the other things I’m behind on.) So, tonight…

What can you make out of a 15 yard bolt of muslin?

I pose this question because the simple investment of $18 ($29.99 minus a 40% coupon) on a 44″ wide bolt can do a great deal for your wardrobe.

  • approx 5 chemises or
  • approx 7 pairs of drawers or
  • approx 1 full petticoat and 2 chemises or
  • approx 1 full petticoat, 1 chemise and a pair of drawer or
  • approx 1 tucked petticoat 0r
  • approx 1 corded petticoat and a moderately full petticoat or
  • approx 1 quilted petticoat and a corded petticoat or
  • approx 1 quilted petticoat and a moderately full petticoat or
  • approx 1 quilted petticoat and a nightgown or
  • approx 1 quilted petticoat, 1 chemise and a pair of drawers or
  • approx 2 chemises, 2 pairs of drawers, several collars and several sleeve cuffs or
  •  approx 30 sets of under-sleeves or
  • approx 180 collars or
  • approx 240 various cuffs or
  • approx 4-5 shirts for hubby or
  • approx 3 shirts and 2-3 pairs of drawers for hubby or
  • ….

Please add your combinations below….

Adding Gail’s list:

‎5 shifts/chemises /shirts.
several hooped petticoats
many chemisettes or corset covers (though I prefer linen).
50 day caps (depending on cut, actual material & social class – again, I prefer linen).
a whole lot of backing for silk bodice / br…eeches pieces.
cuff & collar bases
a few test garments…

Published in: on January 5, 2011 at 8:20 pm  Comments (1)  

Christmas fabric

Dan gave me a length of the fabric I saw a while back. Now the fabric and I are in discussion over what it wants to be. Current options are…..

  • A mid-century to 60s wash dress for if/when I’ll get around to doing work in a dress again. I’m not sure how likely this is. Though it may be smart to have a wash dress since I currently don’t have one anymore.
  • The yoke style dress I thought I should have when I realized I don’t have one. Again 50s or 60s
  • A dress more from the 1830s to experiment with the style. I’m not sure I would have enough occasions to wear this decade though.
  • An 18-teens dress since there is likely more times to wear it and I’ve been really wanting to make Regency era dresses. I’m not sure this fabric wants to be that era though.

 Here are some new photos… The ground is a rich brown with the deep, almost turkey red flowers and creamy leaves/stems with a hint of gold. From a distance it reads brown with a hint of red. I think the distance photo below really is more washed out then it really looks. I took these with the phone rather than the camera.

In thinking about the yoke dress idea, I would need some shaping to it. Kinda like this one below. (Though, that collar thing will not be making it.)  I’m concerned I will not look so great in this type dress between my larger bust, fluffiness and short shoulders. Not sure. (opted to play with photo so she isn’t so skinny.)


ADDING…..

Gail suggested this type of early 1850s dress. (this is a facebook link) In actuality, my instinct was to lean towards something later 40s or 50s. But, I have a few dresses for those years, so didn’t include it. I’m just drawn to the styles from then so much more then the early 60s. The V shaped sheering could look nice with this fabric.

Published in: on January 2, 2011 at 12:51 pm  Comments (1)  

Quilted Pettis

One of my favorite garments became one of my favorite garments a few winters back. Oddly enough, this 19th century garment became a favorite in a 21st century way. I already had a couple red wool pettis, which I loved. It was time to make a quilted petti. So, I did using wool batting and a favorite fabric selvaged from a less than fabulous dress,  that reminded me of Grandpa because it had wheat in the stripes. Being a teacher in NY, I often was up and on my way to work well before the snow plows were to far into their routes and in less than wonderful temperatures. Now, add to that my creaky, achy knees and you can imagine the drive in was not so great. One particularly cold morning, when several other school districts were closed due to the cold, I opted for my 19th century coat, hood and new quilted petticoat. It was wonderful. I was toasty warm despite the frigid temperatures. That quilted petti was worn many times over after that.

Fast forward to New Mexico. I didn’t think I would end up missing a warm quilted petticoat of all things. But, there is something about the snuggly softness as well as the warmth it could provide on evening drives after the temperature drops and my husband doesn’t like a warm car. Since I have this black print fabric with a green tone that just kept saying it wanted to be a quilted petti, it is time to make one. Here is the fabric.

The inside is a nice white muslin which is a tad thicker and softer then most muslins we see. The petti is two 44″ panels, 36″ long with 30″ of quilting. So far the quilting design is 4″ scalloping along the bottom with a 1″ quilt from the bottom edge for now. This might change as I go because I think the very bottom below the scalloping wants something. The top is a chain of 2.5″ wide () shapes, which I can’t think of the name of right now. The field in-between will be vertical stripes of a yet to be determined distance. I may do double sets with two very close together. I’m a little tempted to add some batting in small circles, called Trapunto, under the scallops. But, I don’t think that is common for this era.

Now, of course I can’t post about quilted pettis without some background or originals. I thought I remembered a passage from The Workwoman’s Guide, but I can’t seem to find it, just the flannel pettis. So, here are originals instead:

This is a green silk one from the 40s.

1850s wool petti with a 167″ hem listed

Green wool petti which I don’t think is reversible as they say. It has a 74″ hem.

Quilted cotton petti with narrow strip quilting on the bottom and diamonds on top. 107″ hem

This petti is post war, but a must see for the fabric and shaping. This one is also post war, 1865, but shows nice wide wadding sections.

A child quilted petti.

Here is the outside and inside of one on the Graceful Lady Site –

Another one from Anna Allen’s Graceful Lady site –

A close-up for Corsets and Crinolines

The Musee McCord Museum has this photo which shows what looks like a quilted petti underneith.

This is a blog post from the FIDM Museum with a great, colorful petti

Published in: on December 22, 2010 at 3:16 pm  Comments (3)  

Neck Bow or Neck Ribbons

This is for a Sewing Academy Thread. It looks like I didn’t do the post I thought I did. Just for some quick looks, here is a PDF of close-up images for now.

Close-ups of ribbons at neck

Let’s expand this a bit…..

Neck ribbons are a fun, easy and affordable accessory to add to your wardrobe. I opted to say neck ribbons rather than neck bows because not all are tied in a bow while they are almost all ribbons or fabric cut into ribbons. (You might want to open the pdf file above in a separate window as I’ll be referring to images there in the text below.)

Where are neck ribbons worn? Neck ribbons are worn where the collar meets at the base of the neck. They are seen worn alone or with a pin/broach attached to the knot area.  Most often the ribbons are arranged and attached at the top of the dress, where the collar is without ribbon going around the neck. There are several images however where the ribbon is tied around the neck. Take a look at page four of the pdf file above as well as the third picture on the third page.

How are neck ribbons worn? When I say arranged, usually that means tied into a bow but not always. Some ribbons are worn simply crossed and pinned where the collar comes together at the closure of the dress. Some ribbons are tied in decorative knots. One example can be seen on the fourth page of the pdf file. As for the bows themselves, these do vary. Some are rather compact with short loops and short tails. These compact bows likely have loops and tails each only a couple inches long. Among these compact bows, you will find bows that are completely horizontal with the loops and tails laying in a fairly flat row, sitting across the dress/collar closure. A couple of examples of these are the two in the first row of the first page of the pdf file. The first one appears to be a double bow with two pairs of loops on top of the tails. Another compact bow has short loops and short tails with the tails angling below the loops. These can be seen on the first page as well.  A very common bow continues to have the small loops with longer tails. The bows continue to be two or so inches wide, each, while the tails are longer then a couple inchs. This is a good example of this bow: 

More examples of a bow with small loops and longer tails can be seen on pages two and three of the pdf file. A larger bow with longer loops and tails is also seen in images. With wider ribbon, these bows can simply appear larger.  A sort-of example can be seen on page two in the first image on the second row. With narrower ribbons, the bow can appear to be looser and drapey. This is a good example of such a bow. 

The bows seen in images are single bows as well as double or possibly triple bows. On page three, the first image shows a bow made with multiple loops. The first image in each row on the first page also show multiple loops. Bows are both tied and sewn. (more on that in making them.)

What kinds of ribbons are used? While it is nearly impossible to say what color neck ribbons were based on photographic images, we can find some clues about the types of ribbons. We can find solid ribbons as the most common. We also see ombre, stripes, velvets and edged ribbons. The image above appears to have a narrow edge as well as the worked chevron pattern on the tails. On page one, there are a couple of examples of velvet ribbons as well as a ribbon with narrow stripes on the edge. The second image in page two shows an asymmetrical ribbon with a stripe and a scallop edge. In the second row, you see a ribbon with a lace edge added. It appears the lace on the knot could have been added after the bow was assembled. On page three, we see a clouded or ombre ribbon. Widths also varied, possibly with time and fashion. On page three you will see a narrow ribbon which may be as narrow as a half-inch. The asymmetrical ribbon on page two may be as wide as three inches. Most ribbons appear to be around and inch, possibly and inch and a quarter wide. The tails appear to most often be cut either straight or a single diagonal. Much rarer are fish tail or chevron cuts seen above. Some images are seen fraying. This example of an untied ribbon was posted by a SA member, Paula. Notice the end is fraying.

How do I make my own neck ribbon? To make your own ribbon/bow, first you need a ribbon or fabric to cut into a ribbon. For ribbon look for a silk ribbon with some body. A droopy ribbon will look sloppy. A stiff ribbon will irritate your neck. Depending on the size or length of your loops and tails, you will need between 9 and 24 inches. Unless you want a particularly wide or narrow ribbon, look for one a three-quarters of an inch to an inch and a quarter wide. For a ribbon made from fabric, choose a tight weave fabric and cut on the grain, especially if it is a stripe or plaid. If you want an edge on your bow, you can add it before or after making the bow. You can either tie your bow traditionally like you would your shoe or bonnet, or you can make the loops and tails securing them with a ribbon/fabric loop. To make the bow with the latter technique, cut a small 2 to 3 inch piece of the ribbon from one end. Find the center of the ribbon. Form a loop (or two or three) on each side, securing them with a thread. Angle your loops and remaining tails as desired. Secure with thread. Bring the thread to the back. Wrap the short piece of ribbon around the center, overlapping the ends in the back. You may prefer to turn the outer raw edge under. Sew the ends together.

How do I wear my ribbon? You can attach the bow to your collar, where it comes together with a pair of straight pins (or safety-pin). The straight pins can go through your collar then through your ribbon from opposite directions. It is also possible to pin vertically, but this can be a greater risk of poking yourself. To add a pin/broach, simply pin it through the bow.

Additional images:


This image is later 60s.


Published in: on December 10, 2010 at 10:53 pm  Leave a Comment  

Lace

I just recieved this link from Barb who recieved it from Victoria.

For those like me who are wowed and overwhelmed by the vastness of lace, it is very helpful:

Handmade Laces

Published in: on December 8, 2010 at 4:54 pm  Leave a Comment  

Shawls from the Textile Museum of Canada

I should be sleeping. Instead I am looking at shawls.

Take a look at this early 19th century border plaid shawl from the Textile Museum of Cananda. They call several of their shawls buggy shawls. This small plaid shawl is interesting in that it is said to be hand spun. It is late 19th century. I would love a closer look at this shawl. It has an unusual design to the twill weave. It also has a pair of borders on set of sides but a single on the other. I would like to see if the opposite, unbordered side has signs of being cut. It also looks rather heavy. That may just be the photograph though. The soft, natural texture to the color of this late century shawl is lovely. Take a look at the fringing, which is uneven and looks hand fringed. This is another must see in person shawl. Just take a look. You will see it in an instant. They have it noted as hand spun and woven. I wonder if it is possible it was done on a smaller loom at home To me it looks like it may have been a larger shawl with the center removed or something else causing the center merge. Based on mid-19th century shawls, I would think this should be a square, but it is not as are many of the shawls found here. Pondering… The vertical red border plaid’s stripe are stunning here.  They have a half dozen other ‘buggy shawls’.

This is an unusual shawl from the paisley family. It is from the second quarter of the 19th century. The movement of the motifs is rather nice. This double square is more common for the paisley family, these are as well  one two  three and others. This one shows that not all centers are red, white or black. You can find them in yellows, bright blues, greens. This is an example of a double field, one in red, one in white. Here is a second, which I think (but not sure) may be using the technique used for reversible shawls. I just love how this kashmire paisley plays with color.

They left a wide range of dating for this lace shawl. Wouldn’t it be nice if we could get these reproduced?  

Oh, no. My contacts are drying out with 30 pages left to look at…. more when I can.

Published in: on December 6, 2010 at 11:13 pm  Leave a Comment  

Shawl image

I was excited to stumble across this image and collection this evening. While not mid-19th century, these early 20th century women were from weaving areas of Scotland and may have been related to weavers. In the image 5 examples of 4 different kinds of shawls – two solid, one large scale windowpane plaid, one plaid, and one border plaid.

Published in: on December 6, 2010 at 10:47 pm  Leave a Comment  

Checks and Plaids

This week a friend asked advice about purchasing a shawl. The answer was a definite yes, as long as she sent me pictures. In the end, she ended up with two great shawls.

Her asking about the shawl in question brought up a couple points on shawls. Barbara was looking for a double square, wool shawl. Using some of her words, she was looking for a big fluffy WARM shawl and not a foo-foo shawl. When I get questions about a shawl being purchasable, the shawl is usually one from the paisley family or occasionally a printed shawl. It is less often I get questions about a common woven wool shawl. The reality is, it should be the other way around. The majority of the paisley family of shawls were on the higher end of the cost spectrum, being worn for nicer occasions. The printed shawls became a more affordable response, with the aid of advancing industrial processes, to the desire for nicer, fancier shawls. While many women, and men, may have owned a shawl from the paisley family, the average woman would have had more occasion to wear a wool shawl. In living history terms, we are more likely to be interpreting situations where a woven wool shawl is appropriate then a nicer paisley or printed shawl. A nicer shawl is appropriate for some dinners, some evening social events, some church services, some weddings and other ceremonies. An everyday shawl is more appropriate for wearing while sewing at home, going to market, visiting on a regular day, running out to the barn or chicken coop, gardening, volunteering at the aid society, basic everyday life. This everyday shawl, in my opinion, should be a staple in each interpreter’s wardrobe. Cheers to Barbara!! 

Now on to her shawls.

The shawl she initially asked about was this beautiful double square red check. 
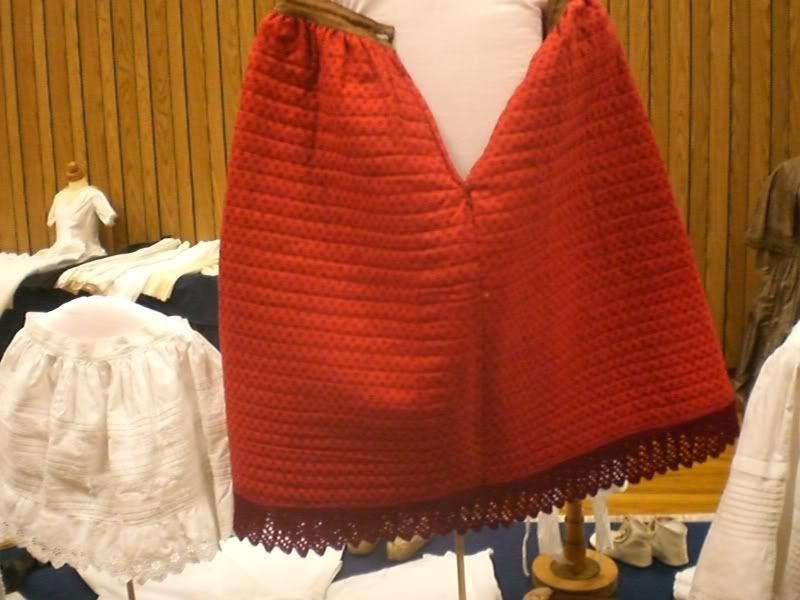
I was thrilled to see a surviving double square in a red check available. (a double square is a shawl that is twice as long as it is wide, usually 60″ by 120″, also called a plaid regardless of design.) What stuck in my mind as this shawl found its new owner, was the tendency of reenactors and interpreters to play it safe, buying what they see or are comfortable with, whether accurate or not. How does this related to this shawl? The check. When it comes to buying or making an everyday wool shawl, it seems we most often go with a symmetrical plaid or a solid (see the close-up of her other shawl below.) I don’t see a check like this worn often at all. Why? I have a couple thoughts. The first is we wear what we see and what we are comfortable with. Second, extant documentation under represents what I believe was actually available. Going huh?  Basically, there are fewer surviving examples of small check shawls then women actually had. In general, there are fewer everyday, working class shawls remaining then the nicer paisleys, lace and higher end silks. A few things may have happened to cause this. The everyday shawls could have been worn out in their day. These shawls could have been deemed by the owner not worth saving. Or, at some point between the mid-19th century and now, the shawls were deemed not as important and worth conserving as other items. Either way, we have fewer examples of everyday shawls to look at and even fewer small checks. Does this mean they didn’t exist as much? Of course not. When looking at original images, we see small check shawls represented. This post-war image shows a small check with a border design. (Sorry, only one on hand until I find the right disk with more images.)  Small check wools are an acceptable choice for a shawl when purchasing a shawl or fabric for a shawl.

I am very glad Barbara was able to acquire these shawls and allow me to talk about them.

Published in: on December 4, 2010 at 12:12 pm  Leave a Comment