
Life of a Straw Bonnet – Cleaning & Care
Miss Leslie’s Lady’s House-book; a Manual of Domestic Economy Containing Approved Directions for Washing, Dress-making, by Miss Eliza Leslie, 1850.
TO CLEAN A STRAW OR LEGHORN BONNETHaving separated the crown from the brim and the cape or neck-piece, and removed the lining and wire, the next thing is to take out whatever stains may be found in the bonnet, the crown of which should be put on a wooden block. For grease, rub on with your finger some powdered Wilmington clay, or a little magnesia; and in an hour or two brush it off, and renew the application, if necessary. For other stains use either cream of tartar or salt of sorrel, put on a little wet. If salt of sorrel,must be washed off again almost immediately, lest it injure the straw by remaining on it. Afterwards (keeping the crown still on the bonnet-block) go over the whole surface of the bonnet with a brush dipped in a weak solution of pearl ash in lukewarm water, (a tea-spoonful to a quart.) Then scour it off at once, with a strong lather of brown soap and cold water, put on with a clean brush. When all the bonnet is well cleaned, rinse it in cold water, and hang it in the sun to dry. Bonnet cleaning should never be undertaken in damp weather. When the bonnet is perfectly dry, you may proceed to whiten it. Fill a chafing dish or portable furnace with burning charcoal; carry it into a small close room or into an empty press or closet, and by a line suspended across, hang the bonnet over the charcoal, at a safe distance, so that it will be in no danger of scorching. Then strew over the coals an ounce or two of powdered brimstone, and immediately go out and shut the door, seeing that no air whatever can get into the room. After the bonnet has hung in the vapour six or seven hours, throw open the door, (having first left open an outside door or window, so as to admit immediately the fresh air,) and go into the room as soon as you find you can do so without inconvenience from the fumes of the charcoal and sulphur. Then bring out the bonnet, and hang it in the open air till the smell of the brimstone has entirely left it. If the day is windy, so much the better; but the bonnet must on no account be hung out if the weather is damp, and it must be brought in before sunset. If it is not sufficiently white, repeat next day the process of bleaching it with charcoal and brimstone.The next thing is to stiffen the bonnet. To make the stiffening, boil in two quarts of soft water, a quarter of a pound of vellum shavings, (the vellum of buffalo’s hide is best,) filling it up occasionally, if it seems to be boiling too dry. It must boil or simmer slowly for six or seven hours. Then, when you take it from the fire, let it stand a while to settle; after which,pour it off into a basin, and it will become a thick jelly. To the sediment left in the pot, you may add a second two quarts of water; and after a second boiling, it will form another jelly or sizing, strong enough for similar purposes. When you are going to use it for a bonnet, melt up a pint of this jelly, and mix with it a small half-tea-spoonful of oxalic acid, (not more, or it will injure the straw,) and then with a clean sponge or brush go all over the bonnet, inside and out, with the sizing. Dry the bonnet; and when quite dry, go over it again with a second wash of the stiffening. Dry it again, and then spread over it a wet piece of jaconet muslin; or damp the bonnet all over with a sponge and lukewarm water, and then cover it with a fine white handkerchief, while you press it hard and evenly with a warm box-iron, exerting all your strength. The crown must be pressed while on the bonnet-block; the brim may be done on an ironing-table. Afterwards expose the bonnet to the air, till it becomes perfectly dry; and next day it will be ready for putting together, lining, and trimming; first mending whatever defective places may be found in it.The front of a bonnet will keep its shape much better if the wire is thick and stout. In lining a bonnet, the best way for a novice in the art, is to pin a large sheet of thin soft paper on the outside of the brim, and (having fitted it smoothly) cut it of the proper shape and size, allowing a little for turning in at the edge. Then pin the paper into the inside of the brim, and if it fits perfectly smooth, cut out the silk lining by it. A piece of oiled silk sewed all round the inside of the crown, at the joining place, and extending down a little upon the brim, will prevent the stain from perspiration, that so frequently disfigures that part of a bonnet.—Without a regular cleaning in the preceding manner, a discoloured straw bonnet may be improved in appearance, if previous to putting on a fresh trimming, you stretch the bonnet on a block, (or something that will answer the purpose,) and go all over it with a sponge dipped in lukewarm water, in which has been dissolved pearl-ash, in the proportion of a small tea-spoonful of pearl-ash to a pint of water; afterwards rinsing it off, wiping it hard with a flannel, and drying it well. Next, go over it with a clean sponge dipped in strong rice-water, which will be the better for having dissolved in it a half-teaspoonful of sugar of lead. Then dry the bonnet, and having damped it all over with a wet sponge, cover it with thin muslin, and press it hard with a heavy and moderately warm iron.TO TAKE CARE OF BEAVER HATS A hat should be brushed every day with a hat-brush; and twice a day in dusty weather. When a hat gets wet, wipe it as dry as you can with a clean handkerchief, and then brush it with a soft brush, before you put it to dry. When nearly dry, go over it with a harder brush. If it still looks rough, damp it with a sponge dipped in vinegar or stale beer, and brush it with a hard brush till dry.A good beaver hat should always, when not in constant use, be kept in a hat-box, with a hat-stick extended inside of the crown.
The Lady’s Receipt-book: A Useful Companion for Large Or Small Families 
By Eliza Leslie
Published by Carey and Hart, 1847
BONNETS.—Before you send a straw bonnet to be whitened, it will be well to remove whatever stains or grease marks may be upon it. Do this yourself, as many professed bonnet-cleaners are either unacquainted with the best methods, or careless of taking the trouble; and will tell you, afterwards, that these blemishes would not Come out. You can easily remove grease marks from a straw, leghorn, or Florence braid bonnet, by rubbing the place with a sponge dipped in fresh camphine oil; or by wetting it with warm water, and then plastering on some scraped Wilmington clay, or grease-ball; letting it rest half an hour, and then repeating the application till the grease has disappeared. Magnesia rubbed on dry will frequently remove grease spots, if not very bad. To take out stains, discoloured marks, or mildew, moisten slightly with warm water some stain powder composed of equal portions of salt of sorrel and cream of tartar, well mixed together. Rub on this mixture with your finger. Let it rest awhile ; then brush it off, and rub on more of the powder. When the stain has disappeared, wash off the powder, immediately, and thoroughly, with warm water. By previously using these applications, no trace of grease or stain will remain on the bonnet, after it has undergone the process of whitening and pressing in the usual manner.In cleaning straw bonnets it is best to give them as much gloss and stiffening as possible. The gloss will prevent dust from sticking to the surface, and the stiffness will render them less liable to get out of shape when worn in damp weather. For a similar reason, the wire round the inside of the edge should in all bonnets be very thick and stout. If the wire is too thin, even the wind will blow the brim out of shape.An excellent way of cleaning and whitening straw or leghorn bonnets may be found in the House Book, page 67.In lining bonnets, always fit the lining on the outside of the brim. It is not only the least troublesome way, but the most certain of success. Nothing is more disfiguring to a bonnet than an uneven puckered lining— left too loose in some places, and stretched too tight in others. If the lining is drawn more to one side than the other, the brim will always set crookedly round the face. The best way, is first to fit upon the outside of the bonnet-front, a piece of thin, soft, white paper, pinning it on smoothly and evenly, with numerous pins. Then cut it the proper shape ; allowing it rather more than an inch all round larger than the brim. From this paper cut out the silk lining; allowing still more for turning in at the edges, on account of the silk ravelling. Then (having notched the edge of the lining all round) baste it on the inside of the brim, and try it on before the glass, previous to sewing it in permanently. See that it is perfectly smooth and even throughout. A white silk bonnet-lining should be of the most decided white, (a dead white, as it is called,) for if it has the least tinge of pearl, rose, blue or yellowish-white, it will be unbecoming to any face or complexion. Straw bonnets are frequently lined with white crape or tarletane.The lining of a silk or velvet bonnet should always be put in before the brim is sewed to the crown.In trimming a bonnet, after the bows, bands, &c., have all been arranged with pins, sew them on with a needle and thread; and afterwards withdraw the pins. If pins are allowed to remain in, they leave a greenish speck wherever they have been; besides denting the straw, and probably tearing it. Also, sew on the flowers, after you have arranged them to your satisfaction.Bonnet strings when somewhat soiled may be cleaned by rubbing them with scraped Wilmington clay, or grease-ball, or else magnesia. Roll them on a ribbon- block with the clay upon them; let them rest a few hours ; then brush off that clay, and put on some fresh. Roll the ribbon again on the block, and leave it till next day. You will find it look much cleaner. It is well always to buy an extra yard, or yard and a half of ribbon, to replace with new ones the bonnet strings when soiled.To keep the bows of a bonnet in shape when put away in the bandbox, fill out each bow by placing rolls of wadding inside of all the loops.‘A piece of thin oiled silk introduced between the lining and the outside, partly beneath the upper part of the brim, and partly at the lower part of the crown, will prevent any injury to the bonnet from perspiration of the head, or oiliness of the hair.In bespeaking a bonnet of a milliner, always request her to send you the frame to try on, before she covers it; that you may see if it fits.When a bonnet is to be sent to a distant place in a wooden box, (bandboxes should never visibly travel,) to keep the bonnet steady, and prevent its tumbling or knocking about, sew very securely to the brim and back, some bits of strong tape, and fasten the other end of each bit of tape to the floor of the box, with very small tack nails. Fill all the loops and bows with wadding as above mentioned. A bonnet thus secured may travel uninjured from Maine to Texas.TO KEEP A BONNET WHITE.—If you have a white velvet or silk bonnet that looks well enough to wear a secon^J season, lay beside it in the bandbox a cake of white wax, (such as you get at an apothecary’s for sixpence or a shilling,) cover the bandbox closely, and do not on any account open it till you are about to take the bonnet again into wear. You will then find the cake of wax much discoloured, but the bonnet as white as ever. Shawls of white silk or canton crape, or indeed any white articles, may be kept in the same manner by putting a. cake of white wax in the box with them, and not opening it so as to admit the external air, till the season for wearing them has returned.In bespeaking bandboxes, desire that they shall not be lined with white paper. A lining of the coarsest brown paper is far preferable for preserving either the colours or the whiteness of any articles that are kept in them. The chloride of lime used in manufacturing white paper is very injurious to the colours of silks, and frequently causes in them spots and stains. The very coarse thick brown paper made of old ropes is far better; as the tar remaining about it partakes somewhat of the qualities of turpentine, and is therefore a preservative to colours. White ribbons, blonds, &c., should be kept wound on ribbon-blocks, and – wrapped in the coarse brown ironmonger’s paper. ‘ .
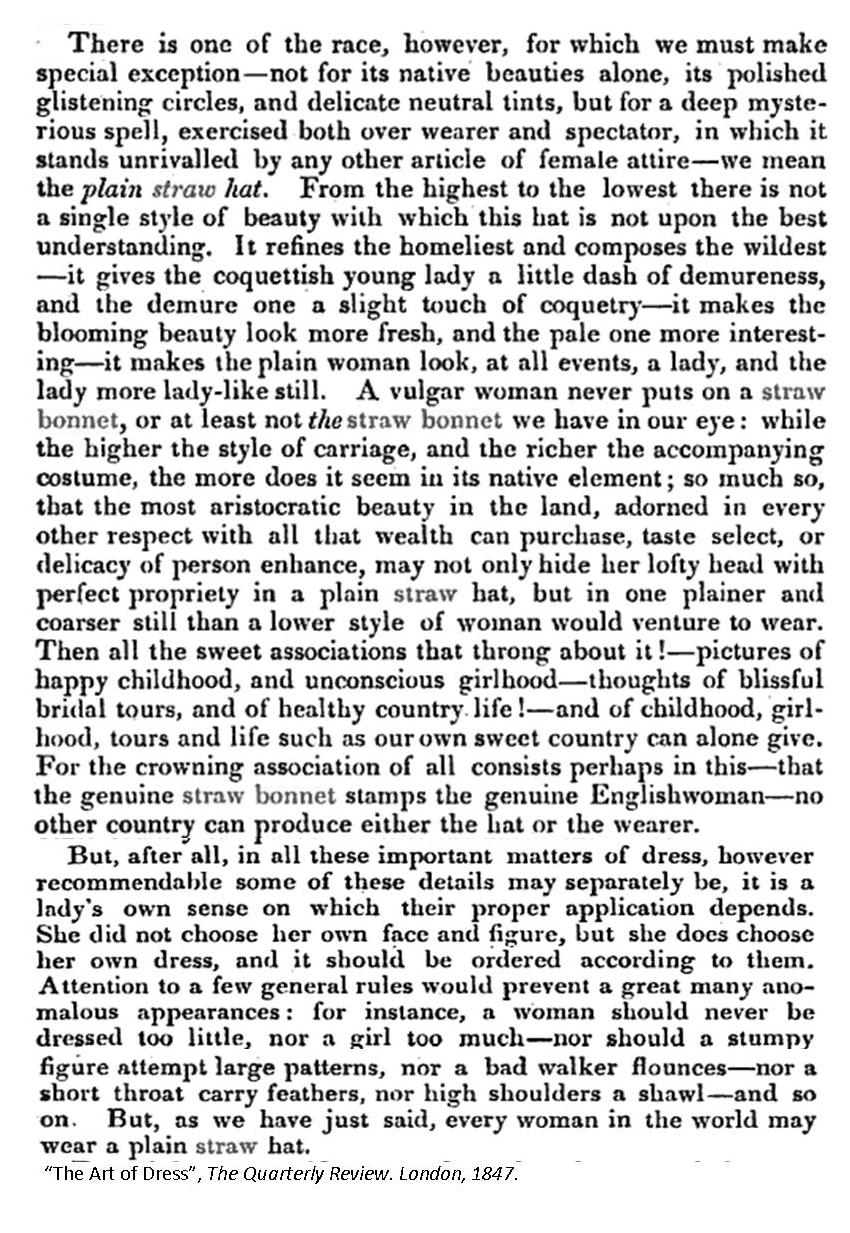

Who Wore Coarse Straw Bonnets?
We often talk about the fashionable side of millinery, where straw plait is finely braided and at times quite fancy. There is a whole other side to straw millinery though, that of coarse straw.
What is coarse straw?
Coarse straw can be poorer quality straw braided into plait. This can be short shafts of straw as well as straw shafts that are uneven or discolored. Coarse straw can be poorly plaited straw, either loosely or thickly plaited. In English plait markets, this plait would be purchased for a lesser price. In the United States, such plait would earn a lesser pay.
Who Wore Coarse Straw Bonnets?
There seem to be two sets of answers, one based on time – That prior to approx 1850 coarse straw bonnets appear in mentions of fashion with the height in the 1830s (roughly). These mentions reference coarse straw for morning wear with simple adornment of only ribbons. As we reach further into the 1840s the mentions switch to saying this practice is falling out of fashion. By the 50s, 1851 actually, these mentions seem to disappear. 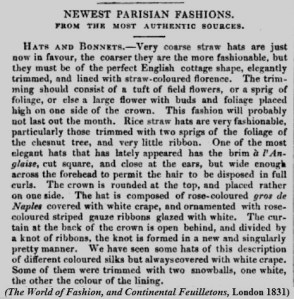
Chapeaux of very coarse straw are now also in favour for morning desbabille; their trimming is ribbon only, but of the most rich and expensive kind. (New Monthly Belle Assemblée, 1841)
Once we turn the mid-point of the century fashion descriptions fall away.
Spanning the 1830s through the 1860s, coarse straw bonnets and hats appear in textual references for the poor, institutionalized and somewhat for school girls.
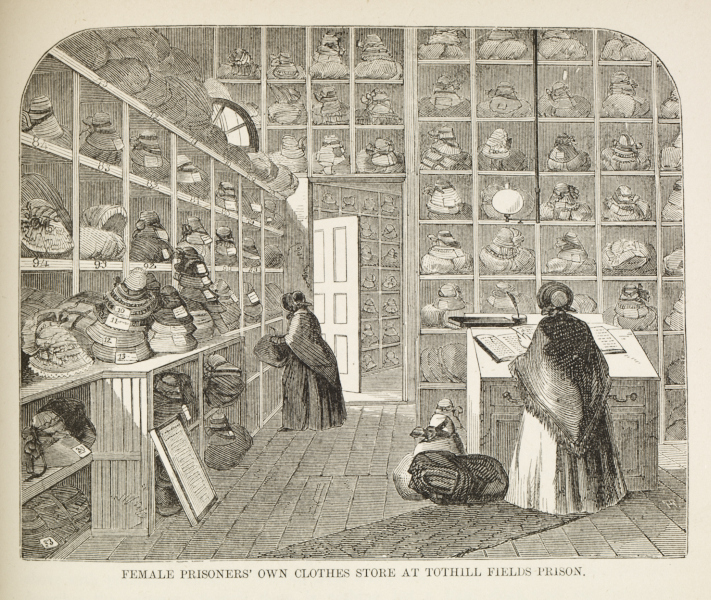
Asylum records in England list plaiting and bonnet making as one of the activities inmates undertook. It is possible these bonnets were worn in house or made for profit. There are descriptions of inmates wearing bonnets. In a short story in The Mirror, 1842, page 75, the author attends a New Year’s Eve event at a Pauper Lunatic Asylum that seems to have been a fundraiser or benevolence gathering. She observes the inmates wearing white caps in some cases and straw bonnets in others, including: “She stalked about in her poor straw bonnet and short sorry gown, with a lofty stage stride, as if she had been the original goddess of plenty.” Admittedly, this is a special event. So, which they wore when is up in the air. I did see an illustration of a store room filled with box style shelves stacked with bonnets. Each box and bonnet was numbered. Many of the bonnets appeared to be straw. I will share this once I find it again. FOUND IT!!
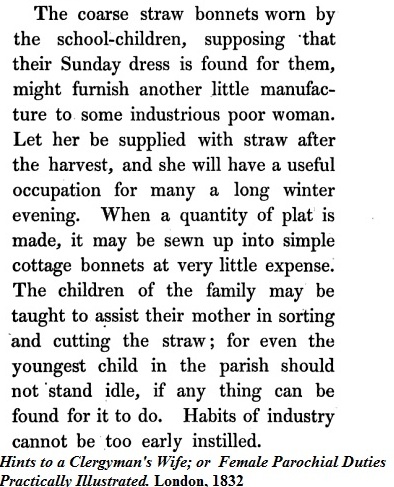
This excerpt recommends supplying poor families with straw so the mothers may make bonnets for the school children:
In this work of fiction, Everley, a women of wealth dresses like a servant, the straw bonnet being discussed as key to the attire. 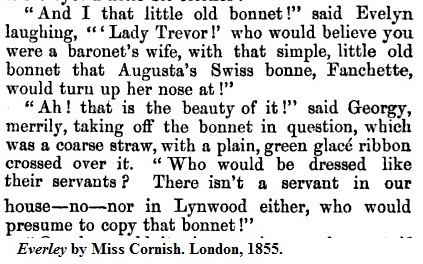
Here a young couple, described as “unsophisticated” are attired in other clothes associated with being poor and a “rough straw bonnet of home manufacture.”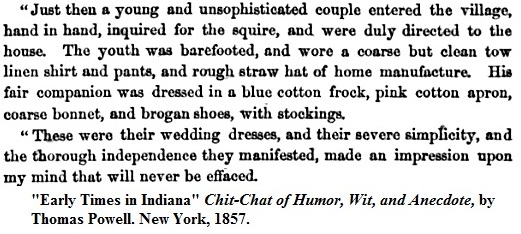
Heat
I have one outlying reference from 1859 that suggests coarse straw may also have been worn for times of extreme heat. I will keep my eyes open for additional mentions or clarification.

Additional Fictional Mentions:
Jane Eyre – Wearing coarse bonnets in the garden
Bleak House – Mrs. Baguet returning from market red-faced in a rough straw bonnet.
For Your Weekend Reading Pleasure: Auction Catalogs
I think everyone will find something of interest within these pages. I added clips of what I look for.
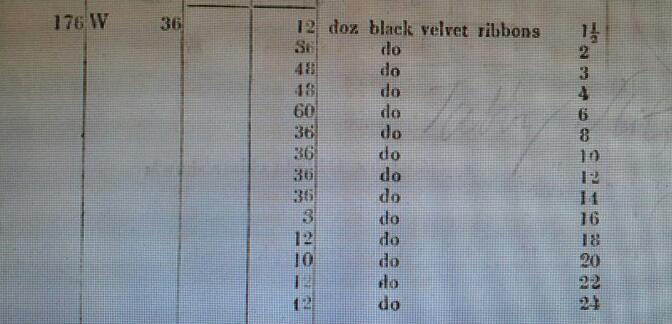
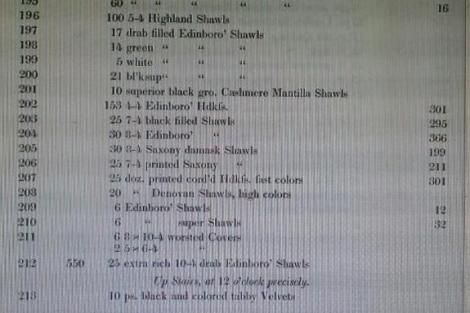
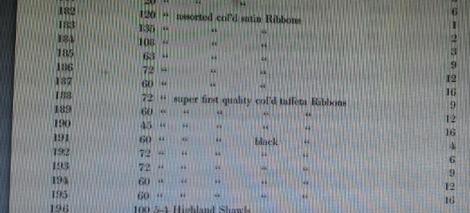

Auction in North Carolina, 1863

Auction in NY, 1866 – Art and furniture
How Do I Store My Bonnet(s)?
 One of the “Ask the Milliner” questions was about storing bonnets. I did answer it. But, now I feel like I want to say more about it.
There are a few layers or directions with this:
- Short term vs Long term storage
- Home storage vs Event/Site storage
- Stationary storage vs Mobile storage
There are a few things to consider with each.
 For long term storage, meaning the storage from year to year at home, you will want to consider the containers you use and the environment they will be stored in. If you have anything original, antique or vintage on your bonnet, you may want to consider using archival boxes and paper. If you have a moisture or mouse issue, you will want a more air-tight and nibble proof container. Since I house my bonnets inside my home and don’t generally use original materials, I use a Sterilite tote (right)

that fits 2 bonnets comfortably and 3 if need be without squeezing. The totes sit on their shelves that are adjusted to the height of the totes.
Ideally, I would have a head form or stand inside each tote for each bonnet to keep the weight of the bonnet from crushing the bavolet or misshaping the cheektabs. If this is not possible, the least crushable position in my opinion is to have the bonnet sit on the tip facing upward. This is assuming there are no decorations on the back of the tip.
Ribbons can wrinkle or sag while stored. A trick for the long, loose ribbons is to take acid free tissue and roll it into in a tube shape. Start at the end of the ribbon and roll it up neatly. Repeat on the opposite side. If the bonnet is on a stand, tuck the ribbon between the cheektabs and the stand. If it is on the tip, set the ribbon rolls inside. For the loops of bows or decoration, take the same tissue rolled into light balls. Tuck the tissue balls inside the loops. You may want to do this to support any particularly large, heavy flowers. I find light, delicate decorations are best left without anything touching them.
For mobile storage, such as moving or long distance transportation to & from events, you will want to consider how the bonnet(s) will move inside the box. I have found that a tote of boxes when turned on end causes the bonnets inside to all fall on their bavolets. When this is not caught, it takes hours to try to steam out the wrinkles and get the right shape back. Keeping the bonnets from moving can save a lot of trouble later. This can be done with tissue as it is light yet helps hold in space. I would avoid using anything heavy or bulky inside with a bonnet as it may cause crushing rather than helping. My dream fix is a stand attached to the bottom of the box and a gentle way of attaching the bonnet to the top of the stand.
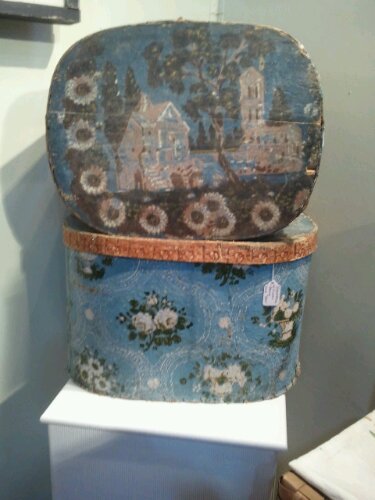
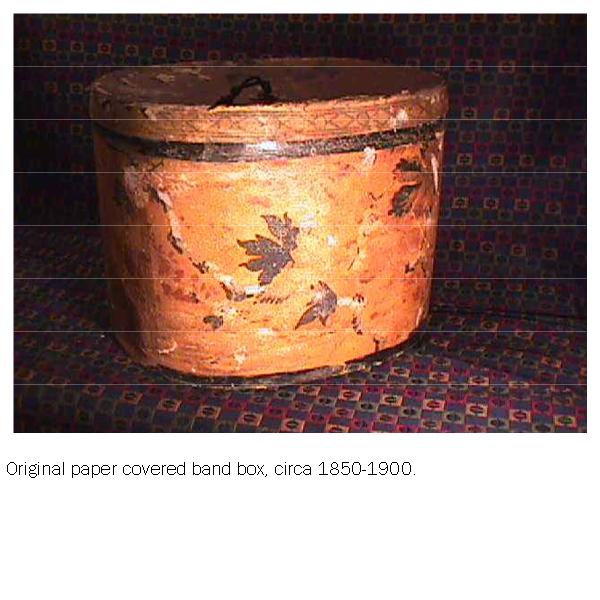 For event or site storing/carrying/displaying, you will want a period correct option. This pretty much comes down to bandboxes, bonnet baskets and a couple other unique options. While currently we are offered circular hat boxes with nifty cords looping about them, mid-nineteenth century boxes were a bit different. First, most were a different shape. They were an oval, squared off oval or a rounded off rectangle. Second, they did not have the nifty cords. Third, they were generally much stronger than many of the thin boxes sold today. In my opinion, when looking for a band box, you want one that is strong, thick walled, large enough for a bonnet to lay on its tip, and with a period paper or able to be recovered.
 As the oval shapes are not easily found currently, I have found deep round boxes are nice for short term bonnet transportation (ie in the car to an event) and wider round boxes do okay as long as they are strong.
I almost forgot. I wanted to say something about size. Looking at the oval and ovalesque boxes used for millinery, most offered at auction or on museum sites: The lengths seem to range from 15″ to 22″ with 18″ being the most frequent. The widths seem to range from 12″ to 18″ with the width proportionately increasing with the length. The depths or heights seem to range from 8″ to 15″ with more landing between 10″ and 14″. Of course there are larger and smaller bandboxes. There seem to be a good number of extant boxes just smaller than those I grouped. Just looking at images with notes, I can not say what their particular use was.
 Now, if you’ve ever tried to carry a stack of bandboxes, especially in a breeze, you know it isn’t easy to the point of comical. This is where bags come in – shaped to fit the bottom of a bandbox, tall enough to carry at least 2. I find these are essential as I can carry 2, 3, 4 band boxes of bonnets up and down the stairs or across the village at the same time.
Further Reading:
For those doing period traveling (there are many other articles here of travel):
Bandboxes are seldom used now, except for the convenience of conveying a cap, bonnet,
or dress to the house of a friend or milliner. They are rarely found among the baggage of a
genteel female traveler, square wooden boxes, with locks, keys, and handles, being substituted
for them. These wooden boxes are generally tall enough to contain a folded dress under the
bonnet or other millinery, and should be painted on the outside. They will last for many years,
will bear exposure, and can go outside with the rest of the baggage. Tall square leather trunks
are sometimes used for carrying bonnets, &c. A paste-board bandbox ought to have a strong
loop of twine, red tape [red cotton twill tape used to tie documents together], or galloon [a
trimming of wool, silk, cotton, worsted or a combination of fiber], passed through one side, large
enough to slip over the hand in carrying it. To secure the lid, bore two holes in it near the edges,
one on each side, and pass through them strong pieces of string, each about a quarter of a yard in
length, fastened by a knot on the inside. Make two corresponding holes near the upper edge of
the bandbox itself, and pass a similar string through each of them. Then put on the lid, and tie
each pair of strings in a tight bow knot. These is no better way of keeping a bandbox fast. (Miss Leslie’s House-Book)
Straw Hat
I really like how this hat came out. The brim dips front and back with a bit more dip in the front. The edges of the brim have a gentle curve down that is oh-so-cute. The crown is shallow with just a hint of curve on the top.

This pretty already has a home.


Shell Pincushions
 You know how certain items make you just a bit more excited than other at antique shows? You know how some of them cause you to let out an accidental “squeee!” that may be just a bit embarrassing afterward?
Well, this little seashell pincushion was one of those items. Of course the photo had to come out awful and blurry. This little pincushion was simultaneously a fond childhood memory in the seashells, a fun flashback to Pioneer Day Camp in the theorem, and a tangent curiosity as a researched for Fanciful Utility. Oh, it was also a little over $100, out of my pin-money price range at the time.
I find pincushions interesting. I find what I’ll call “mixed media” pincushions fascinating. There are many kinds of mixed media pincushions. You likely already saw the post on why I have walnut shells in my sewing basket. Then there are little baskets with pincushions inside, tins with pincushion
 s inside or on the lids, small band or pasteboard boxes with pincushions on the lid. Pincushions and needle-books made from seashells can be found in girl’s activity books of the 19th century such as these from The Girl’s Own Toymaker.
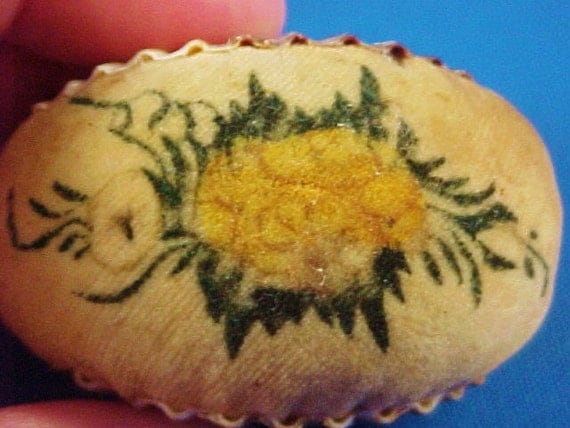
We still see an assortment of original shell pincushions around. The most common exterior fabric is velvet, either in a single color or in a white/ivory/cream with either theorem painting (a type of stenciling) or painting. I have yet to determine how common it was for the shells to be an exact match or just a close match or just the same size.
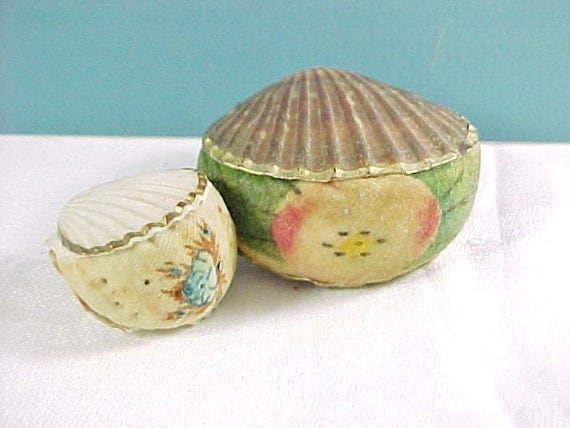
This trio has unadorned velvet for each pincushion.
 This is a beautiful example of theorem on a shell pincushion. (This Etsy seller happens to have some incredible original pincushions if you are looking.)
 These are swoon worthy painted seashell pincushions.
 My shell pincushions:
 Here are my first two shell pincushions drying. I used the method from A Girl’s Own Toymaker of a cotton inside covered with the velvet on the face and glued in place. I have them tied with thread to secure them while they dry. I anxiously wait to see how well they stick after work tomorrow (well tonight if this goes live in the morning.)
I picked the brown velvet for the larger pair because that shell has a brown in the dips of the scallops. I picked the blue velvet for the red and blue shell to bring out the blue in the shell. 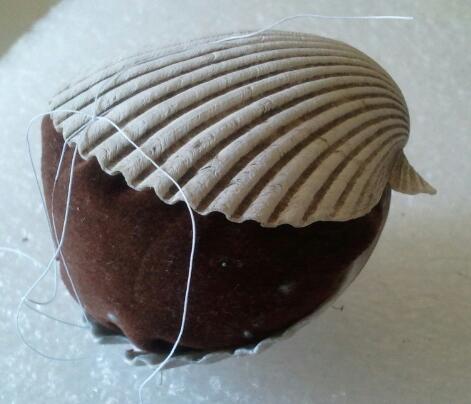
I have a special shell supplier who I am grateful to for my assorted pretties. I definitely need more velvet pieces. I need a natural white to do some theorem or painting. I am really looking forward to doing some of the painting. There are a few smaller shells in the set. Those who know me, know I love playing with pieces on a smaller scale.
Want to know more about Theorem Painting? I suggest this article.
ADD: http://www.brooklynmuseum.org/opencollection/objects/213551/Pin_Cushion
Not a Child’s Toy
 A few weeks ago, I looked into a display cabinet to see this goodie. I was excited to see the velvet pretty. I was also excited to see it still proudly displayed its pins.
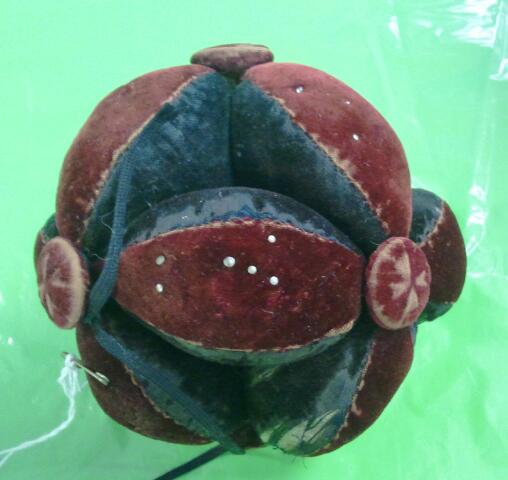
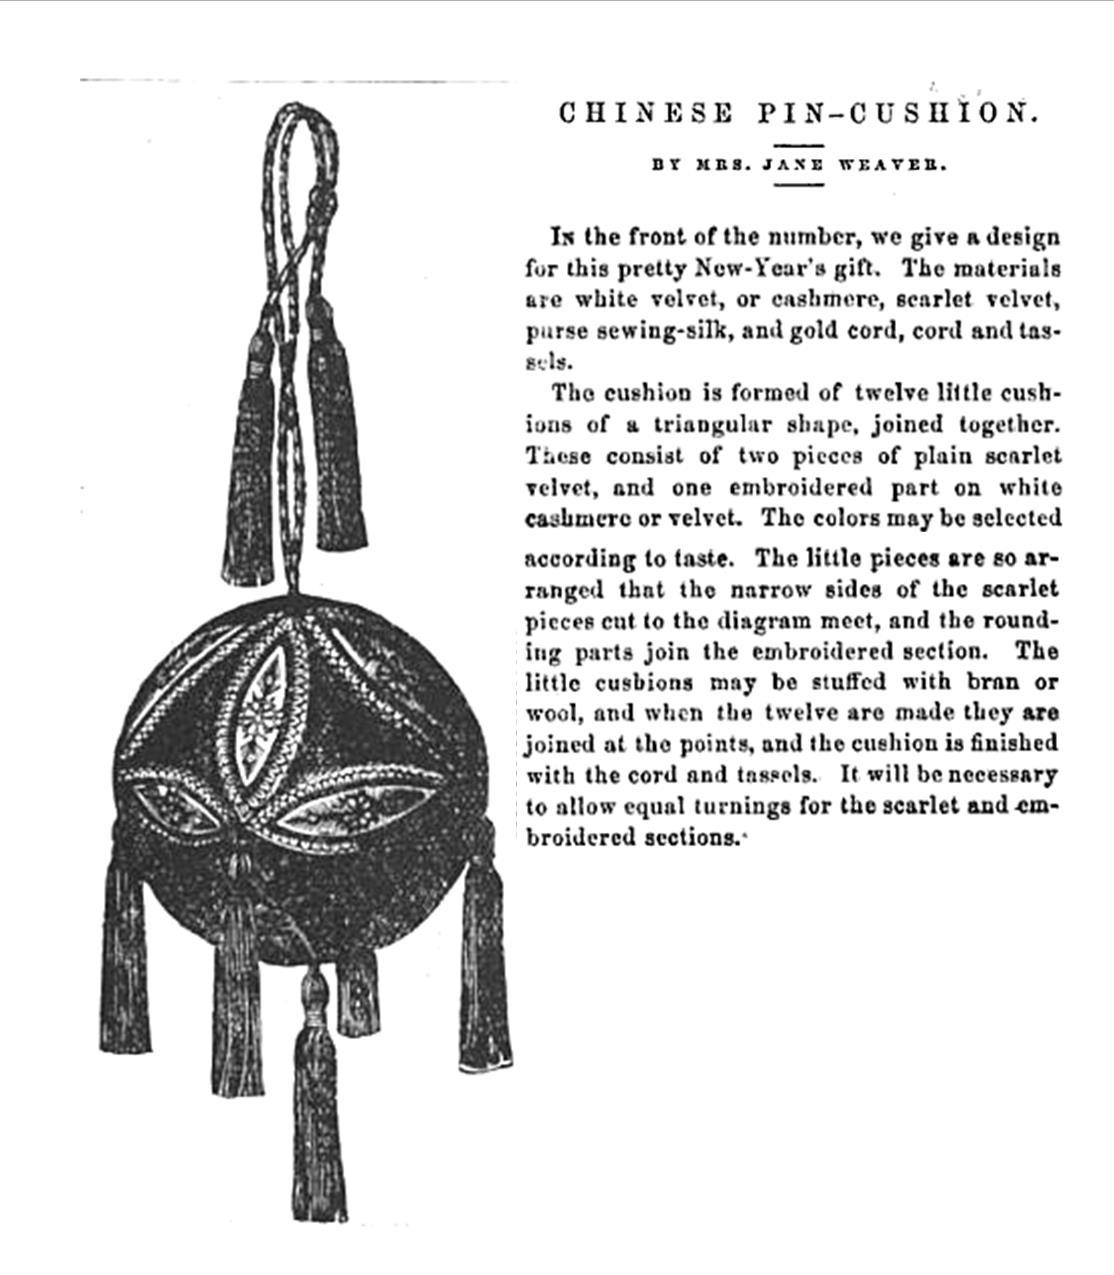
It seems some time in the latter 20th century these ball shaped pincushions went from functional utilitarian item to a toy. Originally, these were not toys. I’ll admit, once I learned they weren’t toys, meaning when I saw them illustrated in ladies’ magazines and girls’ books, I would get squeemish when I would afterward see one used as a toy. Modern merchants seem to offer these as “Amish” or “Shaker” “Puzzleball” pincushions or toys currently, as this merchant did. The thing is, I just can’t seem to find evidence of either origin yet. In the lady’s magazine example below, they call this a “Chinese Pin-Cushion.”
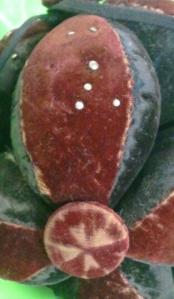
This example uses lemon shaped segments (“lemon” for the lack of having a name for this shape) to create the ball. I wish I grabbed better photos showing this. In the 19th century, these seem to have been made in one of two ways: either with wedge shaped pieces assembled together or with lemon shaped pieces assembled. I also saw one example that uses rectangles to create the ball. Without separating 19th century and early 20th century examples, materials seem to include velvets, satin silks, corded fabrics (corduroy), and wools, with a strong lean towards velvets being a favorite. Examples from the later half of the 19th century show embroidery along the seams. Honeysuckle Lane has a nice blog post with some beautiful examples of this. Earlier directions, such as this 1871 version in Peterson’s Magazine, call for embroidery and embellishment on most of the exterior piece:
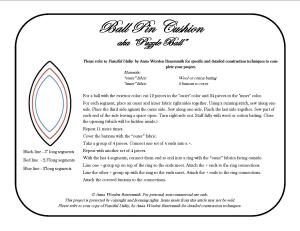
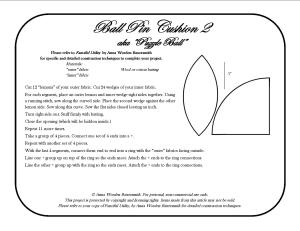
Want to make your own ball pincushion? Here are two different versions.
Additional Examples:
(*Note: Many examples are from selling sites. If the images become unavailable, I will try to catch them and delete the example. I’m sorry if I haven’t caught one yet.)
 This example is made of off white wool and a low pile blue velvet. Small buttons finish the connections. The seller (ebay) lists it as circa 1900.
 This example uses velvet on the outside and a berry colored corded velvet on the inside. It appears to be turn of the century.


