Welcome to my second open Sew Along of the year. For this sew along we are each making a purse in a style and era of our choosing.
For the sake of this Sew Along, we are defining a purse as that which holds money. I am pulling this definition from the miser purse dissertation I shared weeks back.
Purse Ideas:
I have a board started with various purse ideas. In general, you will notice purses were small items, smaller than ‘bags’. Here is just a sampling:


Top R-L- Coin purse ca 1799-1820, Pence Jug ca 1830-60, miser style purse 1800-20, Bottom R-L – long purse 18th century, Christmas purse from Peterson’s, String purse 1880s. (I am really tempted to do that first one too…. and a jug)
A museum full of purses and bags (European.)
**If you want an original miser style purse to copy, I’ve saved a few to an Etsy Treasury. There is a wide range of eras in the Treasury. All are under $100 though.**
Resources:
Knots Indeed has given those who are interested in knitting, netting or crocheting a purse a jump start with this page filled with links to directions.
The blog, With My Needle’s Eye, shares eye candy from Amsterdam’s Purse Museum.
There are several period books with netting, knit, and crochet projects that can be found on Google Books, Archive.org and Hathi Trust. Here is a sampling:
- My Crochet Sampler, 1847. Easy(ish) to read, with projects that are crochet the length of the purse. The same at HathiTrust.
- The Lady’s Assistant, 1847 or 1863 version – Same At HathiTrust (In this book you will notice the use of the word “Tambour” instead of the word “crochet”)
- Mrs Gaugain’s minature knitting netting and crochet book
- The ladies’ work-table book The same at HathiTrust.
- Mee’s companion to the work-table, 1847. The same at HathiTrust.
- The accompaniment to second volume of Mrs Gaugain’s work on knitting, netting and crochet (Only has 1 purse. But, has excellent illustrations.)
- The ladies’ complete guide to crochet, fancy knitting, and needlework. The same at HathiTrust.
- The Ladies’ Self Instructor… (Include pense/jug purse) The same at HathiTrust.
My Purse Project:
I am crocheting a blue and cream silk miser style purse. (Something like the simpler side of this example, without the incredible designs on the right.) My materials include 200 yards of blue silk thread in size E, vintage cream silk I have in size D, teeny silver and gold steel beads (btw 4oz is about a tablespoon. I may need more.), and a pair of steel rings.
I am sticking with a simple purse, crochet round rather than flat as it seem so many of the directions indicate. This is so I can get the hang of this and because I do not read crochet directions well, okay, at all. I’m aiming for 9 inches in length as that seems to be a common recommendation for ladies purses in the 40s and 50s. I want to do one end silver and one end gold. I still haven’t found an image to tell me which end should be which though.
I thought I would be sewing the beads on after, which made a pattern like this ![]() appealing. It turns out, the beads are strung on first. Look at the method below. I fear my beads may be too tiny my thread. I’m not even sure I have a needle small enough just now for them. We shall see.
appealing. It turns out, the beads are strung on first. Look at the method below. I fear my beads may be too tiny my thread. I’m not even sure I have a needle small enough just now for them. We shall see.

My Materials (If you want to make what I am making):
- 200 yard spool of size E silk thread (Size EE may be closer to originals.) (I decided to start with 1 spool. I may need a second)
- 50 yards of a contrast color silk thread (I already have vintage silk in cream.)
- Cut steel beads (I am using silver and gold color steel beads purchased from Etsy. I started with 4 grams, but find I need 8-12grams.)
- 2 steel rings from Mandy at Jewelry4Reenactors
- Crochet hook
Other Materials you might like:
I would love, love these original rings 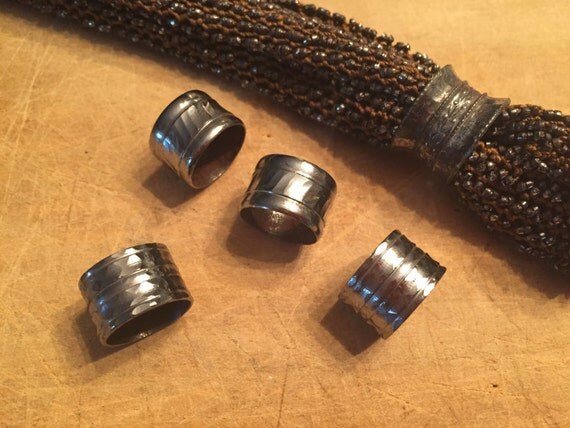 . Okay, I am really tempted to buy them. But, this is becoming a pricey little purse.
I find these ![]() and these
and these ![]() to be potential wider modern options.
to be potential wider modern options.
Logistics:
We currently have two Facebook groups going, the larger Sew Along group and the small, closed, local group. I was going to go with just the one group. But, I’ve now decided to keep both open because I think it is important to have both co-support groups going.