This month’s project is over on Don’t Paint the Cat. I turned an antique pin cushion ball design into a toy for Clara.
The Three Year Rug
My latest project is over on Don’t Paint the Cat. Can I call a project that spanned three years my “latest”?
Please go check out Fallen Snow on a Starry Night.
This is a sewn rug using early nineteenth century techniques with an modern subject.
How They Wore Their Bonnets
A few years ago we looked at how some original women wore their bonnets perched on the backs of their heads as well as how we can also do so. If you missed it, the post was called Got Perch?
This was only one of several ways women wore their bonnets. Today, I would like to look further at how mid-century women wore their bonnets. Let us start with more examples of the bonnet being worn behind the mid-point of the head.
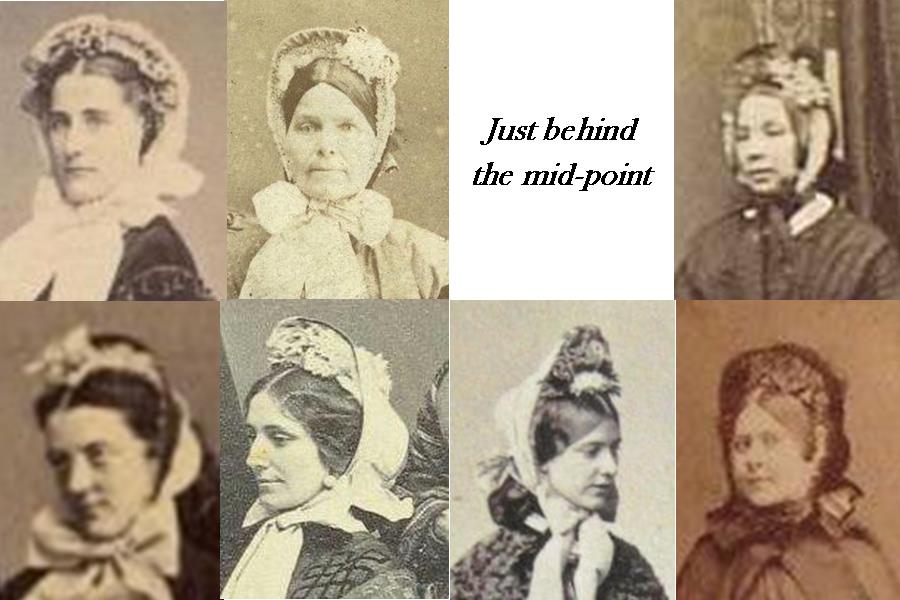 You will notice some variation in how far back the bonnet is worn. The two women on the lower left appear to have their bonnet furthest back among the group. These two also happen to have their bonnets angled more than the others. From the views/positions we have, the third woman from the left on the bottom row appears to have a nearly vertical position to the brim and tip. We can not say for certain with the other women; though I suspect the top left may also be nearly vertical. We can also see that most of these women have their flowers reaching further forward than the brim edge of the bonnet. The position of these flowers may help hold the bonnet in place. In the lower right, the flowers can be seen cupping the top of her head. Take a particularly close look at the woman on the lower left. There is a piece photographing white sitting below the flowers/decoration. This may or may not be a stay.
This next group of women are wearing their bonnets at or just forward of their mid-point.

We see greater variety in the angle of which these bonnets are worn, seeing them worn nearly vertical, angled slightly forward and angled slightly backward. The bottom right and bottom left images show the further forward reach of the spoon bonnet while displaying noticeable difference in the depth, angle and shaping of the crown and tip. In the top left and top right images, we can see how the frill aids in holding the bonnet on. Again, the flowers are aiding in securing the bonnet to the head. In the bottom row, third from the left, you can see the woman’s flowers reaching down over the hair line. (The lower right image could be considered as wearing her bonnet quite forward.)
In this next group, we see the bonnet worn quite forward of the mid-point.

Many will notice these women each look more mature. I do not know if this is a coincidence or if there is truly a connection between age and mode yet. I will look further into this. While these bonnets are worn further forward and a couple are rounder, the fashionable spoon shape is present. The bonnet with the daisies, second on the bottom row, demonstrates well how the flowers can hug the top of the head. In several cases, the flowers sit forward enough to reach to or even beyond the hair line. If there is a connection between age and this mode of wearing, there could be further speculation that this positioning of flowers could conceal a thinning part.
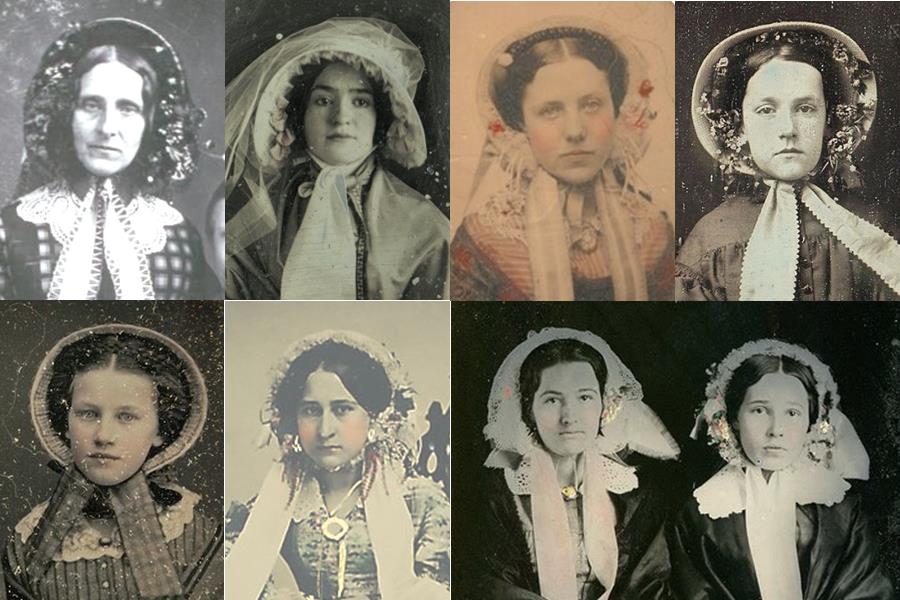
The following group was collected as I was looking at untied or partially tied bonnets. These are late 1840s through early 1850s examples. Each either has the ribbons simply looped over each other without a bow or completely untied. Many, if not most, of the women above would have worn their bonnets in this style ten to twenty years previous.
New Arrival

This adorable hat block was waiting for me at my mailbox when I got home. I wasn’t expecting it until Saturday. This was a pleasant surprise. Pocket friendly price and uber-fast ship. Double win.
This block has a beautiful taper to the crown. The wood is very pretty too. Here Clara holds it in place so you can see the pretty wood and nice taper.
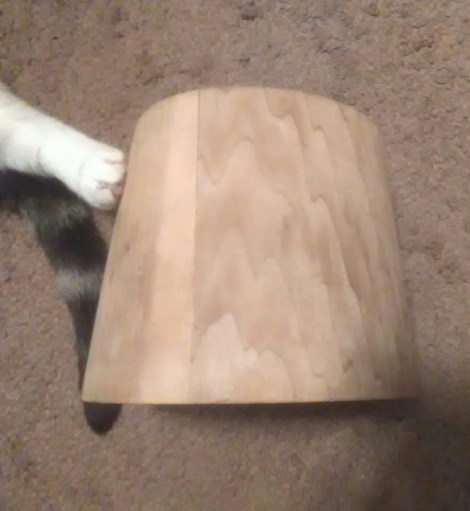
This isn’t an antique block, but it will help me make a few different historic styles.
There are Civil War era styles:


And, 1870-80s styles:


If I try to go a couple rows beyond the block, I may be able to pull off this earlier style:
I am planning to bring this block along with my Julie block, with straight sides, for when I interpret straw sewing. They will make a nice comparison. This crown has yet to be named. I have a couple in mind. But, I want to wait until I take the first straw off it.
I am trying to replace as many of my hand carved foam blocks/forms as possible. Foam becomes misshapen from over use. Wood is much better for me. This is a slow process of finding the right historic shapes at an affordable price.
A Mid-Winter Figgle-Faggle
For a little Mid-Winter amusement, may I recommend A Dictionary of Reduplicated Words of the English Language.

And for the more serious…. The Domestic Dictionary and Housekeeper’s Manual.
Monthly Update – January
 I’ve spent most of this month wrapped up in snuggly warm blankets and plucking away at my laptop. I’ve been editing and re-editing To Net or Not to Net: Revisited. As I started the first round of editing the re-write, I decided I just wasn’t going to be happy without the illustrations from fashion columns. To appease myself about image rights, I tracked down original Godey’s Lady’s Book for 1860, 1861, 1862, 1863, and 1864. And bought them. I sorta oopsed on 1865 because I was distracted editing photos. I am now discovering just how long media mail can take.
This past Saturday, I had every intention of sleeping in in the morning and finding some way to enjoy the 50+ degree weather after a week of testing. I awoke to find hubby checking out the local auctions. Of course, I looked. This one photo of a photo album, opened to show 1860s CDVs inside, caught my eye. It was 9:38. The auction started at 9:30, 30 minutes away. We quickly dressed and headed to the auction. We were there just in time for some thing Dan was watching and to see the $15,000+ comic books sell; then to wait and wait and wait for 3 hours before my box of albums came up. Btw, this three hours was just enough for my previous day’s migraine to start knocking. When I won the box of three albums, two 1860-75 and one 1916-18, for far, far less than a single single album should have gone for, I was quite certain I would find most of the pages empty. I did not open them in the hall. I did not open them in the car. I did not open them before lunch, a much needed lunch. I finally opened them to find nearly every window was full in both albums. The larger album was in incredible shape, while the smaller received some abuse to the spine during the auction. I was actually a bit overwhelmed by what was in the album. These appear to be fairly local with a few outliers. A couple clippings accompany the photos. And, to my delight, several women are wearing hair net.

The month has been fairly light on sewing for me. I have been working here and there on my rug project. I had been keeping it a secret, intending it for last year’s Agricultural Fair. But, it has now leaked over into year three. I have the very top and very bottom done, with a band across the center to do. I know, I am sure that is quite the reverse of most rug makers out there. It will all work out though.
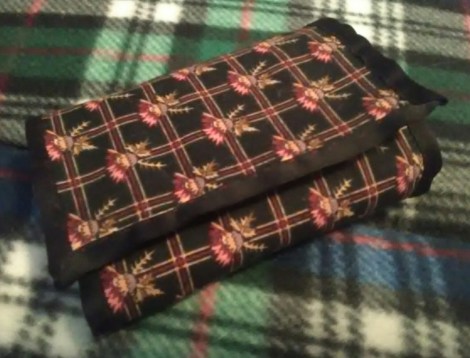
A need for organization prompted this month’s blog sewing project. This will  hopefully keep the sewing box a little more manageable. I do love these rolled cases for keeping various things. I can’t tell you how often the one in my desk draw at work has been brought out as the keeper of needful things. I should do a write up on that version, for just that use.
 I’ve made a few bandeau headdresses. I enjoy this light sewing. Light in that it is easy on the hands and easy on the mess. Velvet ribbon takes up far less space and ‘stuff’ than straw plait.
Speaking of straw plait, I do keep saying to myself that I need to get started on sewing straw for the season. I know I should. Financially, I really should. But, I am just not there yet.  I made one small doll hat from a short bit of rosy plait that came my way. It did not please me the way it usually does in the midst of winter. Don’t despair. Eventually, the straw will come out to play. Eventually.
 I almost forgot one thing. When it really, really cold earlier this month, I finally did something I’ve been joking about for a while. I made up one of my hood patterns with fleece. Yup. Let me tell you how soft and warm this thing is.
I know some of you want a GB update. I met with my GI doctor, well one of them. She’s rather awesome: patient, calm, and explains things well. I am getting there. I know I’ve been pretty open about just about everything with this, but now I’m going to be a bit more reserved on a couple things. I need to wrap my head around them. I will share one fun bit. She said I have nerve damage that is likely permanent around the incision just below my breast bone. This is the one I opened inside trying to pack up after the CW event in July. I’ve decided since these weird electrical spasms are likely permanent, it needs a name. Norbert. After all, it is like a tiny dragon inside.
One last thing to share. This morning a blog post came up on my feed that is obscure and delightful at the same time. I must say, never in my wildest dreams could I have imagined cat bustles were a thing, actually a thing. Okay, maybe in my dreams.
Going to need More Velvet
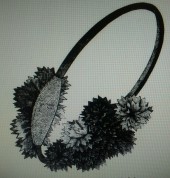
I made a few bandeau headdresses this weekend. I am going to need some more quality velvet ribbon if I am going to make many more. I do have a coral color and a pumpkin color. I don’t know how desired those colors would be.


I may make some of the kind that have the fluffy loops on the divided this week. I need to find the right name.
Another Hexagon
I just love it when I stumble across additional examples of pieces. This purple and yellow hexagon pin cushion is constructed just like the velvet on from my “Hexagons” post.


I like how coarse the stitches are. The beads are much larger.
Bandeau Headdresses
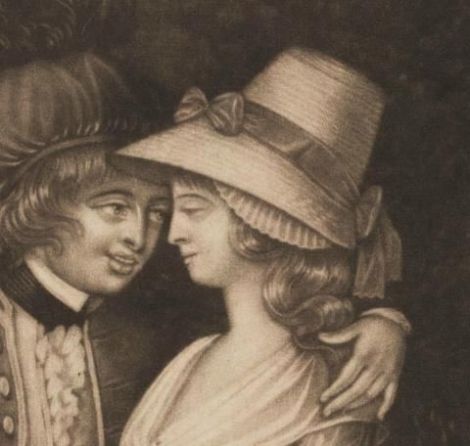
While we do not have an event quite so fine as The Duchess of Kent’s Grand Dinner and Concert to attend, we do have a lovely assortment of dinners, socials and balls to attend throughout the year as reenactors and interpreters.
These events often call for a special dress. They can also call for a special headdress.
The bandeau style headdresses wrap around the head with velvet or ribbon or lace. Be they symmetrical or asymmetrical, a focal point often lands center back. . “The most favorite cap of the season is formed of a round crown, set into a narrow band, which just encircles the head. This band is trimmed in various ways…” (Peterson’s, 1862)
Personally, I just love velvet. The softness. The texture. The way it moves. It is a beautiful material to work with and wear. I am looking forward to making several new headdresses this season. Currently, there are a few in my Etsy shop.
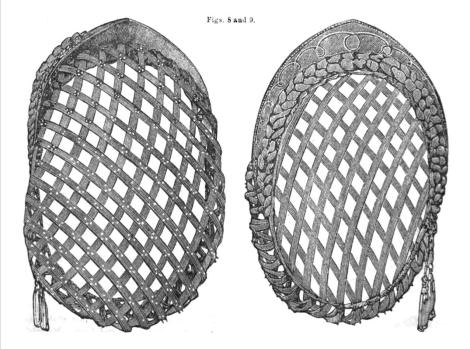
 This first example, from 1862 Godey’s, show a simple band with two millinette pads/ovals to which flowers are stitched. “This coiffure is very simple, and generally becoming. The rosettes are formed of pieces of bias silk about an inch and a half in width; the edges are cut out in point, and the silk box plaited and formed into a rosette, then sewed on to stiff net; the band can be formed into a rosette, then sewed on to stiff net; the band can be of velvet of silk, and a bow of ribbon to match the silk is often placed on one side of the band. One of more colors can be used; rose sublime and black make a good contrast.” This particular headdress is just calling to be made with the aide of one of my pinking machines.
.
 This “Coiffure Zelia” head-dress loops heavy ribbon or velvet around the wired base, a “circular frame.” The heavy ribbon allows for fuller body. This season, I am looking forward to seeing pearls paired with velvet. I may even add turquoise as one description calls for.
“The Coiffure Zelia may be made of velvet or heavy ribbon tastefully looped upon a circular frame, and these loops are confined by pearl or gilt pendants. Black lace is quilled on the one side and terminates in a bow with floating ends behind. The centre is a pearl or gilt ornament to correspond with the pendants.”
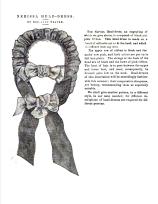
This Nerissa head-dress uses pink and black ribbon on a “band of millinette cut to fit the head, and which is stiffened with cap wire.” The description calls for box pleats. While the illustration fails at showing these, I think box pleats would be just lovely, as would directional pleats or tufts of alternating black and pink.
“The Nerissa Head-dress, and engraving of which we give above, is composed of black and pink ribbon. This head-dress is made of a band of milinette cut to fit the head, and which is stiffened with cap wire.
The upper row of ribbon is black and the under row pink, and both colors put on in full box-plaits. the Strings at the back are of black and the bows of pink ribbon. The knot of hair is to pass between the upper and lower bow, and must, consequentally, be dressed quite low on the neck. Head-dresses of this description will be exceedingly fashionable this summer; their comparative cheapness yes beauty recommending them as especially suitable.”
The Esmeralda Head-dress or the Coiffure Esmeralda appear in Peterson’s Magazine, V41-42, 1862 (right) and Frank Leslie’s Magazine, v 10, 1862(left). In both instances, the focal point is atop the head in front, rather than in back, though there is a knot or half bow in that location. The Peterson’s version specifically mentions being “on a foundation of millinette stiffened with a cap wire,” while both illustrations show the form in the illustration.

I have yet to decide if I will make any of the coronet style head dresses. There substantial structural base appeals to me. At the same time, I would want them to fit just right, while everyone’s head is different. Here are two beautiful coronets from Godey’s, July of 1862:
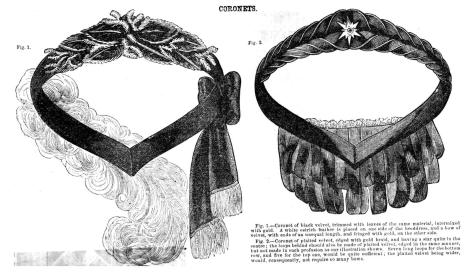
Of course, this similarly shaped coronet appeals due to my current work on To Neto or Not to Net: Revisited.
Looking for a head-dress for that upcoming occasion? Please take a moment to visit my Etsy shop to see those I have to offer.


Me, on a very day wearing a black and red velvet bandeau. 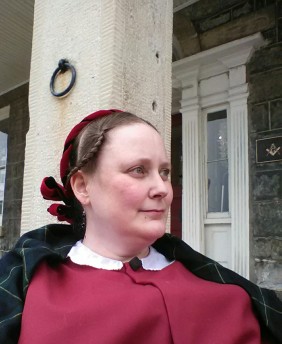
January Project – Rolling Organization
This month’s project is about organizing. It can also be called a FanU Fat Eighths Project because of the materials it uses.
Here is what I needed to organize. This is the Shaker bandbox I keep next to the couch for my everyday day sewing. This is my go to space for the odds and ends of project after project. The funny thing is, though it is my first and favorite box, I never lined it with special pockets for keeping organized. So, I am constantly digging through looking for little tools. 
Here are the tools that I tend to dig for. Bodkins, stilettos, awls, a crayon, hairpins, crochet hooks, seam ripper – long skinny ones. (I did notice not a single one of my metal bodkins are in the box. Where they should be.)
The long, skinny nature of these tools makes a rolled case perfect for keeping them organized. Rolled cases show up for both sewing and travel in nineteenth century literature. This one will have lots of narrow pockets for each tool.
Materials, aka FanU Fat Eighths Project
- 3 fat eighths cotton (18″x9″) (makes 2 rolls)
- 1 1/4 yards 1/2″ or 1″cotton sateen (or 1 1/2 yards for 2)
- Optional: 1/2 yard ribbon to tie with
- 1 or 2 good movies
- A good cup of tea
Some time in the past year, I picked up this pack of fat eighths in reproduction prints at an estate sale of all places. It has moved around the sewing room from project basket to project basket. At one point I thought “quilt”. At another, I thought “doll clothes.” 
They seemed like just the pieces for this project. I hadn’t actually opened the pack. I was quite pleased to find how pretty some of these fabrics were, especially the green and blue 1830s print. 
I picked out three fat eighths. This is one outside, one lining, and one pocket. 
I cut each piece in half lengthwise. This makes 6 pieces 4 1/2″x18″. I set aside one of each.
The layer that would become the pocket, the top fabric, needed 1″ trimmed off the top. 
Once trimmed, I hemmed the upped edge of the pocket. The whole length.
The pocket was then basted to the lining and pockets marked. (Imagine vertical lines marked.) 
I didn’t measure the pockets. I just eyed them mostly a half or three-quarters of an inch wide. I did make some wider pockets as well. If you have specified you want specific widths for, you may want to lay them out before marking the pockets. Keep in mind this is a flat pocket. The spaces for each tool needs to about twice as wide as the tool, in most cases.
Next, the three layers were all basted together and bound with ribbon. Check your copy of Fanciful Utility for directions on how to do this.
Finished:
Each tool gets a space. the crochet hooks will live elsewhere. There was space for a small scissors in the box too. The pockets on the right are wide enough for needle packets. 


Why make one, when I can make two? Here is the second I made at the same time. That blue and green fabric was too hard to resist.
Here it shows how this would be a nice case for holding hair supplies. Narrow pockets for hair pins; wider ones for fine hair nets, elastic ties, a couple ribbons, maybe even a small comb. 

Don’t miss the previous monthly projects:
EDIT
We are having lots of fun talking about other used for a rolled case like this over on FB. Ideas like knitting needles, crochet hooks, paint brushes, even flatware have come up. I want to give a little heads up on jewelry. I would hate to see an earring fall out of this style of roll. Instead, pockets facing the other way would be a better choice, not guaranteed, but better. Take a look at this style Pocket of Pockets I use for many, many things: 


