
How often have you opened your sewing box or basket to find your spools have run amuck and thread is unrolled everywhere? In the nineteenth century, spools of thread were kept neat and controlled with spool holders and spool trucks. (We’ll talk about the latter later.) Spool holders can be both functional and pretty, using small pieces of silk and ribbon.
Here are a few basic spool holders I saved to my phone/tablet over the past year or so. (I was very bad in not saving all the locations.)


These spool holders are also an excellent way to expand your FanU skills. The top and bottom are constructed using the basic techniques found in Fanciful Utility.
Making a Spool Holder

Materials:
1 sheet of pasteboard (8.5”x11”)
Silk pieces – 2 approx 8.5”x11”
Matching wooden spools of thread (number based on shape selected.)
Length of ½” wide silk ribbon – Approx ½ yard
A sharp awl and a bodkin
Long straight pins (optional)
 Directions:
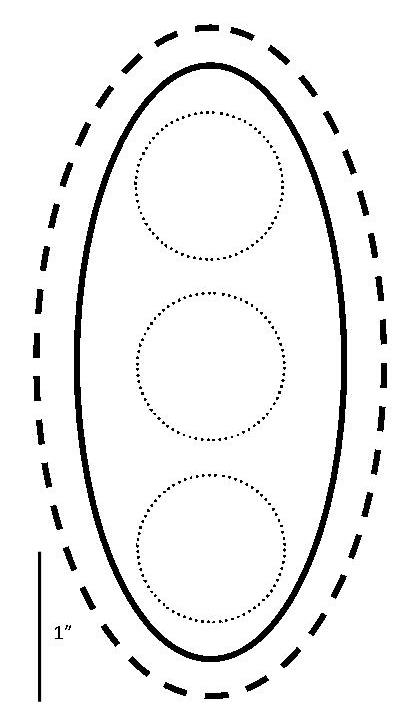
 Choose the template below you wish to make.
Cut 4 pieces of pasteboard using the solid line.
Cut 2 pieces of silk using the dashed line. This can be one decorative silk for the outside and one plain silk for the inside.
Pair the pasteboard and silk into the top and bottom pieces. Pre-punch holes in the pasteboard using the awl. Make sure the holes for each layer line up.
Cover each set using your preferred method from Fanciful Utility (see pages 39-44)
Pierce the holes through the silk from the outside to the inside, for the top and bottom pieces. Be sure to not break the silk threads, but pass the awl between the weave.
Line top piece and bottom piece up with the spools inside. Place the pins through the holes into the holes in the spools.
Thread the bodkin with the ribbon. Run the ribbon through the top layer, through the spool and out the bottom layer. Repeat until the spools are neatly held in place and a pretty bow can be tied.
.
Templates:
(You may need to copy and paste these into MSWord to size them and print. Use the 1″ line for guidance.)


I love this, Anna!!! Thank you so much!
Love them! These are great, Anna! Thank you!