Here is one of those photos we all love to see. It is filled with layers and layers of information. (The screen shot will take you to Connecticut History Online where you can zoom in on the image)
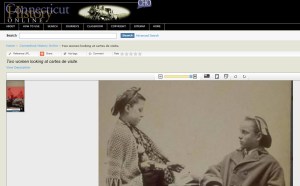
Here is one of those photos we all love to see. It is filled with layers and layers of information. (The screen shot will take you to Connecticut History Online where you can zoom in on the image)
This last swap of the season seemed to fly by. These are the fabrics of the Patriotic Swap, the fun Bonus swap.

Don’t these designs look fun?!
I just stumbled upon this image of a father, daughter and her toyes. It is a staged photo. But, full of information.
http://cdm16694.contentdm.oclc.org/cdm/singleitem/collection/p16694coll8/id/1085/rec/98
I had this nice long, photo filled post that my phone ate. It came down to…. I can’t decide if I like this sleeve or hate it… if it looks like a huge, sloppy coat sleeve or a quasi-close enlarged elbow.
It was reworked from a flopped inspiration in a rush to meet a deadline, which also includes another dress & two full pieces of millinery.
Photos sans-undergarments:


Do I shorten the cuff & trim it (narrow bias going up the outside)?
Recut it into an open sleeve (despite having 2 other semi-sheers with open sleeves)
Turn the sleeve over and recut it?
Or???
If anyone happens to know where I can find the 1860 Moore’s Rural, please let me know. I want to find the article previous to this one:
I’m trying really hard to take a tech/internet vacation. But, I got a message that there is a plait discussion going on. This is an older blog post. I am in the midst of something far more indepth. (That’s all I can say right now.)
One of the most common mistakes in making a straw bonnet for living history or reenactment, is choosing a plait that is to wide and coarse. I will admit, I too made that mistake in the begining. We are often tempted and occasionally encouraged to use the straw from a craft bonnet for making a straw bonnet. Again, yes in the begining I did this. But, I’ve since learned and would like to advise you learn from my mistakes rather than wasting your time.
So, what is wrong with the straw from a craft hat from the craft shop? Most of them are to wide and to coarse. Occasionally, you can find narrower craft straw. But, not always. Take a look at the image below. A is a craft straw. It is 3/4″ wide. Some comes as wide as 1″. While there were wide straw strips used during the era…
View original post 275 more words
A variety of straw plaits.

3mm split plait
5mm split plait
6-7mm split plait
6-7mm fine whole plait
8mm black whole plait
I stumbled across these two images in a Google/Yahoo search. The links back to the seller site were unsuccessful; they weren’t there anymore. As thumbnails, I thought “oh, same woman in different poses. Great, two angles at the same bonnet.” Now, I think these are two women dressed in clothes made the same, or they might be wearing the same dress & coat. I don’t think it is the same woman in different years.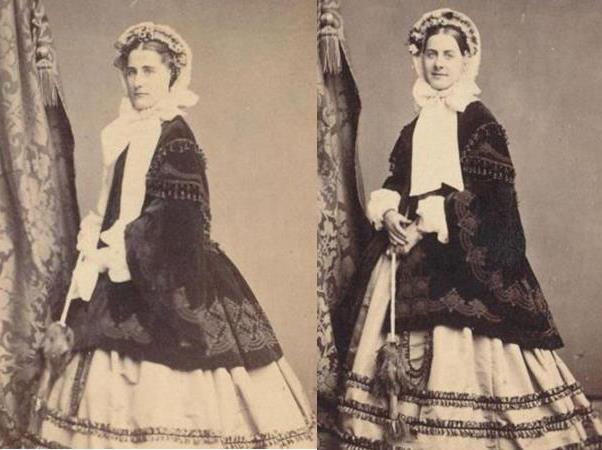
 What I see… The fit in the shoulders is different. Or, is this the position of the arms placing the shoulders forward & back? There are 5 knotwork arrangements on each wide open coat sleeve. The fullness of the undersleeve or dress sleeve is different on each woman. The placement of the knot medallion on the shoulder is nearly in the same place. The rise/drop in the hem of the coat is slightly different. I wish we could see the original images to see the hems of the skirts. The length of the bonnet ribbons are different. The placement of interior bonnet flowers, the side ones either are slightly different or do look that different with the angle change. (This is what I really wanted to see.)
We all know I am quite fond of paisley designs. So, I’ve been looking forward to doing a Paisley swap since last fall.
I was not disappointed.
The swapped fabrics are so much fun. Take a look:

Now, this post is a bit delayed because it seems I was the very last one to get all my fabrics. This was by far not the fault of any swappers. In fact, the two fabrics that arrived today were mailed over a week ago. Let’s just say the local postal service stuck again. This time mom talked with the delivery man since her’s were also delayed.
A bit of extra fun – In the midst of this swap, I received my copy of Wearable Prints, by Susan Greene. When I opened this one particular fabric, I was certain I had just seen the colors. Sure enough.

The next FanU swap is the “Mini Swap” of miniature prints. It actually starts Monday. This swap will be extra fun for swappers who want to make doll size sewing cases. (I hope you saw the doll size templates in Fanciful Utility.)
This post is really a ‘help’ for a discussion we are having elsewhere. It is just easier for me to put my thoughts together here. (If this is of interest, I’ll fix it.)
The questions are – How do we set the scene (individual scene, over-all scene or group of scenes) for visitors? How do we visually signify what the situation is? How do we make a scene accessible to visitors, inviting them to participate in discussion?
I think we need to set a scene or visual story that invites visitors in. I want to interact with them. This means they need to feel welcome to talk, ask questions, make comments, pick things up.
I do think this is much easier interpreting out of a building because I can control a scene easier with my set-up inside walls and an open door already says “come in.” In a camp situation, one very important part of saying “welcome” is making an area easy to walk into and around in. To me, this means easy, flowing tent placement. This can be straight lines or horseshoes or even a spiral. It can not be haphazard with tents placed every-which-way. An area needs to feel safe to families with smaller children. This means keeping fires, ropes, axes/hatches, etc visitor safe. Yes, just the sight of a campfire area can keep a family with pre-school children away. So, placing that fire out of the path between visitors and you is important.
Once you have people in your area, you want them to feel comfortable and safe in your particular “space”. This, again, requires attention to tent placement and ropes as well as furniture. Most of us need a personal space and an interaction space when we set a tent up. Some of us need a clear distinction, some of us do not. Keep this in mind when you create your visitor space. (Personally, I don’t like having to get in and out of my tent over and over. I try to keep what I need neatly at hand or within very easy reach just inside. At the same time, I also need my mid-day nap space.) I’m sure you’ve seen the tall gentleman trying to talk while the edge of the fly is right in his face, or the school-age child leaning on the tent pole trying to see inside. Neither of those are inviting or pleasant.
For your visitor space, think about where your table, work or conversational pieces are. Do their placement give people enough space to stand (or even sit) while you talk/demonstrate/interact? Think about the “display” table. We normally want the visitors to come up to the table, right? What about when we are the interactive display? We want them to come up to us right? They need to have space to do this. They also need to feel comfortable doing this. For me, this means:
So, what do I mean by visual clues or talking objects??? In my case, when I do my millinery impression in the shop, ideally, I have several types of bonnets displayed, samples of fabrics, ribbon, straw, etc., fashion images, etc. For a scene of a group of ladies making comfort bags, piles of the items going into the bags as well as bags already packed and even a crate of bags ready to send out would be good. For interactive purposes, I see the pieces you are working with and the pieces the visitors can handle. For something like comfort-bags, I would love to see kids be able to help fill one.
So, this is where I wanted to put a bunch of photos grazed from the internet pointing out what I think are good examples. Well, finding some is not as easy as I thought. So, this means either people aren’t taking photos of civilian areas enough, aren’t visiting civilian areas enough or are just catching the not so great examples. Or, it could mean those good instances are so very captivating, visitors don’t think to take photos. (I’ll keep looking)
Okay, this is an original image rather than one from an event. But, take a look at where these ladies are placed. This works well for a photo and would work well for visitors. The arch of people and table create a space for visitors to come up, see what is on the table and talk with the people. The strongest interactive person would sit adjacent to the table while those who may be less confident would sit off to the side.


