September Reflections

Ack! Somehow it is nearly the end of September and I feel I have nothing much to say about the month.

With it being back to school, I find it all quite the exhausted blur. I can say my fabulous time, eating, and exercise routine seems to have gone out the window as I come home from work most afternoons and want to just curl up with a blankie. This certainly does not work since I some how need to fit in 3 to 4 hour of millinery, a 1 to 2 mile walk, healthy food consumption, care of the house, and personal sewing, all between the hours of 4 and 8, assuming I complete all errands in a timely manner.

Okay, enough complaining.

The vast majority of this months sewing can not be written about until next month’s posts about the Agricultural Society Fair. All I will say is there is a particularly fun assortment this year.

Millinery

For millinery, I focused on decorated pieces this month.

Coming up

I have started a blog series looking at winter hoods and bonnets from my collection. I will share about a dozen pieces over the next several weeks.

The Agricultural Society Fair at GCVM is next weekend. I will be posting about that.

In November, I will be at the Domestic Skills Symposium teaching a workshop on how to care for and repair straw millinery.

I also plan to open the Holiday section of my Etsy shop in November.

Published in: on September 29, 2019 at 12:00 pm  Leave a Comment  

Quilted Winter Bonnet

I have decided to share select pieces from my winter hood/bonnet collection. Every few days, I will post a new piece. My collection currently spans most of the 19th century, though lightly at the very beginning and end. The pieces I share will be from the early and mid-Victorian eras, roughly 1830s through the 1870s. All but one of my pieces originate from the United States.

This adult size winter bonnet is a quilted piece, ca. 1840s-1870s. The exterior is a brown silk which has some staining. The interior is a cotton in a slightly lighter shade of brown on the brim and bavolet, while the crown has a darker polished cotton. The batting is not visible at any point, leaving it undetermined, likely a wool.

The bonnet is constructed of three main pieces, typical of many winter hoods of this era. These pieces include the crown, brim, and bavolet. The brim was cut on the bias, while the bavolet was cut on the grain. The shape and construction could classify this as a winter bonnet rather than a hood.

The quilting is is by hand with a running stitch. The front most edge around the brim having a narrower and slightly thicker section. The quilted rows appear to be done by eye rather than being fully traced out. This can be seen in the cheek area (below) as the rows curve and narrow imperfectly.

There is evidence that this piece was either made from fabric taken from a previous garment or the quilting was redone. In this photo you can faintly see the holes from former threads.

The gathered seam along top of the bavolet where it meets the crown.

The interior seams are treated in multiple ways. The neck edge where the bavolet is gathered to a gathered crown, the seam is covered with a darker fabric. This may or may not have been a later addition/change. Often this neckline has a channel for drawstring to assist with fit. The seam where the bavolet meets the brim is turned under. The seam where the brim and crown meet was trimmed and overcast


Note 1 – Additional Winter Millinery can be found in posts from September though November, 2019 using the search term: Winter Millinery Series or clicking here.

Published in: on September 25, 2019 at 6:00 pm  Leave a Comment  
Tags:

Winter Hood Patterns

As the earth’s orbit moves us into Autumn, many of us are looking ahead to fall and winter events. These some times chilly, some times down right cold events often call for warm head wear.

I currently offer two winter hood and bonnet patterns. Hopefully another is on its way… once I decide which from my collection to offer.

quilted-winter-hood-pattern-2016-cover-image

First is a long hood based on originals in my collection, one made up with silk on the outside and one made up with wool on the outside. Both are in the same green with pink color ways.

This hood is great for light warmth, while blocking wind and rain or snow. My first time wearing the sample, I found myself caught in quite the driving rain/sleet storm. My head was perfectly cozy while my face was protected as I walked through the village.

il_570xn-281752989

Next is my first winter bonnet pattern. This makes up with more structure, making it fit more like a bonnet than a hood, a snuggly warm bonnet. The original it is based on was made up with a silk exterior with silk ruche trim. Filled with warm wool batting, this winter bonnet will keep your head warm at the coldest of events. It is great for Yuletide events as well as working in the sugar camp.

Since we are talking about being ready for colder weather, don’t forget your shawl. You can read up on mid-nineteenth century shawls in Paisley, Plaid, & Purled.

Will I be making winter hoods and bonnets this season?

I haven’t yet decided. I have plenty of silk and wool batting as well as dozens of originals to copy…. I just have to be in the mood. So… Maybe.

Published in: on September 23, 2019 at 5:15 pm  Leave a Comment  

Corded Pin Ball

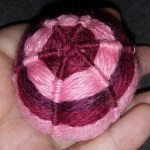
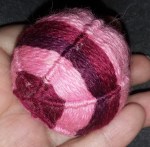
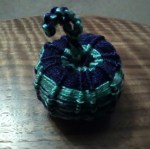
Every so often, I come across one of these ball shaped pin cushions I have come to call Corded Pin Balls. I find them fun and playful between the layers of colors and intertwining of threads.

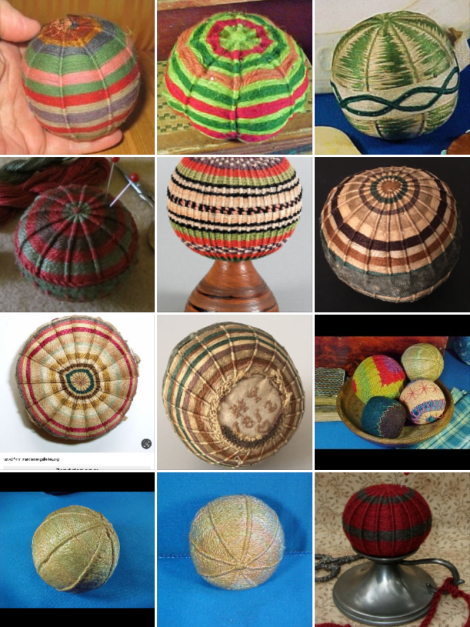
Years ago, I made a few of these corded pin balls weaving the threads over a sewn canvas ball. This was based on original directions from An American Girls Book (below.) I found the process to be imperfect, as the ball wasn’t as firm as I wanted.

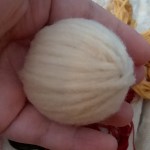
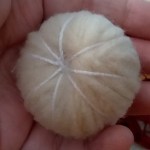
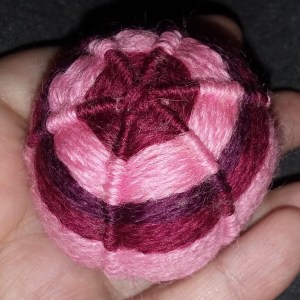
For many weeks now, I’ve been toying with another approach, working right over a tightly wound ball of wool.

This weekend, having caught the funky virus going around school, I am not really up to the tiny stitches for another [on a deadline] project, but, of course, I can’t manage actually resting. Instead, I found myself giving this method a try. I am glad I did because I find it has a very nice rhythm to it.
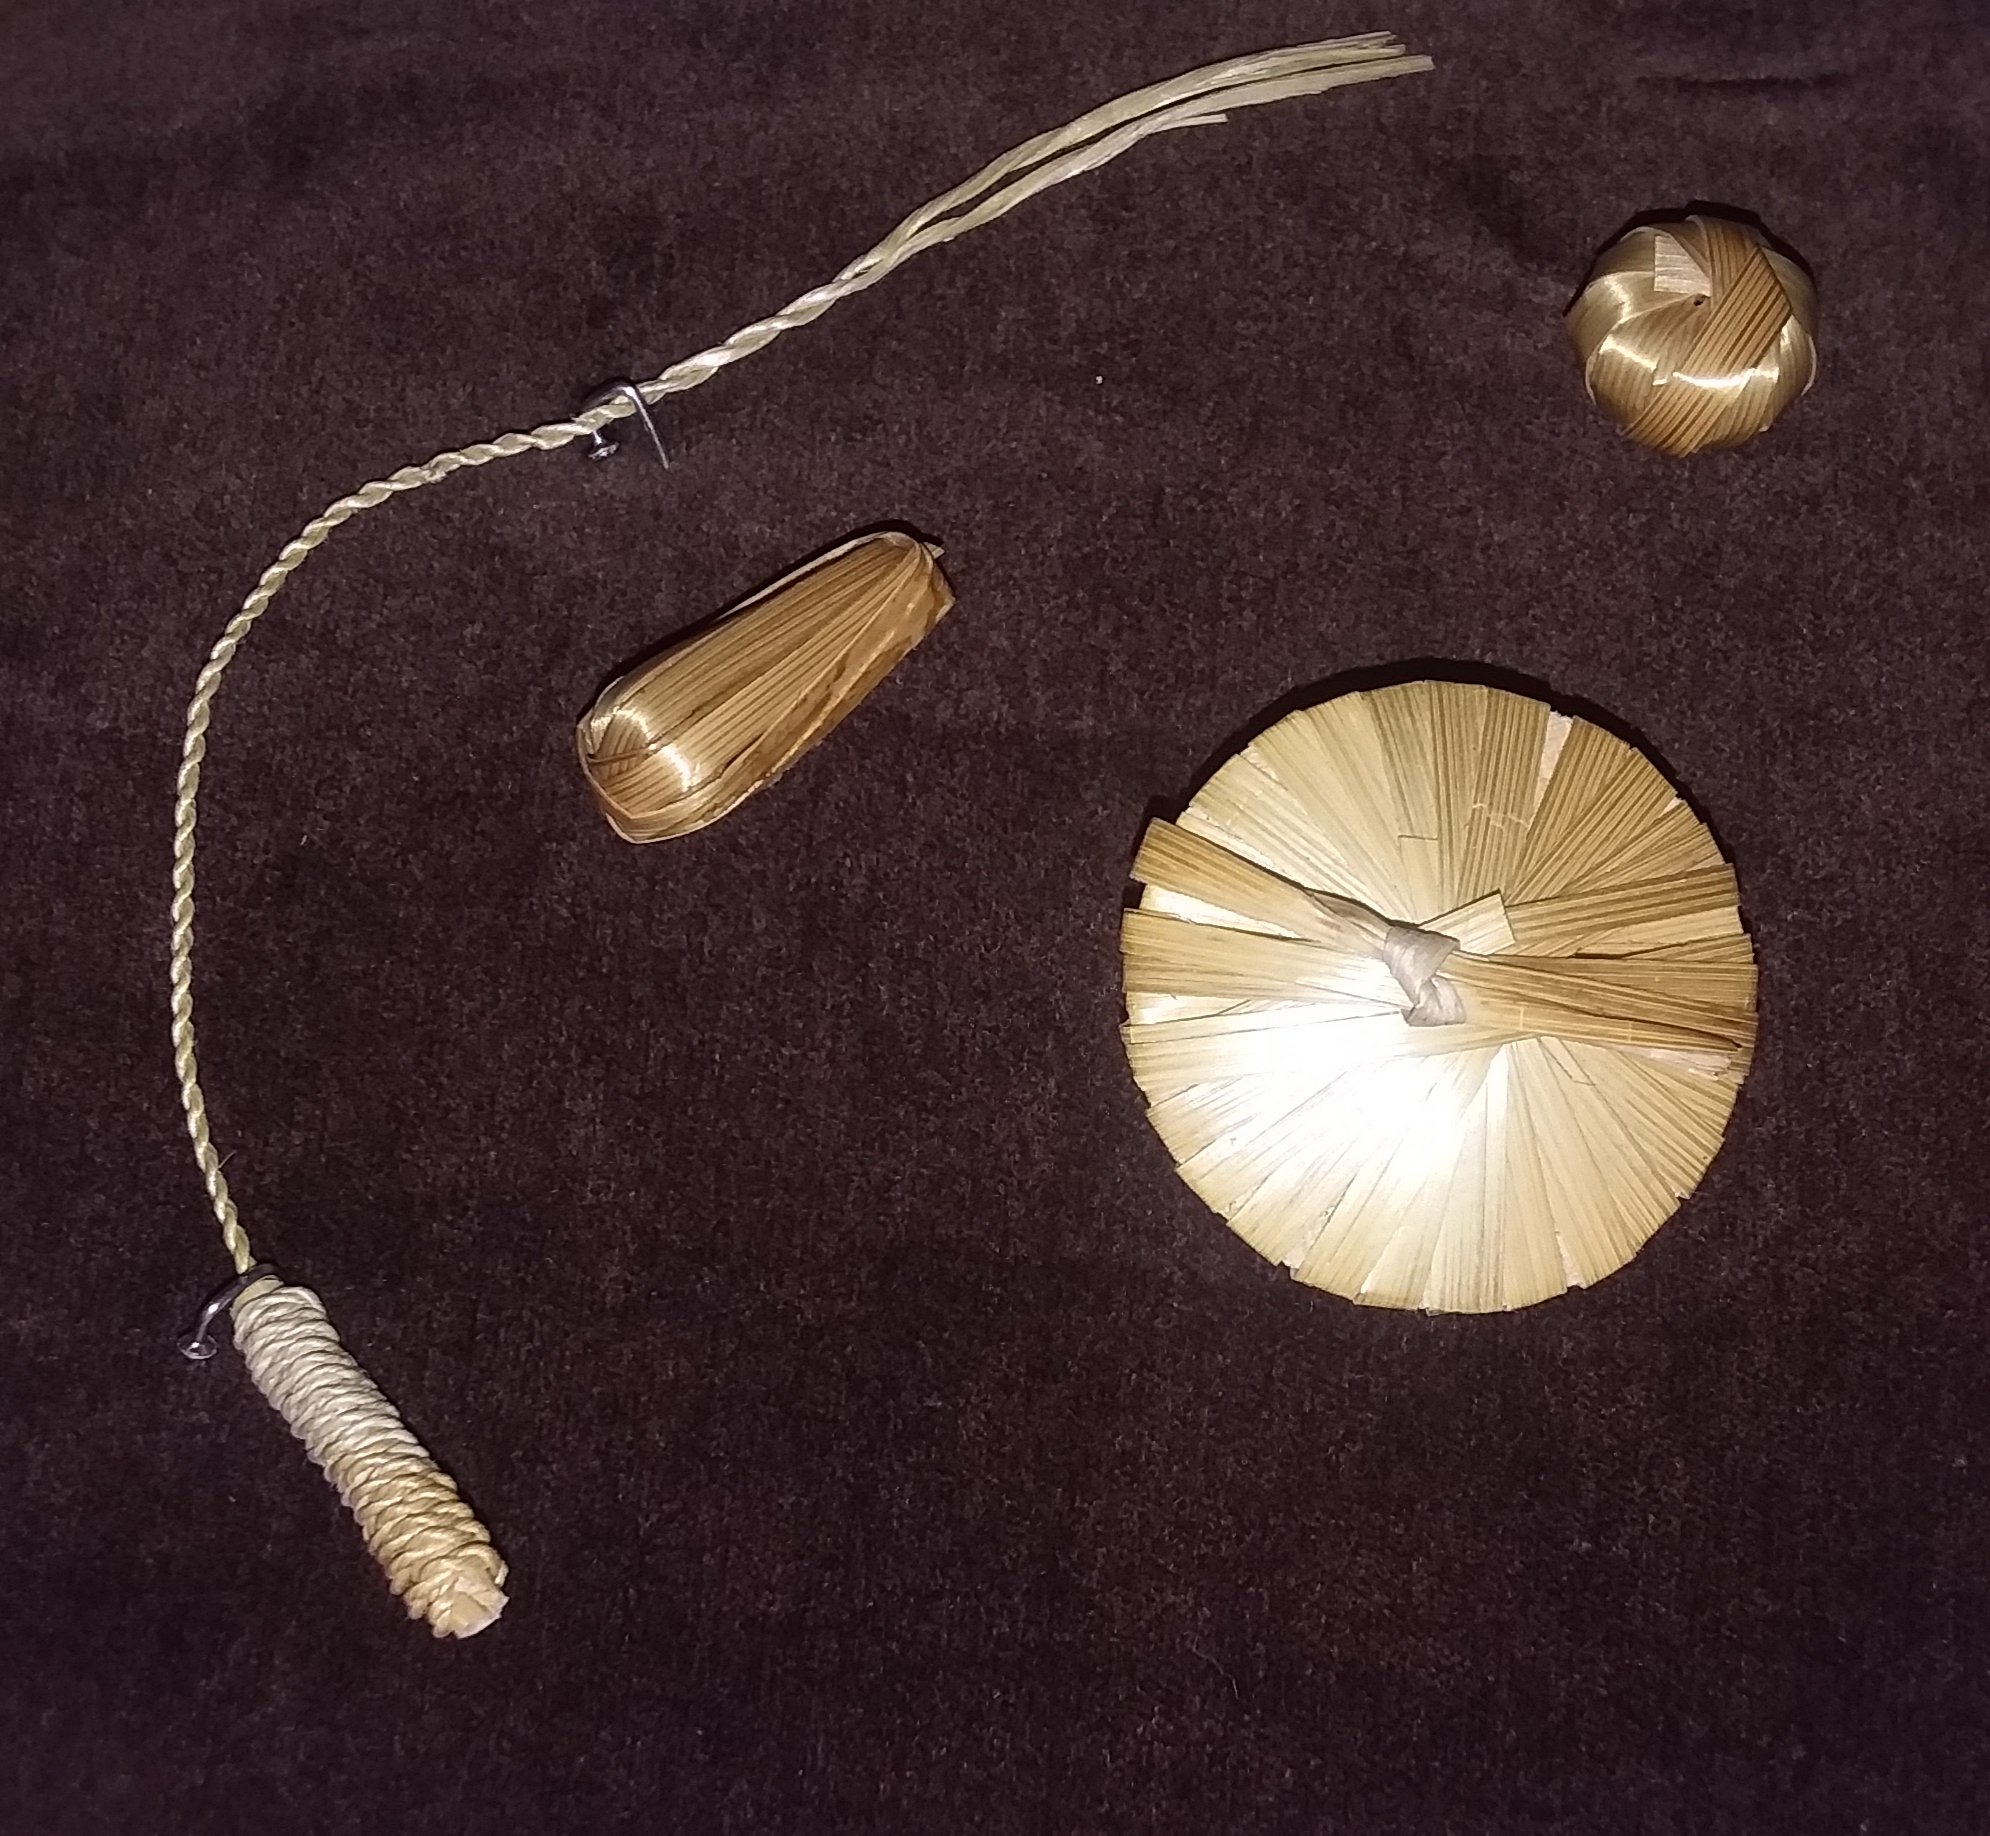
The steps:

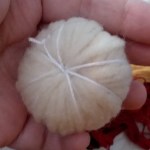
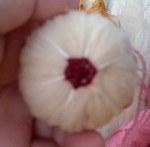
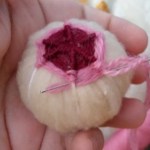
Wind a tight ball of wool about the size of a small clementine. Roll it firmly so the end doesn’t come loose. Using a long sharp, yet strong needle, run crochet cotton through the center creating even partitions. (This is the one challenging part. You may find pliers are needed to pull the needle through the center.) With wool, silk, or cotton*, start at one end weaving around the crochet cotton as you would a Gods-eye as a child. Be sure to keep the threads snug up on the cord, but not so tight as to pull them. Work about a third of the way down. Then repeat on the other side. Do your best to even up the sides s along the cords so the center is even all the way around. Finish weaving the center.

*There isn’t a large enough pool of examples to determine what was the most common fiber for the color threads at different points in time. So far, from the couple dozen I’ve seen, wool, silk, and cotton were used during what may be a 100 year span from the early 19th century through the early 20th century.

A Corded Pincushion

Cut out two round pieces of linen. Sew them together, and stuff them with bran, so as to form a round ball. Begin on the very center of each side, and with a large needle lay coarse thread or cotton all across down to the middle of the pincushion where the binding is to come. These threads must spread out from the centre in every direction like rays; the space between them widening of course as it descends. Make them very even, and do not allow them to be loose or slack. Then take a needle threaded with sewing silk or fine crewel, and, beginning at the centre from which all the coarse cotton threads diverge, (they may be called cords) work the pincushion all round by passing the needle twice under each cord, taking the stitches very close, even, and regular, and completely covering with the sewing silk both the cords and the space between them. The stitches, of course, become gradually longer as you go down towards the seam that divides the two sides of the pincushion. Supposing that you begin with pink silk, you may, after a few rounds, take another colour, for instance green, then yellow, then blue, and then brown. In this manner your pincushion will be handsomely striped, and the cords will give it a very pretty appearance, if evenly laid and well0covered. When both sides are finished, cover the seam with a binding of dark-coloured ribbon, and put on a strin and bow of the same. Always begin and fasten off in a place that is afterwards to be worked over. (The American Girl’s Book, 1831)

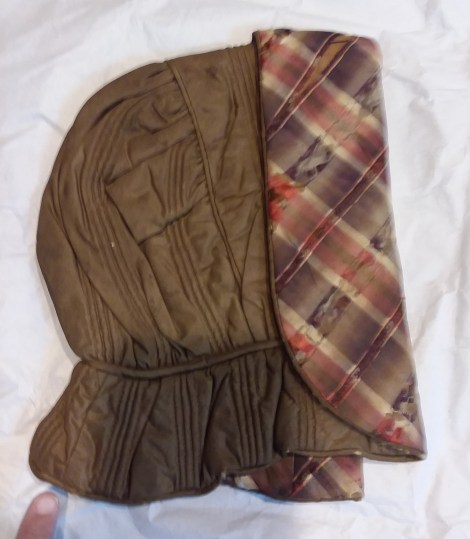
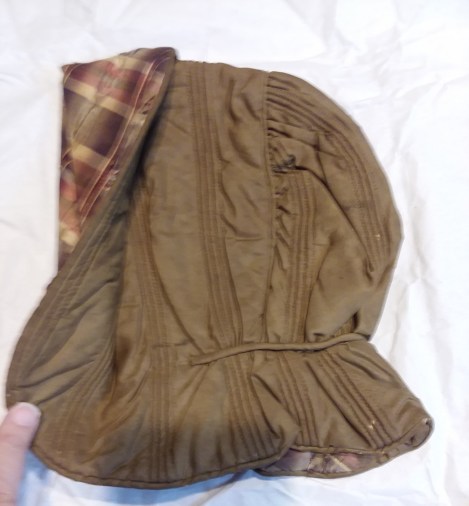
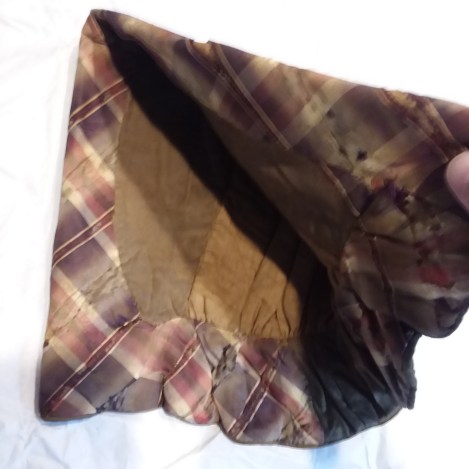
Example at the Manchester Art Galleries.

Published in: on September 21, 2019 at 3:13 pm  Leave a Comment  

August Reflections

I am going to call my August a pop-up month. It has been filled with pop-up thunderstorms complete with wind and hail. It has also been filled with pop-up miscellaneous projects.

One night I made a new seam ripper with a mother of pearl handle because I think my first one plunged into the depths of the trash can. Since I had to dig into the jewelry stuff for the glue, I made a couple pairs of earrings. Not my skill set, but functional.

I had another spur of the moment doll purchase. Duchess arrived and Clara instantly claimed her.

In preparation for the Literary Weekend, I went on a Regency turban hunt because I realized I didn’t have a straw Regency bonnet anymore and didn’t have time to make on.

The maroon scarf above caused a little mischief when I accidentally dyed a load of laundry pink. I was quite pleased with my newly pink silk stockings.

I spent a day in the collections staring at the tinest beads. I discovered I could take photos through a magnifying glass.

Fiddlers’ Fair Pin Holders

I also worked on some projects for the coming Agricultural Society Fair. But, you can’t see those yet.

Millinery

This was another busy millinery month. I made 13 or 14 straw millinery pieces, several of them decorated.

Published in: on August 30, 2019 at 11:02 pm  Comments (3)  

A Rose by Any Other Name???

Okay. Not roses and not exactly the same, but when I saw the 1864 illustration, I knew I had seen something like it before.

The 1862 pocket-book version is made of velvet or leather. The directions say it can be made in the size of the template. Which works out to be just under 6.5″ by 3.5″. The 1864 version holds a comb and brush in the pockets. So, this version would be at least twice, if not three times the size of the 1862 version.

Same Godeys

This is definitely one of those cases where we have to read the text. Of course, it would be lovely if the 1862 version would come with more information.

Published in: on August 26, 2019 at 2:17 pm  Leave a Comment  

July Reflections

I think to wrap my head around this month, I need to do lists.

Events

  • Independence Day
  • Inventions Week
  • GCVM Civil War
  • West Sparta

Millinery

If I finish the piece on my lap right now*, I will have made 15 millinery pieces in July. That does not include the woven/lacey white bonnet, 2 doll bonnets, and a doll hat.

I didn’t take photos of everything though. I need to do better about that.

Projects

  • Bonnie the Bon Bon Doll
  • Ribbon shelf quest
  • Millinery sign
  • Parasol obsession

Rolling Around in My Head, aka What is Coming Up….

  • 15 millinery pieces in August
  • Extra fun secret to-do
  • Need a summery get together in August
  • Eliza Leslie book club
  • Domestic Skill Symposium workshop
  • FanU project – “FanU for Sustainable Holidays”

Personal Projects

  • Holiday season pin cushion and/or ornament tbd
  • Recover a parasol
  • Still want to make the pink silk dress
  • Doll penwipe
  • New sheer dress
  • Still need a 1820s or 30s dress
  • Chair kit – A bird cage Windsor
  • 2 dolls still need bodies and 2 need clothes

*While this bonnet was mostly made during July, it will be wired and bound in August after drying on the block overnight.

Published in: on July 31, 2019 at 12:00 pm  Leave a Comment  

Things That Worked

I am pleased with how the new ribbon shelf worked out. Once on the table and full it looked smaller than it is. I did ened up with more ribbon than I had space. I could easily use a matching one in the display, though I have no idea where I would put it at home.

Btw – When a guest came in with a Doctor Who lanyard, it popped out that the decorative marking on the back of the shelves is in fact Timelord writing.

I liked how the brown storage boxes fit on the shelves this year. It occured to me to turn them sideways in front of the books when I saw they were pushed back last week. I could use one more nesting set or a trio of the smaller ones to fully fill the space.

I made a point to have a new set of hands-on items this year. I kept it simple with a couple small hats and some ribbons. I instantly regretted not bringing a length of straw Saturday morning as I usually do. As the weekend progressed, it turned out not to be a big deal because few people picked them up. That was until nearly the last hour. A family came in with a visually impaired child. I was so happy I brought pieces thaf could be held and explored.

Sigh Room placement. I decided to move the table over in front of the back door that attracts too much attention. I thought this would encourage people to come in because it made the space in the door and to the left bigger. I was wrong. While we felt the breeze from the doors better, people needed to be verbally encouraged to come in. This is a puzzle I need to work on. It may be a color issue or a light issue or something??? else.

I really liked how my last minute sign came out. The cut out letters arrived just barely in time Friday morning. I quickly painted two layers of blue paint that is close but not quite the color of some of my stands. I glued them on and stuck on a weighted board with a fan. Fingers crossed

Ribbon Hanger

I was quite pleased with how the ribbon hanger came out. This was a last minute idea of Lily’s for the blank spot on the empty wall. I put it by the door instead to get a better proportion, with the visually larger fashion plates hanging on the larger wall space. While working on it, I had ideas on how to make it better for next year: ball or finial ends, more ribbons, bows at the joins, a bow arrangement where it hangs.

Then I noticed how many people want to lean on that wall. They would come in the door and lean against the wall. This meant they were leaning sweaty bodies against white walls and silk ribbon.

What ever goes there needs to either be so substantial people don’t feel they can lean there or high enough they don’t lean on the item or simply inexpensive and replaceable. In the past, I have picture a mirror hanging there if I could get the okay.

Concerning

A few things concerned me during the event. I will skip over those not drinking or not watering their children. There were two comments that worried me in general.

“There must have been a lot of war.” and “Oh, that’s a sad song.”

Both comments threw me. The first may have caused a physical double take. This prompted a back to basics explaination of who was who, how long the war was, where battles took place. These are not the things I normally cover. I dawned on me this person had been walking around the event for four or five hours, but just now “asked” for basics.

This makes me think we should consider if events need an introduction tent to prepare people new to this type of event. Think along the lines of the welcome video that was popular at museums in the 90s, only live. The tent could have a few rows of benches or bales and rotating pairs of guides to introduce people to what they are about to see. This would be a space to share basic historical background and a general outline of who is where on the site. I could be wrong. This could be an utter flop. But, if there are people who don’t know there must have been a lot of war, we have to try something.

The second comment surprised me a lot. Taps is usually a moment of stillness and silence for me. This is true whether I am near the battle, at a ceremony, or hear it through a window at home. No talking. No moving. No sewing. Quiet reflection. So, when someone started speaking to me I was surprised. When she commented “oh, that’s a sad song” I realized she hadn’t ever heard it before, let alone understood. I felt a mix of happy for her that she never stood graveside, hearing it played for a family member or friend; sad that she hadn’t attended a community memorial ceremony where it was played. I whispered what it was and how it was used. I think, I hope, she understood from my whisper there was notable significance to it. It may be time to include a short note regarding the significance of Taps on event information sheets.

For Next Year…

I want to tweek the ribbon hanger if I use it again.

While chatting, it came to mind that I need a clock. This is of course a lofty goal.

Published in: on July 22, 2019 at 5:53 pm  Comments (1)  

Millinery Available in Shop!

This weekend’s display pieces are now available in my Etsy shop. Pieces include:

  • Black and natural straw bonnet
  • Black straw bonnet (slightly smaller in the brim)
  • Natural straw bonnet with a fancy brim
  • Natural straw bonnet with a flared brim (smaller)
  • Porkpie hat I decorated at the event (I called it a toque in the video. I was tired.) (Coming as soon as I finish it.)

Here is the video from ths event.

11:15…. Finished the hat!

Published in: on July 22, 2019 at 4:09 pm  Leave a Comment  

Antique Straw Designs

Some of you may recall me working on a display box this spring for the demonstration I was doing in the gallery. I wanted to include the various beautiful straw elements found on original straw bonnets and hats. The problem was I haven’t yet learned to make these many motifs.

A couple weeks ago, I was talking with an Etsy merchant in Italy about her straw millinery products. She told me about these antique straw art pieces. I agreed to purchase them for her very reasonable price.

They are from around 1900, but these same elements can be found on hats and bonnets from the mid nineteenth century.

I will be arranging them into my display box. I would like to do a reference sheet for each, noting where millinery with each design can be found. If you would like to see some now, check out the The American Straw Art Museum.

Published in: on July 22, 2019 at 2:00 pm  Comments (4)