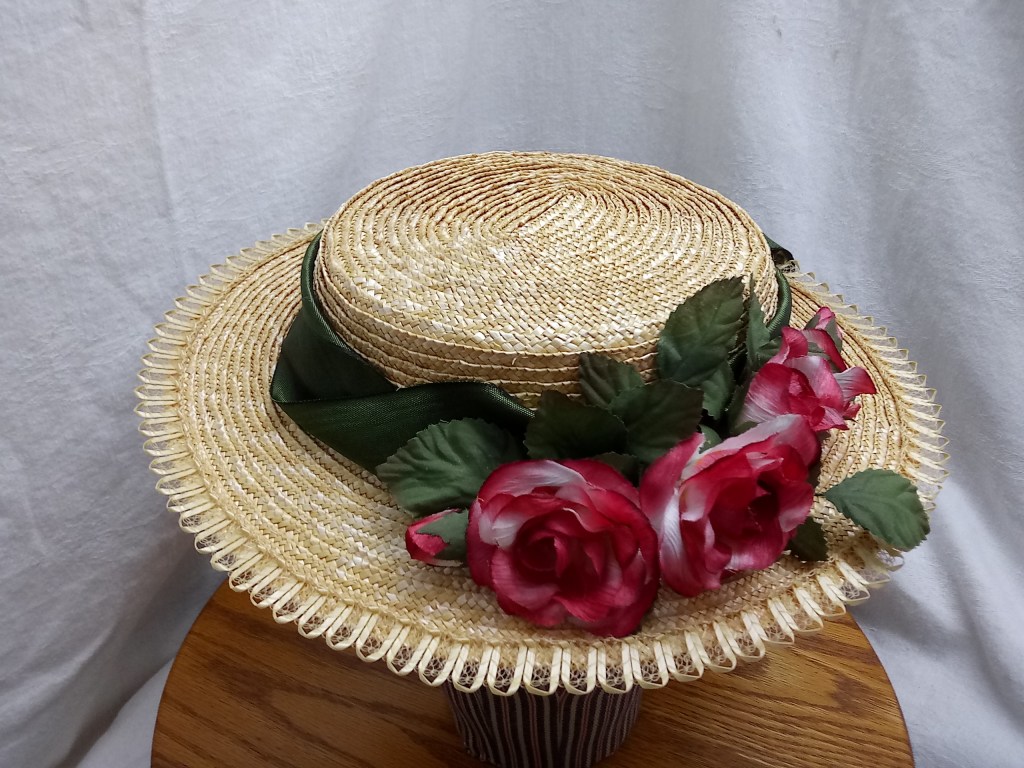
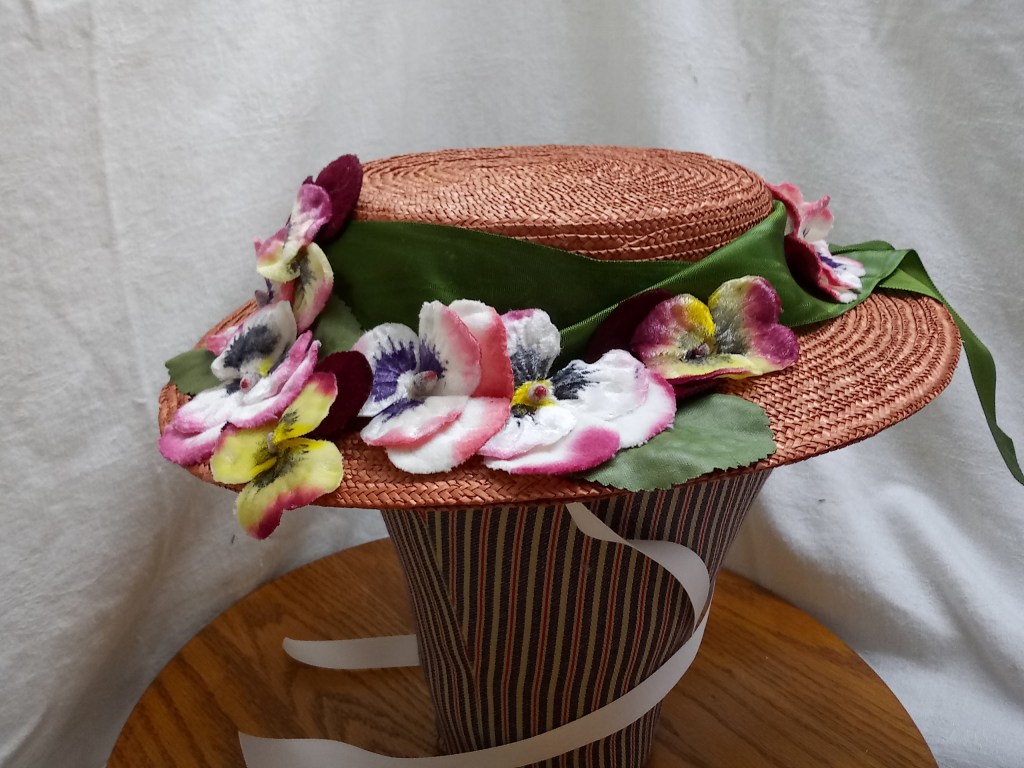
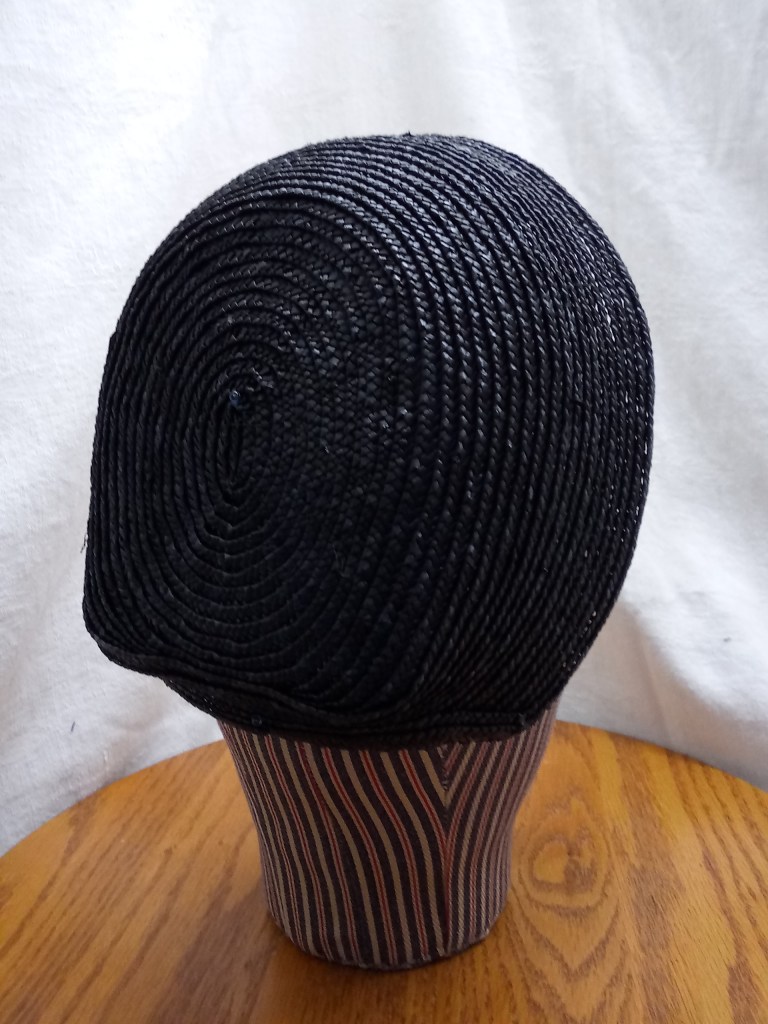
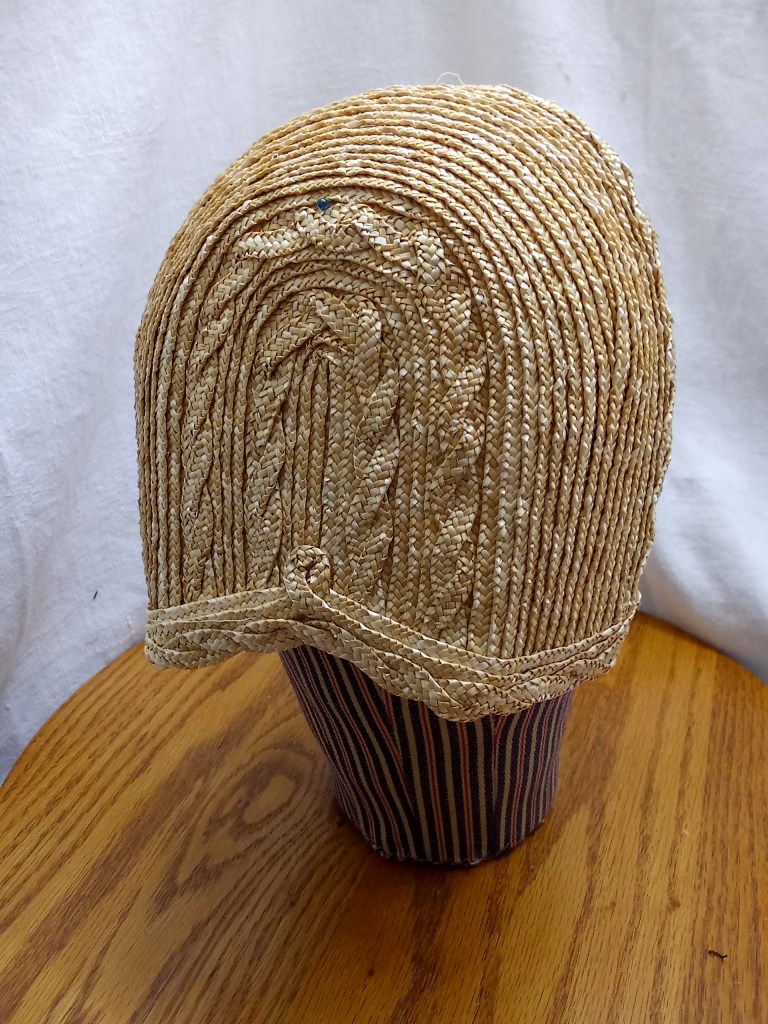
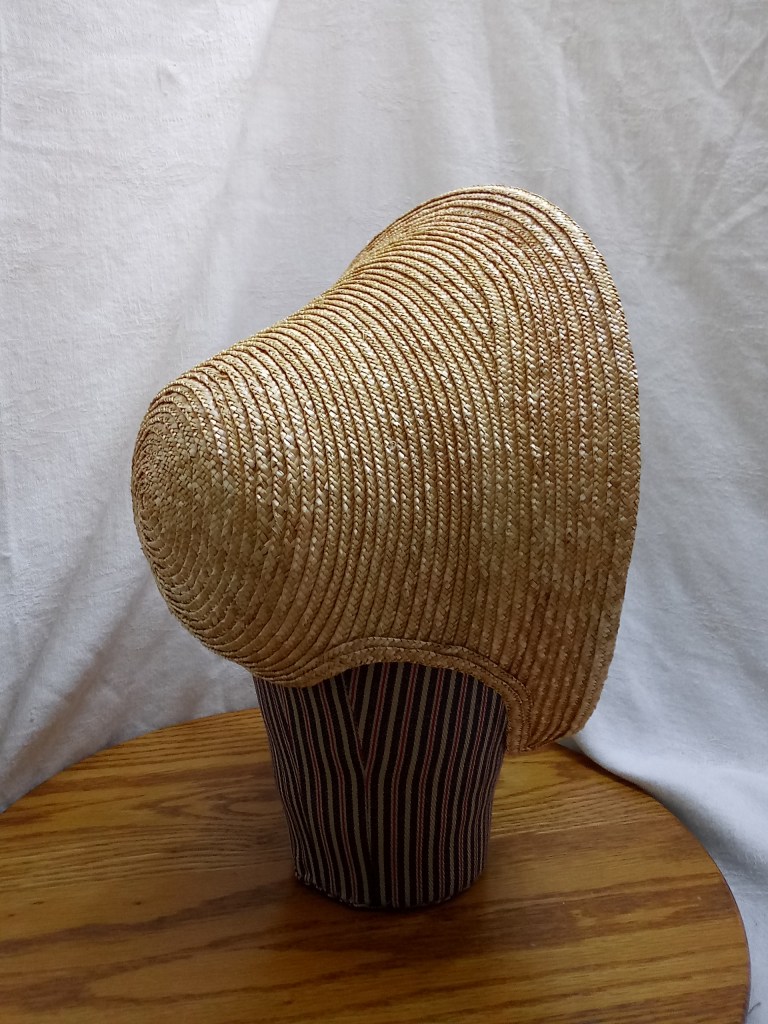
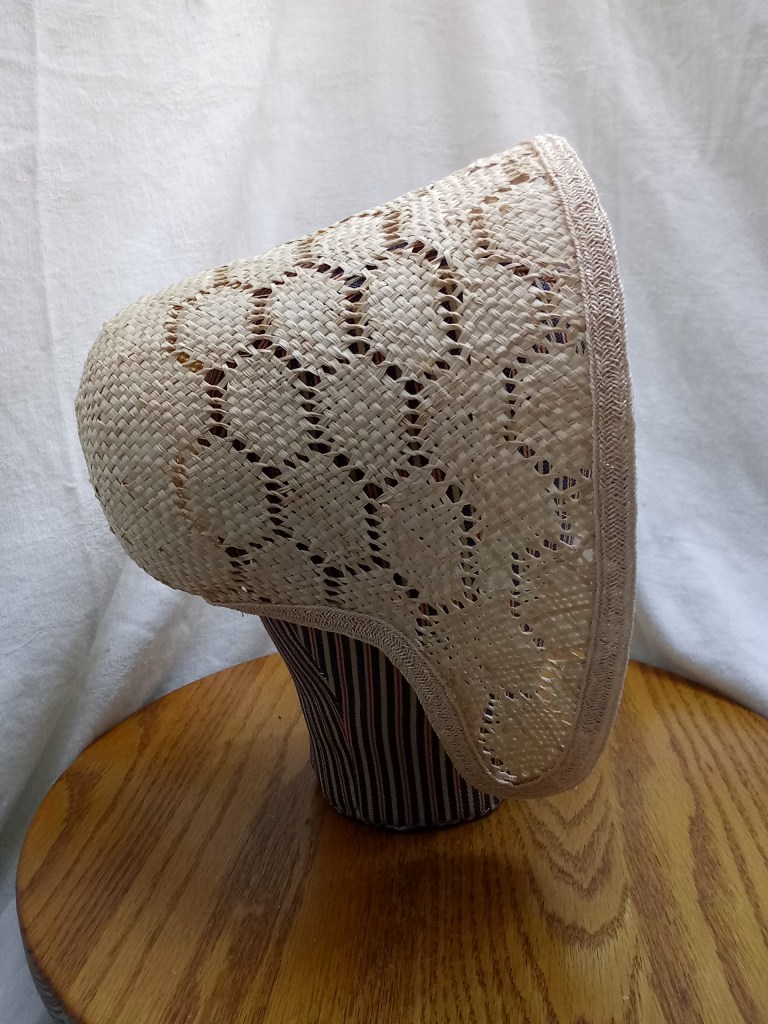
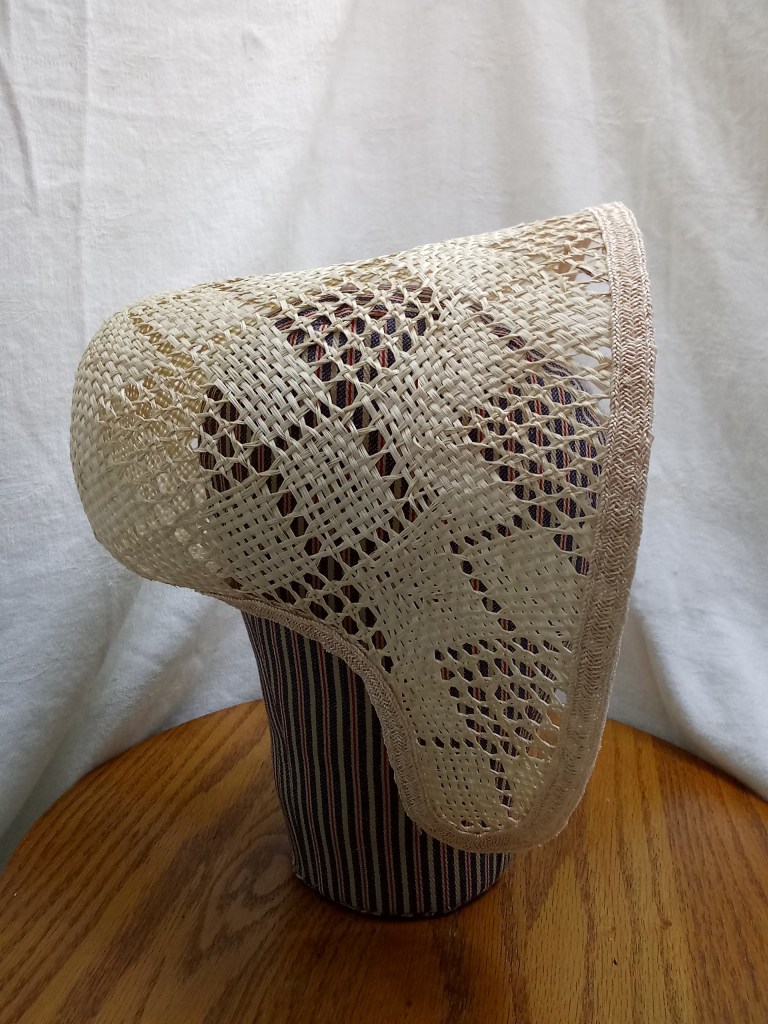
This year, I added a “new” 1880s capote bonnet block to my collection. This has been an enjoyable block to work with as it has unique lines and works well with fancy straw plaits. I played more with manipulating plait and using fancy plait for bonnet and hat edges. I also started working with additional materials to mimic the look of horsehair and other period materials.
I am currently curled up in the couch with my blanket and gingerbeer warming up from a great day. Today was type of day where I start talking at 10 am and don’t stop until the last visitors leave as the sun shifts downward.
I love these days.
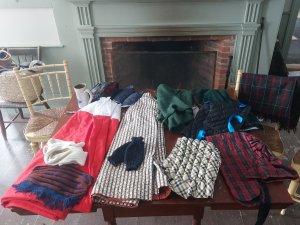
As with the past few Holiday Open Houses, I shared some of the many handmade gifts of the nineteenth century. This year, I chose to focus on the sewing items found in ladies’ and children’s publications. I selected an assortment of pin cushions, needle-books, pin keeps, and sewing cases.
The cat needle-book and paper pieced pin ball were by far the most popular. The shape of the pin ball is similar to a D20 die, or so I learned from visitors.
I am already thinking ahead to next year’s selection, thinking a variety of toys from the pages of Godey’s, Peterson’s, and St. Nicholas’s would be a hit.
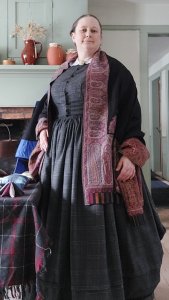
This event gave me the perfect opportunity to wear my beautiful new shawl a friend picked up for me from India.
I did a seperate post in Don’t Paint the Cat for the new Peppermint Doll: Here
Just before Thanksgiving, I spent the weekend at the Genesee Country Village and Museum for their Preparing for Winter event. This annual event not only gave me an opportunity to talk about how to stay warm during the cold winter months, it gave me a chance to test out my mid-nineteenth century winter layers.
Before diving into the layers I wore, let’s talk about that weekend’s weather for those of you not from the area.
This was the weekend the Buffalo, NY area was blanketed with record breaking snow coming off of Lake Erie. Some areas on the south side of Buffalo saw over four feet of snow. This bought of lake effect snow covered from Buffalo south and east to the museum, which is south-west of Rochester. Meanwhile, Rochester saw little snow. In the historic village, it was in the mid twenties and deceptively sunny making Saturday absolutely beautiful, nearly perfect day to visit. Sunday morning as I got ready my weather app said it was 18 degrees with a windchill of 4 degrees, expecting a high of 27… and… it was Windy, very windy. The 8 mile route to the museum was drifted over causing my 10 minute trip to take closer to 35 minutes. This was the perfect weekend to test out the layers.
I want to take a moment to talk about the physical aspects of interpreting compared to an actual living situation in the 1850s, the era I was dressed for. If I was living in this house in the 1850s, fires would have been going in each of the fireplaces for several days maintaining a level of heat within the house. The floors would have been warmer and potentially covered with a floor cloth or carpet possibly insulated with paper or straw. Other techniques would have been used to winterize the home (see previous post below.) As an interpretive space, magical, modern heat replaces or supplements the lack of fireplace heat. The entry door is opened regularly as visitors come and go, allowing heat to escape and cold to come in. The floors are either bare wood or covered in mats in visitor traffic areas. These are the realities of interpreting historic spaces.
Layers Work
Now, let’s talk about my layers. I have an abundance of cold weather wear accumulated from over the years. I used to participate in several other colder events including Yuletide and teaching events that would get so cold my contacts literally froze in their case. Developing my layer preferences has been a learning curve. This event allowed me to test myself – could I still put on my 19th century only clothes and go? Overall, I was very comfortable the whole event including coming and going in the cold wind. My two cold spots are noted below.
As I was inside, I opted for basic cotton chemise and drawers. If I were to be outside for the whole of the event I may have opted for wool flannel drawers. In previous years I wore them and found them to be absolutely lovely. My corset was the same of course.
I selected wool stockings. I think the pairs I grabbed from the basket were both from Delp. I do have Woolies or Wool OTKs from Sock Dreams.
I opted to wear my elastic gusset boots due to the snow and salt. I didn’t want to damage nicer boots. I find my Sekela made balmoral boots are notably warmer than my side-lacer boots or slip-on elastic gusset boots. See my thoughts below on boots and feet.
For petticoats, I wore both a quilted petticoat and wool petticoats. The quilted petticoat is a layer of wool batting sandwiched between layers of quilt weight cotton. One wool petticoat is a balmoral style made of red wool flannel with ribbon bands. The other is a plain weave lightweight wool in a darker brown color.
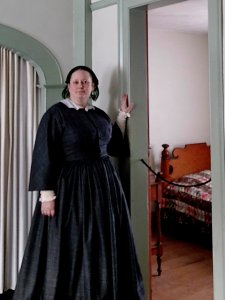
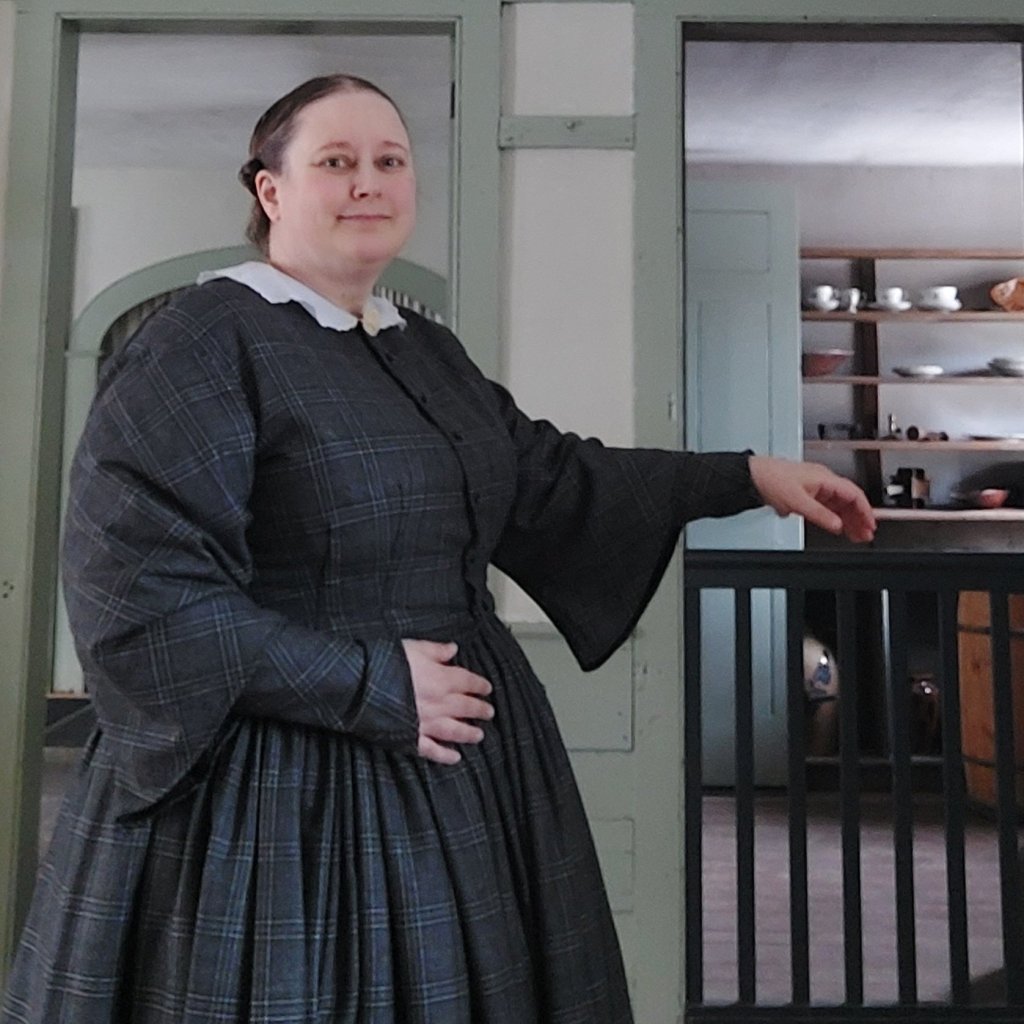
My dress was a light weight wool in grey plaid. The weight is light but not quite tropical weight, similar in density to quilt cotton. I added knit wool undersleeves instead of sheer cotton ones. (see thoughts below.)
On Saturday, I wore a woven wool shawl. This was made using light weight wool fabric fringed around the edges. I didn’t wear one on Sunday.
When I went outside, I added a black wool paletot style coat edged in blue quilted silk and a black silk taffeta quilted hood. I may have added a wool scarf on Sunday, I can’t recall for sure. (If I knew where I packed them, I would also wear my Tingley rubber overshoes outside. These not only help with keeping the feet warmer and dry, they help with slipping on ice.)
Hands and Feet
In complete disclosure, I can not say my winter weather layers were a complete success. There were two cold body parts I found unsatisfactory, or interpretive mis-steps. One brings us back around to the realities of interpretive space. The other is a detail of the clothing I selected.
First, my feet. This is where the dynamic differences of living in the mid-nineteenth century and interpreting the mid-nineteenth century really showed through for me. If I were living in the mid-century I would have removed my leather boots upon entering the house, selecting warm slippers for indoor wear, opting to keep my feet up on a small foot stool while sewing. Instead, I wore my leather boots through the day on Saturday. Even with keeping my feet off the floor, on a make-do stool (aka a log), my feet were cold. For Sunday, I decided to bring a pair of soled slippers to change into rather than wear boots again. Even though the slippers have far less coverage, leaving about half of my foot with only wool stocking for coverage, my feet were definitely less cold on Sunday. (The building was already about 20 degrees warmer on Sunday morning though.)
Next, my forearms. Leading up to this event, I made a new wool dress focusing on the early 1850s. I was very indecisive about the sleeves trying to decide between a funnel sleeve highlighting the fashion of the early 1850s or a coat sleeve with the winter weather in mind. A week before the event, I needed to get sleeves on the dress. I decided on the sleeve that showed up most in 1851/1852 illustrations – a funnel sleeve. This decision resulted in cold forearms. My dress sleeves fell to mid-forearm. Saturday, I wore slim wool undersleeves made to wear with my 1860s coat sleeves. These came to just below my elbow. While technically all of my arm was covered, draft or chill easily reached my elbow area. Cold radiated down to my forearms and hands all day. Knowing I could not do another day like that (and that I wouldn’t have time to make another pair of undersleeves… and my ego wouldn’t let me use a modern solution,) Sunday I turned a pair of thicker cotton stockings into undersleeves. Yup. I basically cut the feet of a pair of white cotton stockings I rarely wear and put them on my arms. It worked. (I will be making new undersleeves this weekend for next weekend.)
Want to know more? Check out these previous posts:
I am going to pair up two favorite projects from lockdown for this week’s Fancy Work Friday: The Parasol Pen Wipe and Pin Cushion
Materials for both the Pen Wiper (PW) and Pin Keep (PK):
2 parasol handles (1 for each project)
Tight, densely fulled heavy weight wool (PW)
Sead beads (PW)
Ribbon (PW)
Silk taffeta – solid or a small design (PK)
Tight, fulled medium weight wool, preferably light color (PK)
Embroidery floss (PK)
Pin Keep
Pen Wiper
For the Pen Wiper, cut 1 and a half circles of the densely fulled wool with a pinked edge:
Are you one of the many readers enjoying my millinery blog posts? Consider becoming a Patreon patron. Doing so helps support my work and helps me write more useful articles. https://www.patreon.com/AMillinersWhimsy
Here are some of the period directions for making parasol accessories:
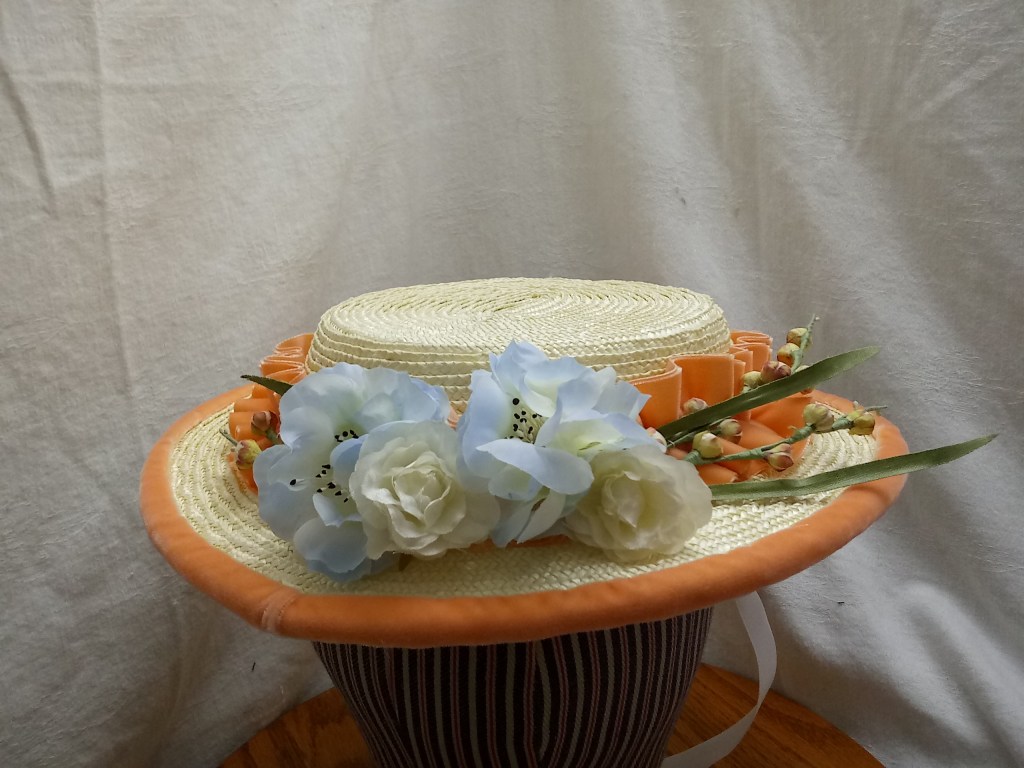
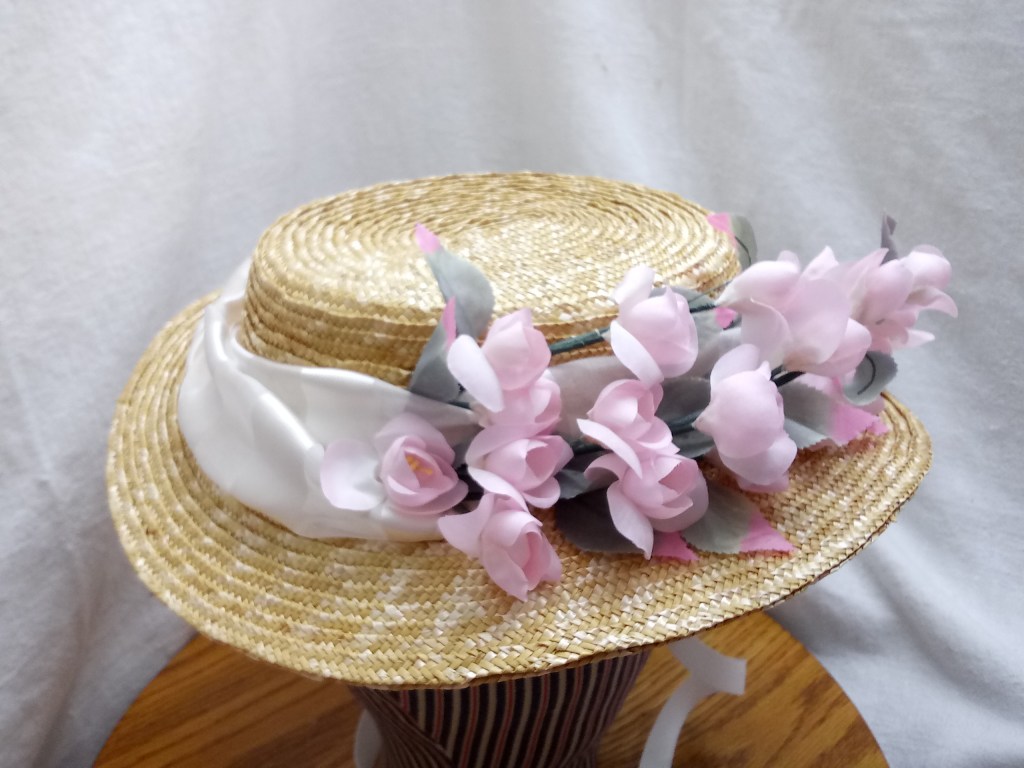
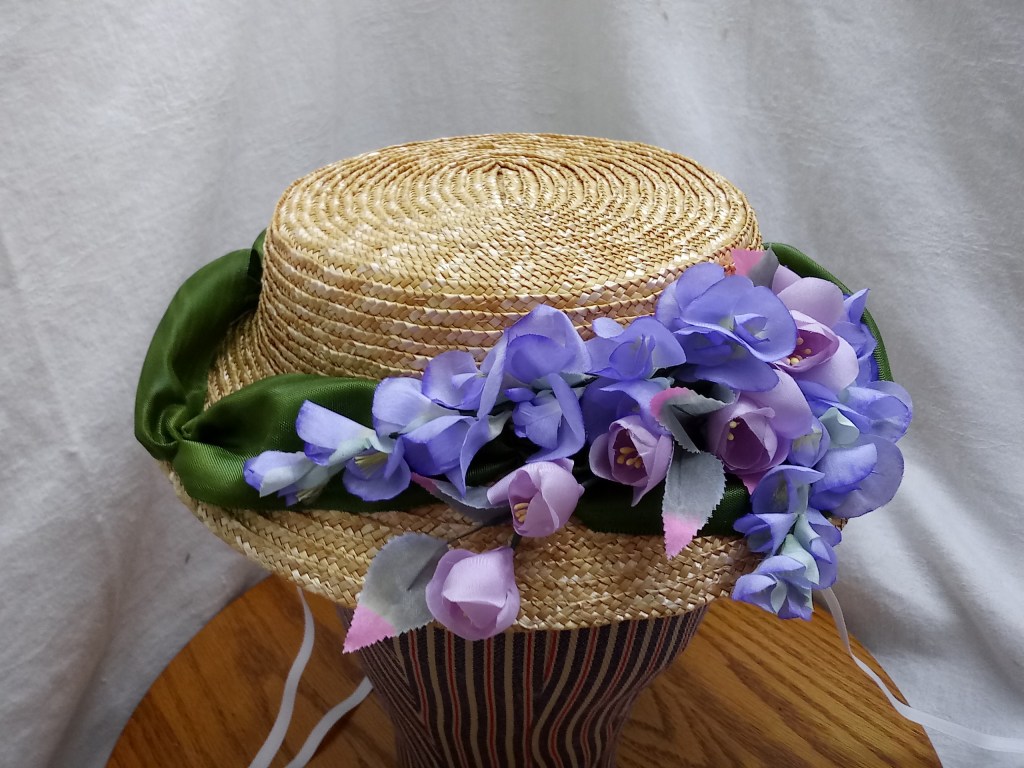
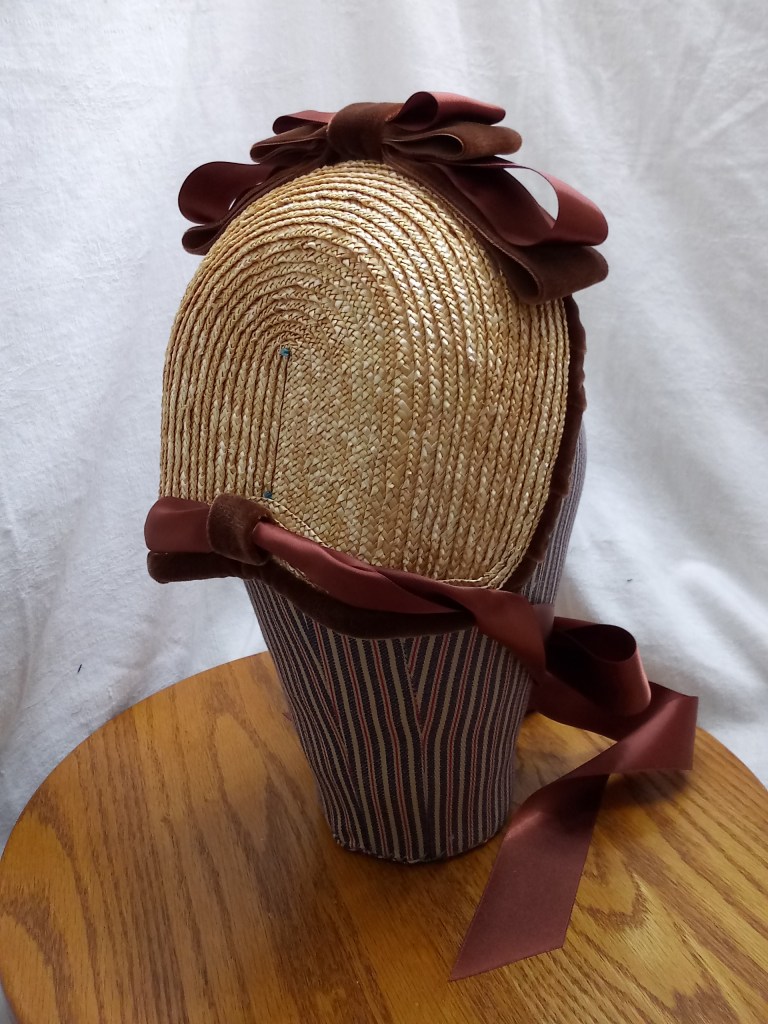
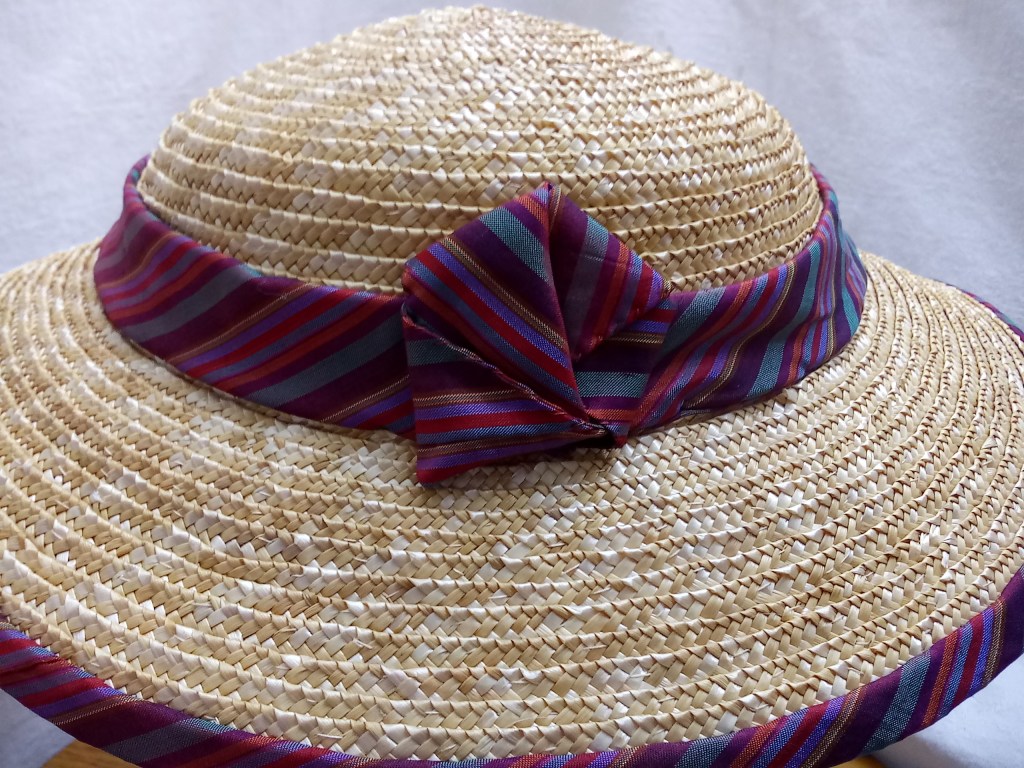
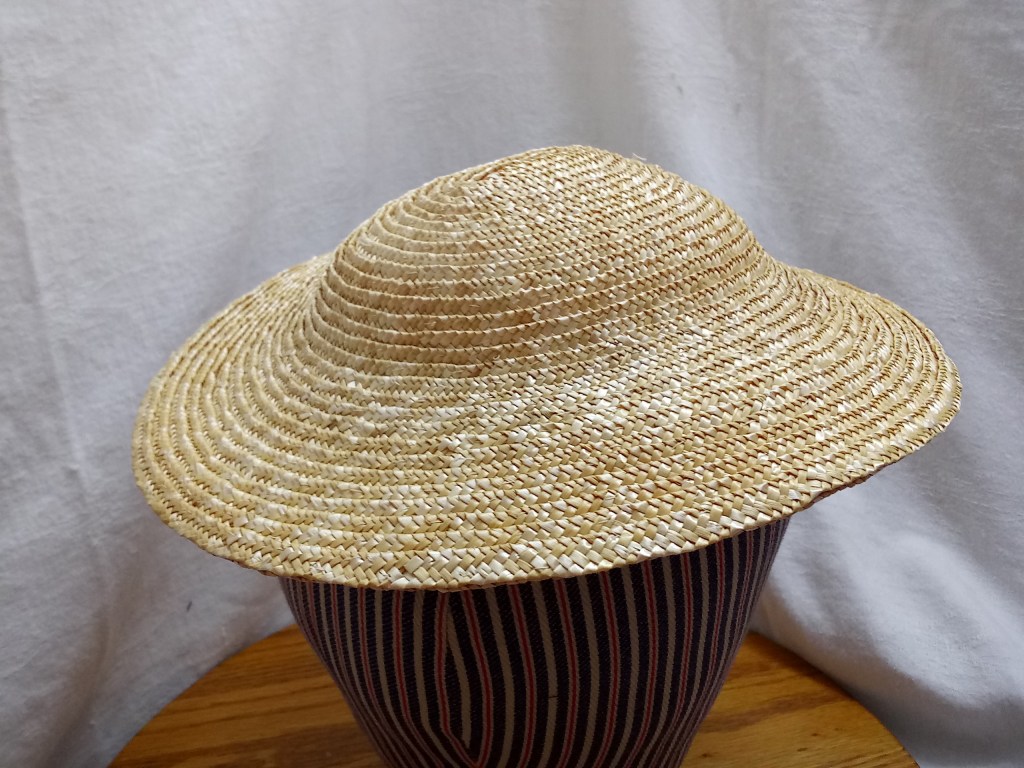
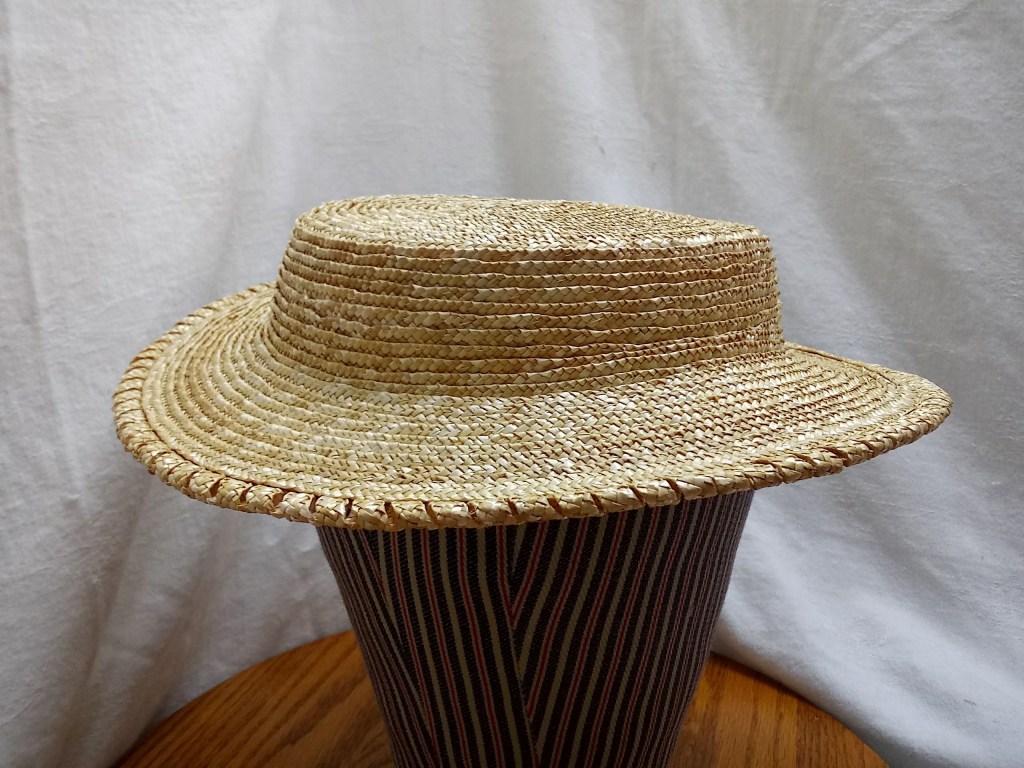
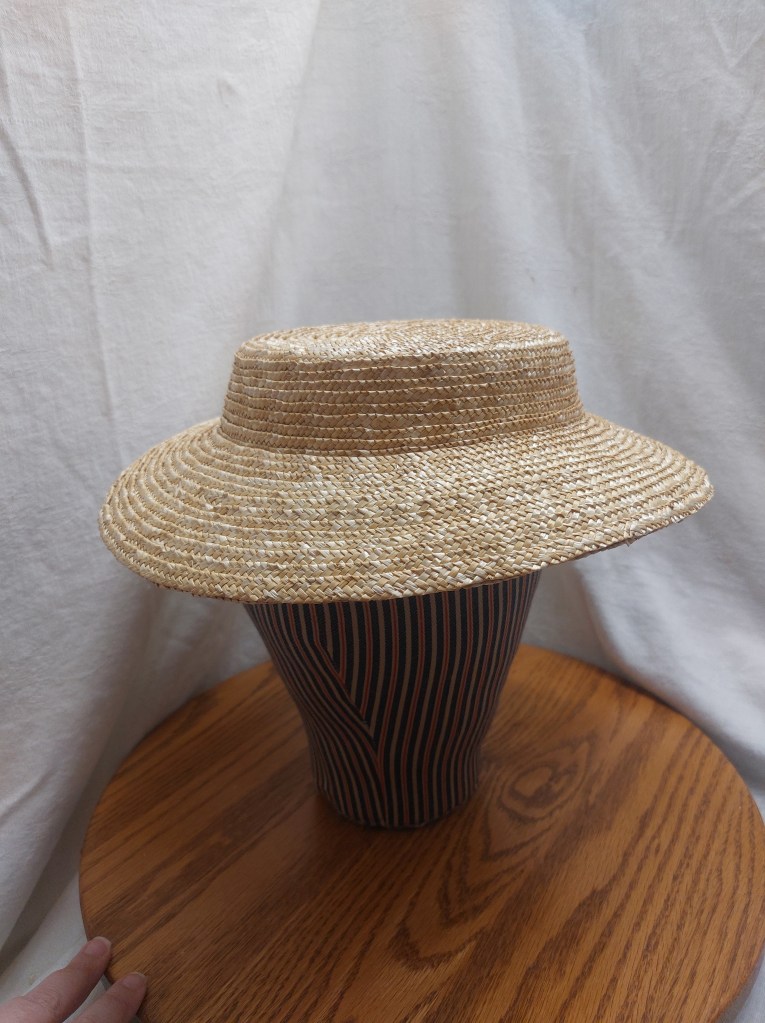
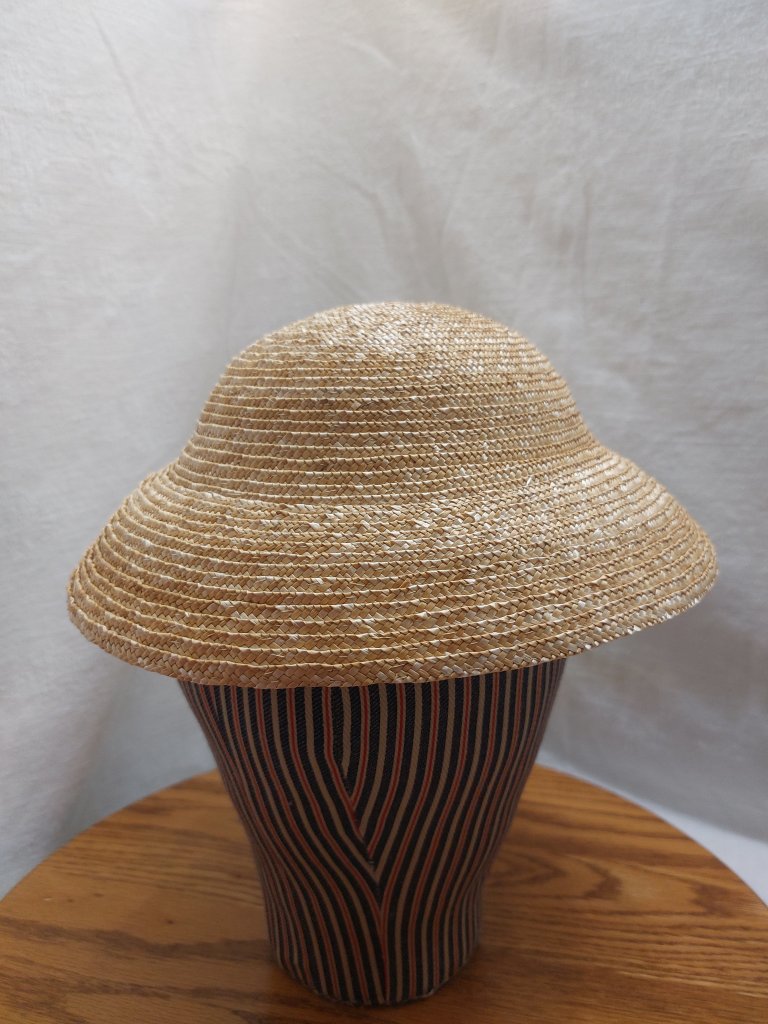
It has been far too long since I made this style hat. The Chapeau Cloche is a country or sea-side hat featured in Godey’s Lady’s Book, in 1862. This a low crown and dome curved brim, made of straw or leghorn.
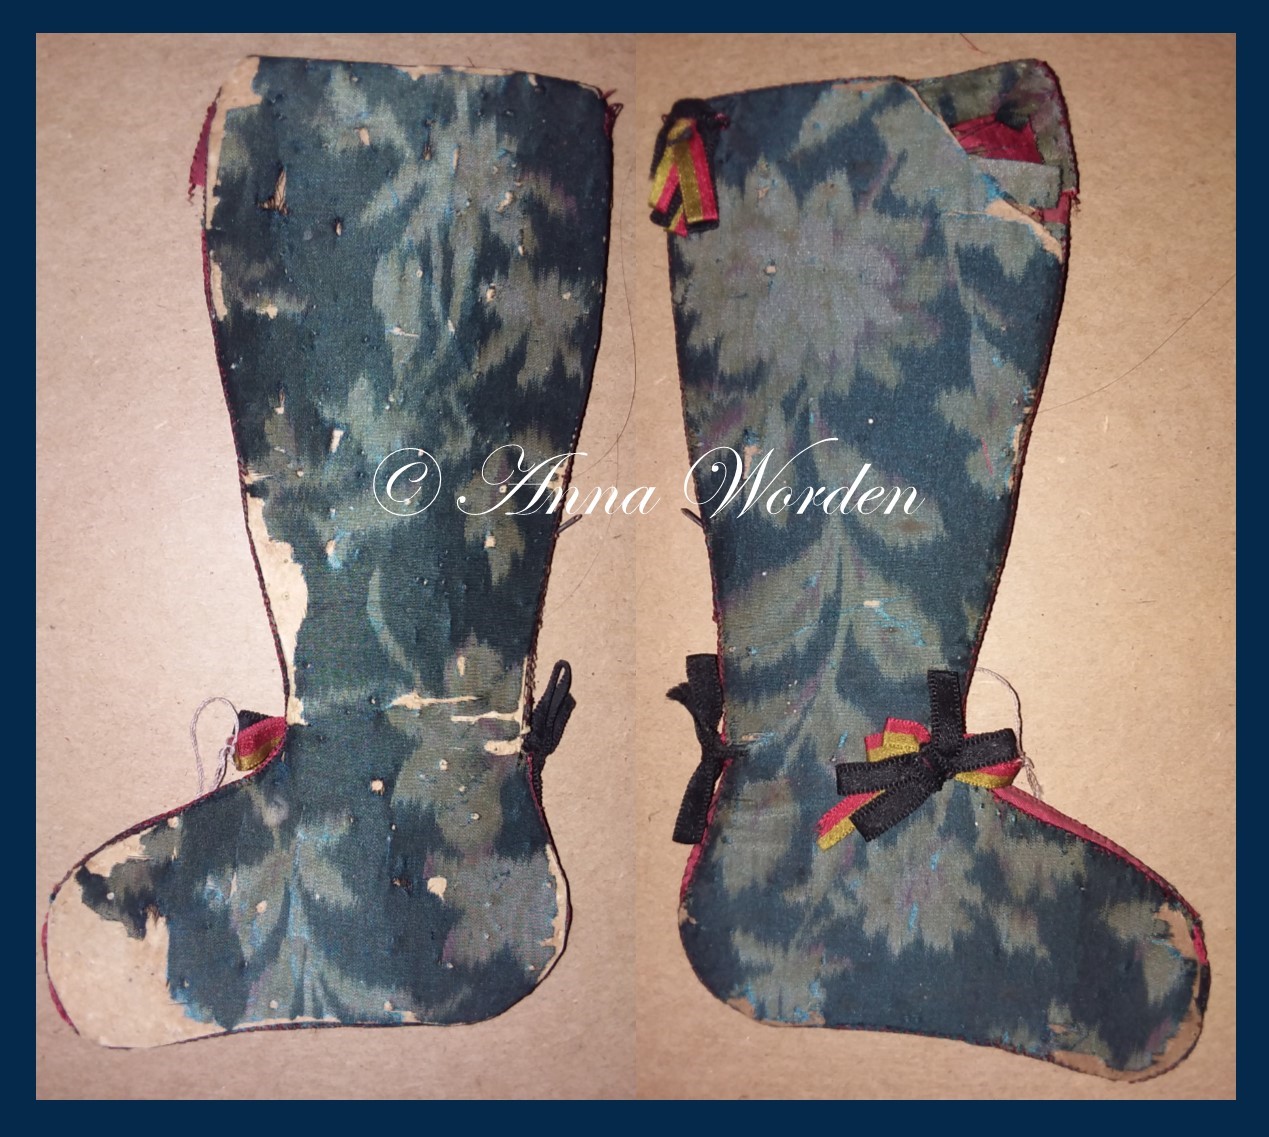
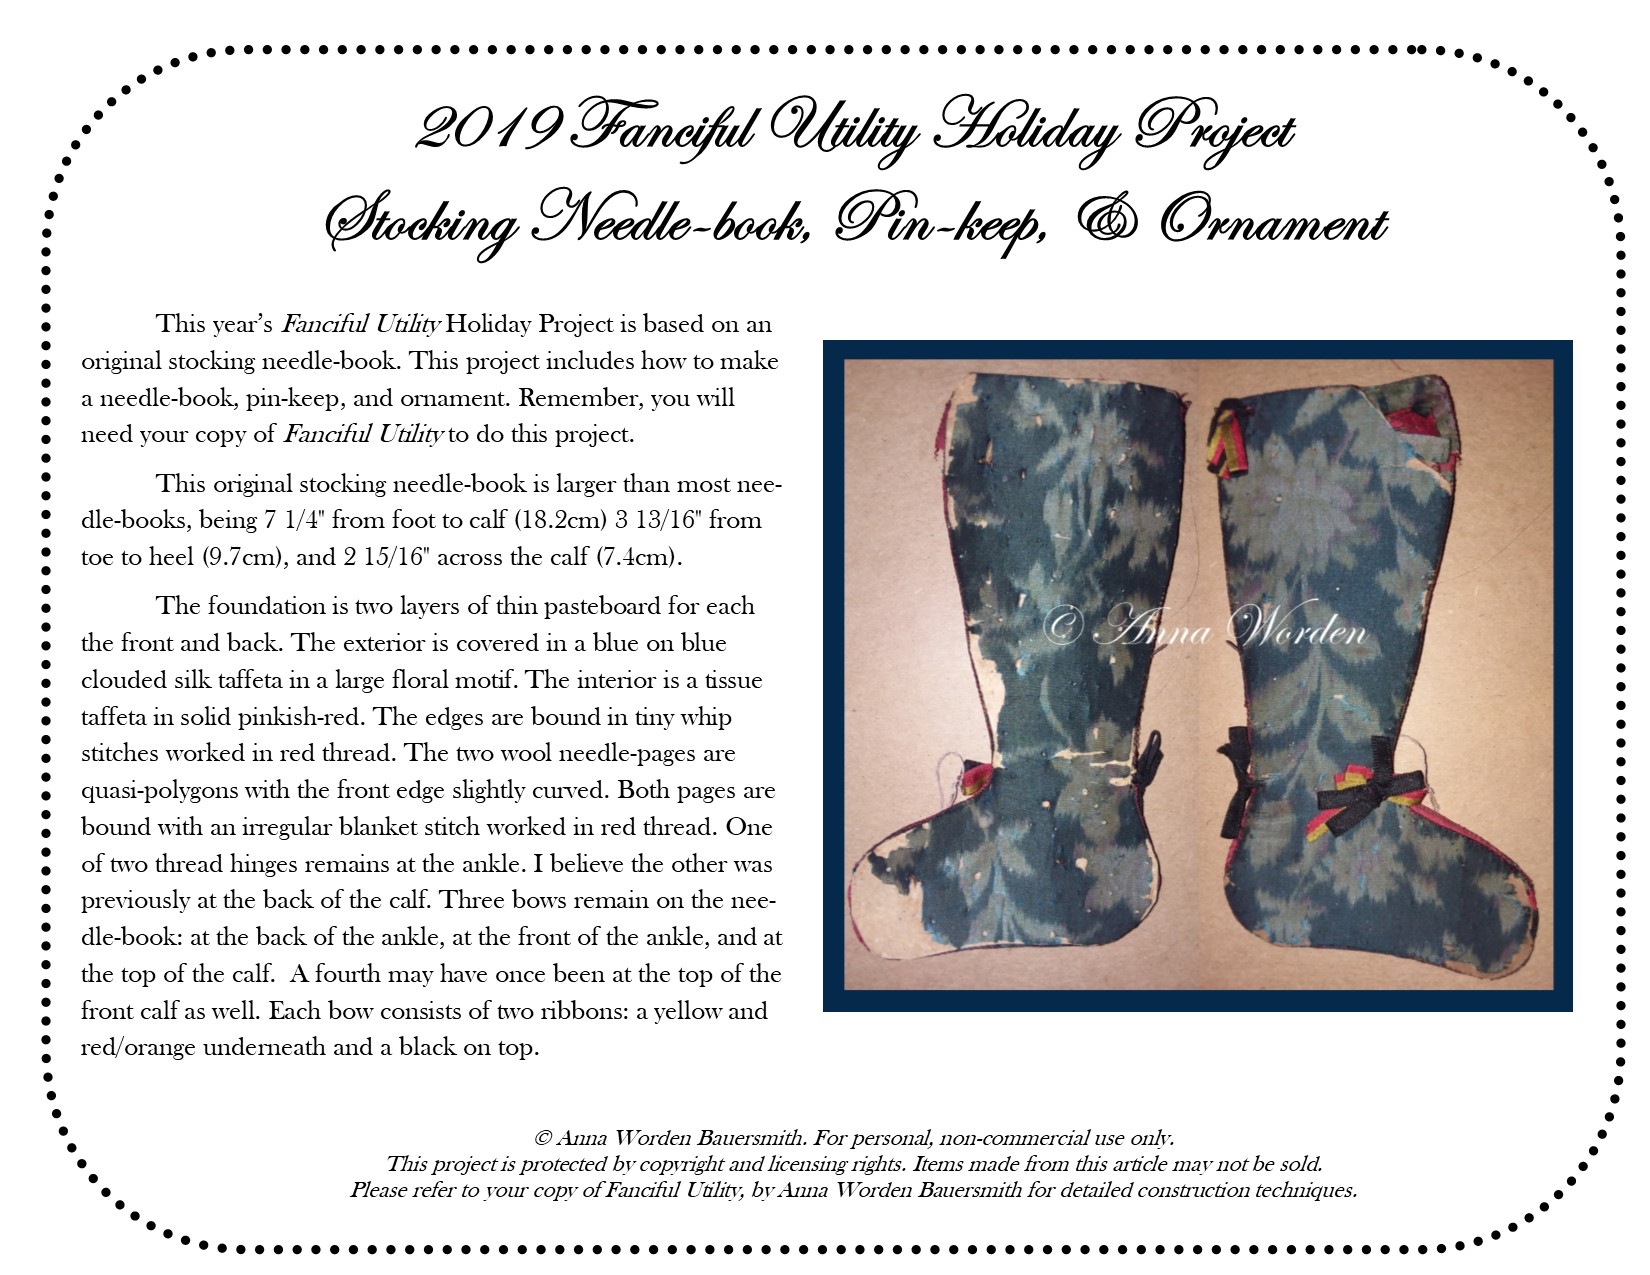
The original needle-book is larger than most needle-books, being 7 1/4″ from foot to calf (18.2cm) 3 13/16″ from toe to heel (9.7cm), and 2 15/16″ across the calf (7.4cm). The foundation is two layers of thin pasteboard for each the front and back. The exterior is covered in a blue on blue clouded silk taffeta in a large floral motif. The interior is a tissue taffeta in solid pinkish-red. The edges are bound in tiny whip stitches worked in red thread. The two wool needle-pages are quasi-polygons with the front edge slightly curved. Both pages are bound with an irregular blanket stitch worked in red thread. One of two thread hinges remains at the ankle. I believe the other was previously at the back of the calf. Three bows remain on the needle-book: at the back of the ankle, at the front of the ankle, and at the top of the calf. A fourth may have once been at the top of the front calf as well. Each bow consists of two ribbons: a yellow and red/orange underneath and a black on top.
Closer looks at some details:
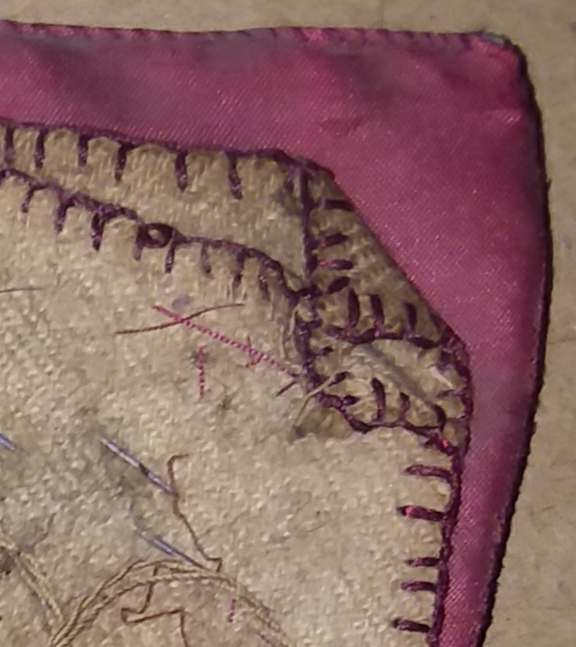
This damaged corner shows a few things. It let me see just how thin the pasteboard is on this piece. I do suggest we use the fairly standard pasteboard most of us have on the backs of notebook. There is a thicker version I like for boxes, but that would actually be too thick for this project. Along the edge of the fragment piece, you can clearly see the whip stitch used for binding the exterior and interior fabrics.
This interior corner shows the binding whip stitch as well. This gives a good view of the blanket stitch on the wool needle- pages. This photo also emphasizes the curves this stocking shape has. I think these curvy lines are what make this shape so appealing.
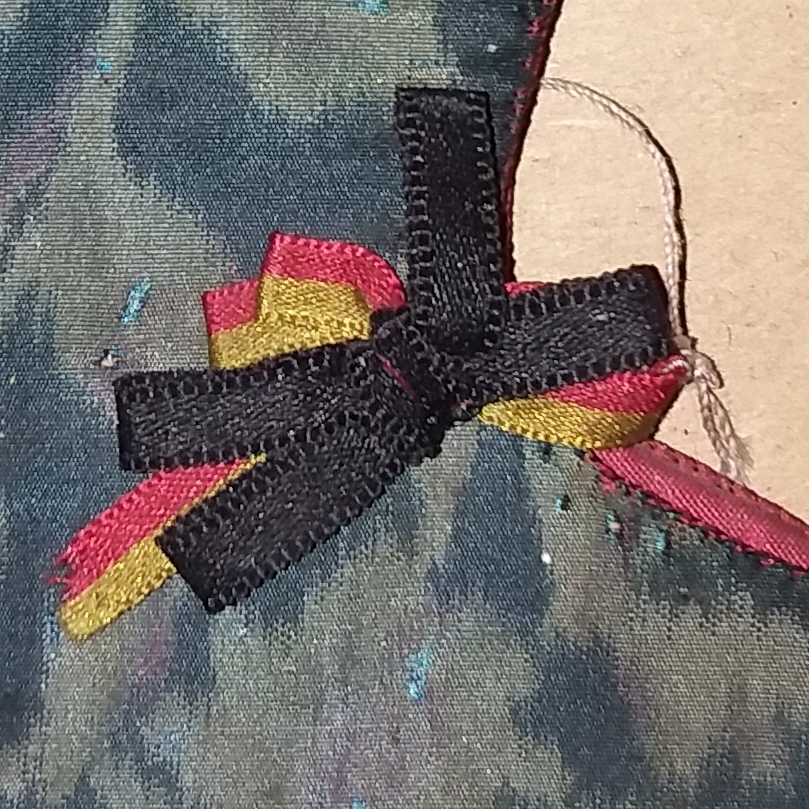
This close-up shows how each bow is really two bows stacked on top of each other. I rather like how the use of a two color ribbon gives the suggestion of three ribbons.
The Project:
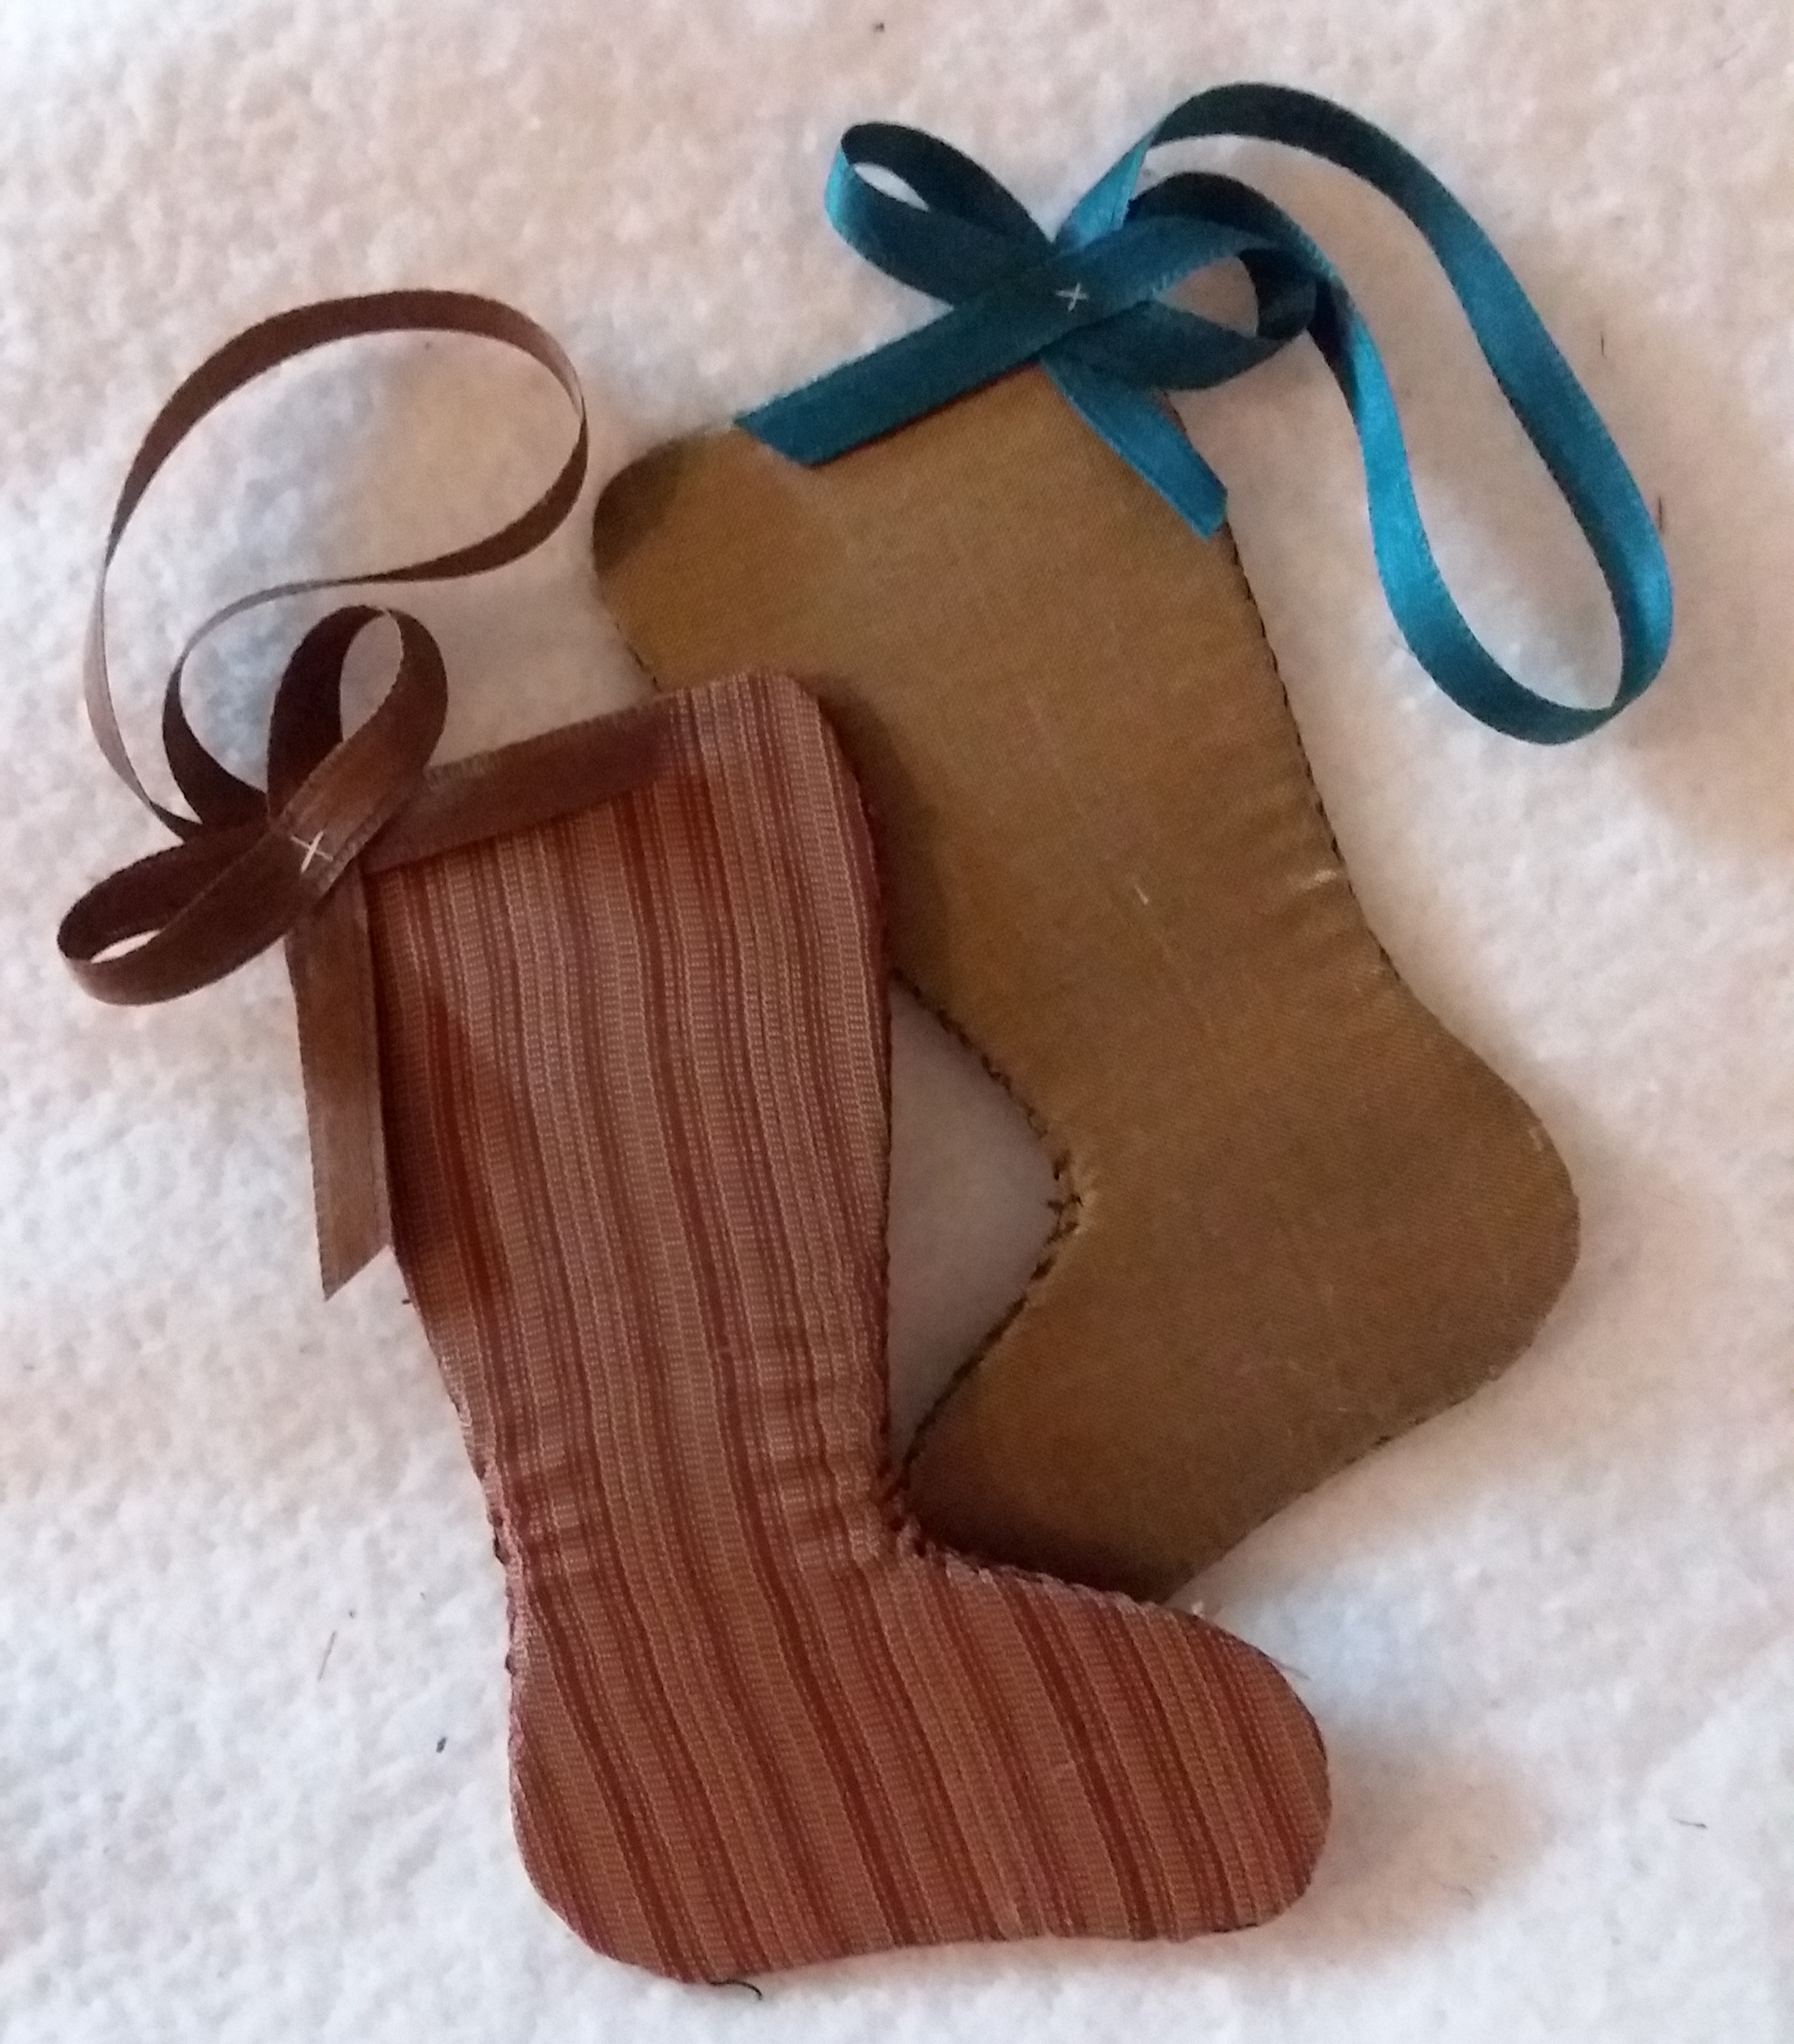
Please download this PDF for directions on making the original size needle-book, a smaller 4″ pin-keep, and a 4″ ornament. You will need your copy of Fanciful Utility to do this project.
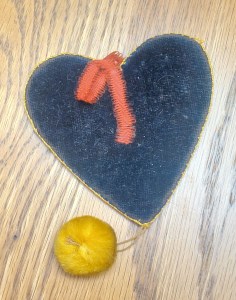
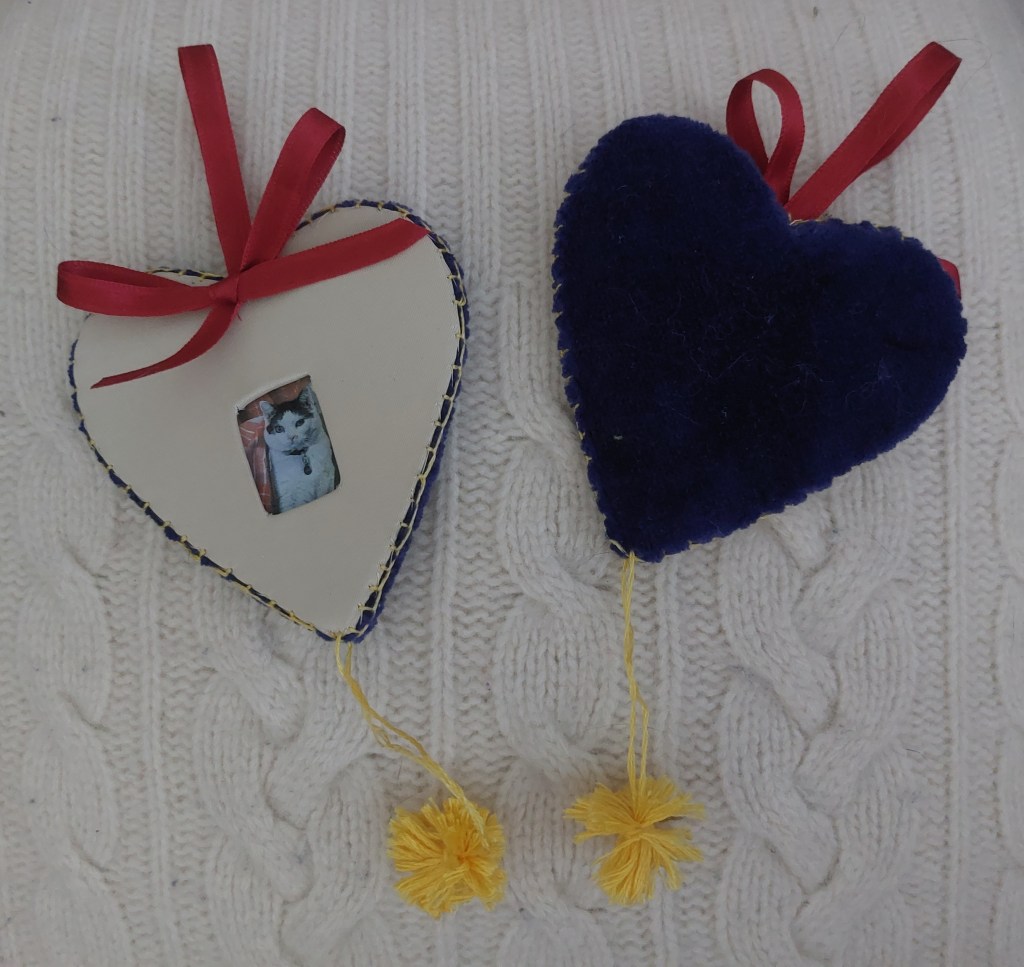
This summer I rescued the sweetest little heart shaped frame from an antique shop changing hands. It was tucked in a little basket on a shelf surrounded by chaos. Delicate items like this are likely to be lost or destroyed in situations where larger items get the focus. I am so glad I saw it.
The heart is 3 1/8″ tall and about the same wide. The 1″×3/4″ opening for the tintype photo sits about an inch above the point of the heart.
It is made of two layers of pasteboard. The back is covered in dark blue velvet. The front is covered in off white silk taffeta that has disintegrated.
The threads pulling the silk and velvet around the pasteboard can be seen through the photo opening as the photo has slipped.
The whole is bound with a bright golden yellow embroidery floss, likely silk, in a blanket stitch.
At the top of the heart is a red ribbon hanging loop and bow. The ribbon is a silk grosgrain with picot edge. At the bottom is a gold silk pom hanging from cord.
I recreated this heart frame from materials on hand. (Directions in pdf coming soon.) I think they came out quite darling.
Do you enjoy reading my blog? Do you find it helpful? Please consider supporting through Patreon or Sending a Tip.
In recognition of the coming Halloween, this week’s post will look at various ways of making a pumpkin.
In terms of construction, essentially, a pumpkin can be seen as a large, orange tomato with a stalk.
In the pages of the 1892 Vision; A Magazine for Youth, we find these directions for making a pumpkin pin cushion tucked in next to a tomato:
The foundation of the pumpkin pincushion consists of two circular pieces of stout muslin joined together at the edges, and stuffed with wool. Two pieces of orange silk the same size, are smoothly arranged over the cushion and joined with as small stitches as possible at the edges. The cushion is the caught through the center, the needle being passed in and out through the seam (which should pass along the top and bottom and two sides). Rope silk or twist should be used, and it will have to be drawn very tightly up and down through the center to divide the cushions into sections. Two pieces curved to look like a stem are filled with cotton and caught with invisible stitches to make it “crinkly;” it is then sewed very neatly to the cushion. This cushion may be made any size you desire.
The Ladies’ Home Journal, 1892. Pumpkin Pincushion. By M. J. Safford. The materials needed are a puece of bright yellow surah, satin, or any bit of plain silk stuff, a spool of button-hole twist the same color, a few scraps of dark green silk, a little wadding (wool is preferable) and a piece of thin white cambria. Commence by making the wadding and cambric into a cushion seventeen and one-half inches deep, and flatten it somewhat on the top and bottom like a pumpkin. Gather the yellow material – wool will answer if silk cannot be had – at the top and bottom, and closely together in the center and sewing firmly to the cushion underneath. Next fasten a needle full of twist at the top of the cushion, draw it down to the bottom tightly enough to indent the silk and fasten at the bottom. Repeat this eight times, keeping the threads at an equal distance apart in the center of the cushion, thus dividing it into sections of the same size. Then cut from pasteboard a circular piece two inches in diameter, cover it with dark green silk and sew it to the bottom to conceal the gathering of the silk. Cut from the same green silk a piece three inches long and two wide, and stitch lengthwise four tucks one eighth of an inch to be left outside. Stuff the ease thus made with wadding and hem the bottoms neatly down upon the yellow silk top of the cushion.
Of course, if you can make something into the shape of a pumpkin, you can make a pumpking into something.
Marna found this workcase made from a pumpkin in Godey’s, 1870. I am skeptical of drying a true pumpkin dry enough in my climate. Maybe one of the gourds meant to be dried. The directions begin:
Work-Case Made of a Pumpkin.
Materials. – A yellow pumpkin measuring four and four-fifths inches across, some brown glace silk, thick brown braid, round transparent beads, gold-colored purse silk, fine gild-colored silk cord and ribbon three-quarters of an inch wide, nine round brown glass buttons, some wadding.
The pumpkinto be used for this case must be quite dry when gathered. Then hang it up to be dried. After some weeks cut it into halves, empty each half carefully as far as the skin, and bind each half round the edge with a strip of brown silk a quarter of an inch wide. …… (continued….)
I stopped at the local antique shop on the way back from the post office to see how it was doing with the new owner. I had not planned on buying anything.
I spent $15.
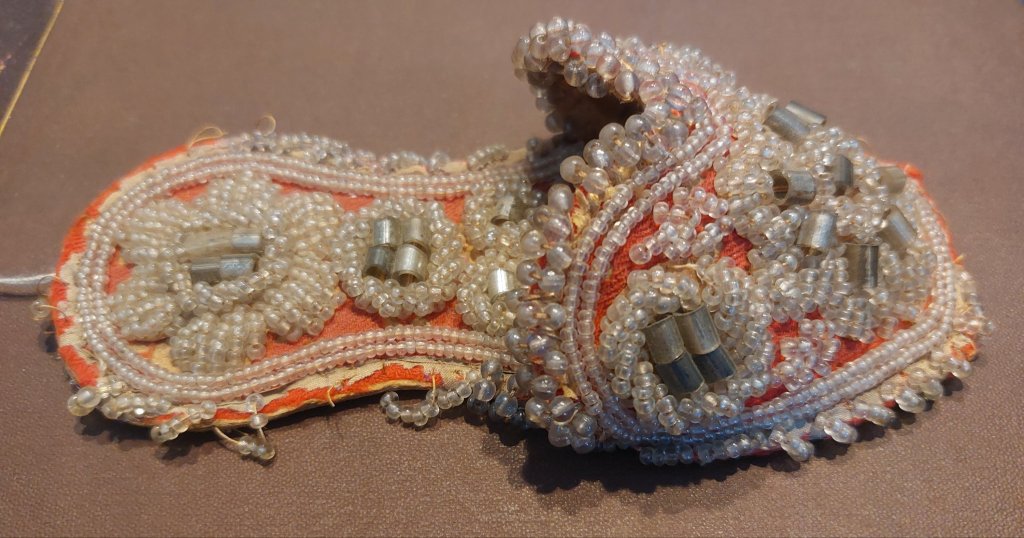
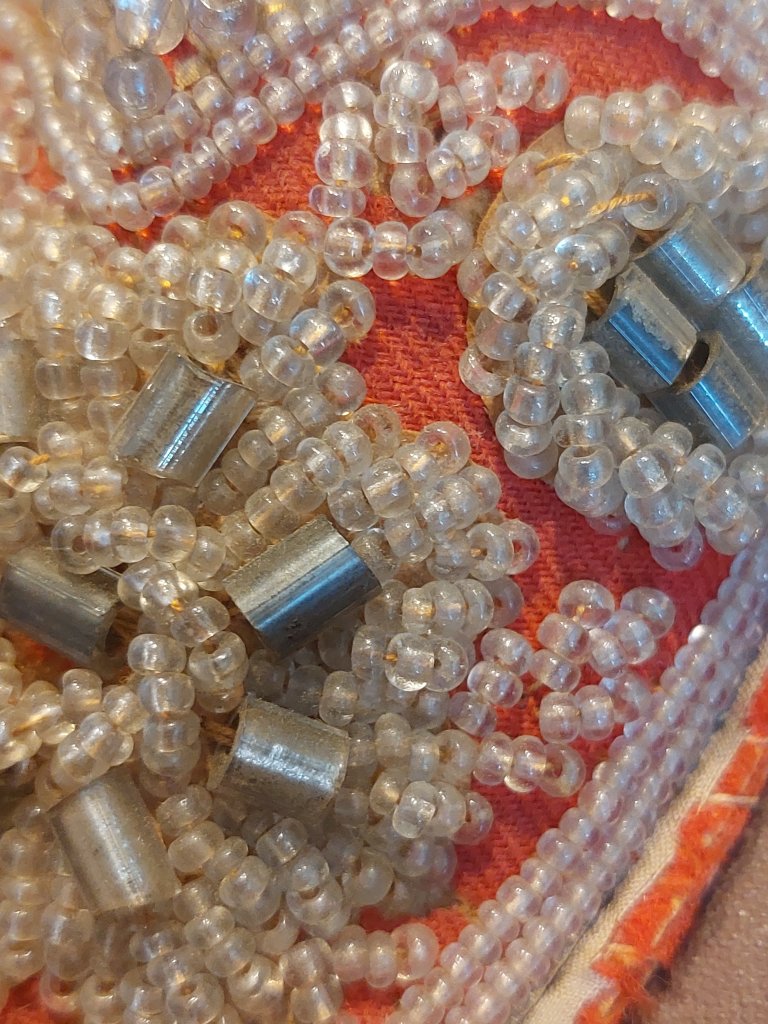
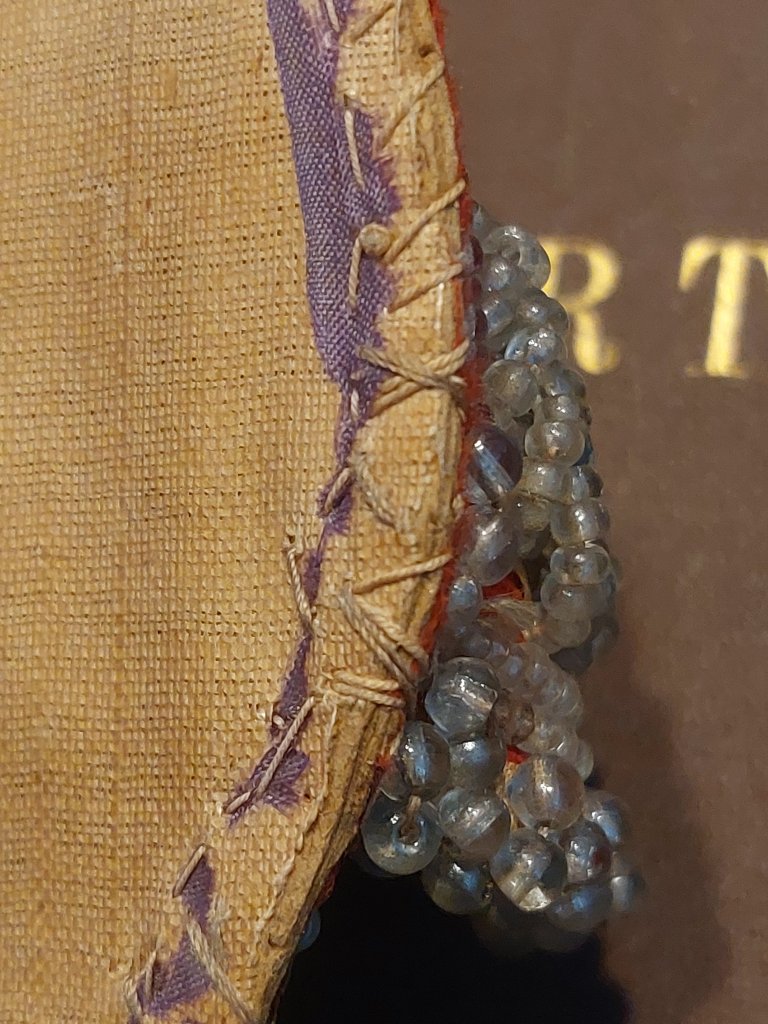
I got some books for family and friends, a beaded slipper, and a pile of tintypes. Yes. For $15.
The beaded slipper is most likely a local Haudenosaunee (Iroquois) piece, though ladies magazines did try to mimic the look. At first, I thought the red base fabric was a silk twill. After taking closer photos, I think it is wool, maybe a wool/silk blend.
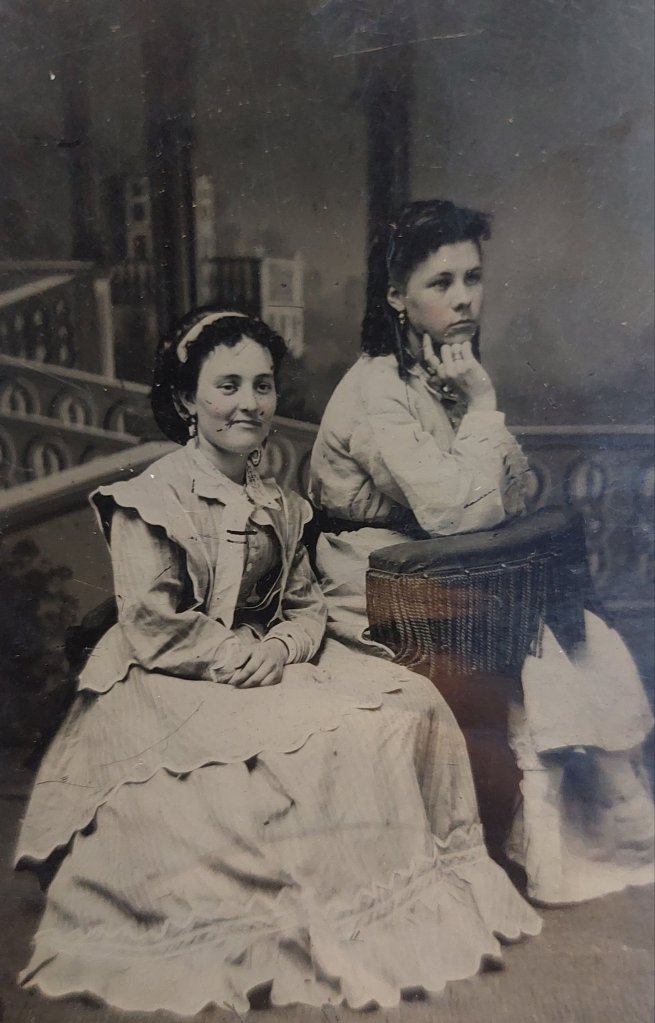
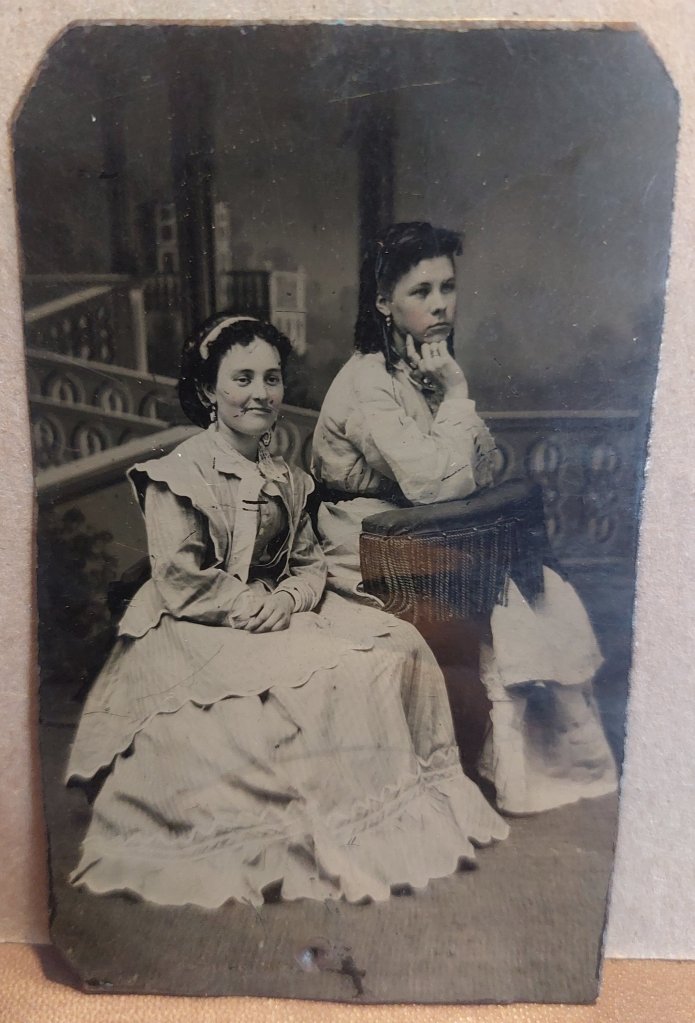
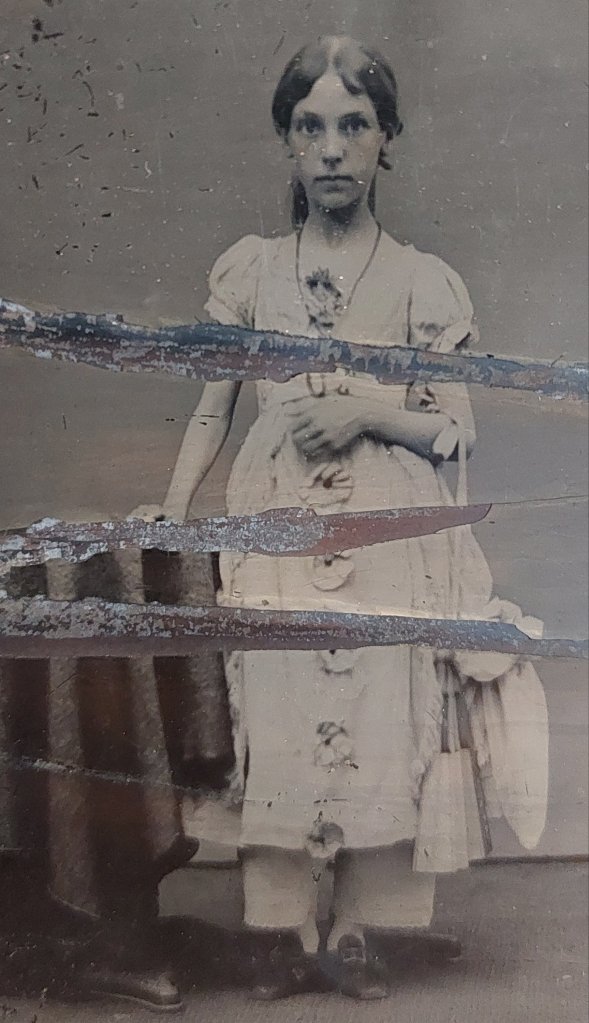
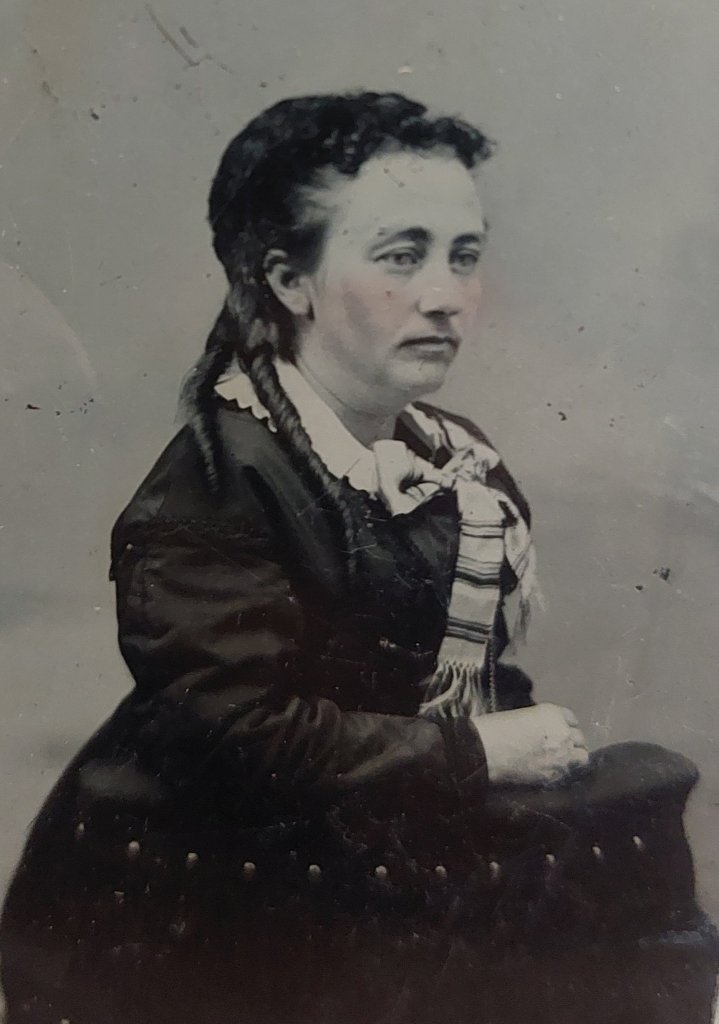
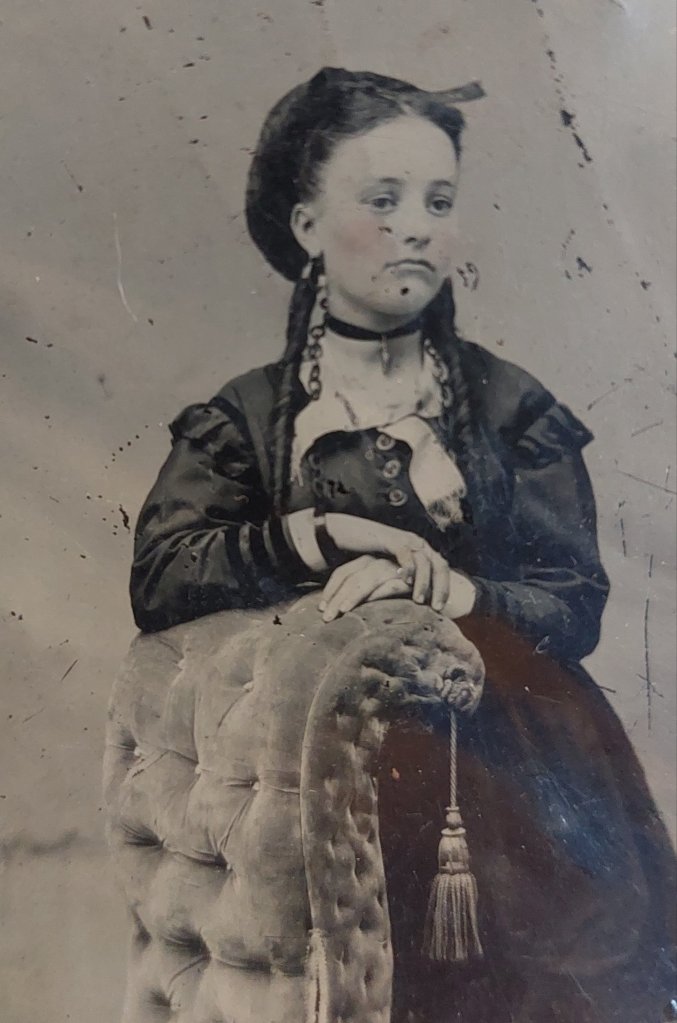
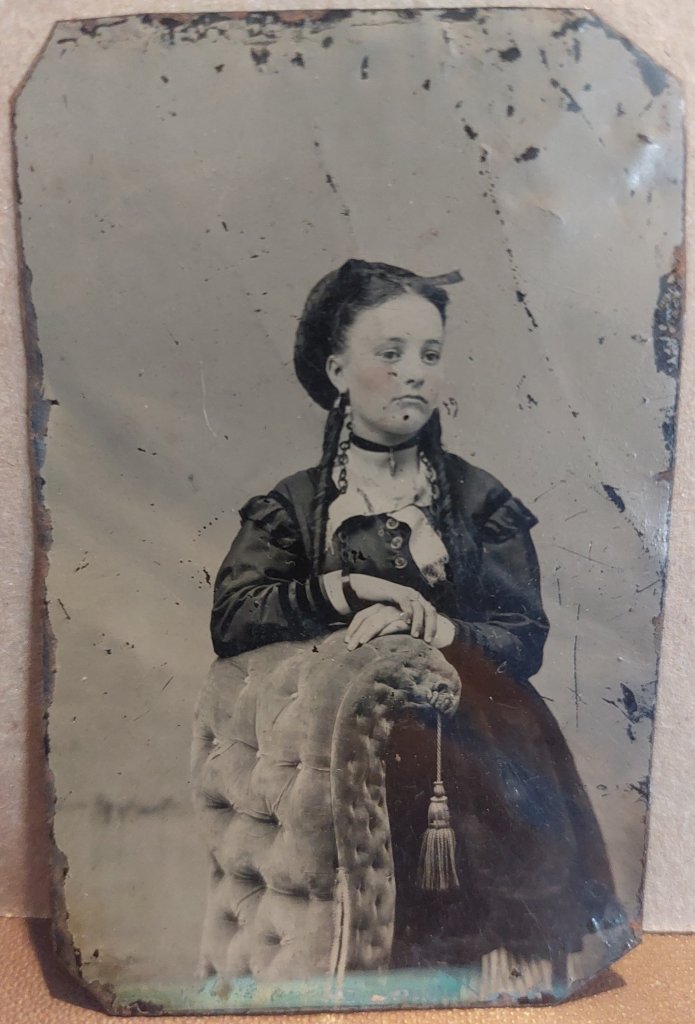
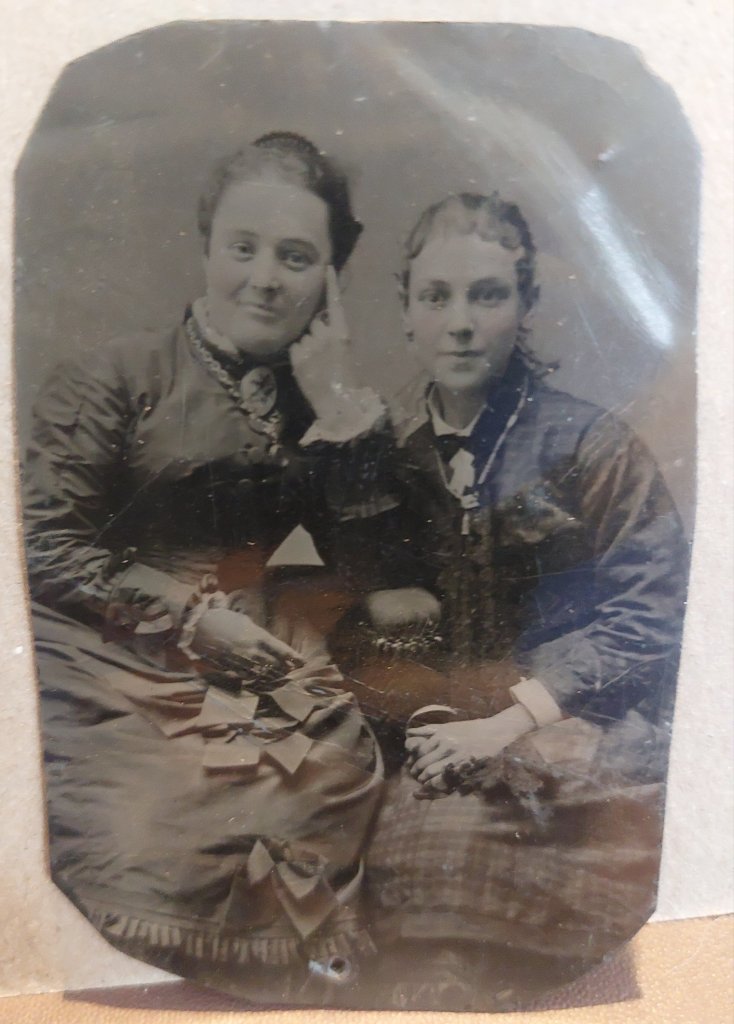
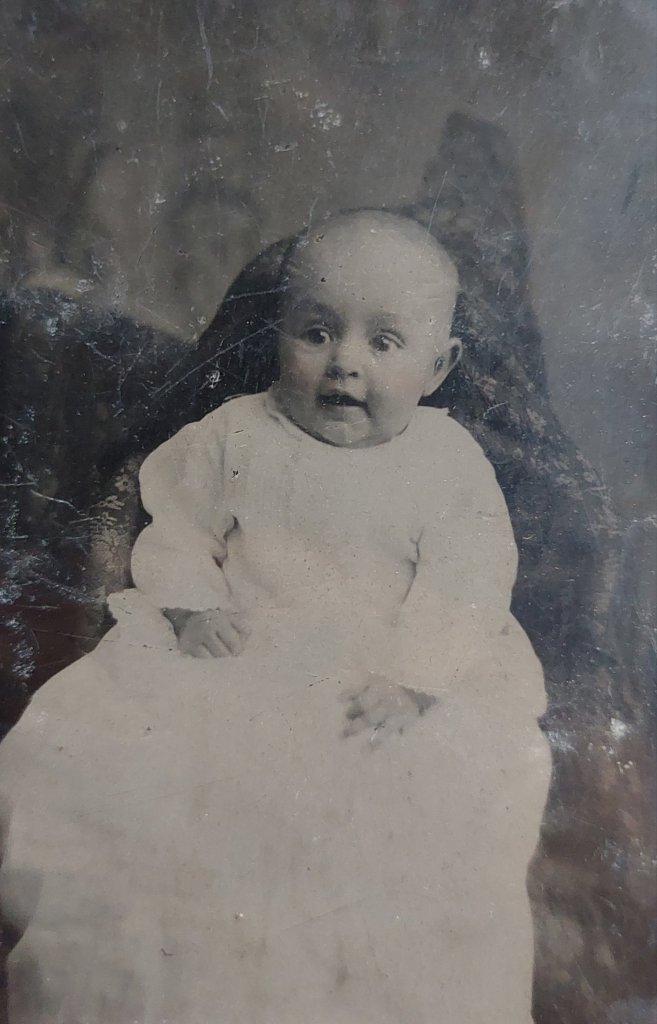
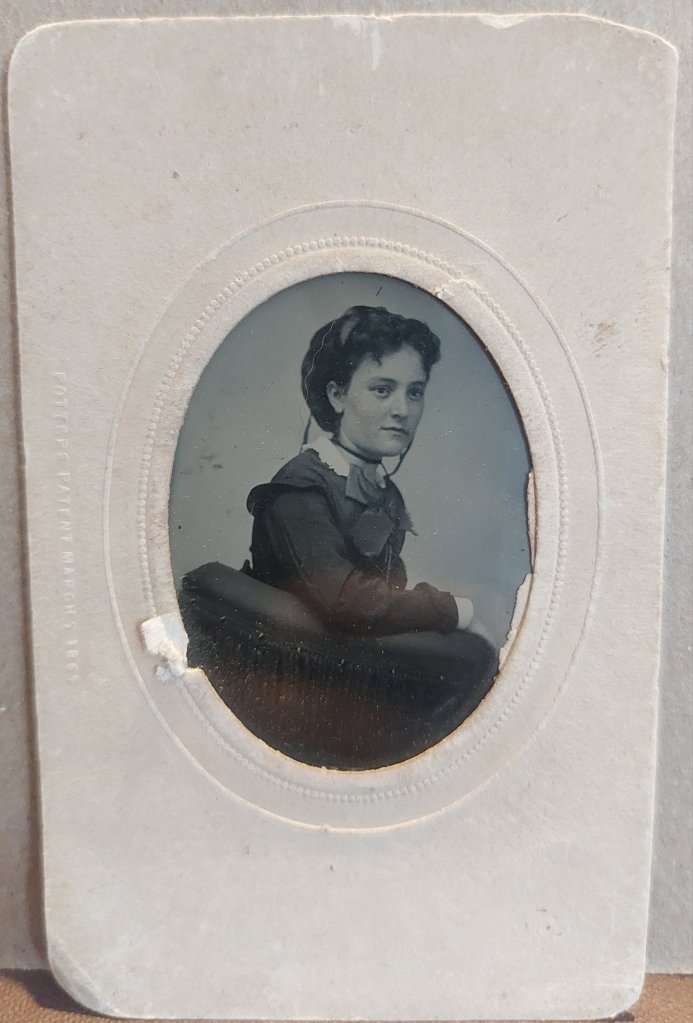
The tintypes were the whole pile for $5. I didn’t even go through the pile to loom at them. I just picked up the pile and added it to mine. They have a lot of damage.
You will see one was folded. This is such a shame because the women’s outfit is amazing. Another of two women either has something on the surface or the surface was smeared. This one has two hats.
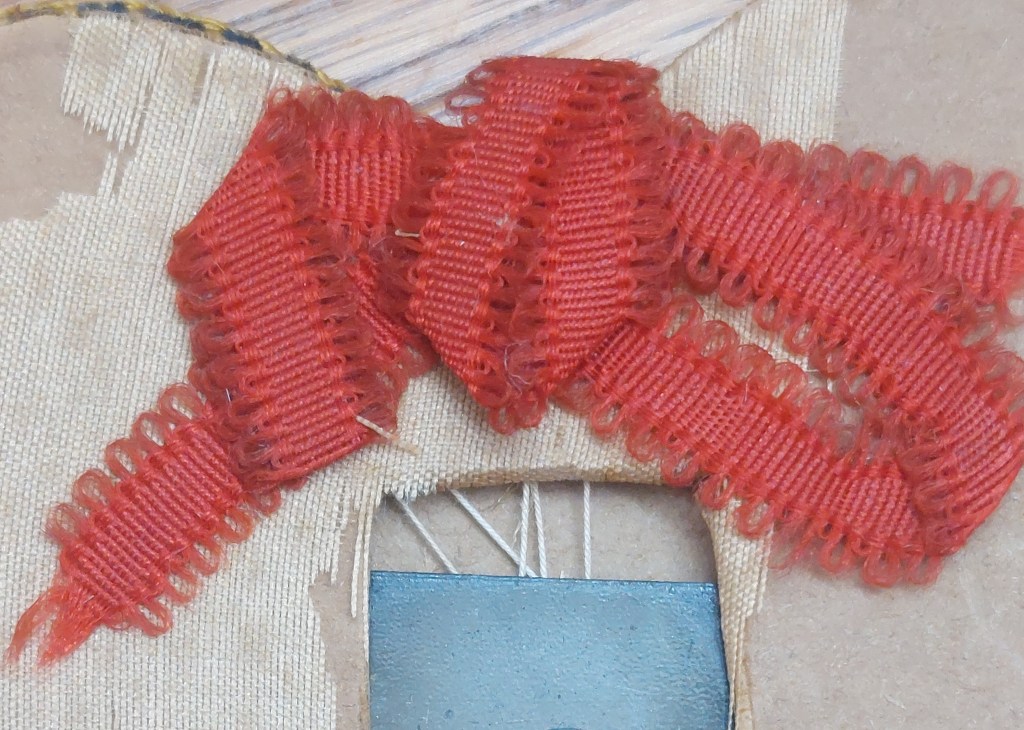
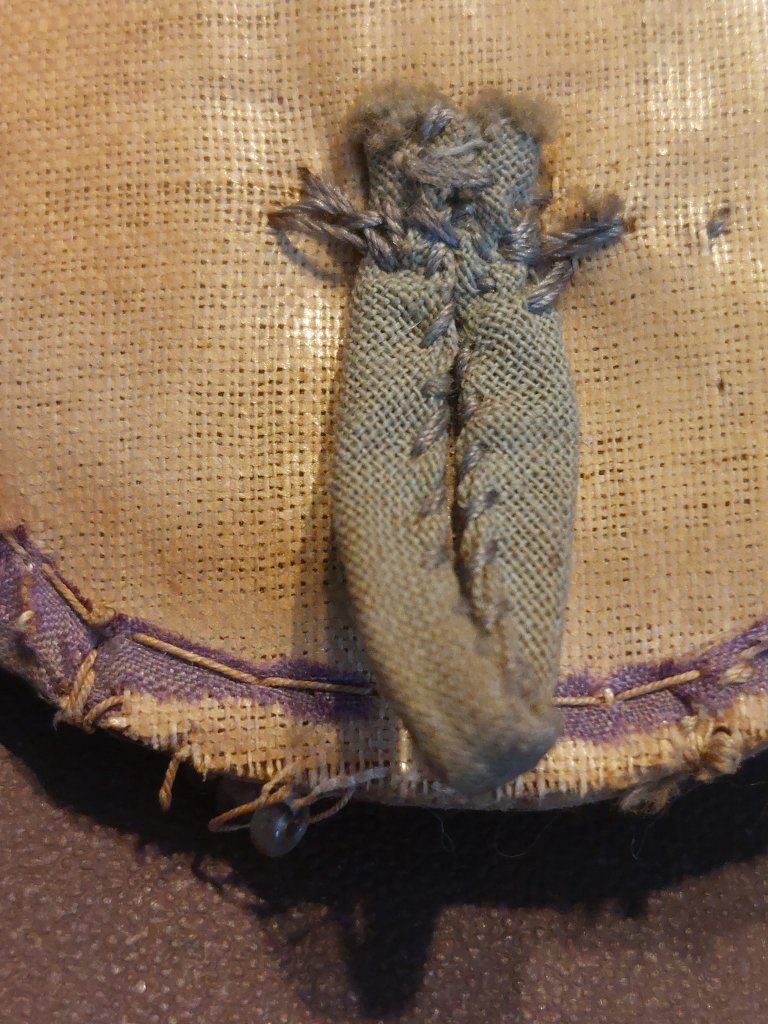
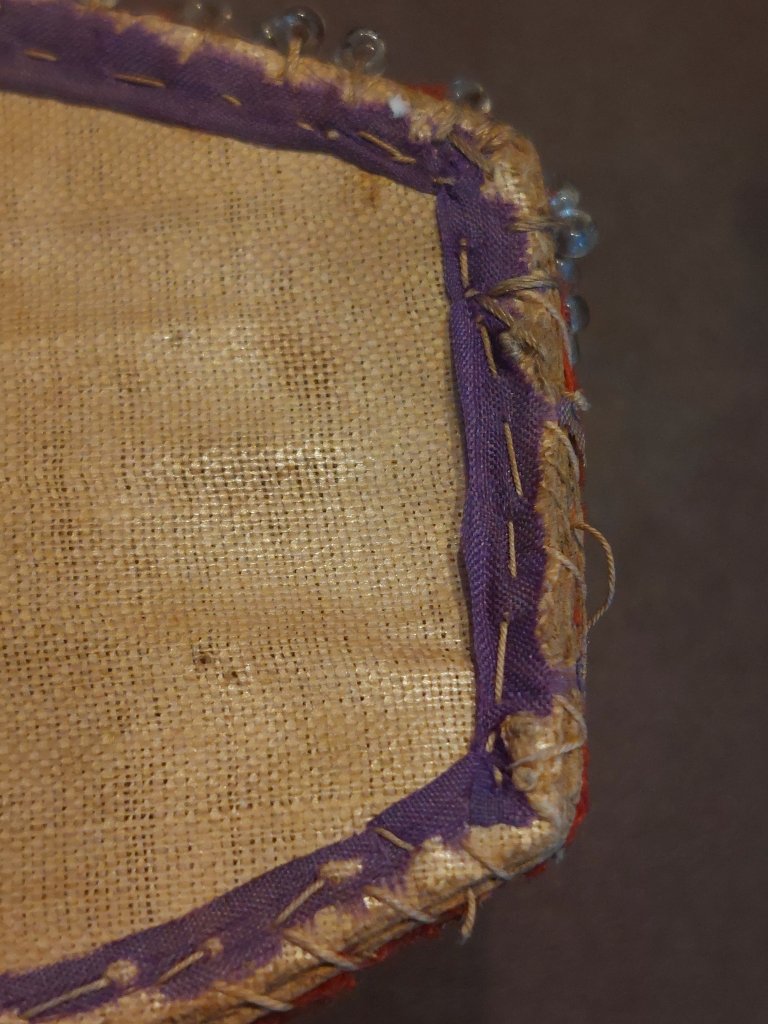
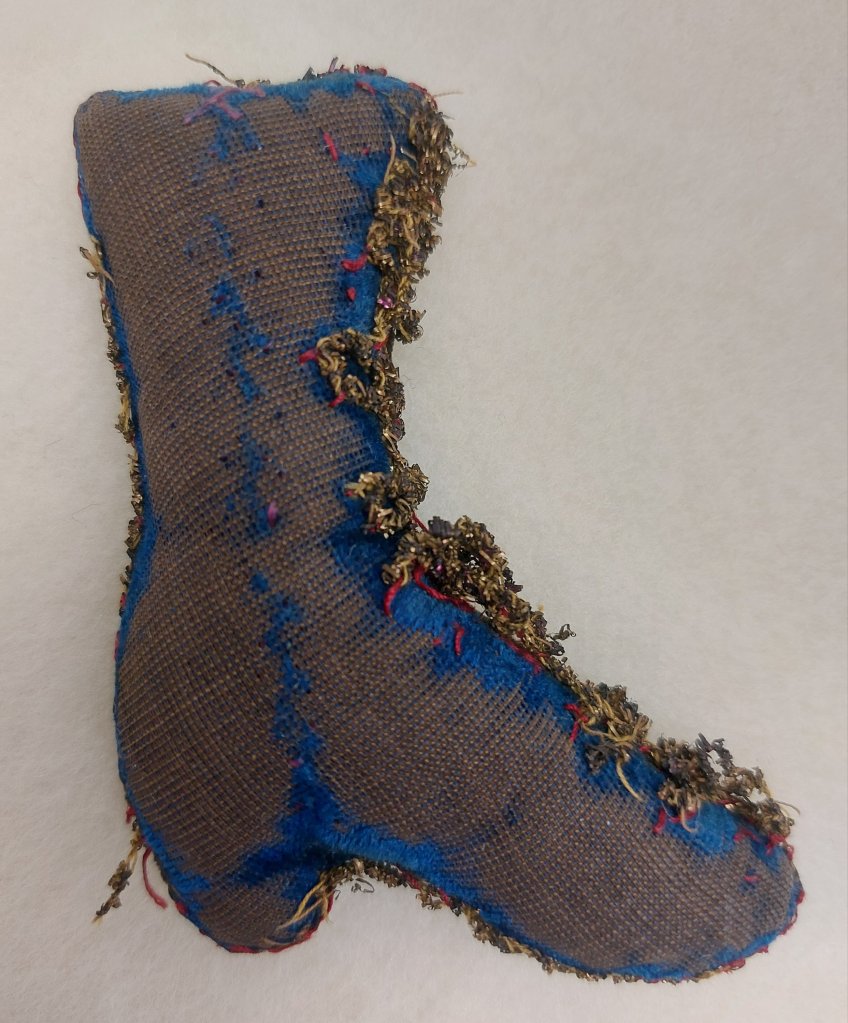
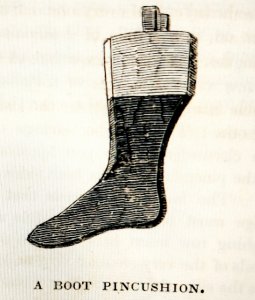
This is an example of a boot shaped pin cushion in my collection. Boots and stocking were fairly common shapes used for making pin cushions and needle-books during the Victorian Era.
The boot is about 3.5 inches tall and 2.5 inches wide. This cushion is quite weighty for its size, weighing 2.6 ounces. While the piece is too delicate to squeeze to determine the filling, I suspect it is filled with bran or dense sawdust. It seems too large to be filled with emery, though the weight and solidity feels right.
From An American Girl’s Book – Cut two pieces of paste-board into the shape of a boot, in length equal to that of a grown person’s middle finger, or larger if you choose. Cover them with black silk. Put between them several pieces of flannel, cur into the same shape. Unite the two sides of the boot, by inserting, between the edges of each, a binding of black gallon. When this is done, cover the top or upper part of the boot, on both sides, with a bit of thick buff-coloured ribbon, about and inch or and inch and a half broad, to look like the light leather tops on real boots. The. Sew on, at each side of the top, a loop of buff-coloured gallon, to resemble the straps by which boots are drawn on. The pins are to be stuck in the gallon-binding that unites the two sides of the boot.
Both sides of the boot are velvet with most of the pile worn away. One side was a vibrant blue, the other a deep brown. It seems to have been constructed with a brown thread while a red thread was used to add trim. From a distance, the trim seems to be a bullion. Under low magnification, the trim looks to be comprised of two narrow, flat, almost straw like fibers, one light and one dark, set on a thick light brown thread. This trim was arranged in altenating loops along the front of the boot to mimic the look of lacing. Bits of trim remaining suggest a single strand of the trim ran around the edge of the boot as well. The “front” or brown side of the boot has a row of fir or feather stitching. The reverse, “back” or blue side, has a short continuation of this stitching at the top of the boot. Holes in running down this side of the boot suggest this embroidery may have once embellished the length of this side as well.
From Godey’s Lady’s Book, 1861 – Boot Needle-Book. This is made by cutting out two shapes in card-board of the same size, and covering them with bronze kid kid, colored leather, or satin, velvet, or silk, any of these materials being suitable. It is ornamented with gold thread in the pattern given. A row of very small pearl buttons is placed up the front, or else a row of gold or black beads. A bow of ribbon is placed where the buttons commence. Both the shapes are worked the same, and the inside are lined with silk. The tops are finished with a fringe, and the two tied together with a bow of ribbon, having the leaves for the inserted between them, and leaving them so as to open.
A few pins remain in the cushion. The placement suggests pins may (or may not) have been used to accent the decorative trim in two ways. A pin remains placed inside a lacing loop hints at the possibility pins were placed to mimic the look of boot/shoe buttons. Two pins remain on the “front” of the boot tucked into the embroidery at the vertices of the Vs