When I dropped off my Ag Fair entries on Friday, Mary asked me if I had a theme this year. At first, my answer was no. I hadn’t intentionally stuck to a theme this year. Later, I realized many of the pieces I entered were originally made with an interpretation/presentation idea I had been working on but didn’t get a chance to do. The idea was to loom at different types of sewing cases, work bags, and work boxes used in the nineteenth century with recreated examples of each.
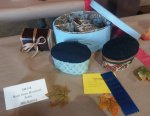
I entered a sampling of sewing cases for the Sewn Household Articles category. This included: A leather and silk sewing case, which is based on the box cases found in my book Fanciful Utility. A Shaker style box which I sewed the two tier trays and lining for. A pair of covered bandboxes with pun cushions.
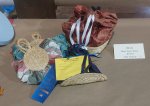
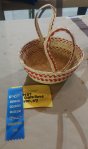
During the summer, the sampling of sewing cases melded with exploring items that were made with straw. Marna, of Wicked Step-Mothers, and Joyce, of the Time Traveler’s Rabbit Hole, kept teasing me with illustrations and descriptions of straw baskets, boxes, and workbags pulled fancy work columns in magazines and manuals.
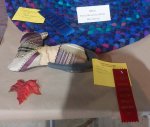
For the Hand Sewn Fancy Work category, I submitted a sampling of the straw workbags I made during the summer.
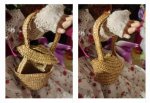
One of my favorite items I made this summer was a doll size basket that mimicked one that showed up on social media from a French Ebay listing.
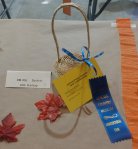
The final straw basket entry was a last-minute addition, which went under Clara’s name. This was inspired by an article Joyce found. It was meant to become a workbag. But, once I got the basket done, I kept procrastinating adding the bag because I like the basket itself so much. It gets to remain its basket self.
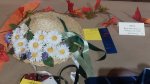
This year, I finally made an 1850s straw hat for myself. This became my non-corded clothing category entry. The daisies and violets are personal tributes to my Grandmothers. The flowers also have symbolic meaning.
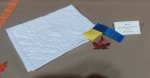
The longest project I entered would be the white on white quilted table mat in that I started it last year. This was meant to be a practice round for a much bigger sentimental project I am now giving myself permission to let go of. For several years I have wanted to do a multi-generational quilt for an Ag Fair entry. The base or center for the wall quilt would have been one of Grandma’s unfinished quilt blocks. Around it, I envisioned blocks quilted by my mother, sister, niece, and self. That would have spanned 4 familial generations or 5 age generations.
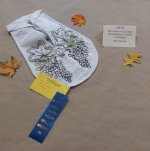
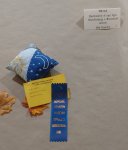
Part of me wanted to enter a whole bunch of pockets, reflecting the Pockets of the Month I’ve been designing for Patreon. Since I entered a bunch last year, I decided to only allow myself to enter September’s Pocket, an embroidered grape design. I plan to color in the design with ink or pastels after the event.
As has become a newer tradition for me, Clara entered a piece of Feline Fancy Work. This is Patches, the patchwork cat. Patches is silk with embroidery. This past year, I learned that what I think of as “crazy quilt” was actually called “patchwork” in the second half of the 19th-century. The embroidery is noted in publications as being “for patchwork.”
Patches sparked a new-found joy for this technique for me. This resulted in one of my last two entries, an embroidered pin cushion. The cushion is embellished with a sun and moon design. I find I really enjoy the processed of putting the scrap bits together and embellishing them.
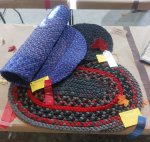
When I filled out my entry form, I found I hadn’t finished several categories/items I originally planned. From the hallway, exploding bags of wool kept calling to me to be made into something. A handful of the wool suiting endcuts I picked up at the fleamarket last spring became a wool table rug. Mine is far, far more rustic than the other braided rug entries. The others were beautifully folded before they were braided. The makers also planned their designs. I really liked that by chance, there were four braided rugs entered this year.
Overall, I was pretty sad there were so few entries in several categories. You can see from these photos many of the categories I entered had only my entry. As much as I like ribbons, I love seeing other people get ribbons. I also love seeing the work of others in the categories I enter. I like to see how they interpret a category. That doesn’t happen when only one person enters in each. The Agricultural Society Fair has such a strong sense of nostalgia for me. I get more excited about it than I do for Christmas now.