The embroidery for the shawl is progressing, slowly. I’m working on the leaf layer.
It is rather fun to see how an item or story appears from one publication to the next. I’ve been amused time and time again by how the accounts of shawl production numbers evolve into more and more flattering accounts. Sometimes the subtle or not so subtle evolution takes place over a couple months, other times over years.
This week, I found myself looking at an illustration in a May 1865 Godey’s convinced I’ve seen this travel bag before. In fact I did. About a year back, or so, maybe two, Marta, I’m pretty sure it was Marta, sent me a bag from La Mode’s July 1864 edition. This one was called a “Sac-Portefeuille”. A year later, across the water, the same bag was called “A Travelling Hand-Bag.” The description gives the option of making it of leather or canvas:
Our pattern is in dark brown leather, varnished on both sides, but may also be made of drab-colored canvas, in which case a small pattern looks well worked over it in cross-stitch. The bag is cut out all in one piece, with the exception of the sides. Each part is bound with silk braid, firmly stitched, after which it is easy to sew the different parts together. The leather handles, which are finished off with tassels, are fastened to the bag by small straps put on with steel buttons. The rosette in the centre is made with stiff ribbon; a buckle of cut steel is fastened in the middle of it; a loop of silk elastic is sewn on under the rosette, and fastens to a large steel button placed on the lower half of the bag.
I do have a similar bag started in leather, which I think I will be taking apart and starting over with this version once I find it. I also think I want to work this up in canvas.

I have been reading through the Encyclopedia of Victorian Needlework reprinted from the 1882 second edition. (Thank you, Pat.) Along with the helpful explanations and definitions, there are several illustrations of travel accessories. Just about everyone screams “make me.” I need to look each of these up to see when and where they originate from to determine if they will be appropriate for my travel impression. While I do this, I’ll be looking for information who may have made this item, who may have used it, when it was used, how it was used, etc.
(My apologies for those images which refuse to load right-side up.)
This Railway Rug, is the only non-container of the bunch. It is essentially a blanket. I need to look up the phrase to see when it came into use.

This “Travelers Wallet” is a larger case than the word “wallet” would suggest. Laying open it measures 48 inches by 23 inches. The items shown in the illustration make me think this may be for a man. But, I can easily see a parasol and shawl or fan tucked into this case.

This “Traveling Case for Wraps and Bed Linens” seems as thought it would also be rather large. I do not know if this would be inside the trunk or larger travel bag intended for the evening. If the traveler was traveling through the night on a railcar, then she may have it with her in her larger travel bag. If she were staying at an inn, it would more likely be in a trunk.

This case for medicine is quite interesting and very tempting to make. It would make a great discussion piece. It would also be very useful to have on had with Benadryl and pepto or headache meds.

This “Luncheon Case” looks like it would be quite handy. It reminds me of the smaller lunch case from Beeton’s book. 
This “Bolster case” has to be shared for its similarity to the “Dufflebag”. I suspect this illustration is later in the century, as with some of these others, but need to look into that.

This simple “Umbrella Case” would be very useful. I keep my parasols and umbrella in a simple cloth tube-shaped bag for storage. This would give a nice safe place to put a damp or wet umbrella to keep it from getting other things wet. (Do remember to take it out to dry.) 
In making my list of bags and such for my travel impression, I can’t help but think about which ones were seen as the most practical by the original cast, which they made but found were not as useful as they thought, and which were purely fancy.
Let us start with a fairly standard travel bag. This one comes from one of Beeton’s books. Pulling from her description:  “This pattern is of the ordinary shape of travelling-bags, but it is very prettily worked…. The embroidered part measures 14 inches in its widest part, and is 11 inches deep. The bag is lined with light brown silk, and made up with a steel clasp.” With her measurements of the embroidered section, this bag may be 20-28 inches wide and 15 to 20 deep. This is a fairly good-sized bag capable of holding the day’s necessities of travel or even the set of night-clothes suggested by some advice writers. She does indicate the sides are made of java canvas. I will have to look into this material more, but I would be concerned about how water-proof or not this material (thus bag) is.
 Comparatively, here is the Pouche Pompador from the December 1864 edition of Godey’s. This is a pretty and interesting travel bag I’ve wanted to make since it showed up in Virginia Mescher’s “Traveling Tips for Ladies”. This bag is described as having the shape of a large purse. Continuing ” The bag is entirely lined, a pocket is formed on each side, and a slit is made in the centre of the bag exactly in the same way as in a purse; two rings are slipped over, and the slit is further fastened by pearl buttons and silk loops…. These pockets are very convenient to hold the numberless small articles which a lady always wishes to have by her during a journey.” It is the “small articles” that is catching me when thinking about the slit in the meeting point of the pockets. If this meeting point is narrow, the size of the items that can fit inside either pocket would be limited. I don’t know about you, but I hate digging for small items in a bag. If the meeting points are relatively wide, then larger, though not big, items may fit. I do have an alternative idea for the openings. But, I would really like to hear from those who have made this bag to see what they find.
This next one has me thinking ‘maybe… maybe not’. A few versions of this show up in the 50s and 6 0s. This particular one comes from Godey’s in November of 1860. The description reads: “We direct the attention of our lady reads to a little article which will be found an extremely useful travelling companion, and which, by the exercise of female taste and industry, may be rendered no less elegant than useful. We allude to the worked plaid strap of which we furnish two illustrations; one with the plaid, and the other without. Plaid straps made of plain leather have long been used by gentlemen, and their utility is fully acknowledged by travellers. These straps are much used by ladies, who impart to them a superior degree of elegance by various kinds of ornamental work. They are available not merely for plaids or shawls, but for securing together umbrellas, parasols, and other small articles, which, in the hurry of railway travelling, changing carriages, etc. are liable to be dropped and lost. The strap from which our engraving is copied is made of Danish leather, and the ornaments are executed in beadwork, or embossing in colored silk.” Nifty? Yes. Practical? Maybe. I don’t know if I want to fuss with strapping together my parasol, umbrella, shawl, etc if there is a chance in departing one of the articles may be needed with no place to easily unstrap and restrap. I would rather take them out of a bag. Since many of the similar items are described primarily for shawls, I am concerned about keeping the shawl dry and clean. Yet this could be useful. So, it sits firmly in the maybe-maybe not category.
Now, as my battery almost runs out…. The “duffle-bag” travel bag as we’ve named it. I have to say I love this bag. But, I’ll have to say more about it later. 
As part of my focus on a travel impression, I’ve started a new board on Pintrest for items related to this impression. As it grows, you will find a variety of travel bags including carpet bags, trunks, travel attire, and other details. Hopefully, this will be useful for some and just enjoyable for others.
(ps – I’m also in the pre-planning stages of some ‘make me happy’ clothing that may go a tad over the top.)
Fanciful Utility will be ready for pre-sales in July!! Please visit the Sewing Academy for a video preview and to order.

Some updates from the Publisher:
1: I need to have the last details from the bindery on the final price, but it won’t be more than Dressmaker’s Guide ($30), and includes all the projects and templates and techniques, plus you’ll gain the skills you need to design your own project from imagination or an extant example, so it will be a very valuable book for dozens of projects to come.
2: When we get that final pricing back, we’ll finish coding the shopping cart, and open full reservations immediately. If using a credit/debit card, your information will process about a week before the book ships. We’ll add cover shots and such when that shopping card goes live. The book has black & white illustrations, templates, and a color photo section of the gorgeous samples Anna made for the book project.
2.5: We are looking at the probability of offering two different binding options: normal perfect bound (softcover with spine) and spiral spine.
3: We’ll be able to process credit and debit cards with Visa, MasterCard, and Amex logos, and yes, we’re pleased to be adding a PayPal option as well!
4: Books will be shipping by the end of July, if not sooner (this is based on the binding house schedule; they usually try to push us up the line toward the top, because they’re lovely!).
5: You’ll be able to reserve and pay for your copy at http://www.thesewingacademy.com… and don’t worry, we’ll have the announcement and link put up LARGE on the front. 🙂
We can’t wait to see snapshots of what everyone will make with the book! You’ll all be thanking Anna for making this great resource available.
Regards,
Elizabeth Clark
I’ve done a little rearranging of the categories for the blog. Hopefully this will make finding what you want a little easier. In doing so, I’ve added a new long-term project – “Travel Impression”. While I’ve decided not to do many, if any events, until we get settled properly, I’ve also decided to acknowledge the theme of travel that has constantly popped up time and time again over the years and actually focus on this interesting area by developing an educational impression on travel. As I work on this, I want to share my research, planning and process with you.
A little back story – Last fall I had the opportunity to develop an impression of a woman traveling across NY in the 1830s using rail, canal and stage. Two weeks ago, while talking with Bevin about the linen plaid recently added to my stash, she suggested a travel dress to expand on last fall. That was a combination of a ‘light-bulb moment’ and a ‘duh moment’. I felt like that answer should have been staring me in the face. Back when I started CW reenacting, we often used travel as a significant portion of our interpretation (we had the luxury of our events being village, home or train based.) Since then aspects of travel have always been of passing interest to me. Developing a travel impression is an excellent way of bringing together many material culture pieces as well as aspects of social and regional history.
So… Step 1 – Make a list. How I love t0-do lists.
Travel impression
(1850, 1830, 1840, 1860) Develop files on (arrange research and fill in the gaps) Travel images Types/Time/Instances of Travel Cold weather travel Hot weather travel Long-distance & over-night travel Rail, canal, stage, private (carriage, wagon) What a woman traveler would have had List – Acquire & make (note the advantages and disadvantages of each.) Types of luggage Trunks Bonnet trunks Bonnet boxes Types of bags Large carpet bags Small carpet bags Travel bags Small bags Travel attire – Differences between travel attire and everyday attire Safety while traveling Coming soon … Step 2 – The items to make list and the items to acquire listThanks to a text message from my sis-in-law, I made it to one of my favorite place’s fundraisers where I picked up this shawl. With these colors it just had to come home despite the fold fractures.
It is 63″ by 128″.

 There are plenty of moth holes and fold fractures. But, I’m going to have to spend some time looking closer at the damage spots because I noticed something as I was measuring it. Along the sides, the red areas are shorter than the other color areas. I’ll need to determine if these areas have worn differently, if they were trimmed back (there is very little red fringe but plenty of blue and green) or something else.
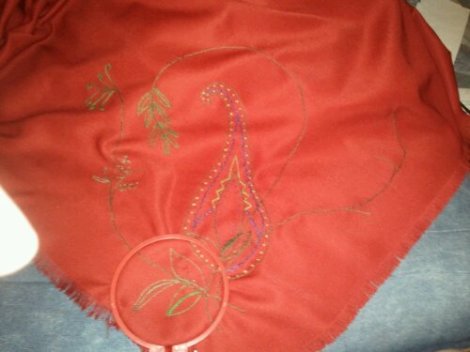
The base of the cone motif which will get more texture & color added then get covered with floral vines and leaves. Or such is the plan. (I have an idea for a second one too.)

As I promised, here is a critique of one of my bonnets. I’m going to try to honestly cover the good, the bad and the ugly.
A little background first- This is a straw bonnet I made while in New Mexico. We were invited to an event at Ft Sheldon by some local friends. We had just a short time to pull everything together. I realized I didn’t have any millinary with me that was appropriate for the very sandy, red-dusty terrain I saw in photos. This bonnet was made in a few days out of materials I found in Alamogordo since there wasn’t time to order anything.
Now, a look at the materials.
The straw came from a vintage hat from a thrift shop. It is just about 3/8ths of an inch thick and rather smooth. This is about as wide as I would suggest for a fashion straw bonnet. The width of the plait and the width of the split straw borders on what would have been considered ‘coarse’ in the 1850s and 1860s. The coarser the straw and plait, the cheaper. The finer the split straw the finer the plaits or other straw work can be and thus the more expensive. The straw plait was completely unsew from its original state, soaked to let the sewing holes fill back in then let to dry to an almost dry state. Then it was sewn back together into the bonnet.
The white lining is made of white cotton voile I had on hand. I stiffened this with lots of my husband’s uniform spray starch despite it already having a fairly full body for a cotton sheer. (I’ll talk a little more about this later.) The spray starch method is not one I would normally use preferring a material with more body and stiffness already.
The flowers came from the local floral shop. They were the closest to natural looking I could find. These are rather sparse/thin for my preferences and what appears to be the level of fullness in period images
The ribbon and bavolet, or curtain, are silk taffeta I had in my stash. The ribbons are cut straight on the grain. The edges are frayed on the body of the bonnet and sized with a glue mixture to keep the silk from fraying more. While this can be seen in a few examples of extant bonnet, it is less common than ribbon which has a selvage edge. You would not see the ribbon fashion ties set on the bias. The width, about 4″, is common for mid-century fashion bonnets. The ribbons are an adequate length. I would not suggest going any shorter. The ribbon does stand fairly well despite spending the mid-day out in the rain and thoroughly damp.The bavolet is cut and pieced on the bias. The bias in the bavolet helps with the fullness. As you can see in the side view of me wearing the bonnet the bavolet is rather limp. This is because I do not have any net backing the silk. If I had net, I would hem the net into the silk or tack it to the silk. Then I would pleat the top of the silk and net as one.
Just under the taffeta ties, is the silk functional ties. This is 1″ wide silk ribbon
 Now, let us look at shape and parts.
Looking at the side view of me wearing the bonnet, this is what happens when I put on a bonnet without a mirror, using the side of the car instead. The bonnet is angled backwards more than I would like. While it doesn’t need to be perfectly vertical, it certainly should be more vertical than this. To adjust what I see, I would sit the tip slightly higher on my small bun (I often wear my hair with braids flat against the back of my head, but opted for a bun instead which does stick out further from the back of my head.) with the top of the brim angled closer to vertical.
Looking at the overall shape of bonnets, one of the first things I see is the transition line from the tip though the crown to the brim. This should be a gentle transition not a drastic one. See how in this straw the transition has gentle curves? Compare that to this original straw bonnet which has a markedly deeper tip or this lovely original black straw.
As I noted the depth of the tip in the original compared to mine, we can look at that next. Yes, mine could be deeper. I think one or two rows of plait moving into the crown would make the difference. One thing to keep in mind when looking at the tips on straw bonnets is that they were not flat. Instead, they rounded from the back of the tip to the sides. Sometimes this was a small curve, other times it was more ball-like.
 The cheek tabs are an area that was quite the challenge when I started working with straw. At first they were thick and angular. But, as I looked at more bonnets, I saw cheek tabs were more narrow with a nice curve to them. Sometimes they were almost pointy.
Back to the frill. It isn’t frill enough to be a true frill. I would much rather have another layer of stiffer material double box pleated with the raw edges filling the edge of the brim. When thinking frill, think full and three-dimensional. The flowers need to be much fuller too.
The black across the inside is the velvet band that holds the bonnet on my head. I love these. They work wonderfully. Even with the bonnet perched at the odd angle on my head, the rain coming down and repeatedly wacking myself in the bonnet with my umbrella, the bonnet stayed put without feeling like it wanted to move at all thanks to this strip.
I’m sure there is more I can pick apart on this. But, that is all for tonight.


