This is a fun little story I started some time back. It is the idea that I used for my AI homework in the previous post.
We’ve all heard stories of the little mouse who just doesn’t fit in. In recent years, there has been a brave mouse who helped save a princess and a little cook who helped save a cooking empire. Ok, so that cook was a rat not a mouse. This is a similar story.
Our little mouse lived with his family, his mother, father, and three siblings, in a beautiful historic house museum. This little mouse’s name was Alex. All his life Alex’s mother and father told him and his siblings how lucky they were to live in such a beautiful, old house. Alex’s school lessons took place through-out the house, where he and his many mouse classmates learned about all the Federal furniture, early Victorian decoration and mid-nineteenth century textiles. Alex’s classmates’ favorite day of the week was when they learned about 19th century food and cooking. Alex, on the other hand just couldn’t figure out how the little old lady who made the food never figured out bits and pieces went missing.
That wasn’t the only thought Alex had that was different from his classmates, or his family for that matter. Actually, Alex had very little interest in most everything around him. While his sister loved to watch the human school groups come visit and try to answer all the kids’ questions before the tour guide, Alex simply was not amused. While Alex’s brothers like to race each other from the second floor grandmother’s clock to the first floor grandfather’s clock in the parlor in the time from the first chime to the last chime, Alex simply was not amused. While Alex’s best friend George, enjoyed collecting all the bits and pieces of thread and fabric from the women sewing to make his own quilt, Alex simply was not amused.
But, there was one weekend a year that Alex loved. When the weather turned warm and the days a bit longer, the house museum would host a living history event. Hundreds of people from all around the area would come set-up camp and dress in historic clothing while visitors would wander through the house’s yard. Alex was very excited to see all these people. It turns out that while Alex was not interested in the 19th century, he loved vintage goodies; they were so much newer then everything he grew up with. His room was filled with vintage items he collected each year on this weekend. Each year, as people arrived on Friday, Alex would watch paying close attention and coming up with his scouting plan for that evening. Then as evening came, he would prowl the area collecting.
This particular year, Alex was quite excited as he watched people arrive. He had already spotted a group of women over by the willow tree that kept bringing plastic totes out of their car. That will be where he will start. Then, if everything isn’t too heavy, he’ll work his way back to the house.
As the sun began to set, Alex ventured out.
Alex learned the best place to travel was along the edges of the tents as these were fairly safe and protected areas. He especially liked the tents that had straw packed along the sides, as if needed he could hide or stash his finds there. As he scurried, Alex realized he was actually stepping in time with the music being played a several tents over. He even surprised himself with that one. Then he stopped quick. A sound. A very different sound. It was coming from the next tent. He ran ahead and ducked under the canvas. There was a man, half dressed in the gray wool so many of the other men were wearing, sitting on the ground hunched over. Bleep, bleep, bling, bleep. It was one of those little noise making toys the school kids brought with them and the teachers took away. Alex tried to climb up the tent pole to get a better view. He found these games interesting. But, he knew better then to take one as he already found they stop working after a few days. He also knew he couldn’t be distracted to long. He had to move on.
Back outside, Alex headed right for the willow tree. As he got closer, he knew he was in the right spot. A table cloth had slid off of a blue plastic ice box outside the tent. He slid under the edge of the tent. Once inside, he assessed his surroundings.
At the top of the little folding stool, one of the ones Alex saw women fall over on many times, Alex became very excited. Left in a pile was one of those bags the women wore on their heads holding their hair. This was just perfect. Alex was hoping he would find something like this because his bed was getting old and he really wanted a hammock to sleep in. Green would be perfect. He rolled it up as best he could and slung it over his shoulder. As he did, he saw something shiny on the bed below. He worked he way down to the bed and over to the shiny object. Once again, Alex was happy. It was a pony-tail lady. Alex loved these pony-tail ladies. He had a whole collection of them.
This is where I stopped writing 13ish years ago.
The Adventures of Alex the Mouse
Winter (head)Wear Week – The Pumpkin Hood aka Wadded Winter Hood
What is a Pumpkin Hood?
A “Pumpkin” hood or bonnet is a wadded bonnet, most commonly made of silk on the exterior and polished cotton, cotton or silk on the interior. Wide, full channels are filled to a full loft with wool batting either lightly or densely. The channels are separated by smaller channels, single or multiple, that are drawn in by cord or ribbon. The front brim may or may not have a decorative ruffle, attached or tucked from the base exterior fabric. These usually have a petite to moderate bavolet either lightly filled with batting or without batting.
Some other terms that seem to apply: Wadded bonnet/hood, “Ugly”, a “Kiss-me-quick”.
How early were these worn?
Most museums seem to start their dating of wadded, pumpkin style hoods in the second quarter of the century. Some do push earlier, as far as the late 1700s/early 1800s, such as this example from the Boston Museum of Fine Arts.
As domestically made winter hoods were a utilitarian garment rather than a fashionable one, their appearances in fashion literature is limited. I see one set of passages referencing a wadded hood or bonnet, drawn in, worn close to the face that may help us give wadded hoods drawn close to the latter 1830s:
In the Ladies Pocket Magazine, of 1838, London, we see a mention of wadded bonnets as a fashionable item. Of English fashions – “Wadded bonnets which before were very much in vogue, are now almost the only ones adopted in promenade dress, and it must be confessed nothing could be better calculated for the season, particularly when they are worn, as in often the case, over a blond morning cap of the demi-cornette form.” (In this passage, wadded pelisses and wadded mantles are also mentioned.) Of Paris fashions “Winter has set in with all its rigour, but that is of little consequence to our elegantes, who, occupied with the grand dinners, balls, and fetes that are always given in the commencement of winter, have deserted the promenades. Novelty in out-door costume is consequently out of the question, velvet or satin mantles, which are trimmed and sometimes lined in fur, that their busts are defended by a large fur palatine, their hands doubly shielded by fur cuffs, and a muff, and their pretty faces guarded by a large wadded bonnet, which completely meets under the chin, we have said all that can be said of out-door dress.” The year prior, the same publication tells us: “We may cite with confidence, among the new bonnets will be very fashionable, the capotes a conlisse ouatees, or wadded drawn bonnets; the are a most comfortable head-dress, composed of satin or pou de soie, lightly wadded, and simply trimmed with ribbon. They differ a little in shape from the other bonnets, sitting closer round the face.” This may or may not be the beginning point of the wadded, pumpkin style bonnet. Neither publication includes an illustration of this practical winter wear in the midst of the popular large bonnets of the era.
In that same time period, we see wadded and quilted hoods/bonnets constructed for children in The Workwoman’s Guide. The illustrations suggest the quilted versions have larger crowns that are volumous in some cases. It is important to note the difference between this shape and the Pumpkin shape. I believe this is the construction that evolves through the rest of the century as the quilted bonnet.
Blackwood‘s suggested I should look at “quilted wadded capotes” as well as “bonnets” and “hoods”. Though, this February and March 1843 Peterson‘s suggest capotes were quilted, rather than wadded with loft.
One of only photographs clearly depicting a wadded “pumpkin” style bonnet/hood is a bit of tease. While taken in 1897, the photograph does not show contemporary/current wear, rather historical costume wear. This photograph is held by Deerfield.
Were they worn during the Civil War?
Yes, evidence suggest wadded hoods were worn in the 1860s. The 1860 painting, School Girls, by George Augustus Baker, shows the girl on the left in what could be a red silk wadded pumpkin bonnet. The artist did several studies for this painting, including Little Girl in a Red Bonnet, which is undated.
Examples:


Learn more about Wadded Hoods and How to Make Your Own in my New Wadded Hood Workbook.

Museum examples:
- LACMA circa 1850
- MET circa 1840s
- MET “early 19th century”
- MFA Late 18th to early 19th century
- Wayne State University Libraries, circa 1820-1850
- Wayne State University Libraries, 1840-49


Wearing the Mid-Nineteenth Century Hat

Wearing nineteenth century clothes, we find they fit differently than our modern clothes. The waist is in a different spot. The bust sits differently. Seams are used to accent or de-accent parts of the body. The fit feels different and moving in the clothes is different. The same is true for hats and bonnets. In previous posts I’ve talked about bonnets and perch. Here, we are going to look at how a hat was worn and how it “fits”.
In the 1850s and 1860s, hats were worn much higher on the head than we are accustom to in the twenty-first century. Think about when you wear your modern beach or garden hat. You know that line across your forehead where it sits after a long hot day? You do Not want that. A mid-nineteenth century hat sat higher, at the top of your forehead, at your hair line, or even higher. Take a look at these fashion illustrations from 1860-1862. Notice where each hat sit. In a few illustrations, the front hairline is obviously below the crown line. In others, the crown sits just at this line. The hat sits atop the head, not encompassing it. The curve of the brim is what dips to the eye line, not the hat itself.

What does this mean for you when picking a size?
There are two factors for finding a comfortable fit: Size and shape.
The difference in wear or placement means we measure for a mid-nineteenth century had differently than we do for a twentieth or twenty-first century hat. The modern hat is measured just above the eyebrow. (This is also where many of us measure for bonnets. We want to keep you on your toes.) For mid-nineteenth century, we measure higher, at the hair line. In this illustration, we can see the difference between where the two measurements would be.
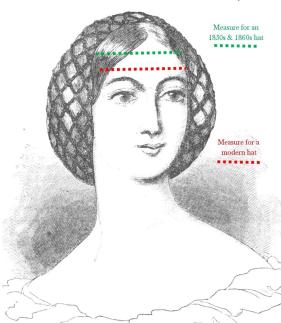
These higher, hairline measurements are often smaller than those taken at the eyebrow. A hat worn at this point can be slightly smaller to slightly larger for comfort. So, add and subtract an inch to your hairline measure.
For example: I am 22.5″ around at my eyebrows and 21.5″ at my hairline. The vast land of the internet tells me that the average woman’s head measures 22.5″ to 22 5/8″ around at the modern measuring point. So, I am about average. I comfortably wear a mid-nineteenth century hat that is 19.5″ to 21.5″
General guidelines I use:
- Small = Less than 21″ at the hairline (crown less than 20″)
- Average = 21″-22.5″ at the hairline (crown 20-21.5″)
- Large = Greater than 22.5″ at the hairline (crown greater than 22″)
Just like every head measures a bit differently, they are each shaped a bit differently.

When looking from above, some people have rounder heads while other have more oval heads. Both of these shapes to the right can have a circumference of 22.5″. Yet, the same hat would fit each head differently.
I will try to indicate which hats have rounder crowns or more oval crowns. I am in the process of naming the crowns. Hopefully, that will help.
My straw hats and bonnets are available in my Etsy shop as I finish them: https://www.etsy.com/shop/AnnaWordenBauersmith
Are you one of the many readers enjoying my millinery blog posts?
Consider becoming a Patreon patron. Doing so helps support my work and helps me write more useful articles.
https://www.patreon.com/AMillinersWhimsy
Winter (head)Wear Week – The Pumpkin Hood aka Wadded Winter Hood
What is a Pumpkin Hood?
A “Pumpkin” hood or bonnet is a wadded bonnet, most commonly made of silk on the exterior and polished cotton, cotton or silk on the interior. Wide, full channels are filled to a full loft with wool batting either lightly or densely. The channels are separated by smaller channels, single or multiple, that are drawn in by cord or ribbon. The front brim may or may not have a decorative ruffle, attached or tucked from the base exterior fabric. These usually have a petite to moderate bavolet either lightly filled with batting or without batting.
Some other terms that seem to apply: Wadded bonnet/hood, “Ugly”, a “Kiss-me-quick”.
How early were these worn?
Most museums seem to start their dating of wadded, pumpkin style hoods in the second quarter of the century. Some do push earlier, as far as the late 1700s/early 1800s, such as this example from the Boston Museum of Fine Arts.
As domestically made winter hoods were a utilitarian garment rather than a fashionable one, their appearances in fashion literature is limited. I see one set of passages referencing a wadded hood or bonnet, drawn in, worn close to the face that may help us give wadded hoods drawn close to the latter 1830s:
In the Ladies Pocket Magazine, of 1838, London, we see a mention of wadded bonnets as a fashionable item. Of English fashions – “Wadded bonnets which before were very much in vogue, are now almost the only ones adopted in promenade dress, and it must be confessed nothing could be better calculated for the season, particularly when they are worn, as in often the case, over a blond morning cap of the demi-cornette form.” (In this passage, wadded pelisses and wadded mantles are also mentioned.) Of Paris fashions “Winter has set in with all its rigour, but that is of little consequence to our elegantes, who, occupied with the grand dinners, balls, and fetes that are always given in the commencement of winter, have deserted the promenades. Novelty in out-door costume is consequently out of the question, velvet or satin mantles, which are trimmed and sometimes lined in fur, that their busts are defended by a large fur palatine, their hands doubly shielded by fur cuffs, and a muff, and their pretty faces guarded by a large wadded bonnet, which completely meets under the chin, we have said all that can be said of out-door dress.” The year prior, the same publication tells us: “We may cite with confidence, among the new bonnets will be very fashionable, the capotes a conlisse ouatees, or wadded drawn bonnets; the are a most comfortable head-dress, composed of satin or pou de soie, lightly wadded, and simply trimmed with ribbon. They differ a little in shape from the other bonnets, sitting closer round the face.” This may or may not be the beginning point of the wadded, pumpkin style bonnet. Neither publication includes an illustration of this practical winter wear in the midst of the popular large bonnets of the era.
In that same time period, we see wadded and quilted hoods/bonnets constructed for children in The Workwoman’s Guide. The illustrations suggest the quilted versions have larger crowns that are volumous in some cases. It is important to note the difference between this shape and the Pumpkin shape. I believe this is the construction that evolves through the rest of the century as the quilted bonnet.
Blackwood‘s suggested I should look at “quilted wadded capotes” as well as “bonnets” and “hoods”. Though, this February and March 1843 Peterson‘s suggest capotes were quilted, rather than wadded with loft.
One of only photographs clearly depicting a wadded “pumpkin” style bonnet/hood is a bit of tease. While taken in 1897, the photograph does not show contemporary/current wear, rather historical costume wear. This photograph is held by Deerfield.
Were they worn during the Civil War?
Yes, evidence suggest wadded hoods were worn in the 1860s. The 1860 painting, School Girls, by George Augustus Baker, shows the girl on the left in what could be a red silk wadded pumpkin bonnet. The artist did several studies for this painting, including Little Girl in a Red Bonnet, which is undated.
Examples:
Learn more about Wadded Hoods and How to Make Your Own in my New Wadded Hood Workbook.
Museum examples:
- LACMA circa 1850
- MET circa 1840s
- MET “early 19th century”
- MFA Late 18th to early 19th century
- Wayne State University Libraries, circa 1820-1850
- Wayne State University Libraries, 1840-49
Millinery Care and First Aid
I have written a couple posts in the past about caring for or storing our bonnets. Lately, a few specifics “uh-oh” fixes have been asked of me. So, I thought it would be good to put together a more detailed article on millinery care and first aid. Here I will be talking about Straw millinery only.
Preventative Care Your Bonnet
The best prevention is to store a bonnet or hat on an archival stand, under a glass dome with its own security system. ….. A dream, right?
(If I could have all the storage space in the world and start over – I would attach two stands to the inside of the lid of a tote (I think they are the 15 or 20 gallon totes) With the lid as the bottom, the tote becomes the top. I could then place a bonnet on each stand with the ribbons rolled up. No wrinkles, no dust, no issues. Again, that is my dream.)
I’m going to boil this down to my list of dos and don’ts:
Do – Keep you hats and bonnets on stands
Do Not – Use foam heads for storage. These will release chemicals that will discolor your bonnets. Even covered with other fabric this can happen.
Do – Cover your bonnets some how to keep dust off of them. Yes, a box is best.
Do Not – Store in overly moist or overly dry areas. Moisture can cause mildew, mold and color issues. Dryness can cause silks to shatter.
Do Not – Store a bonnet on its face, side or bavolet. This will cause crushing, wrinkling and misshaping.
In Case of Mishaps
Rain – A gentle sprinkle can usually be okay with a gentle drying while on the bonnet stand. If you find you were stuck in a heavier rain with your bonnet on, first remove all flowers and ribbons from your bonnet. Hang your flowers upside down. I have this awesome stand from Wilton that was meant for cake making that works great. You may want to use clothes pins to hang them from a clothes hanger. Lay the ribbons flat to dry on a paper towel or old towel as not all ribbons are color fast. You may find you want to remove the bavolet as well. Lay it flat, net side up. Most bavolets can be pressed with the aid of a pressing cloth once dry.
For the bonnet itself, press any mishapings out with your hands gently against the counter if need be. Take a roll of paper towel. Unroll it to about the size of the tip of your bonnet. Place the bonnet face down on top of the upright paper towel. If you left the bavolet attached, let it lay open but not touching the bonnet. Arrange the pleats and work out any wrinkles carefully with you hands. Allow it to dry completely. In the case of a hat, you may need to shape the top of the paper towel roll to reflect the curve of the crown and lay a layer or two of towels over it to make a smooth surface.
Reattach the ribbons and flowers.
Wrinkled ribbons – Ribbons get wrinkled and crinkled when tied and untied. Bonnets should be stored untied with the ribbons neatly rolled into a coil. (I even roll some of mine around little ribbon pillows I’ve made.) Rolling the ribbons will help coax the fibers that were inside in the bow to relax back where they should be while keeping additional wrinkles from forming.
If you find your ribbons to be holding their wrinkles, you can steam them to help relax the wrinkles then roll the ribbon. You can also try pressing the ribbon with an iron using a pressing cloth. (Most silk ribbons are vintage with older fibers, while newer ribbons, even high quality ribbons are a combination of rayon, polyester and nylon. A low temperature and pressing cloth is safer than ending up with your ribbon stuck to your iron or breaking.)
Squashed Flowers – a Flowers can become squashed during wear or storage (or oopses). For velvet flowers, I find a light spraying of spray starch and reshaping with my fingers works best. Spray just a small area at a time, 1 or 2 square inches at most. The petals should be barely damp, not wet. Gently work the damp petals and leaves back into shape. Allow them to dry fully. If you have removed them from the bonnet or hat, clip the flowers to something so they stand up to dry.
For organza or other faux silk flowers, a light steaming may work to help coax the fibers in the petals to be manipulated and reshaped. Allow them to dry fully as well.
Crushed Frill – a A slightly crushed frill can be steamed and reshaped with the aid or a bodkin or hair pin. A severely crushed frill needs to be removed and pressed with an iron. Silk organza or cotton organdy should be able to be pressed on the designated setting. Lace should be pressed on a low setting with the aid of a pressing cloth. I try to press the frill while it is still pleated. (un-pleating and re-pleating is timely.)
Crushed or Shattered Straw – This is a though one. I’ve had a couple people ask me about bonnets that have been sat on or crushed in baggage. If the straw is not completely broken just misshapen, I suggest removing the flowers, ribbons, etc. Dampen the area(s) that have misshapened. Reshape the area(s) with your hands. Use objects in your kitchen for support if need be. Allow the straw to dry fully. If needed, mix some millinery gelatin or white glue & water (1:1) and brush it on the area for firmness and strength.
If a single or only a couple straws have been broken, it may be possible to replace or support those areas with additional plait if a matching plait can be found. To support, clean the break with fine scissors or nail clippers so the cut is along the diagonal of the plait. Unpick the stitches connecting that row of plait to those adjacent. Cut a piece of straw 2 or 3 inches long with diagonal cuts. Slide the piece into the fracture. Line it up carefully. Sew the piece into place catching the layers and the broken strips.
If multiple rows of plait are broken or it is a woven straw, the best chance is to realign the straw (dampened) and support it from the back with sinway or a piece of woven straw. The front of the straw will need the aid of a bodkin and/or tweezers to get the right look. You will want to use millinery gelatin or a glue solution to firm up the realigned straw. I would only recommend this if purchasing a new one is out of the question as it will be very intensive.
Dust or Cobwebs – If you store your bonnet or hat on a stand, you may get cobwebs. My favorite solution is a can of spray air, like the kind used for computers. Spray gently and at an angle.
Squashed Bavolet– A bavolet can get squashed during storage. If this happens, Turn the bonnet upside down. If need be, tie the functional ties together and hang the bonnet from the loop. Steam the bavolet encouraging it to flop over the tip and sides of the bonnet. Steam both the silk side and the net side. Smooth out tough wrinkles with your hands. Once the bavolet is back in shape, let it dry fully and spray with spray starch.
Are you one of the many readers enjoying my millinery blog posts?
Consider becoming a Patreon patron. Doing so helps support my work and helps me write more useful articles.
Wearing the Mid-Nineteenth Century Hat
Wearing nineteenth century clothes, we find they fit differently than our modern clothes. The waist is in a different spot. The bust sits differently. Seams are used to accent or de-accent parts of the body. The fit feels different and moving in the clothes is different. The same is true for hats and bonnets. In previous posts I’ve talked about bonnets and perch. Here, we are going to look at how a hat was worn and how it “fits”.
In the 1850s and 1860s, hats were worn much higher on the head than we are accustom to in the twenty-first century. Think about when you wear your modern beach or garden hat. You know that line across your forehead where it sits after a long hot day? You do Not want that. A mid-nineteenth century hat sat higher, at the top of your forehead, at your hair line, or even higher. Take a look at these fashion illustrations from 1860-1862. Notice where each hat sit. In a few illustrations, the front hairline is obviously below the crown line. In others, the crown sits just at this line. The hat sits atop the head, not encompassing it. The curve of the brim is what dips to the eye line, not the hat itself.
What does this mean for you when picking a size?
There are two factors for finding a comfortable fit: Size and shape.
The difference in wear or placement means we measure for a mid-nineteenth century had differently than we do for a twentieth or twenty-first century hat. The modern hat is measured just above the eyebrow. (This is also where many of us measure for bonnets. We want to keep you on your toes.) For mid-nineteenth century, we measure higher, at the hair line. In this illustration, we can see the difference between where the two measurements would be.
These higher, hairline measurements are often smaller than those taken at the eyebrow. A hat worn at this point can be slightly smaller to slightly larger for comfort. So, add and subtract an inch to your hairline measure.
For example: I am 22.5″ around at my eyebrows and 21.5″ at my hairline. The vast land of the internet tells me that the average woman’s head measures 22.5″ to 22 5/8″ around at the modern measuring point. So, I am about average. I comfortably wear a mid-nineteenth century hat that is 19.5″ to 21.5″
General guidelines I use:
- Small = Less than 21″ at the hairline (crown less than 20″)
- Average = 21″-22.5″ at the hairline (crown 20-21.5″)
- Large = Greater than 22.5″ at the hairline (crown greater than 22″)
Just like every head measures a bit differently, they are each shaped a bit differently.
When looking from above, some people have rounder heads while other have more oval heads. Both of these shapes to the right can have a circumference of 22.5″. Yet, the same hat would fit each head differently.
I will try to indicate which hats have rounder crowns or more oval crowns. I am in the process of naming the crowns. Hopefully, that will help.
My straw hats and bonnets are available in my Etsy shop as I finish them: https://www.etsy.com/shop/AnnaWordenBauersmith
Are you one of the many readers enjoying my millinery blog posts?
Consider becoming a Patreon patron. Doing so helps support my work and helps me write more useful articles.
https://www.patreon.com/AMillinersWhimsy
Got Perch?
A favorite blog post from 2014
A CDV recently appeared that brought up how women wore their bonnets perched on the backs of their heads from 58ish to 63/4ish. (I want said cdv & will be bidding. Fingers crossed.) Here is a close-up:
See how the bonnet sit further back on her head? Her interior flowers land almost at her mid-line.
The question I am hearing is “how did they do that?’
There as a few aspects that help:
– A bonnet stay. This is a ribbon, strip or even wire inside the bonnet, positioned to act like a headband holding the bonnet in place. (These need to be fitted to the wearer.)
– The frill and interior decoration. The placement and fullness of these act like a catch or a band to help hold the bonnet.
– Balance. The front to back balance of the bonnet needs to put more weight in the brim and forward crown area of the bonnet rather than the back.
The placement of the hair can also be a contributing factor.
This is my first straw bonnet, years & years ago. While it has some early issues, it shows what a stay can do. These photos were taken after a parade marching into 40 mph winds that ended in a hail storm. During this walk, the force of the winds actually snapped a bone in my cage. But, the bonnet stayed put.

Here is Lily in the same bonnet. It sits further back on her. But, stays pretty well. (It finally got to retire after this.)
This next bonnet is a different shape, drawn. Instead of a stay, it holds put thanks to the frill and flowers. The frill is gathered like ruching in this one. The back edge sorta stands fluffed, holding against my hair.

This is my bonnet from last year. (How awful is my facial expression?) I think you can see the position of this one. This stays with the work of the frill and my hair.

Here is how I often wear my hair:
Now, Lily’s bonnet from last year does need a stay as she does have some issue with I staying put. Granted, se is also showing kids how o play with games including stilts much of the time. She also has far better posture than I do. Now that I think about it more, she has less hair in the back too.
Here is a photo of both of us from last month with the same two bonnets. (different ribbon on mine) This shows the fullness of the frill pretty well.
Tomorrow, I’ll be wearing my new soft crown. It has the ruched frill but no stay. Of course, the weight will be at the top. I will likely be wearing my veil turned back over the bonnet most of the day. I will report back on how well it stays.
Betsy Connolly sent me some beautiful photos showing excellent perch. (The photos are so pretty, I’m not going to crop them.) She says some have stays, some do not. She agrees that staying put is about balance.


Here is Lisa Springstube Lindsey in a mourning bonnet with the full frill helping hold it and a Marie Stuart:

Here is Beth Chamberlain with two good examples:

If you have a good ‘perch’ photo & would like to share it, please let me know (I think if you link it in the comments, I can grab it. Otherwise, email or message me.)
Veil Light Study
What does one do on a sunny, cool morning when a hat isn’t dry? A veil light study of course.
My uber scientific method includes a straw bonnet with a deep brim, a stand, camera and assorted original and reproduction veils. Put bonnet on stand. Drape bonnet with veil. Slide camera up underneath. Take photos. While this doesn’t give an exact reflection of what light control the wearer feels,it is a start.
The backyard without a veil.

Original hat veil. Fiber undetermined.


Black silk gauze, made by me


White silk gauze, made by Bevin.


Original silk net with light dots.


Silk net trimmed in lace made by me.


When I unwrapped the one antique veil, I realized I have another somewhere in the house.I don’t know where. Hopefully, I was good and put it in one of the archival boxes with the winter bonnets. When I find it, I will try to replicate the photos, but the sun will be different.
Another in would have liked to photograph through is Bevin’s green silk gauze veil.
Personal Observations
So far, I think I prefer the black silk gauze. I will have to wear both the gauze and the net a few more times to be sure. The gauze seems to soften the light more. The net seems to be a shade for the light. The white gauze softens some in low sun light. But, in bright sunlight it creates glare. The silk net has notably more body than the original, which is nearly as soft as the gauze. I was much more aware of it feel wise when I first put it on, compared to the gauze. The net was less disturbed, moved by the wind when I walked.
The photos suggest more obscuring of vision than I find to be the case when wearing them.
Millinery Care and First Aid
I have written a couple posts in the past about caring for or storing our bonnets. Lately, a few specifics “uh-oh” fixes have been asked of me. So, I thought it would be good to put together a more detailed article on millinery care and first aid. Here I will be talking about Straw millinery only.
Preventative Care Your Bonnet
The best prevention is to store a bonnet or hat on an archival stand, under a glass dome with its own security system. ….. A dream, right?
(If I could have all the storage space in the world and start over – I would attach two stands to the inside of the lid of a tote (I think they are the 15 or 20 gallon totes) With the lid as the bottom, the tote becomes the top. I could then place a bonnet on each stand with the ribbons rolled up. No wrinkles, no dust, no issues. Again, that is my dream.)
I’m going to boil this down to my list of dos and don’ts:
Do – Keep you hats and bonnets on stands
Do Not – Use foam heads for storage. These will release chemicals that will discolor your bonnets. Even covered with other fabric this can happen.
Do – Cover your bonnets some how to keep dust off of them. Yes, a box is best.
Do Not – Store in overly moist or overly dry areas. Moisture can cause mildew, mold and color issues. Dryness can cause silks to shatter.
Do Not – Store a bonnet on its face, side or bavolet. This will cause crushing, wrinkling and misshaping.
In Case of Mishaps
Rain – A gentle sprinkle can usually be okay with a gentle drying while on the bonnet stand. If you find you were stuck in a heavier rain with your bonnet on, first remove all flowers and ribbons from your bonnet. Hang your flowers upside down. I have this awesome stand from Wilton that was meant for cake making that works great. You may want to use clothes pins to hang them from a clothes hanger. Lay the ribbons flat to dry on a paper towel or old towel as not all ribbons are color fast. You may find you want to remove the bavolet as well. Lay it flat, net side up. Most bavolets can be pressed with the aid of a pressing cloth once dry.
For the bonnet itself, press any mishapings out with your hands gently against the counter if need be. Take a roll of paper towel. Unroll it to about the size of the tip of your bonnet. Place the bonnet face down on top of the upright paper towel. If you left the bavolet attached, let it lay open but not touching the bonnet. Arrange the pleats and work out any wrinkles carefully with you hands. Allow it to dry completely. In the case of a hat, you may need to shape the top of the paper towel roll to reflect the curve of the crown and lay a layer or two of towels over it to make a smooth surface.
Reattach the ribbons and flowers.
Wrinkled ribbons – Ribbons get wrinkled and crinkled when tied and untied. Bonnets should be stored untied with the ribbons neatly rolled into a coil. (I even roll some of mine around little ribbon pillows I’ve made.) Rolling the ribbons will help coax the fibers that were inside in the bow to relax back where they should be while keeping additional wrinkles from forming.
If you find your ribbons to be holding their wrinkles, you can steam them to help relax the wrinkles then roll the ribbon. You can also try pressing the ribbon with an iron using a pressing cloth. (Most silk ribbons are vintage with older fibers, while newer ribbons, even high quality ribbons are a combination of rayon, polyester and nylon. A low temperature and pressing cloth is safer than ending up with your ribbon stuck to your iron or breaking.)
Squashed Flowers – a Flowers can become squashed during wear or storage (or oopses). For velvet flowers, I find a light spraying of spray starch and reshaping with my fingers works best. Spray just a small area at a time, 1 or 2 square inches at most. The petals should be barely damp, not wet. Gently work the damp petals and leaves back into shape. Allow them to dry fully. If you have removed them from the bonnet or hat, clip the flowers to something so they stand up to dry.
For organza or other faux silk flowers, a light steaming may work to help coax the fibers in the petals to be manipulated and reshaped. Allow them to dry fully as well.
Crushed Frill – a A slightly crushed frill can be steamed and reshaped with the aid or a bodkin or hair pin. A severely crushed frill needs to be removed and pressed with an iron. Silk organza or cotton organdy should be able to be pressed on the designated setting. Lace should be pressed on a low setting with the aid of a pressing cloth. I try to press the frill while it is still pleated. (un-pleating and re-pleating is timely.)
Crushed or Shattered Straw – This is a though one. I’ve had a couple people ask me about bonnets that have been sat on or crushed in baggage. If the straw is not completely broken just misshapen, I suggest removing the flowers, ribbons, etc. Dampen the area(s) that have misshapened. Reshape the area(s) with your hands. Use objects in your kitchen for support if need be. Allow the straw to dry fully. If needed, mix some millinery gelatin or white glue & water (1:1) and brush it on the area for firmness and strength.
If a single or only a couple straws have been broken, it may be possible to replace or support those areas with additional plait if a matching plait can be found. To support, clean the break with fine scissors or nail clippers so the cut is along the diagonal of the plait. Unpick the stitches connecting that row of plait to those adjacent. Cut a piece of straw 2 or 3 inches long with diagonal cuts. Slide the piece into the fracture. Line it up carefully. Sew the piece into place catching the layers and the broken strips.
If multiple rows of plait are broken or it is a woven straw, the best chance is to realign the straw (dampened) and support it from the back with sinway or a piece of woven straw. The front of the straw will need the aid of a bodkin and/or tweezers to get the right look. You will want to use millinery gelatin or a glue solution to firm up the realigned straw. I would only recommend this if purchasing a new one is out of the question as it will be very intensive.
Dust or Cobwebs – If you store your bonnet or hat on a stand, you may get cobwebs. My favorite solution is a can of spray air, like the kind used for computers. Spray gently and at an angle.
Squashed Bavolet– A bavolet can get squashed during storage. If this happens, Turn the bonnet upside down. If need be, tie the functional ties together and hang the bonnet from the loop. Steam the bavolet encouraging it to flop over the tip and sides of the bonnet. Steam both the silk side and the net side. Smooth out tough wrinkles with your hands. Once the bavolet is back in shape, let it dry fully and spray with spray starch.
Are you one of the many readers enjoying my millinery blog posts?
Consider becoming a Patreon patron. Doing so helps support my work and helps me write more useful articles.
https://www.patreon.com/AMillinersWhimsy


