Seaside, Gardening, Resort and Other Shape Straw Hats

Now that I’ve talked about Fashion Straw Hats, there will of course be people saying “but what about this one”. One word:

Context.

Yes, there were other shape hats…. They all have their place. It is very important to understand the context of these other shapes before you wear one.

Harpers Monthly June 1850Hat shapes are time sensitive, such as the promenade hats to the left from June of 1850, age sensitive, such as hats for youth, year sensitive, such as hats from late in the war, and situation sensitive.
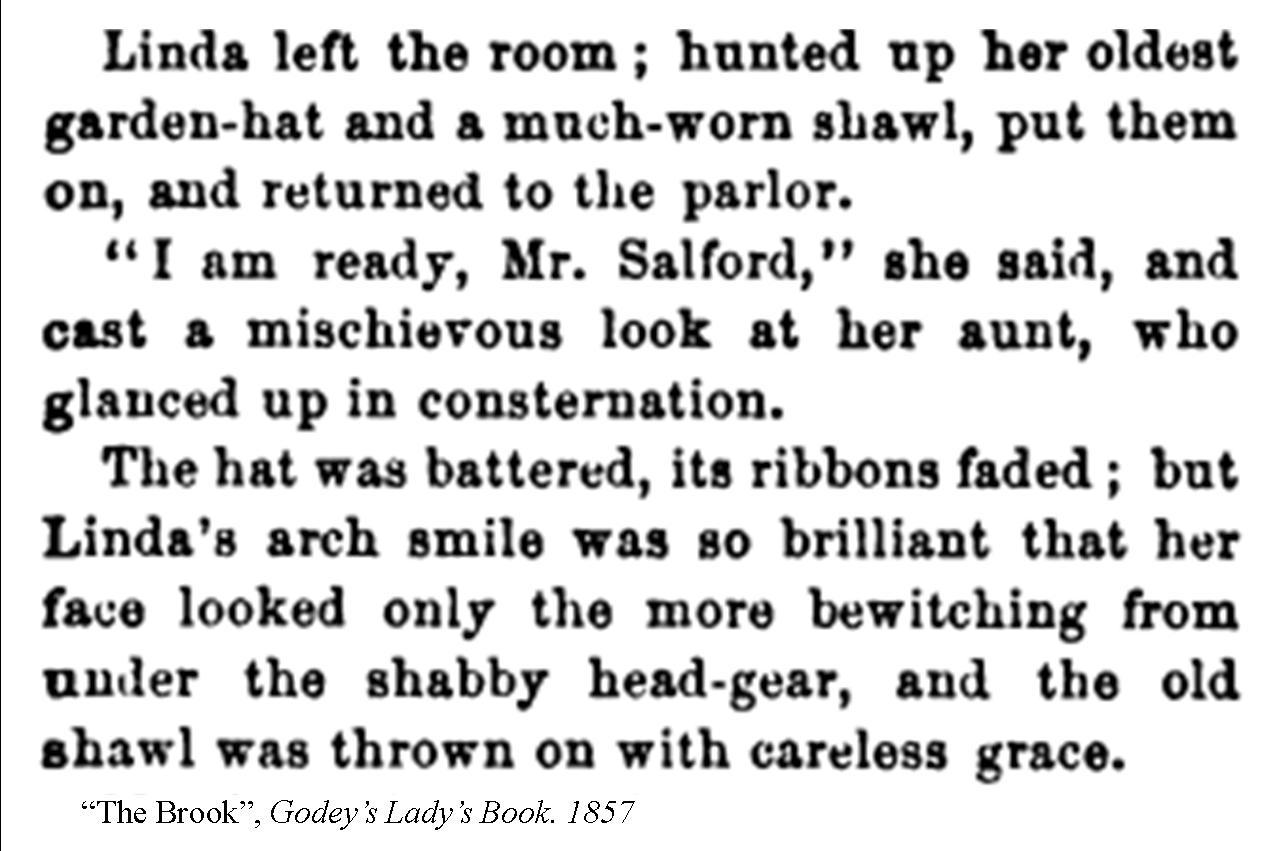
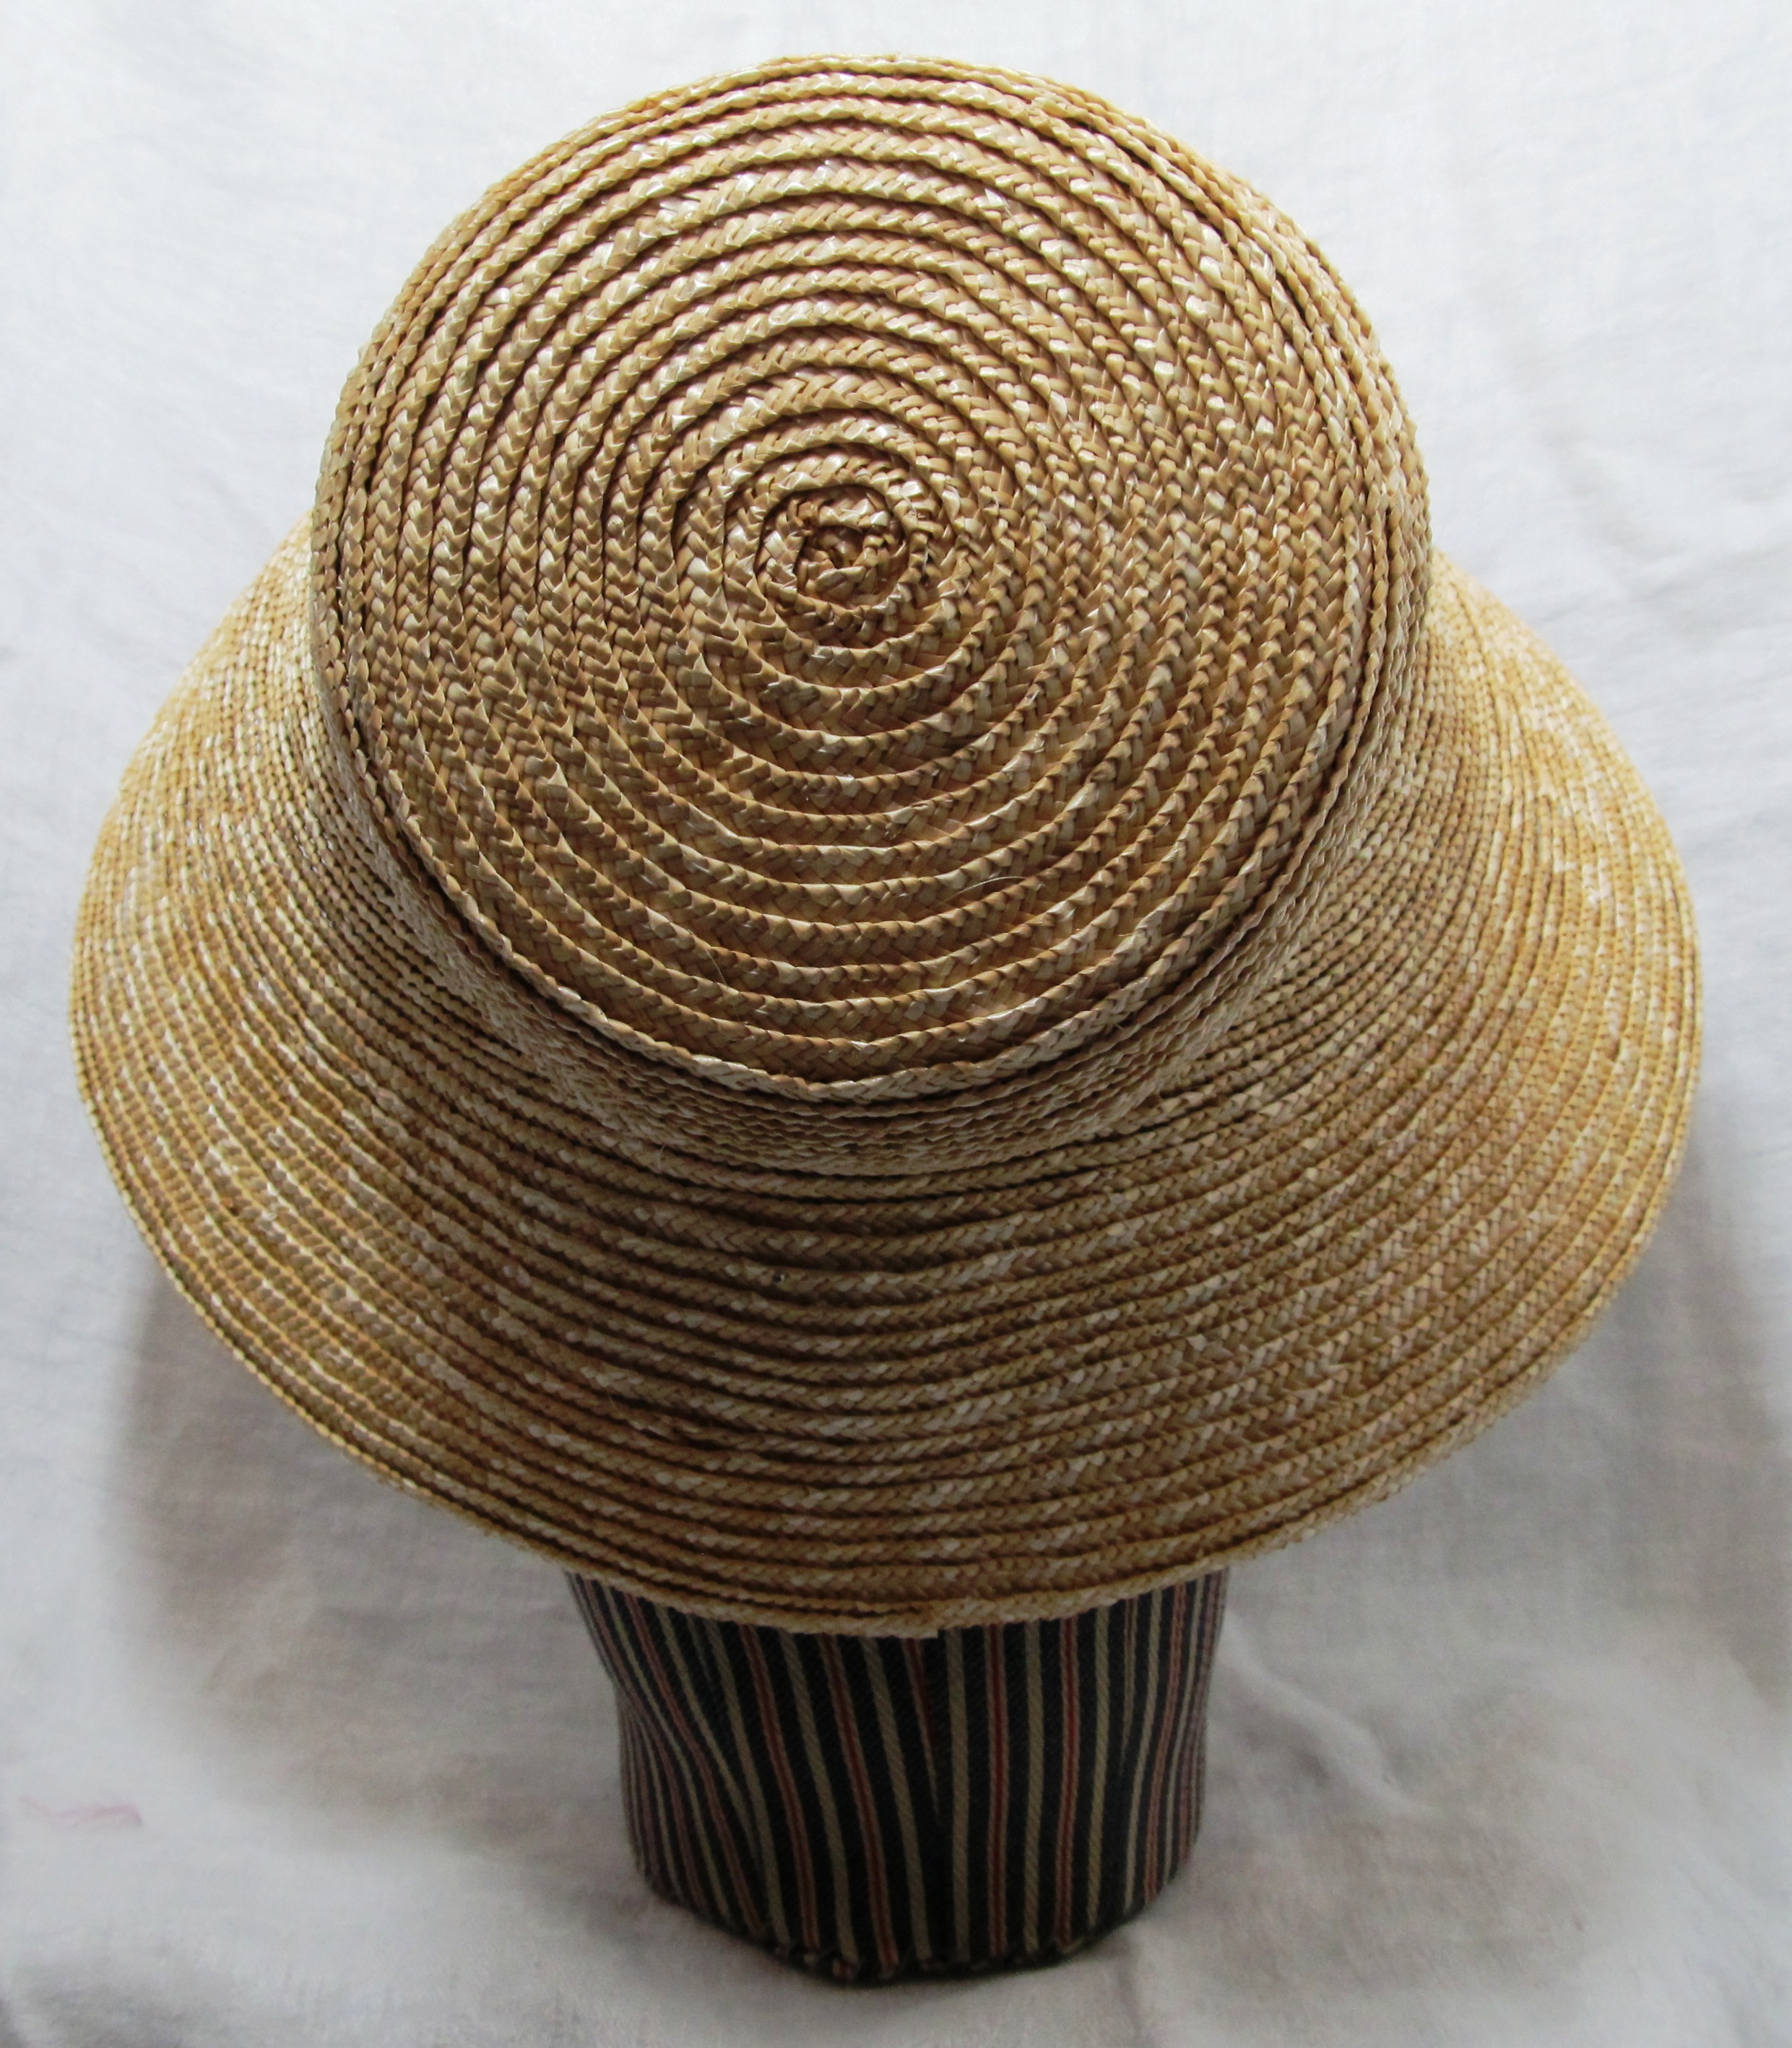
Garden Hats:

longislandmuseum.pastperfect-online.com

William Sidney Mount’s Returning from the Orchard shows a good example of a garden hat. She wears a hat with a shallow crown and a round, full brim.

Straw Garden hat clip 2

Lily Martin Spencer gives us a very nice look at a garden hat in her painting The Artist and Her Family at a Fourth of July Picnic, ca1864. On the right, you can see the hat held just behind the woman in pink. It is an almost circular hat, though still an oval crown, with a wide brim.

To give us even more perspective on the garden hat, take a look at this story snip-it:

Straw Garden hat clip 1

Seaside and Resorts:

One of the first things you will notice when looking at seaside/resort images is that the range of millinery is in addition to rather than instead of. We see round, wide brim hats in addition to fashionable hats, in addition to bonnets. This 1859, Harper’s Weekly image demonstrates this.

Seaside hats from Charles Wynne NichollsNotice – Charles Wynne Nicolls paints several of his seaside women with hats that don’t fit the norm we see seaside. This is important to note because these pieces were painted on the other side of the pond in England. These were also painted late or just after our Civil War eras. A further detail of how important context is.
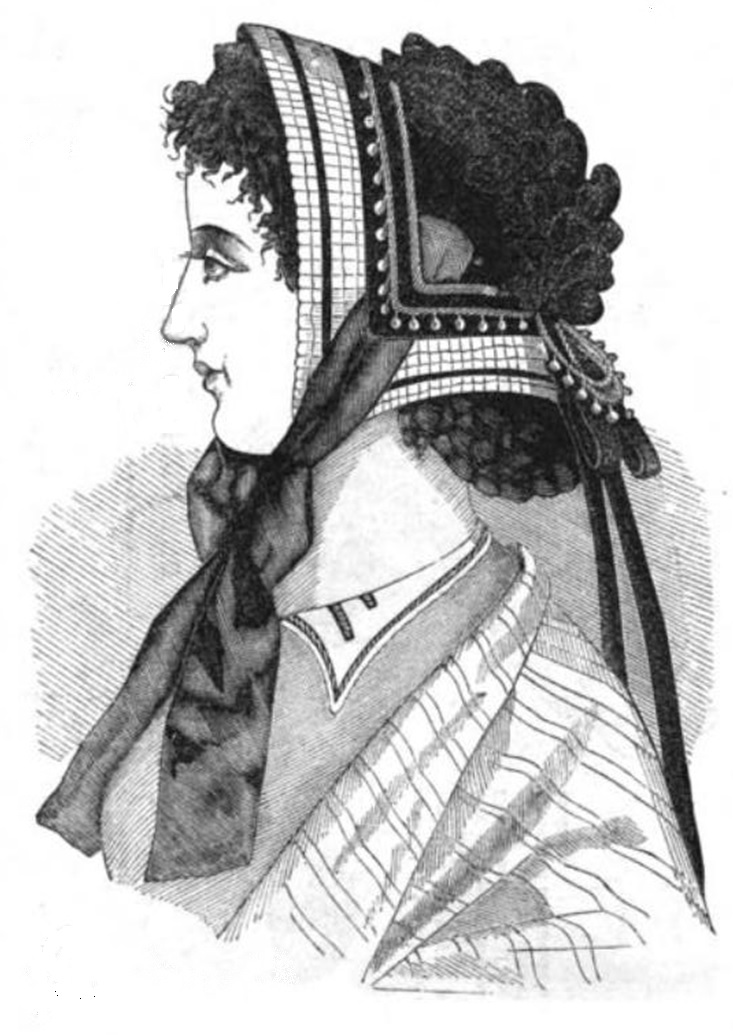
Reform Dress Hats: 

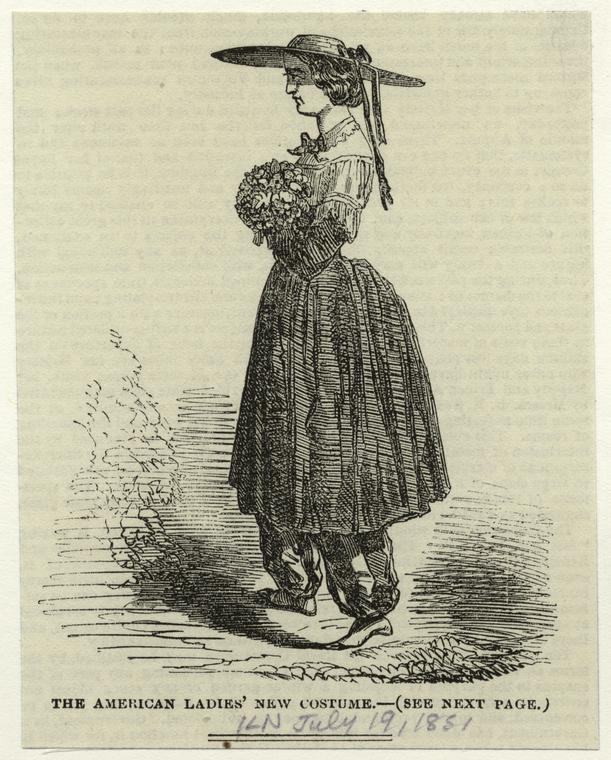
The American ladies’ new costume. (1851)

Many 1840s – 1860s illustrations of reform dress show a wide brim, shallow crown hat as part of the attire. This shape of hat was seen a practical, shading the face and eyes from the sun.

More coming. I just wanted to get this much up….

Published in: on February 22, 2015 at 2:52 pm  Comments (1)  

The Shape of Straw Fashion Hats

I may be on a (cranky) roll. But, I’m sick of incorrect shapes when there are some very nice ones available.

First and far-most, 1850s and 60s fashionable straw hats were rarely circular. (This does not count seaside hats, garden hats,  hats for the watercure and such. Those are not fashion hats.) Fashionable hats were ovular. Fashionable hats had curves. I can’t get any more simple that this: (That should say “The Basic Shape of CW Era Straw Hats”)

Shape of straw

This is not new news. Take a look at this nice blog post from Crown Heads Millinery from 2013. Don’t miss her example either. We also took some time to look at shapes here back in 2009.

This hat that was up for auction some years ago is excellent for seeing the shape from above. Notice how the crown is oval as well as the brim. The front and back reach much further than the sides.

Here is a page from the September, 1857 Godey’s Lady’s Book. Notice the general shapes.

a

From http://www.thegracefullady.com (click link for full image)

The images to the right show ladies holding hats that obviously show the shape of the crown and brim.

his painting, Portrait of Mary French, 1862, shows how a shaped, fashionable hat sits on the head. Notice how the brim dips in front of her eyes and in the back. If her head was level, part of her vision was likely blocked.

Looking for a CW era straw fashion hat? The first place you should look is on Pam Robles site. She spent a very, very long time getting her woven straw shapes right. I will also hand make hats on occasion.

I strongly caution you to get a solid second opinion on any hat under $75. Take a close look at the type of straw, the sewing, the thread used and of course the shaping. Handsewing a straw plait hat will take at least 6 hours. They then need to be wired and blocked. Woven straws need extra special attention to the details of shaping in the blocking and wiring process taking time.

Coming soon in another post:

Now that I’ve talked about Fashion Straw Hats, there will of course be people saying “but what about this one”. One word:

Context.

Yes, there were other shape hats…. They all have their place. It is very important to understand the context of these other shapes before you wear one. 

Published in: on February 20, 2015 at 10:46 pm  Comments (3)  

Why I am Not Sharing

I am quite convinced that certain issues come up in a cycle rotating almost every two years or so.

This post has to deal with one of those issues. I will try to get through it as nicely and politely as possible. Intellectual property

Lately, there have been some issues with violating Intellectual Property Rights. As such, we will start there.

What is Intellectual Property?

“Intellectual property refers to creations of the mind: inventions; literary and artistic works; and symbols, names and images used in commerce.” (World Intellectual Property Organization.)

What are Intellectual Property Rights?

Intellectual property rights are the rights given to persons over the creations of their minds. They usually give the creator an exclusive right over the use of his/her creation for a certain period of time. (World Trade Organization)

and

Article 27. Section 2 “Everyone has the right to the protection of the moral and material interests resulting from any scientific, literary or artistic production of which he is the author.” (The Universal Declaration of Human Rights.)

Copying and distributing someone’s research without permission violates Intellectual Property Rights. Using someone’s photos from the internet without their written permission violates Intellectual Property Rights. Taking photos of someone’s slideshow and sharing them violates Intellectual Property Rights. This is as much a moral issue as it is a legal issue.

Now, I am not going to address other instances of late as those are other people’s business. I will address part of my end.

I feel I share quite generously that which I am happy to share. This past year, I shared transcribed primary information weekly for millinery and in a variety of series for other social and material culture topics. I have shared a number of how-tos and directions over the years. Besides my blog, I have shared a notable amount of research and information in printed publications.

Frankly, I put a great deal of my time, thought, energy and money into my research and writing. I know there is some delusion oou there that those of us who work in the public school system live a comfortable lifestyle. I assure you, this is not the case. I do not have oodles of extra time and extra cash laying around to toss at a fun little hobby. I take my research seriously and choose to cut other parts of my budget to get what I need to do my research.

I have been asked for particular pieces of research lately.

  • I have been asked for up-close photos of the techniques I use in my winter millinery.
  • I have been asked for step-by-step images of how I do my straw millinery.
  • I have been asked for up-close images of originals in my collection.
  • I have been asked for construction details from originals in my collection.

want to be happy to share these. My gut reaction actually is to share. But, the reality is I have had my millinery work copied and sold. I have had my directions copied and distributed.

There is no way for me to tell if someone asking is doing so for honest reasons of personal enrichment, curiosity and improvement, or if they are looking for some pre-done research they can make a quick profit off of.

I acknowledge some people may not realize they have done this; they may not have malicious intent.

But, it happens.

And, frankly it sucks.

This said…. Yes, I am working on a couple projects. I have one pet one in particular. You will see some of the products resulting from some of the work during this project. You, meaning the general internet public, will not see the details of this project until I have decided the format and venue to properly introduce it.

Please, as take time to consider how you can protect Intellectual Property Rights whether your’s or someone else’s. 

Published in: on February 20, 2015 at 6:44 pm  Comments (16)  

About Mourning Bonnets

The question of mourning bonnets came up twice this week. ???????????????????????????????

In the past couple years, I have been asked to make mourning bonnets for times of real mourning, for a family member who has just passed or who is expected to pass soon. The requests were each uniquely genuine and heartfelt in their own ways. I was honored to be asked to make such a meaningful piece for such a sorrowful occasion.

Making these pieces was very important to me. I did not know the deceased at all. Nor, did I know the wearers well at all. But, I have lost many beloved family members. I have mourned in both centuries. I know what it is like to put on the external symbols of mourning so prominent in the nineteenth century and so lacking in the twenty-first.

To me, these pieces are incredibly meaningful, personal and heavy.

I have decided not to make mourning millinery for faux mourning or mourning impressions. I feel, for me, this will lessen the importance of when I make real mourning pieces. I feel I need to be able to put the full importance each of those pieces.

I will consider making “light mourning” or “half mourning” pieces as those are notably under-interpreted and I think I can approach them from the artistic and historic directions.

Thank you for understanding,

Anna


For a view on interpreted mourning, please take a moment to read Beth Connolly’s blog post. She has very good insight on the weight of such an impression.

For additional information on mourning attire, please see Garments of Mourning.

(*Note about the image. I have discovered that a post is more likely to be read if there is an image attached.)


Published in: on February 20, 2015 at 4:51 pm  Comments (1)  

Today is the FanU “Red Swap” Sign-up Day

RedsToday is the day to sign-up for the FanU The Red Swap!

For Red Swap, we will exchange Red color fabrics from the 19th century.

We will mail our fabrics on February 28th.

Please read all the details below. 

To Sign-up, simply comment below with your email and mailing address. (I’ll erase those before approving your comment, so the whole world doesn’t have that info.)

What is a Swap?

This is a chance for to exchange fabric with a small group of people. Each group will have 8 people exchanging pieces of fabric. All you need is a half yard of fabric and envelopes along with your copy of Fanciful Utility.

To Participate:

1: Sign Up Day!
On sign-up day, groups will be assigned on a first-in basis; the first eight will be the first swap group, second eight in the second group, etc. **Please be certain you will be able to fully participate by mailing your fabrics on the Mail-Out Date.**

The Red Swap Sign-Up Day: February 20th


2: Mail-Out Day:
Place a 9×9″ piece of fabric suited to the mid-19th century in envelopes for each of the 7 other people in your swap group, stamp them (be sure to double check at the post office, but the small 9×9″ pieces should mail in a regular envelope with a normal stamp),8 and send them off no later than the Mail-Out Day.

The Red Swap Mailing Day: February 2th


3: Get Fanciful!
Use your Fanciful Utility templates and techniques to make a project from the book, or copy your own from 19th century sources. We’ll all look forward to seeing your projects! You don’t have to sew right away, but don’t keep us waiting forever to see all the fun things!

(If you need a copy of Fanciful Utility, you can purchase them from the publisher at www.thesewingacademy.com

Fabric Guidelines:

  1. For the cotton and silk categories, your fabric should be early to mid-nineteenth century appropriate. (If there is a want for an earlier or later group, we can do that.) Prints and motifs should reflect those available in the 1840s, 50s and 60s. Cotton should be 100% cotton. Silk should be 100% silk.
  2. To keep the swap and sewing possibilities interesting, please avoid solids as best we can.
  3. Fabrics that do not work well for sewing cases should not be swapped. These include sheers, gauzes, heavy, thick, easy-to-fray, slippery and stretch fabrics.
  4. For the “crazy swap” category, think crazy quilt in a sewing case. This could include satins, velvets, textured fabrics. Quality synthetic fabrics are invited.

Swapper Guidelines:

  1. Please be certain you can fully participate in the swap before you sign-up.
  2. If something arises after you sign-up that will effect the date you are mailing your fabrics, please email your group so everyone is aware.
  3. If you fail to fully participate in a swap, you will not be able to sign-up for future swaps. (We do understand medical and family emergencies. I need to be able to ensure swappers will receive fabrics when they send fabrics out.)

Q&A

Yes, you can participate in 1, 2 or 3 of the swaps.

Yes, if we end up with multiple groups, you can participate in more than one group to swap more fabric. If you participate in 2 groups, you should swap 2 fabrics.

Yes, you can swap large and small scale prints.

Yes, you can swap now and sew later.

Yes, we would love to see what you’ve made with the swapped fabric.

Yes, you can use your own fabric in your swapped project.

Published in: on February 20, 2015 at 6:00 am  Comments (9)  
Tags:

Regency Shape

imageimage

I have long loved the shape of these bonnets. I have no idea why.


You’ll notice these two have similar shapes with two very different constructions. The one with the scallops has the brim shape develop from arcs coming off the crown. The one with the black ribbon gets its brim shape with arcs that circle the brim.

I tried the first method.

???????????????????????????????


image

I am not entirely happy with how it turned out.

I tried and tried to get that transition from the crown to the brim right with that little flare up.

The straw was determined to go straight, flat, flareless. It is a bit more like this illustration. A bit.

As a result, the crown looks like it is sitting at an odd angle. It is very tempting to try to take that crown off and re-position it. On problem. Every single one of those rows is layered into the crown. Not going to happen.

So, half a hank of Italian plait later… here it is.

??????????????????????????????? IMG_5919 ???????????????????????????????


Published in: on February 17, 2015 at 10:30 am  Leave a Comment  

Veil Finding –

I think this is a white veil.

It is also over on Etsy from the same seller. 19″x41″

Published in: on February 15, 2015 at 8:25 pm  Leave a Comment  
Tags:

Veil Finding – Not a Doll Shawl

This might be my favorite “not a…” yet.

It is currently over on Etsy.

Published in: on February 15, 2015 at 8:19 pm  Comments (1)  
Tags:

Ribbon Hairnets

New Thumbnails hairnetsThere has been lots of discussion lately about how to make ribbon hairnets. Here is a set of directions I posted on the Sewing Academy back in 2007.

Please be sure to take the time to read To Net or Not to Net and to look at original hairnets before proceeding. This will give you a better idea of appropriate materials, fibers, widths and weight.

Okay, a quick 7 am modern method of making an easy ribbon net….. Let’s see if I can make any sense this morning.

This is for a simple, basic ribbon net with no decorations, made with silk or velvet ribbon cut while woven. There is a way to do it with one long piece of ribbon. I don’t think I am awake enough to describe that clearly. It really is better with pictures.

You are going to want a surface to work on, either something to pin the ribbons to or to hold the ribbon ends. For the first ribbon net I made, I used a large 12 or 14 inch embroidery hoop. A large pillow will work nicely as will a piece of cardboard. Draw a circle 12 to 14 inches in diameter depending on the size of your head and the amount of hair you have when done up. Use a compass or a dinner plate. Now decide how close you want your ribbons to sit. If you have 1/2″ wide ribbon, 1/4″ space is good. If you have 3/4″ ribbon 1/4″ to 1/2″ is good.

Cut two ribbons 2 inches longer than you circle is wide (14″ or 16″). Center them in a + on your circle. Pin each end at the edge of the circle. This marks the center of your net. If you need to mark out a grid for your ribbon placement, just measure your spaces and ribbon width away from center on all 4 sides. Or, you can just eye it. Measure 4 lengths of ribbon for above, below, right and left of the center +. Cut them and lay them down in place, the decided distance from the previous ribbons. Repeat in sets of 4 until you reach the edge of the circle.

Weave the ribbons over & under each other as you would a basket bottom. I like to work from the center out. Adjust your ribbons so they are set your chosen distance apart. Pin each end on the circle. With a matching thread, tack each + point with thread. When all the + points are stitched, work on the edges. Unpin one ribbon end. Turn the end under creating a half inch loop. Stitch the loop securely. Repeat this for every ribbon end.

When all the ends are looped, take a length of ribbon or plain elastic and run it through all of the loops. The elastic will need to be roughly 3 times the diameter (less than the real circle’s circumference) to bring the sides of the net in once the elastic is tied. The ribbon can be 3 to 4 times the width depending on how much ribbon you want to tie the net with.

Chandra M shared photos in the SA thread of her hairnet using these directions with brown velvet. Take a look.

A couple years later, but not much more awake (it has been a long, cold week), I have this idea in my head that one of those round knitting thingies may work nicely as well. It may even make the single strand of ribbon version easily doable. You could weave the ribbon across one direction, then back across weaving, using the little tabs. Sew. Then slide the ends off.

Published in: on February 13, 2015 at 10:49 pm  Leave a Comment  

Where Do I Find….?

Fanciful Utility: Victorian Sewing Cases and Needle-books is available directly from the publisher, ESC Publishing.

Straw Millinery, Drawn Millinery and Winter Millinery are all available in my Etsy Store.

Handmade Sewing Cases and Needle-books are available in my Etsy Store.

From Field to Fashion and my Quilted Hood Pattern are currently out of print. When they are back in print, they will be available in my Etsy Story.

Published in: on February 11, 2015 at 6:00 am  Leave a Comment