A New Style Hat

wpid-2015-05-26-10.58.40-1.jpg.jpegFor lack of a true name, I am going to call these “flatties.” Cheesy, huh? The nickname sorta reflects my initial skeptical thoughts about these hats. Don’t worry, as soon as I figure out what the original cast called them, I’ll use that.

These hats have a very low, rounded crown that subtly transitions into a convex brim. They appear almost flat compared to other hats of the 19th century. The montage to the right shows some examples. The lower right one appears to have a brim that falls evenly all around. The one above it, with the green ribbon, seems to be the flattest of the bunch with a brim curve dropping front and back. The same drop appears in the upper left hat. The one with the daisies has a neatly upturned brim, letting us see the brim lining. Top left. (one more)

This slideshow requires JavaScript.

I’ll have the Etsy listing as soon as I get home tonight. (My phone is being cranky. I don’t know if it is the reception in the car or the site.)

One oops. I made my version without the images next to me. I usually have working images on my phone. But, my phone died. I made the hat with the oval tip center like the other fashion hats of the mid-century, rather than the small circular center each of these has. Errr.

Published in: on May 28, 2015 at 6:59 am  Leave a Comment  

Reading Homework – Perfection and Myth

Some weeks back a blog article found its way on to my feed from a blog I was unfamiliar with. “Social Media and the Myth of Perfection” is not the common “look at this pretty” blog post. Instead, it takes an honest look at all the realities of life behind the costuming and writing.

My blog is by far not the prettiest, filled with fabulous photos and shiney awesomeness. Yet, I do have a bit of a regular readership. (a huge thank you to all of you.) Despite being an infamous Facebook whiner, I don’t always share the raw details in my blog posts. This week, this could include how I’ve had to glue parts of my fingers together because of the straw cuts or the avalanche that took place in the sewing room while trying to balance the phone on my shoulder and numerous garments in my hands. I’m not going to share photos of just befores, just afters or whiles, because I simply can’t even match the events up in my head anymore. In the time I’ve written this blog I have lost my father and grandparents, been homeless, dealt with family and personal medical problems and had heart-aches I’m just not ready to share.

I think these follow-up posts are also worth the read:

Is This The Real Life? Is This Just Fantasy?” – The Myth of Perfection by American Duchess

The Myth of Perfection by A Damsel in This Dress

Published in: on May 27, 2015 at 10:39 am  Leave a Comment  

Pinwheels and Their Friends

Opps. Sorry, I pressed the wrong button.

Published in: on May 26, 2015 at 2:03 pm  Leave a Comment  

One More for This Weekend

This second bonnet of the weekend was finished just before midnight last night. It was actually still damp when I took the photos this morning.

It is one of the highest brimmed Civil War era bonnets I have done. The brim has a slight flare and spoon shape.

IMG_6486 IMG_6487 IMG_6490 IMG_6495 IMG_6502 IMG_6506 IMG_6516 IMG_6517

Published in: on May 25, 2015 at 1:29 pm  Leave a Comment  

Straw Hat

I spent the whole day inside relaxing and sewing yesterday. Shortly after noon, I realized if I pushed myself and made use of the fan, I might actually be able to finish a hat in one day. I did. I think I started sewing around 10am. By 10pm it was drying.

I wanted to make sure this hat would be good for a veil. So, I made the brim wide enough all the way around to allow a veil to drape nicely off of it around the face. The crown is shallow and shaped to make the curves of the brim. It is shallowest at the sides, while being a little deeper in the front than it is in the back.

IMG_6461 IMG_6462 IMG_6463 IMG_6464 IMG_6465 IMG_6466 IMG_6467 IMG_6468 IMG_6478

Published in: on May 24, 2015 at 10:19 am  Leave a Comment  

“Show Your Millinery” Give-Away Entries

wpid-2015-05-09-11.13.11-1.jpg.jpegThank you to each of the ladies who took the time to enter my “Show Your Millinery” Give-Away.

I suspect I made this give-away a little too complicated because I only had a few entries. But, I have to say, each of the entrants are look absolutely lovely in their millinery.

Now, what you have all been waiting for….. The winner of the “Show Your Millinery” Give-Away and the recipient of the Genesee Country Village & Museum‘s first Centuries of Fashion Cards is…..

Darline!!!!

Give-Away Entrants:

wpid-img_54927802308076.jpeg

Darline did a lovely job finishing her black straw form. “I love how this bonnet fits.”

Erin did a beautiful job decorating her 1880s straw form. (Check out her blog and amazing dress by clicking on the photo.)

wpid-img_34965508149822.jpeg

Darline also has one of my favorite drawn bonnets, this green and white mini-check. Here is the side view.

wpid-img_34982828060031.jpeg

Darline also has one of my favorite drawn bonnets, this green and white mini-check. Aren’t the colors perfect for her?

Inspire Me! Entrants:

😦 I actually didn’t get any “Inspire Me!” entries.

Published in: on May 22, 2015 at 8:00 pm  Comments (1)  

Hats of Mine

I realized something today. I had a few people asking if I make hats for adults as well as children. I do. Of course I do. Oh, but they sell so fast, few people ever see the listings. Ooops

Here are some of the hats I’ve made. (These are just the photos I have on hand right now. I’ll add more asap.)

This slideshow requires JavaScript.

Published in: on May 21, 2015 at 6:00 am  Leave a Comment  
Tags:

Avoiding Millinery Mishaps

There were a few questions that came up when I asked for questions for the milliner that had to do with what not to do. I generally prefer to approach things from the positive. But then I saw this post “The Most Common Mistakes in Historical Costuming/Re-enactment- and how to avoid them“, which was written quite well and from a very helpful standpoint. So, I’m sorta stealing her format to look at the mishaps and mistakes that can happen with millinery.

The wrong shape or size for your face.

Perplexing 2This is a point of narrow margin. I believe women in the era followed fashion trends but also paid attention to what looked good on them. Not every bonnet suits, nor flatters every face shape. I hate seeing a perfectly lovely woman who looks like her head is squeezed into a bonnet that scrunches around her face or a woman who appears to have a teeny head floating in the midst of an enormous bonnet. I just want to hug them and give them something that will flatter them and bring their best features. (really, seriously, if I could I would.) Take a look at these two women to the right. Their image were taken at roughly the same time with similar, possibly the same attire. Each woman has a slightly different face shape and has subtle difference to their bonnets. The woman on the left has a squarer jaw line than the woman in the right who has a nearly oval face. One of the biggest mishaps I see for those with a squarer jaw line is to have a bonnet that hugs the sides of the face causing it to look squished or trapped. The bonnet on the left shows the periord way of avoiding this – The sides pull back further just above the ear allowing for the side of the bonnet through the cheektab to curve and angle forward. On the right, the sides of the bonnet are more ovular mimicking the oval shape of her face. The left softens the squareness of the jawline while the right mimics the soft curve.

A great hat/bonnet in the wrong era.

While there are some pieces of millinery from one era that are very similar to that of another era, pieces that distinctly belong in another time period stand out when they are misplaced. I do understand how it can be so tempting to pick up a beautiful Georgian piece and wear it to a Victorian event, it simply does not work 98% of the time.

secondI do happen to be more flexible about dressing out of fashion than many others. I actually don’t have a problem with dressing as much as a decade back if the character and situation so calls for it. Robert Dowling’s Breakfasting Out really emphasizes this for us. The artist depicts women in head wear that spans easily ten years, possibly fifteen years, in a single public scene.

Wearing the wrong millinery for your social class or situation.

We tend to talk about bonnets in two categories: fashion and sun, which may accidentally cause us to compartmentalize fashion into an upper class garment and sun into a lower class garment. This is not the case. What we often call ‘fashion’ bonnets, those structurally made of wire & buckram/willow/net or those of straw, spanned up and down social strata. (We really need to figure out what they would have called their bonnets.) The same span also existed for sun bonnets.

Clunky materials.

There is something about clunky materials that stand out even more than synthetic materials to me. Now, I’m not approving of a poly-taffeta for your bonnet either. I’m saying clunky cotton or poly cotton laces scream at me, as do thickly spun or loosely woven silks. These are not the materials of the vast majority of 19th century millinery. Fabrics, laces and net were fine and light. Even the bonnets that were made from velvets or corded materials were still made with versions often lighter than those we commonly see today.

Trims that will bleed.

To great dismay, and often tears, ladies have found that some beautiful flowers or feathers are not color-fast. While most of us fear the rain when we have a pricey bonnet on, it is at times the slightest sprinkle or even heavy humidity that can cause the dye to run.  The biggest culprits are brightly dyed feathers and paper flowers.

Bad advice.

I sorta feel like a jerk as a blog writer saying “don’t listen to that blog writer”. But, I am. There are several quick and cheap millinery advice posts out there. I plead with you – Do not follow them!

Do not make a bonnet out of a cereal box. Do not use duct tape on a bonnet. Do not use quilters templates nor plastic cross-stitch canvas to make a bonnet. Some of these may be okay for a Halloween costume or middle-school play. They are not correct for a historical site, nor are they healthy when you consider how much heat some of these materials can trap against your head.

Published in: on May 20, 2015 at 7:00 pm  Leave a Comment  
Tags:

Bonnet Stays

This is the long, long, long since requested post on bonnet stays.

What is a bonnet stay? A bonnet stay is a band inside the mid-nineteenth century bonnet that helps hold the bonnet on the wearer’s head. In the nineteenth century, bonnet stays were also called “cross-bands”, “bandeau” or “traverse” (though these words could also mean other things.)

“A cross-band of black velvet that lies on the hair is trimmed on the right hand side with a group of rose-buds.” (Peterson’s Magazine, 1855)

A row of black lace covers the cross-band and forms a fanchon” (Peterson’s Magazine, 1864)

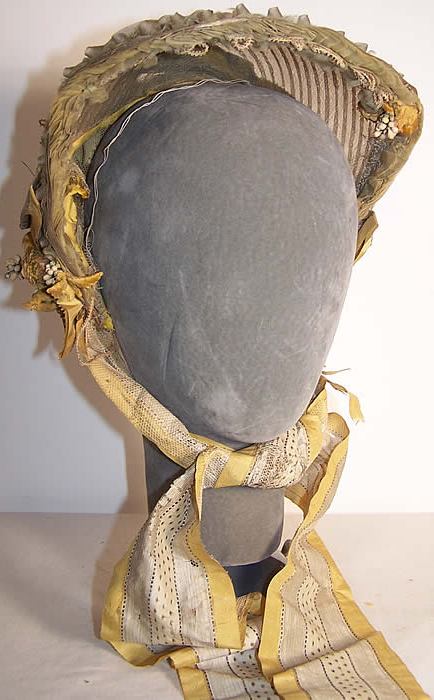
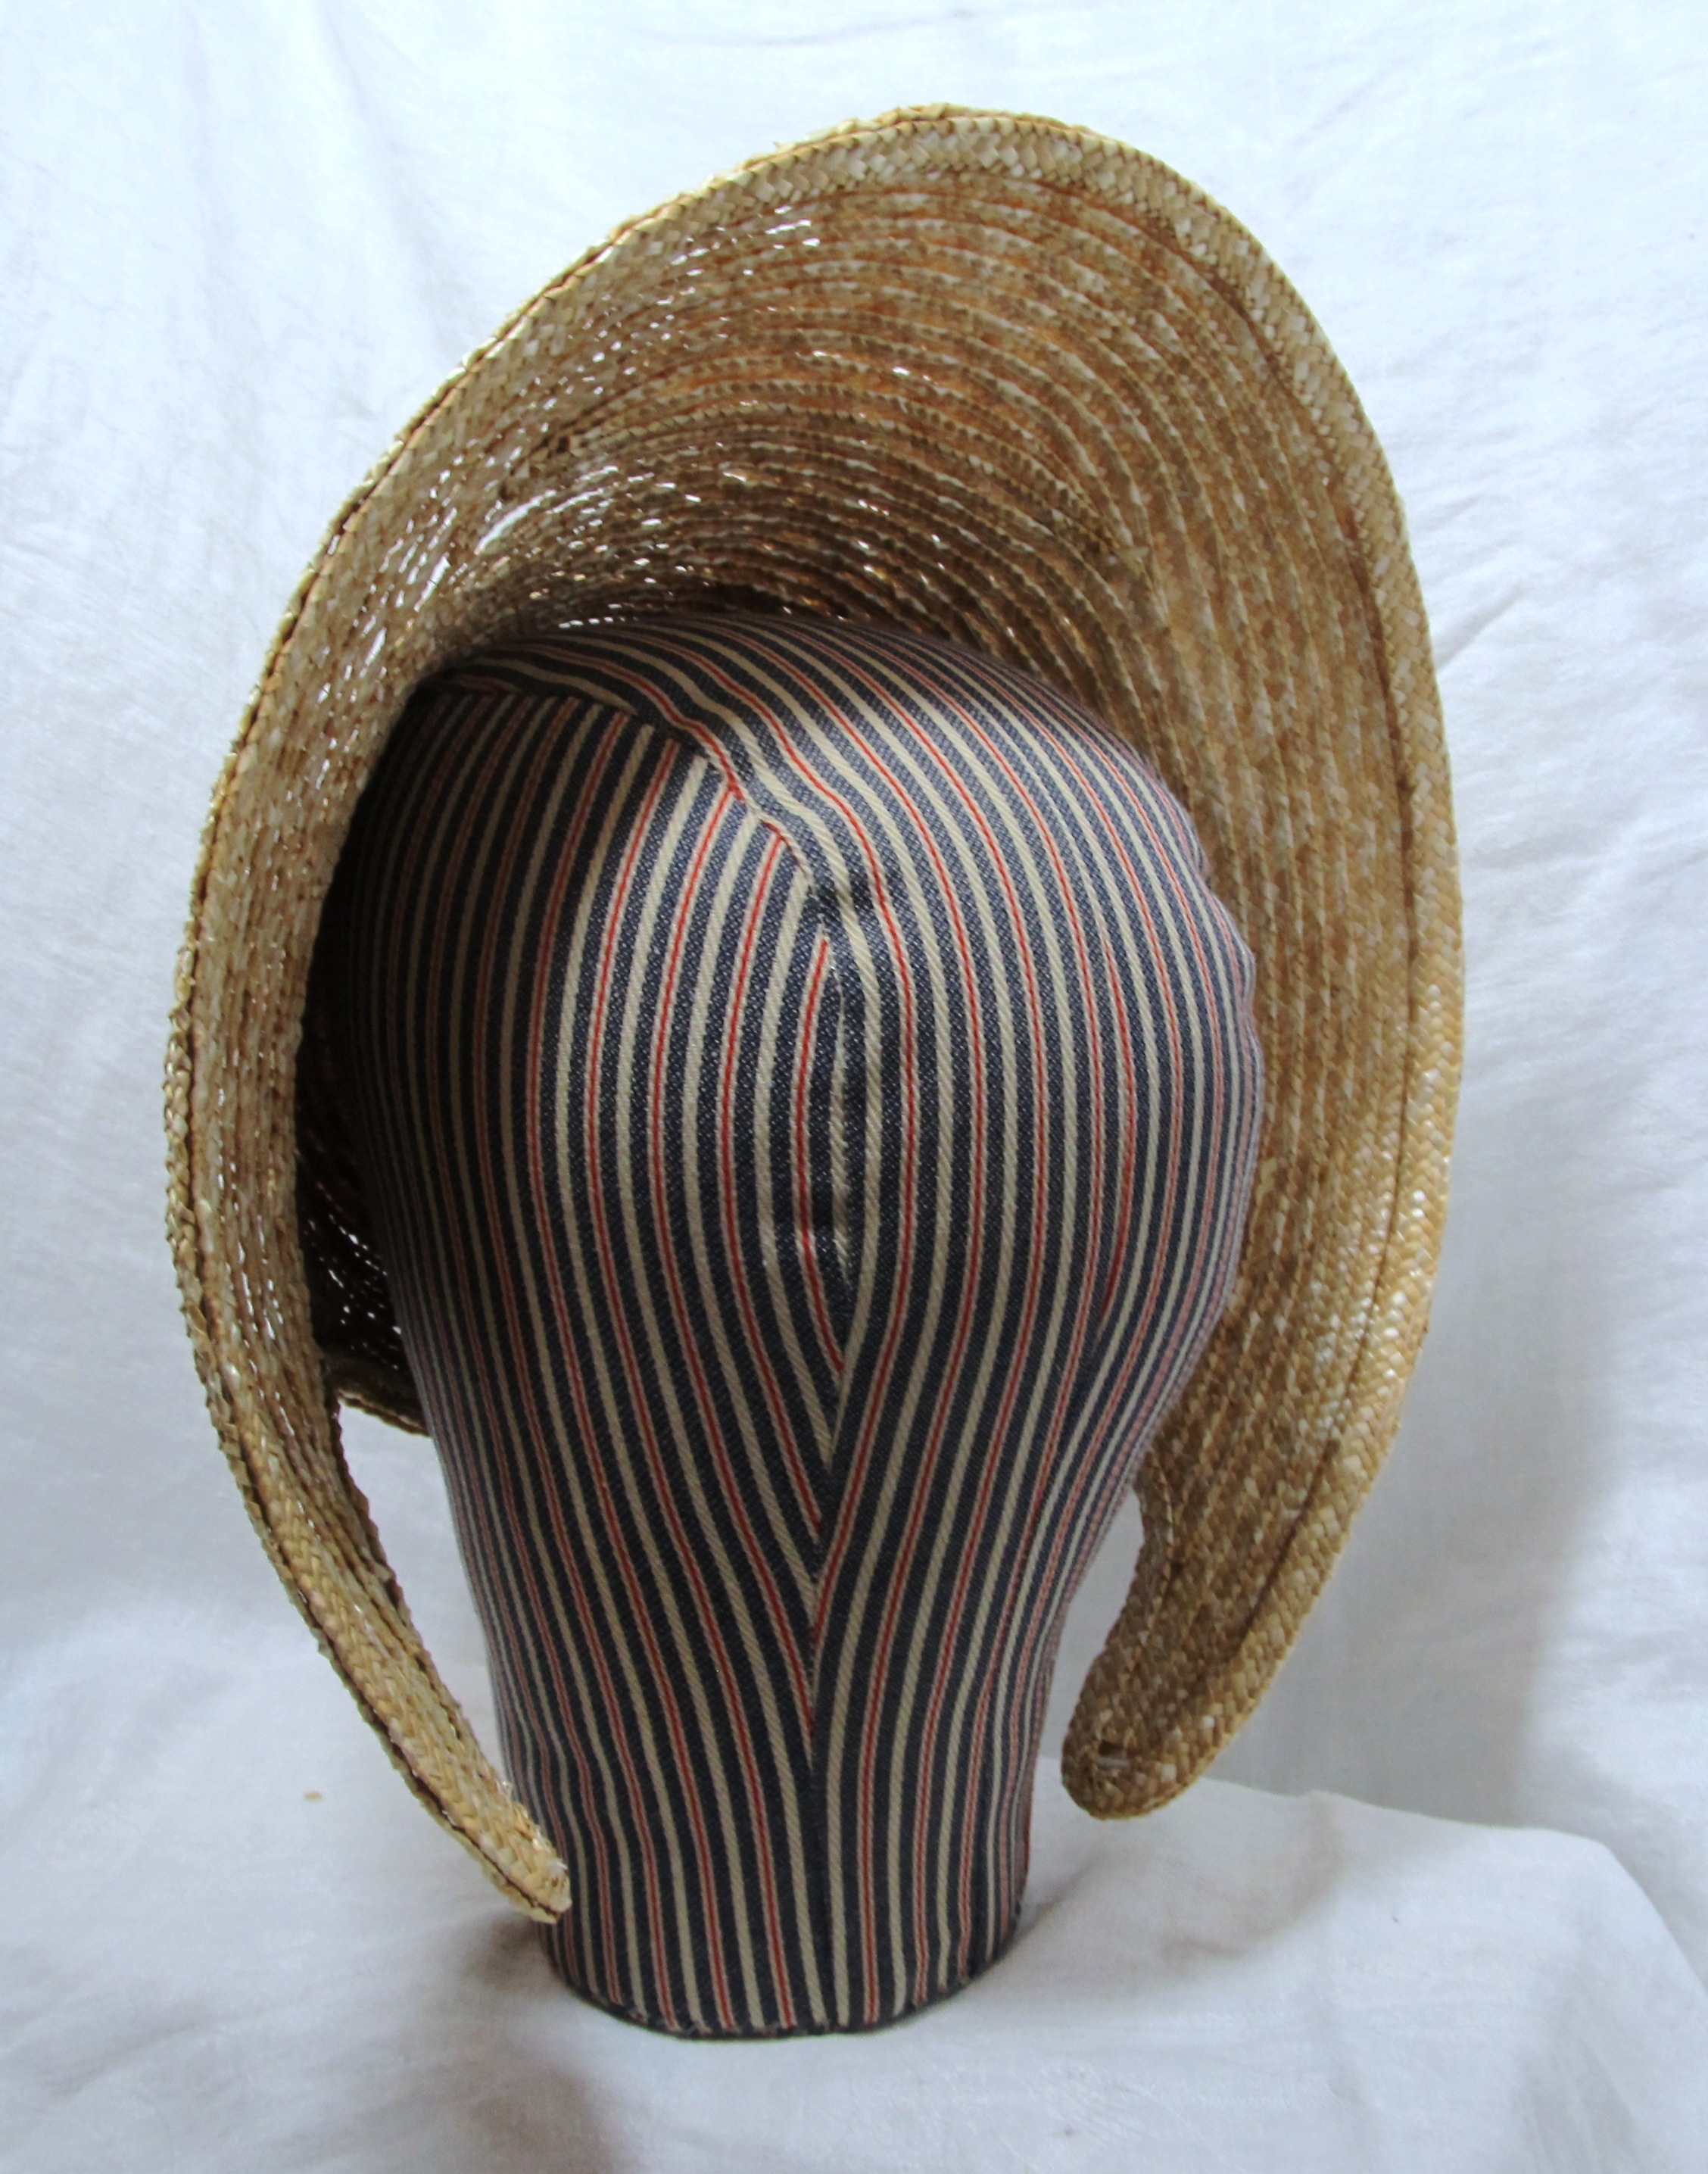
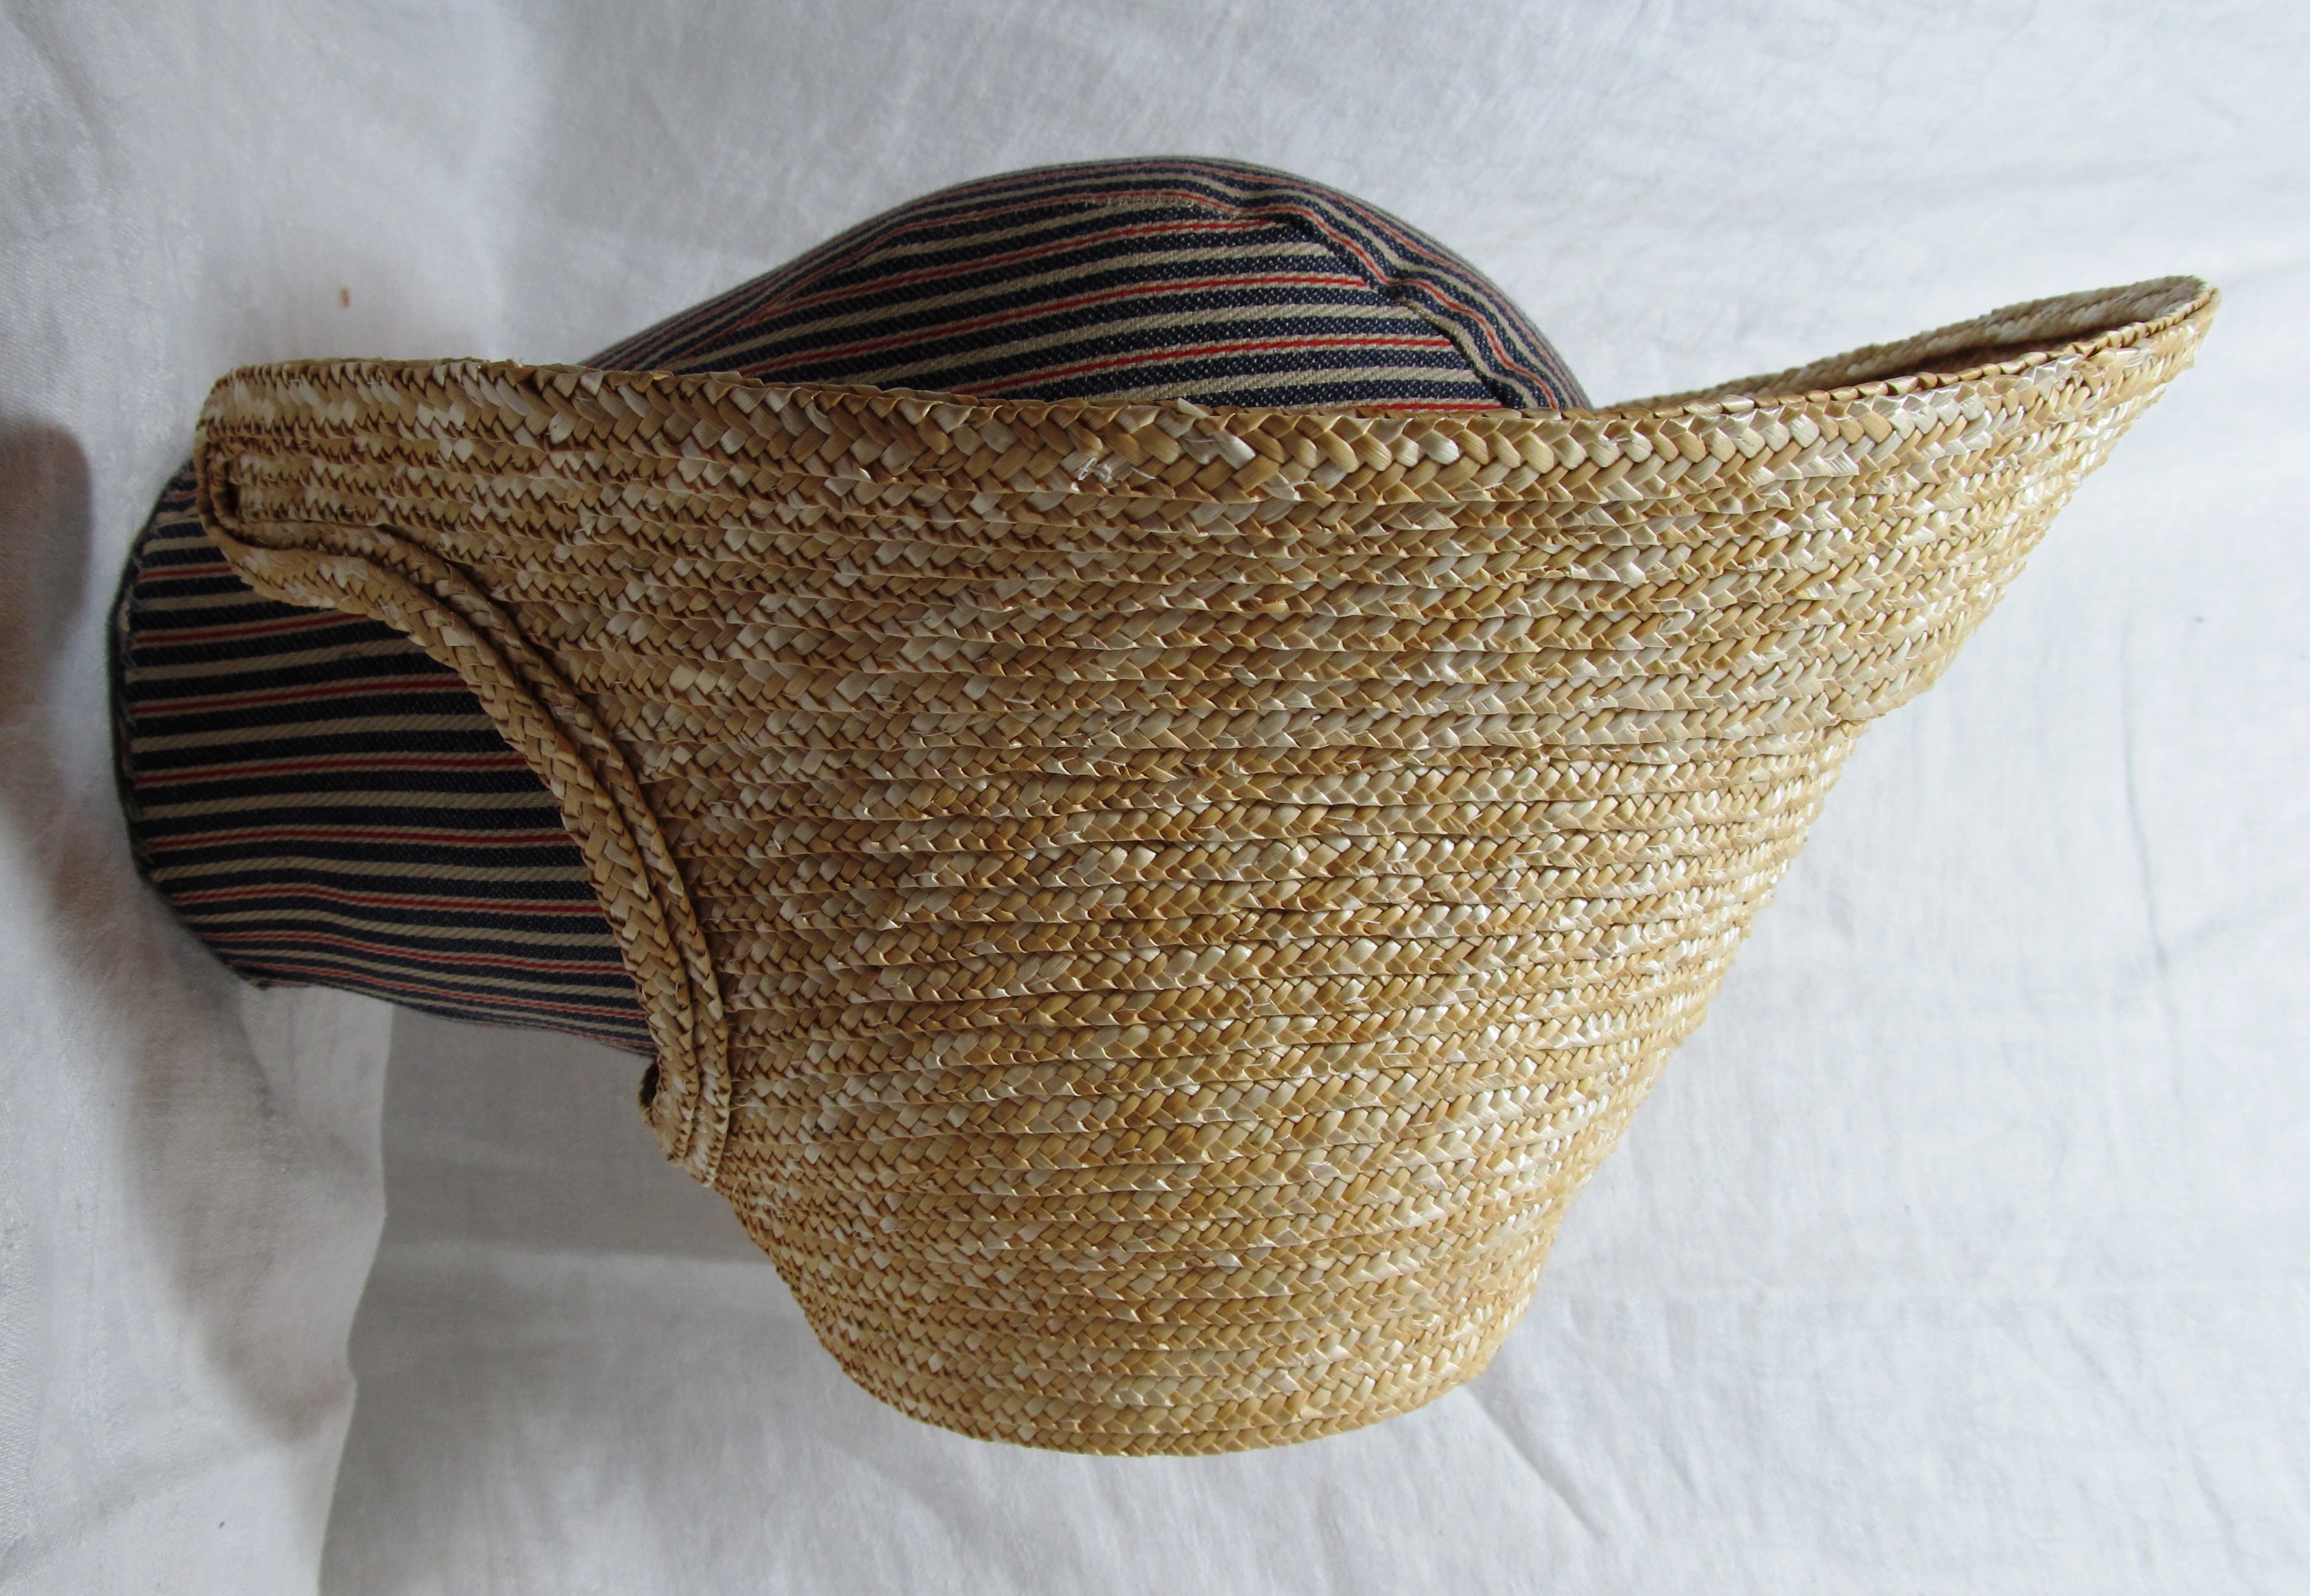
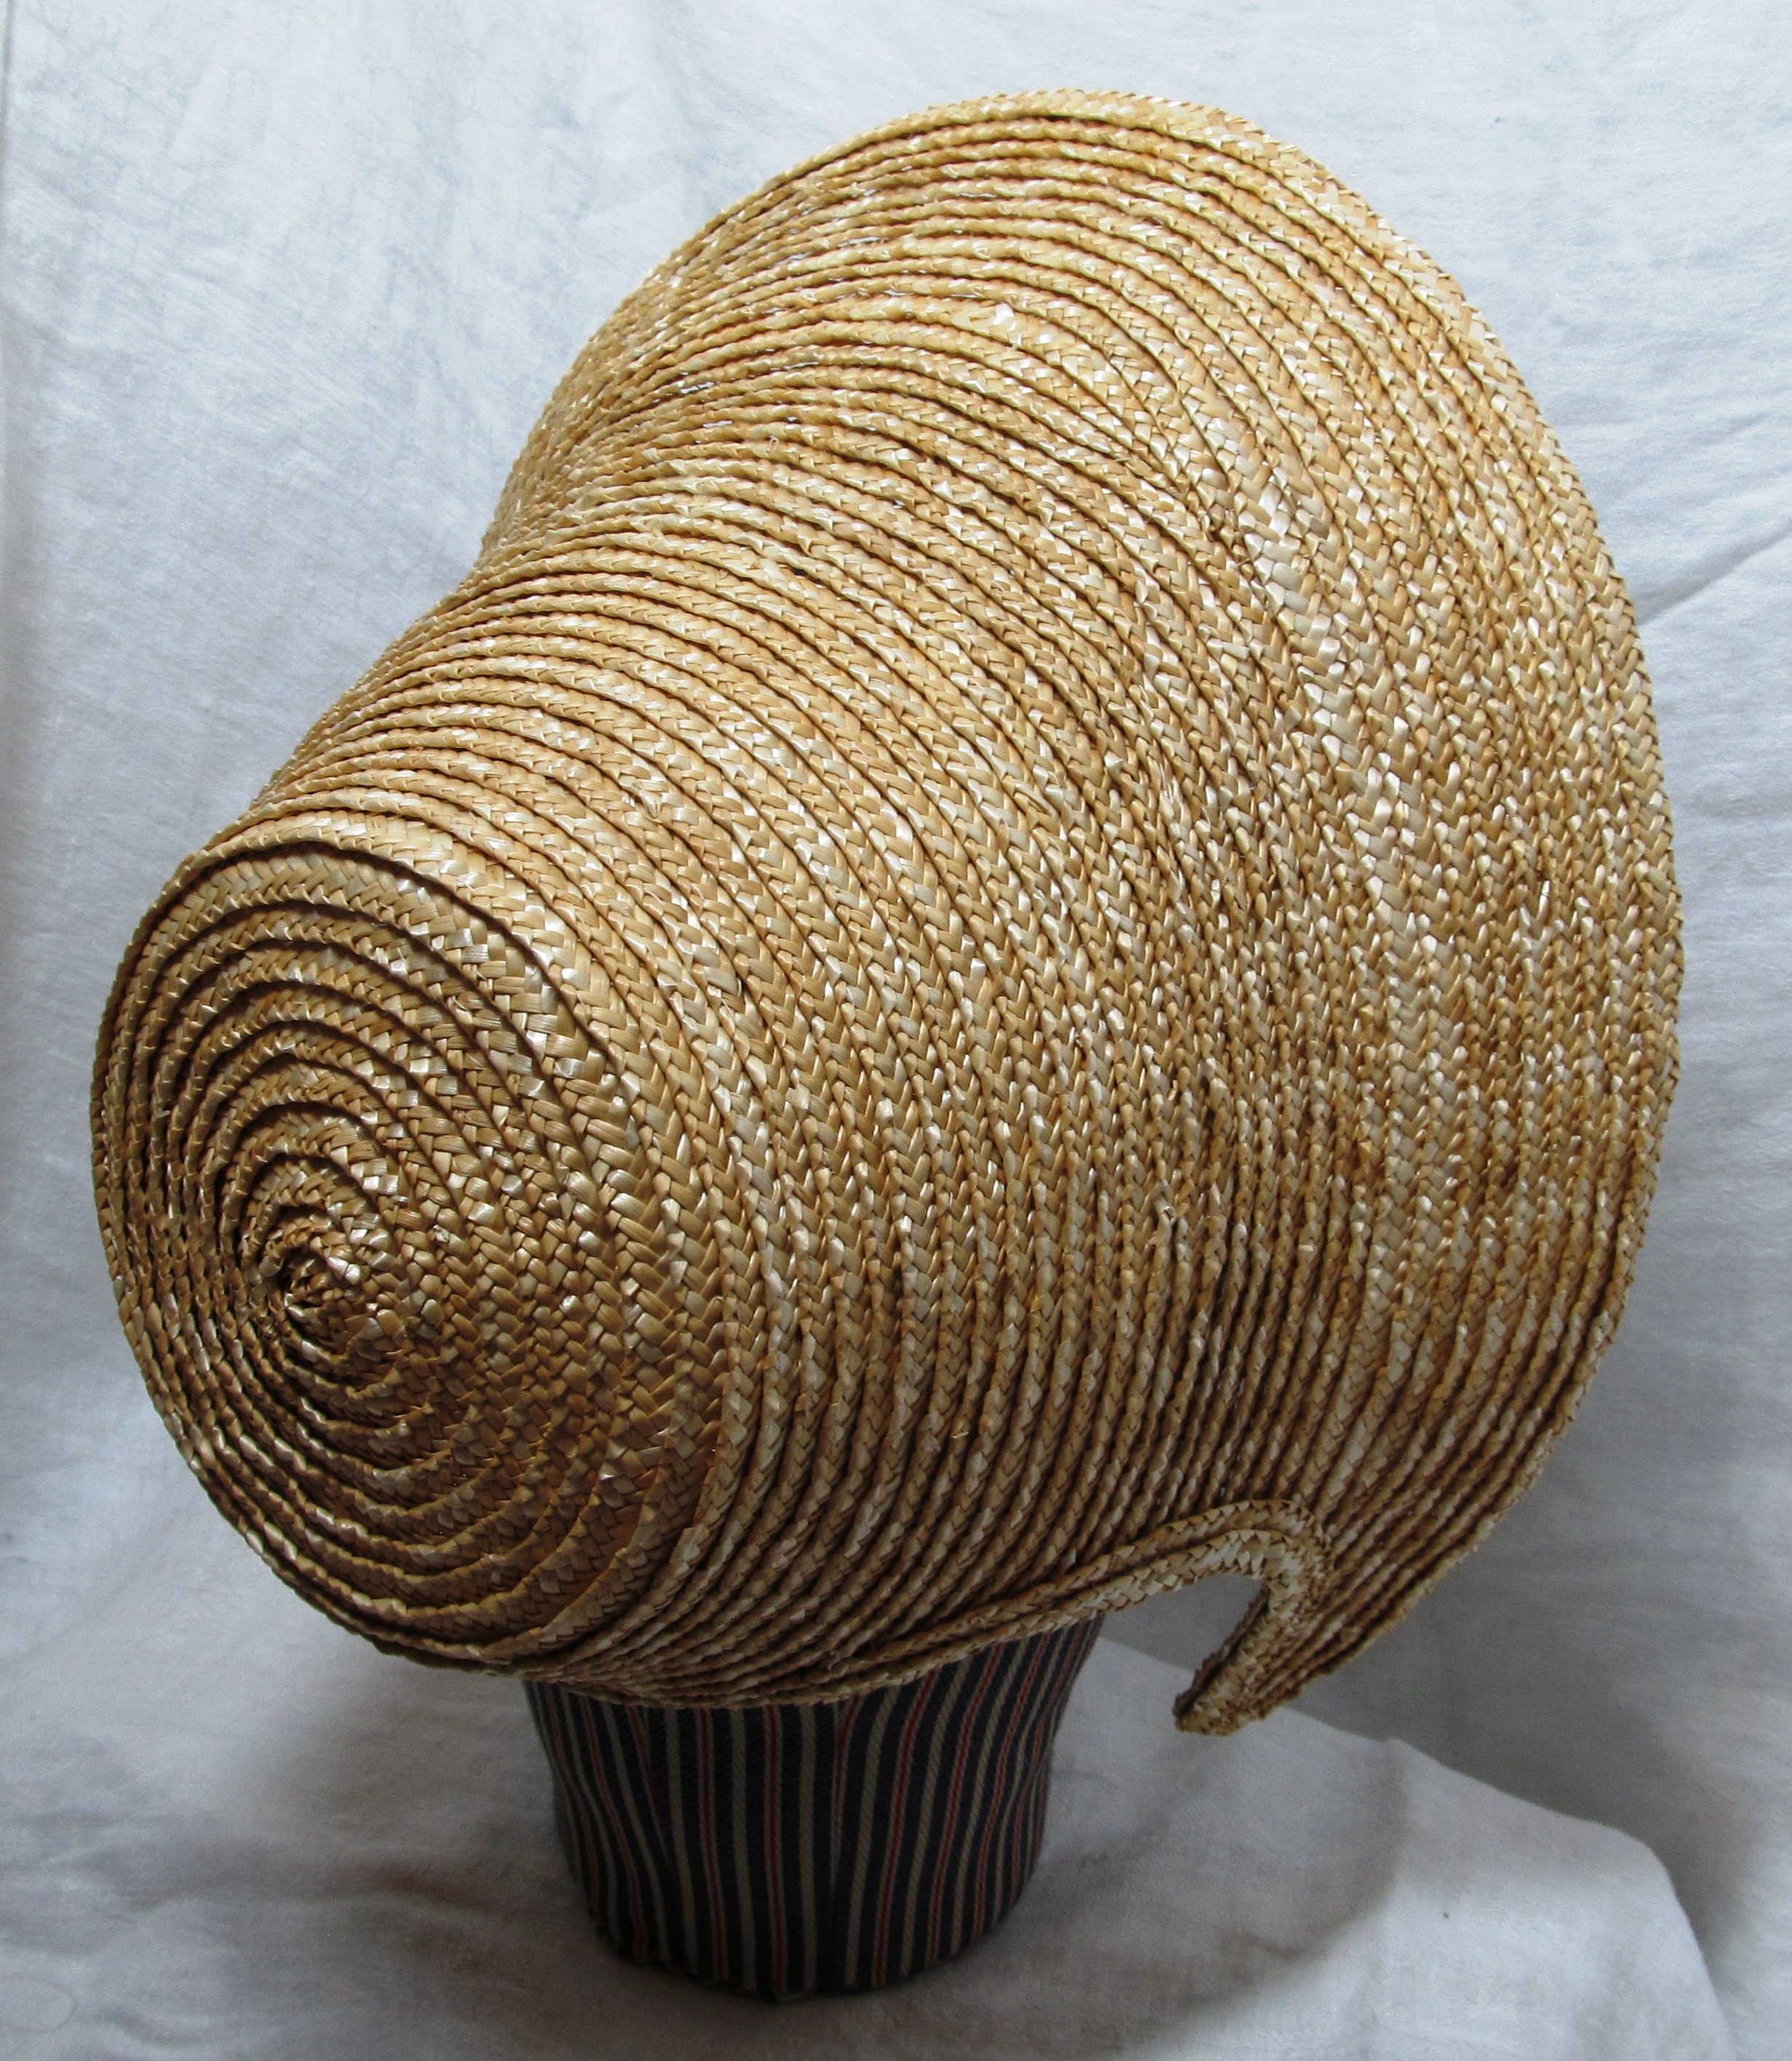
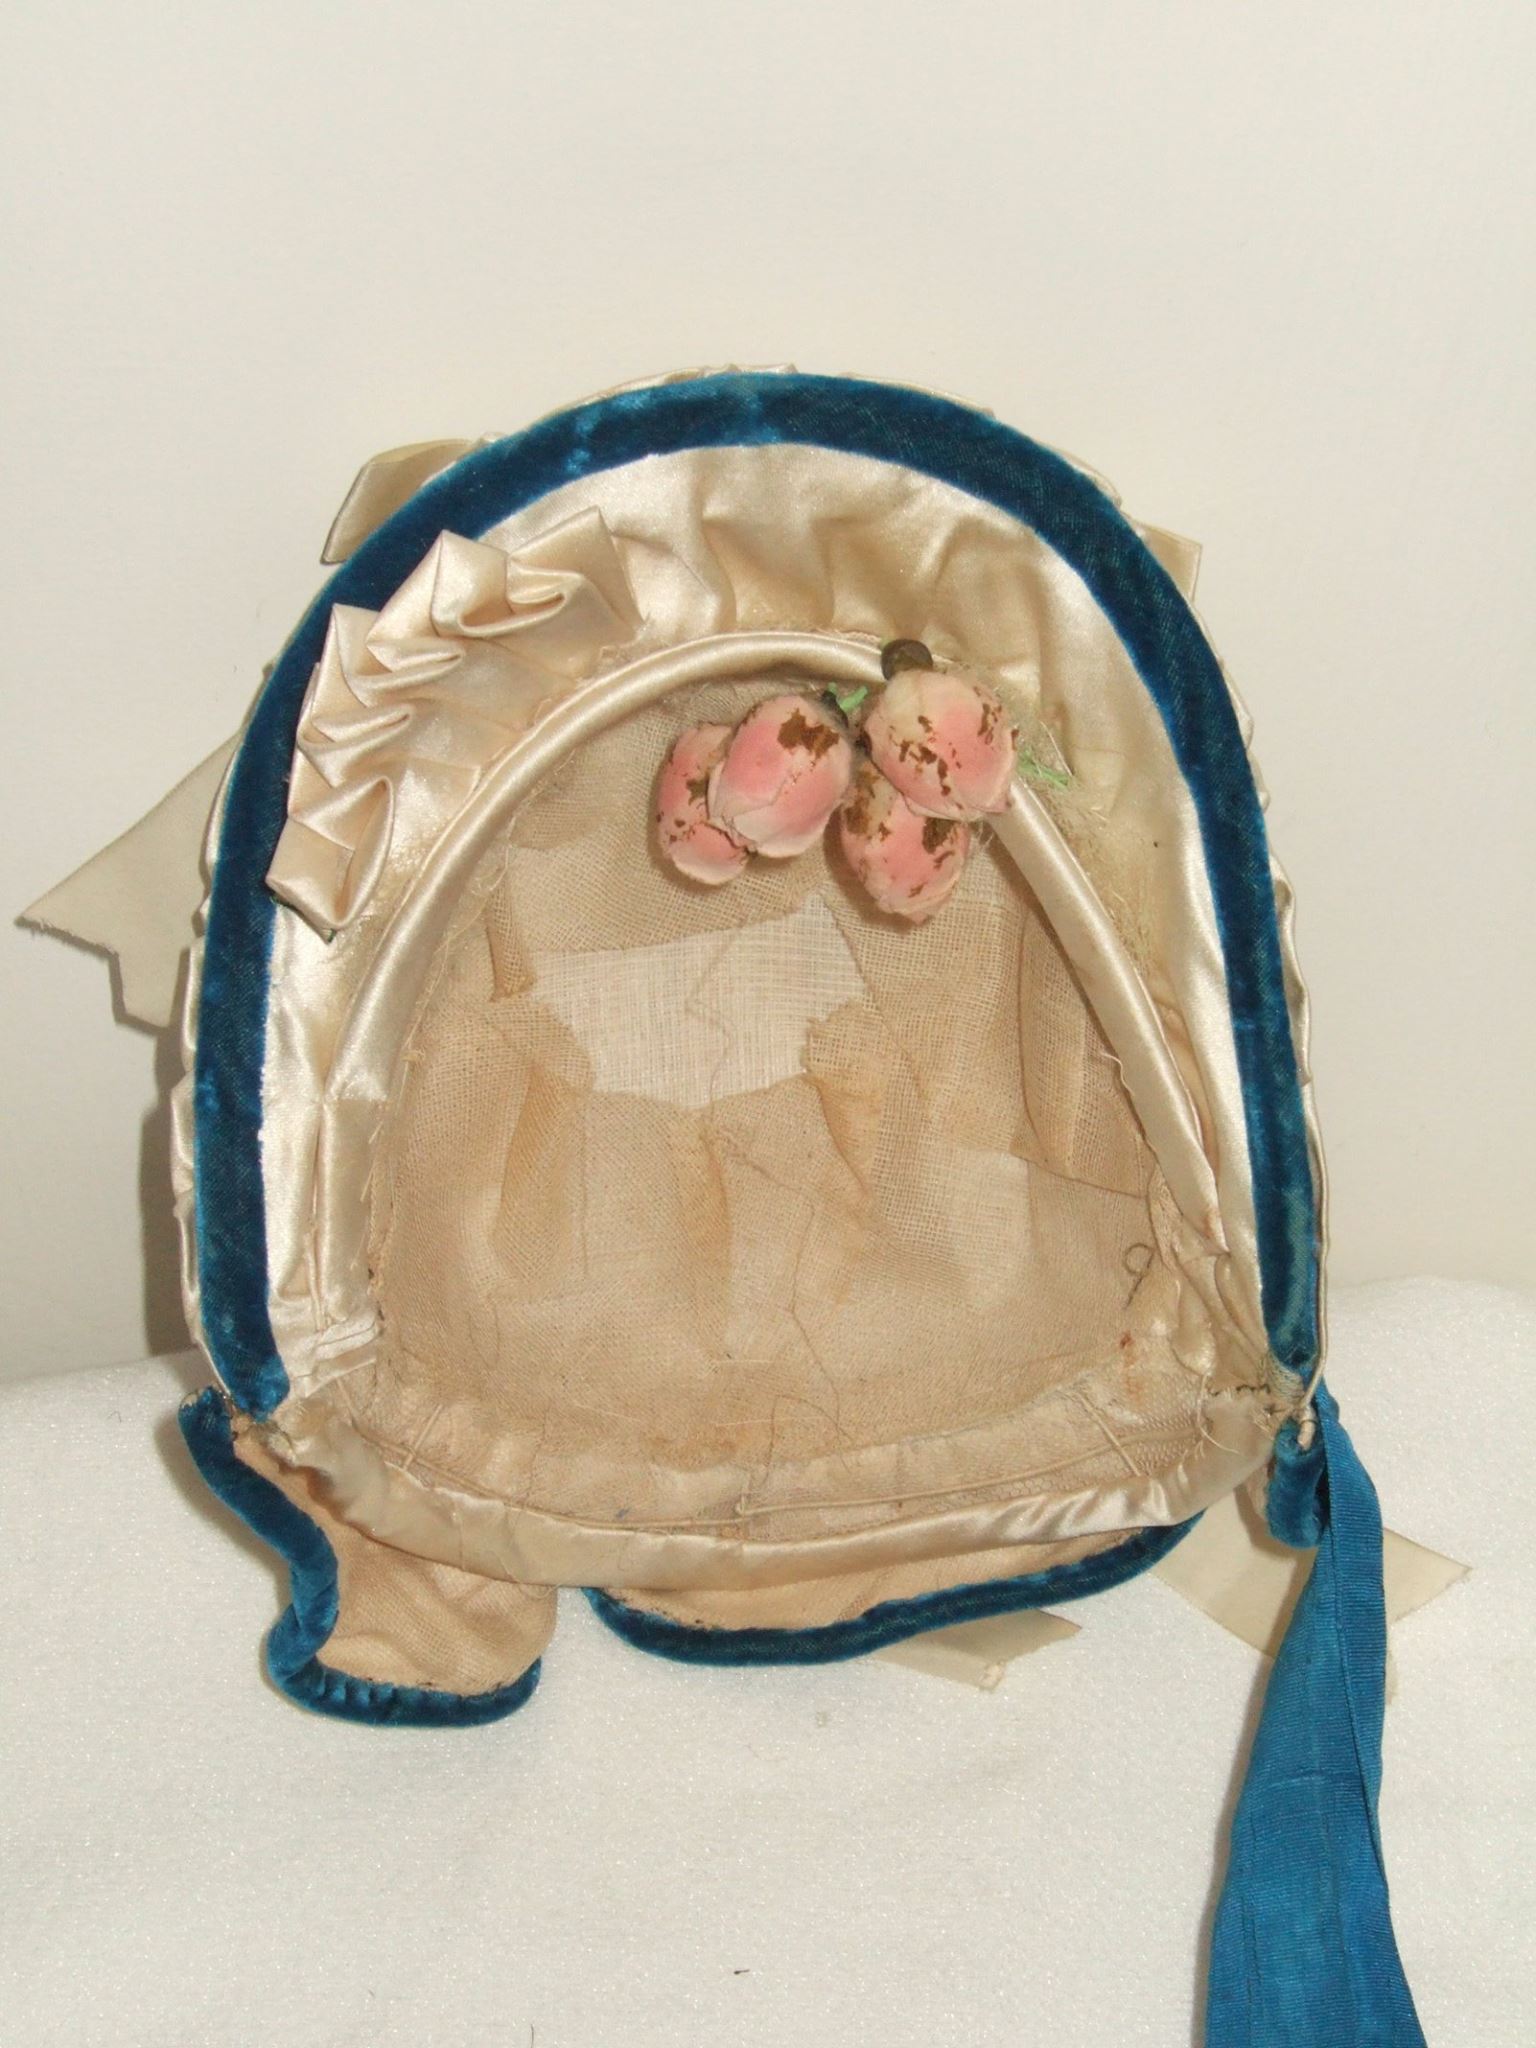
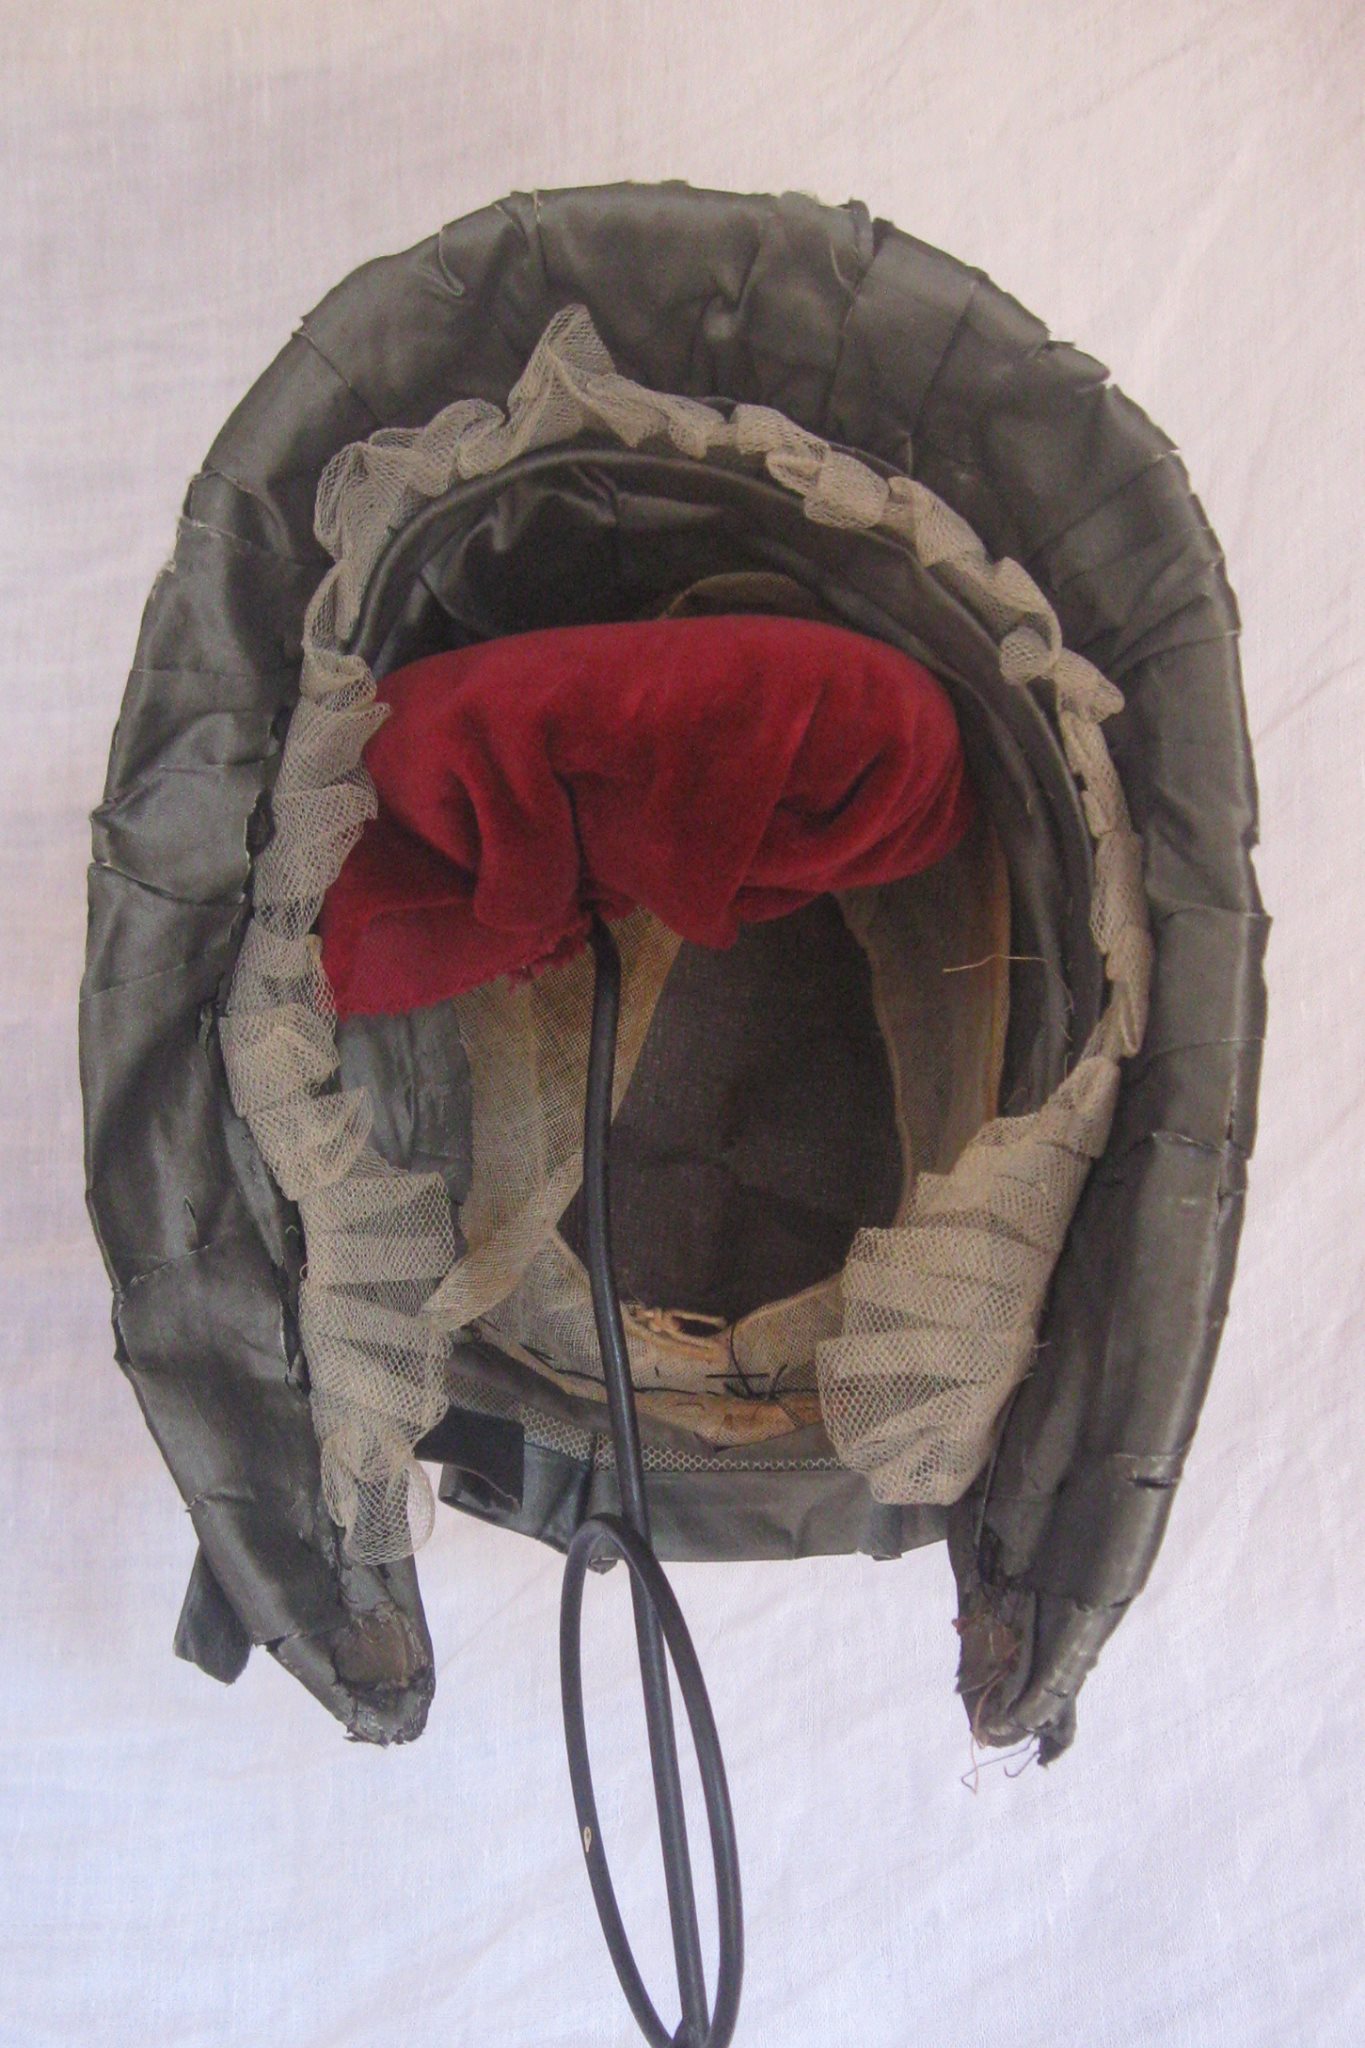
What were bonnet stays made from? Stays we have been able to identify have been made out of velvet ribbon, velvet fabric, cording and wire. This yellow trimmed horsehair &/or straw bonnet shows a wrapped wire stay. In the one image, you can get an idea of how the stay holds the bonnet on the head. The stay connects to both sides of the interior of the bonnet. Is sits on the head as a headband would, crossing over the head from ear to ear, actually above the ear.

From the Timely Tresses Collection featured in Fashionable Bonnets for the Introduction of the Ambrotype in 1854 through the end of the Civil War in 1865.

“From the Timely Tresses Collection featured in Fashionable Bonnets for the Introduction of the Ambrotype in 1854 through the end of the Civil War in 1865.

From the Timely Tresses Collection - Fanchon bonnet with covered cross-band. Notice the stitches used to attach the band that are visible on the left.

From the Timely Tresses Collection – Fanchon bonnet with covered cross-band. Notice the stitches used to attach the band that are visible on the left.

Dannielle Perry bonnet for stays post 3

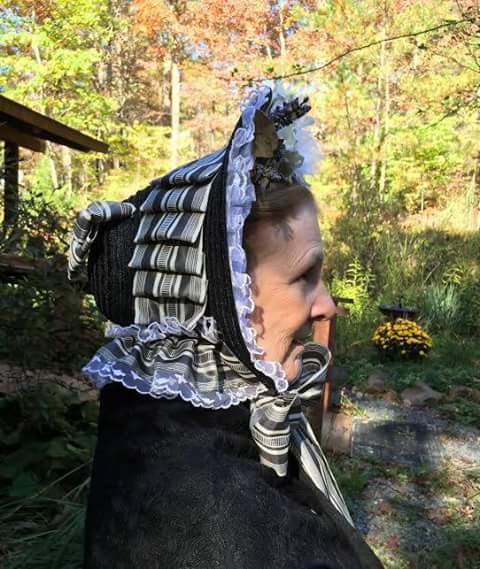
From the Timely Tresses Collection – An early 1860s bonnet with a cross-band.

Dannielle Perry bonnet for stays post 2

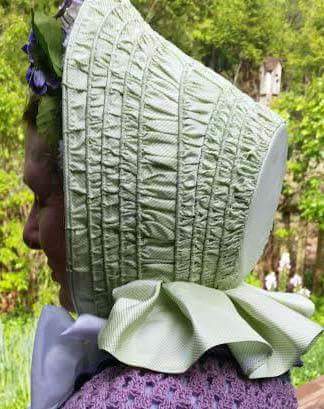
From the Timely Tresses Collection – An Empire bonnet with a velvet stay/cross-band behind the cap/frill.

How do I make a bonnet stay?

This is a bonnet I had to very quickly make overnight from what straw I could find. The shape is very loose and flat. This stay holds it on rather well.

This is a bonnet I had to very quickly make overnight from what straw I could find. The shape is very loose and flat. This stay holds it on rather well.

To add a stay to your bonnet, you will need velvet ribbon. I suggest purchasing half a yard, a half to three-quarters of an inch wide in a shade that will blend in well with your hair color or bonnet.

Hold the ribbon on your head with the velvet side down against your hair, running from ear to ear so you can feel where it is going to need to sit. Measure a couple finger widths up from the top of each ear and slide a pin in to mark that spot.

Put your bonnet on, positioned how it should fit. If you are nimble with your fingers, slide the pins that are in the ribbon into the inside of the bonnet. If that is too fiddly, pin the inside of the bonnet with separate pins just above the ears a couple finger widths.

Remove the ribbon and bonnet. Secure the ribbon into the bonnet with pins. Try the bonnet on for fit. You should be able to move your head without the bonnet shifting. (I was able to walk into 40mph parade winds without my bonnet coming off.) You may need to repeat the adjusting, pinning and trying on a few times before it is comfortable. Once you have the right fit, tack the ribbon in place securely. I suggest folding the end of the ribbon under and using a thread that matches the exterior of the bonnet.

What else keeps a bonnet in place?

Beside a bonnet stay other characteristics of a bonnet, a mid-century bonnet, helps keeps it in place.  ~The combination of the frill and the interior flowers play a big, no, make that huge part in holding a bonnet in place. It is possible to take an early 60s bonnet that would want to slide right off the head un-adorned and arrange the frill and flowers such that the bonnet will perch in place as it should. The backside of the frill and flowers sort-of catch and hold the hair, keeping the bonnet in place. ~The overall balance front to back is a big help. If a bonnet is weighted towards the tip or the bavolet, the bonnet will want to slide backwards. If the flowers in the brim or on the top/side of a bonnet are heavy, the bonnet will shift forward or sideways. Keeping a balance is a matter of positioning as well as weight. ~ For some shapes, the cheektabs actually help hold the bonnet in place as they hug the side of the head, not the face, the head. ~Your hair placement and style can also be a factor in how a bonnet fits. For some years (more 50s) the hair arrangement goes inside the tip of the bonnet. For other years (more early 60s) the tip rest over or on the hair. In either case, the hair anchors the tip whether it is encasing or sitting on the hair. Another hair aspect to keep in mind is simply having too much or too deep of a hair arrangement for a shallow tipped bonnet. (If you naturally have a lot of hair and a large hair arrangement ask for a deeper tip.)

I will add some additional photos once I take them.

Published in: on May 20, 2015 at 4:00 pm  Comments (8)  
Tags:

One Hat inspiring future hats…..

IMG_6322I made this taller crown, narrow brim straw hat with the 1880s in mind. More specifically, these hats:

With the attention I’ve been paying to the Regency era for my 1820 dress, I started noticing something….

This… and, this….(Right) and, this…. (Lower left) (Rudolph Ackermann Fashion Plate November 1, 1823)

Which had me asking myself “why didn’t I make a Regency hat?”! Check out the height! Check out that whee curve! Check out those brims!

I am going to have to make an uber tall Regency hat….

This, nearly brimless style is something I find very nifty indeed….1810, from the MET  (non-straw version, similar with a brim that is down turned.)

Then, there is this with the wider, forward shifted brim that is bent down with the ribbonmelding of the hat into a bonnet…

Okay, there are like a bazillion others but they all seem to be from Scene it in the Past.  And, I don’t want to impose on her images. So, go over there and drool away as you scroll through her Flicker slides.

Published in: on May 19, 2015 at 4:00 pm  Leave a Comment